
Hand knit slippers are wonderful, but it’s always nice to be able to make a fancier pair, especially if you are making them as a gift. This pattern shows you how to make slippers for girls from size 9 up to a woman’s size 12.
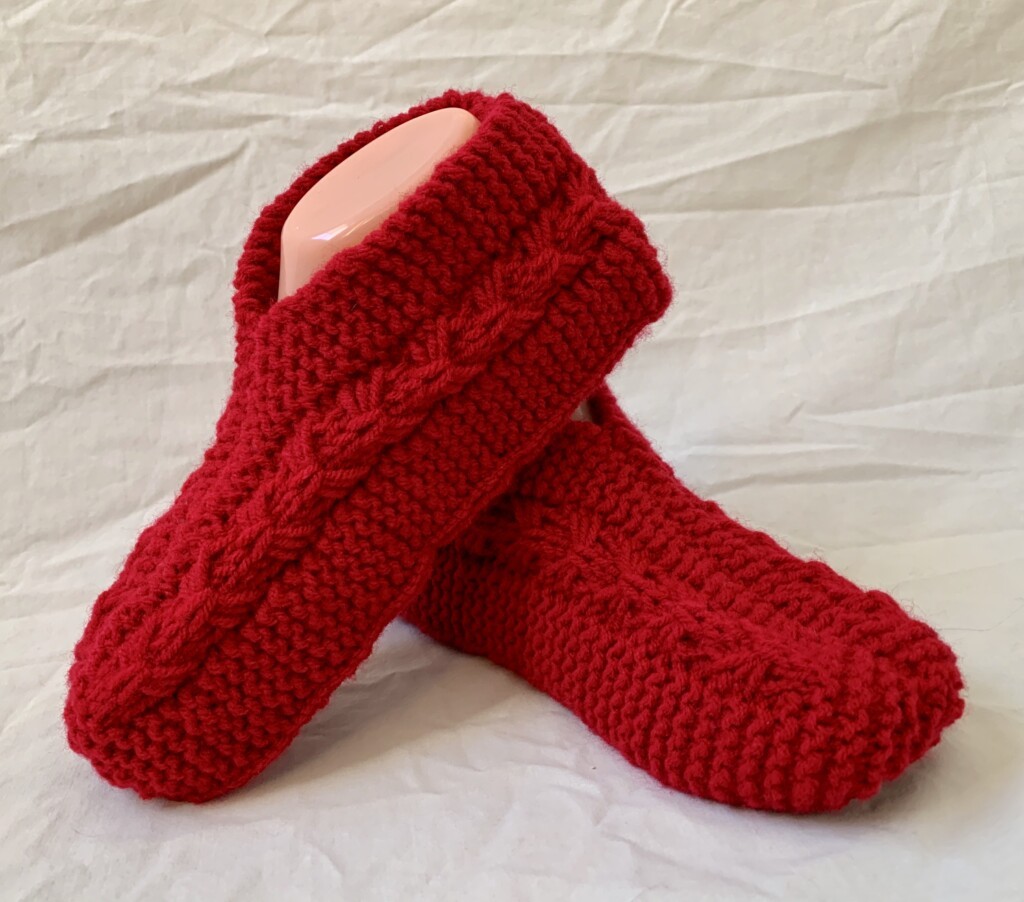
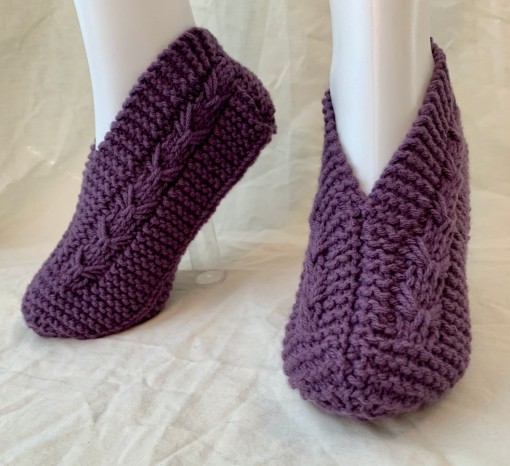
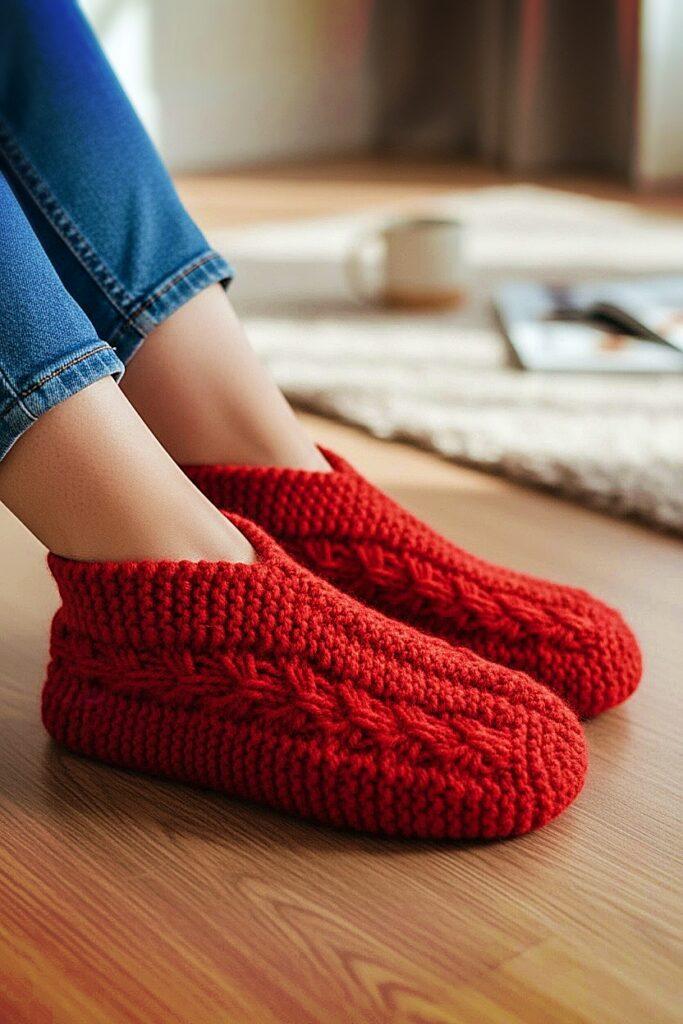

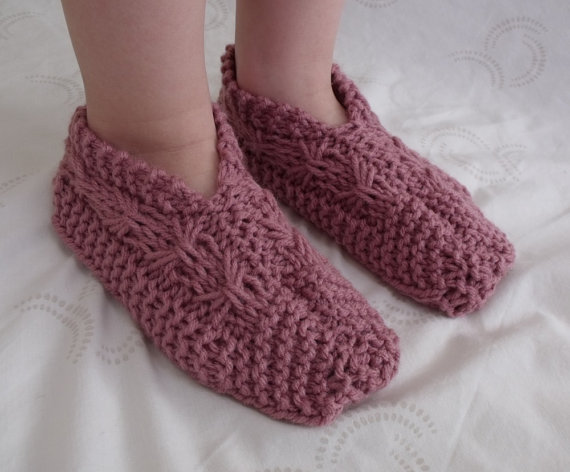

The stitches used to make the slippers are very basic and this pattern includes detailed instructions and step by step photos that show how to create the bows. This makes it a great project for a knitter with some experience but wanting to make something that is a little more challenging.
If you are just learning how to knit or need to brush up on your knitting skills, these are the links to videos that show you how to do all the basic stitches including: casting on, knit stitch, purl, bind off, knit 2 together, draw through, and how to pick up stitches to make the heel.
Not a fan of reading things online or would like to print this pattern? You can download the ad free PDF version of this pattern for a small fee here – Easy to Knit Bow Slippers, from Ravelry, LoveCrafts, Buy Me A Coffee or from my Etsy Shop.
Another way to avoid ads and pop-ups, get instant, PRINTABLE downloads of this pattern and others, is by becoming a Member. When you become a Website Supporter at $4/month, you’ll gain access to exclusive member only posts on Buy Me A Coffee. You can download as many patterns as you like for the same $4 each month. You can go to this page to learn more, become a member and support my work… Exclusive Member Area
Somehow found yourself on this page and absolutely LOVE these but don’t know or have the time to knit yourself a pair. I sell them right here too! Here’s the link to this shameless plug – Custom Order Bow Slippers
Things You Will Need
Having a hard time knowing what you need? Click any of the links below to have everything sent right to your door.
200 gr of worsted weight yarn (usually this is less but better to have too much).
Size 5 mm (US size 8) single pointed knitting needles or whatever size to obtain correct gauge.
Darning needle to sew seams and work in the ends
Gauge
12 rows stockinette = 2″
9 stitches stockinette = 2″
Be sure to check your gauge to obtain correct sizing!
If you need help in making the bow, I made a quick tutorial to help you.
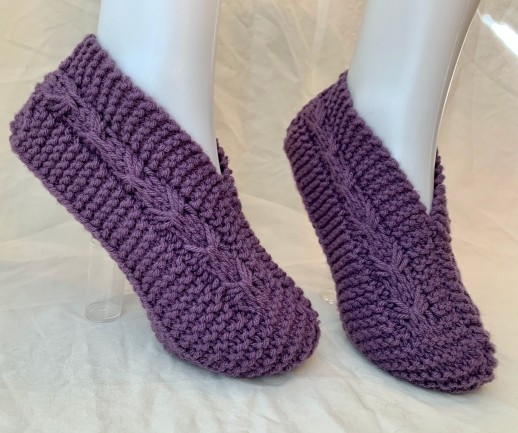
Woman’s Size 5 – 12
Cast on 44
Row 1: K5 P1 K3 P1 K24 P1 K3 P1 K5
Row 2: K6 P3 K6 P1 K12 P1 K6 P3 K6
Row 3: K5 *P1 hold the yarn in front of your work. Pass the next 3 stitches over to the other needle (Strand made). Purl the next stitch* K24 Repeat from * to * K5.
Row 4: Repeat row 2.
Row 5: Repeat row 3.
Row 6: Repeat row 2.
Row 7: Repeat row 3.
Row 8: Repeat row 2.
Row 9: K5 *P1 K1 Pick up the three strands from the bottom up. Knit the next stitch and pull the loop down through the 3 strands (Bow completed). K1 P1* K24. Repeat from * to * K5.
If you need help with this row, i’ve queued up the video to show you how to do this. Tap play to watch how.
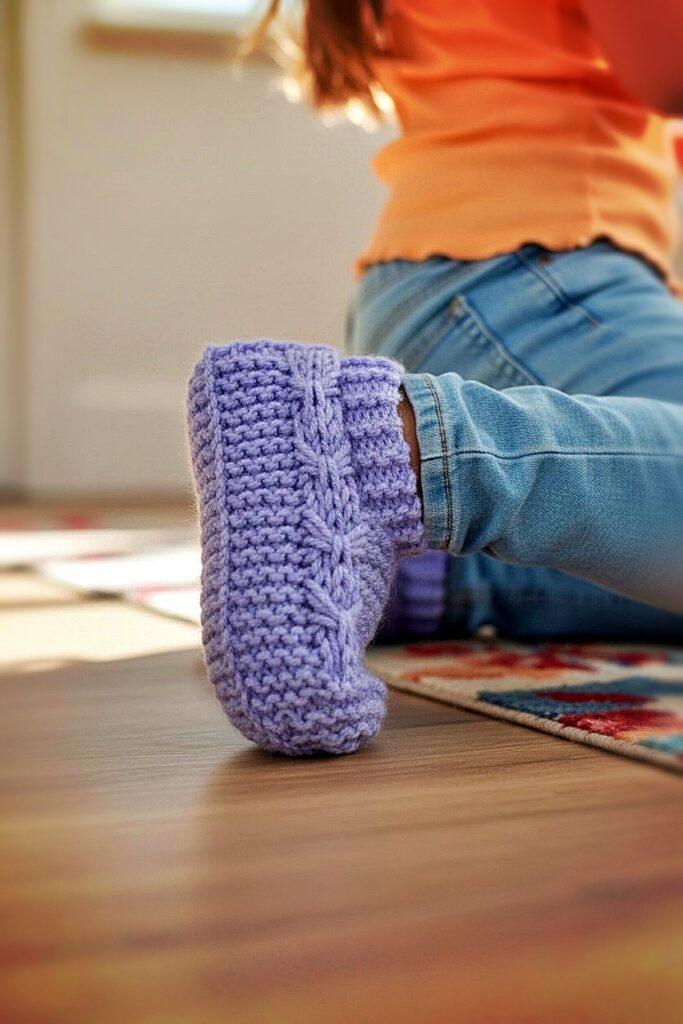
The bow portion will look like this.
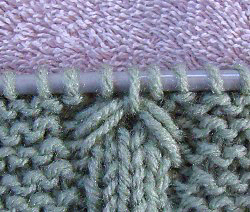
Row 10: Repeat row 2.
Repeat rows 3 to 10 3 (3, 4, 4) more times.
Next row: K2tog K3 *P1 Hold the yarn in front of your work. Pass the next 3 stitches over to the other needle (strand made). P1* K24 Repeat from * to *K3 K2tog. (42 sts)
Next row: K5 P3 K6 P1 K12 P1 K6 P3 K5.
Next row: K2tog K2 *P1 Hold the yarn in front of your work. Pass the next 3 stitches over to the other needle (strand made). P1* K24 Repeat from * to * K2 K2tog. (40 sts)
Next row: K4 P3 K6 P1 K12 P1 K6 P3 K4.
Next row: K3 *P1 Hold the yarn in front of your work. Pass the next 3 stitches over to the other needle (strand made). P1* K24 Repeat from * to * K3. (40 sts)
Next row: K4 P3 K6 P1 K12 P1 K6 P3 K4.
Please share this page!
More FREE patterns
Click the pic to read online!!


FREE Knitting Graph Paper for Colorwork Knitting


![]()
![]()


Next row: K3 *P1 K1 Pick up the three strands from the bottom up. Knit the next stitch and pull the loop down through the 3 strands (Bow completed). K1 P1* K24. Repeat from * to * K3.
Next row: K4 P3 K6 P1 K12 P1 K6 P3 K4.
♥ Next row: K3 *P1 Hold the yarn in front of your work. Pass the next 3 stitches over to the other needle (strand made). P1* K24 Repeat from * to * K3.
Next row: K4 P3 K6 P1 K12 P1 K6 P3 K4.
Next row: K3 *P1 Hold the yarn in front of your work. Pass the next 3 stitches over to the other needle (strand made). P1* K24 Repeat from * to * K3.
Next row: K4 P3 K6 P1 K12 P1 K6 P3 K4.
Next row: K3 *P1 Hold the yarn in front of your work. Pass the next 3 stitches over to the other needle (strand made). P1* K24 Repeat from * to * K3.
Next row: K4 P3 K6 P1 K12 P1 K6 P3 K4.
Next row: K3 *P1 K1 Pick up the three strands from the bottom up. Knit the next stitch and pull the loop down through the 3 strands (Bow completed). K1 P1* K24. Repeat from * to * K3.
Next row: K4 P3 K6 P1 K12 P1 K6 P3 K4.♥
Repeat from ♥ to ♥ 1 (1, 2, 2) times more.
More of my stuff on Etsy
You can make a widget like this for your blog or website, too.
Instructions are on my website here: How to Display Etsy Items on Your Website
Form Toe
Next row: Knit across.
Next row: K13 P1 K12 P1 K13. Repeat these two rows 0 (1, 0, 3) times more.
Next row: K2tog K36 K2tog. (38 sts)
Next row: K12 P1 K12 P1 K12.
Next row: K2tog K34 K2tog. (36 sts)
Next row: K11 P1 K12 P1 K11.
Next row: K2tog across. (18 sts)
Next row: Knit across.
Next row: K2tog across (9 sts).
Next row: Knit across.
Break yarn and pull yarn through stitches to gather together to finish the toe.
Form Heel
With the right side of the slipper facing you, pick up 14 sts along the back of the sole between the lines. If you need help in doing this, there is a QR code linking to a video to help you.
Row 1 – 4 : Knit across.
Row 5: K2tog K10 K2tog. (12 sts)
Row 6 -7 Knit across.
Row 8: K2tog K8 K2tog. (10 sts)
Row 9 – 10: Knit across.
Row 11: K2tog K6 K2tog. (8 sts)
Row 12 – 13: Knit across.
Row 14: K2tog K4 K2tog. (6 sts)
Row 15 – 16: Knit across.
Row 17: K2tog K2 K2tog. (4 sts)
Row 18: K1 K2tog K1. (3 sts)
Row 19 – 20: Knit across.
Cast off.
Make another slipper to match. Sew up seams, work in the ends and enjoy!
Child Size 9 – 3
Numbers in parenthesis are written for sizes as such 9-10 (11-12, 13-1, 2-3)
Cast on 32 (32, 34, 34)
Row 1: K3 P1 K3 P1 K16 (16, 18, 18) P1 K3 P1 K3
Row 2: K4 P3 K4 P1 K8 (8, 10, 10) P1 K4 P3 K4
Row 3: K3 *P1 hold the yarn in front of your work. Pass the next 3 stitches over to the other needle (Strand made). P1* K16 (16, 18, 18) Repeat from * to * K3
Row 4: Repeat row 2.
Row 5: Repeat row 3.
Row 6: Repeat row 2.
Row 7: Repeat row 3.
Row 8: Repeat row 2.
Row 9: K3 *P1 K1 Pick up the three strands from the bottom up. Knit the next stitch and pull the loop down through the 3 strands (Bow completed). K1 P1* K16 (16, 18, 18). Repeat from * to * K3.
Row 10: Repeat row 2.
Repeat rows 3 to 10 1 (1, 2, 2) more times.
Next row: K2tog K1 *P1 Hold the yarn in front of your work. Pass the next 3 stitches over to the other needle (strand made). P1* K16 (16, 18, 18) Repeat from * to *K1 K2tog. (30, 30, 32, 32 sts)
Next row: K3 P3 K4 P1 K8 (8, 10, 10) P1 K4 P3 K3.
Next row: K2tog *P1 Hold the yarn in front of your work. Pass the next 3 stitches over to the other needle (strand made). P1* K16 (16, 18, 18) Repeat from * to * K2tog. (28, 28, 30, 30 sts)
Next row: K2 P3 K4 P1 K8 (8, 10, 10) P1 K4 P3 K2.
Next row: K1 *P1 Hold the yarn in front of your work. Pass the next 3 stitches over to the other needle (strand made). P1* K16 (16, 18, 18) Repeat from * to * K1.
Next row: K2 P3 K4 P1 K8 (8, 10, 10) P1 K4 P3 K2.
Next row: K1 *P1 K1 Pick up the three strands from the bottom up. Knit the next stitch and pull the loop down through the 3 strands (Bow completed). K1 P1* K16 (16, 18, 18) . Repeat from * to * K1.
Next row: K2 P3 K4 P1 K8 (8, 10, 10) P1 K4 P3 K2.
♦ Next row: K1 *P1 Hold the yarn in front of your work. Pass the next 3 stitches over to the other needle (strand made). P1* K16 (16, 18, 18) Repeat from * to * K1.
Next row: K2 P3 K4 P1 K8 (8, 10, 10) P1 K4 P3 K2.
Next row: K1 *P1 Hold the yarn in front of your work. Pass the next 3 stitches over to the other needle (strand made). P1* K16 (16, 18, 18) Repeat from * to * K1.
Next row: K2 P3 K4 P1 K8 (8, 10, 10) P1 K4 P3 K2.
Next row: K1 *P1 Hold the yarn in front of your work. Pass the next 3 stitches over to the other needle (strand made). P1* K16 (16, 18, 18) Repeat from * to * K1.
Next row: K2 P3 K4 P1 K8 (8, 10, 10) P1 K4 P3 K2.
Next row: K1 *P1 K1 Pick up the three strands from the bottom up. Knit the next stitch and pull the loop down through the 3 strands (Bow completed). K1 P1* K16 (16, 18, 18) Repeat from * to * K1.
Next row: K2 P3 K4 P1 K8 (8, 10, 10) P1 K4 P3 K2.♦
Repeat from ♦ to ♦ 0 (0, 1, 1) times more.
Form Toe
Next row: Knit across.
Next row: K9 P1 K8 (8, 10, 10) P1 K9.
Repeat these two rows 0 (3, 0, 2) times more.
Next row: K2tog K24 (24, 26, 26) K2tog. (26, 26, 28, 28 sts)
Next row: K8 P1 K8 (8, 10, 10) P1 K8.
Next row: K2tog K22 (22, 24, 24) K2tog. (24, 24, 26, 26 sts)
Next row: K7 P1 K8 (8, 10, 10) P1 K7.
Next row: K2tog across. (12, 12, 13, 13 sts)
Next row: Knit across.
Next row: K2tog 3 times K0 (0, 1, 1) K2tog 3 times (6, 6, 7, 7 sts).
Next row: Knit across.
Break yarn and pull yarn through stitches to gather together to finish the toe.
Form Heel
With the right side of the slipper facing you, pick up 10 (10, 12, 12) sts along the back of the sole between the lines. If you need help in doing this, there is a QR code linking to a video to help you.
Row 1 – 2 : Knit across.
* * Skip rows 3 – 5 if making child sizes 9 – 12 * *
Go to row 6
Row 3: K2tog K8 K2tog. (10 sts)
Row 4 – 5: Knit across.
Row 6: K2tog K6 K2tog. (8 sts)
Row 7 – 8: Knit across.
Row 9: K2tog K4 K2tog. (6 sts)
Row 10 – 11: Knit across.
Row 12: K2tog K2 K2tog. (4 sts)
Row 13 – 14: Knit across.
Row 15: K1 K2tog K1. (3 sts)
Row 16: Knit across.
Cast off.
Make another slipper to match. Sew up seams and work in ends.
Hints and Tips
When creating the strands, pull apart the 3 stitches passed over to the other needle. This allows for some additional slack in the strand across the 3 unworked stitches.
Sometimes the bows will appear lopsided. If you put your knitting needle under the 3 strands and pull gently on one side and then the other, you can easily even them out.
This pattern doesn’t contain a child’s size 4-5. Based on the foot measurements I used to develop the pattern there isn’t a need. A woman’s size 5 measures 8 11/16 inches long, while a girl’s size 3 measures 8 9/16 inches long. Knitting is very forgiving with small differences in measurements such as this. But when in doubt, I recommend making the larger size.
Abbreviations
K – Knit
P – Purl
K2tog – knit 2 together
st – stitch
sts – stitches
How to Make the Heel
Need help with how to pick up sts for the heel? This video will help you. It’s for a different pattern but done the exact same way.
How to Make the Bow
I know I already shared this but it will show up in the Table of Contents if I put it here and easier for you to find.


I would love to knit these slippers but I can’t print the pattern. When I try, I get a blank page.
That’s what it’s supposed to do. The patterns are free to read online because they are ad supported. If you want to print a copy you’ll need to purchase it from one of my many online retailers or this website. I’ve priced it that it’s less than a cup of coffee. Everyone can afford it. It’s less than the yarn costs to make whatever you’re making.
Why do I charge to print? 3 reasons. The first is that people came on the website, printed everything and didn’t even give a single word of thanks, share or anything.
Second reason is that web hosting is expensive. Just because it is free for you doesn’t mean it’s free for me. I pay for this website to exist. I don’t think recouping my costs is too much to expect.
Last reason, my efforts are worth something. If there is no financial advantage to writing and distributing patterns, then there’s not a lot of reasons for me to keep putting the weeks worth of effort it takes to design and write a pattern. Not to mention the hours it takes to create and maintain a website.
In short, not everything is free. Artists deserve to make money from their art. I’m willing to share my work with everyone, but at some point there has to be a line drawn.
Thank you so much for this lovely pattern. I’m not a very good knitter but this was simple enough for even me to follow and I’ve tried socks before but not managed to complete the shaping. I’ve made a pair of these in a weekend and will definitely do more. Thank you Karen