Owls seem to hold a draw for a lot of people, myself included. I think there are as many reasons as there are people as to why this happens.

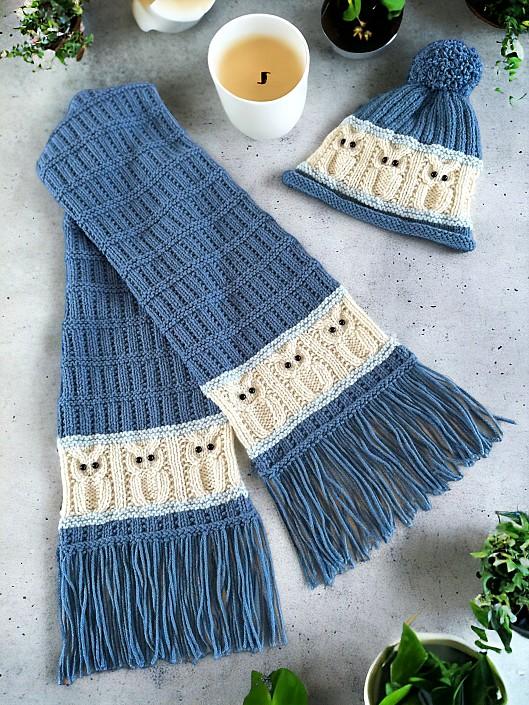
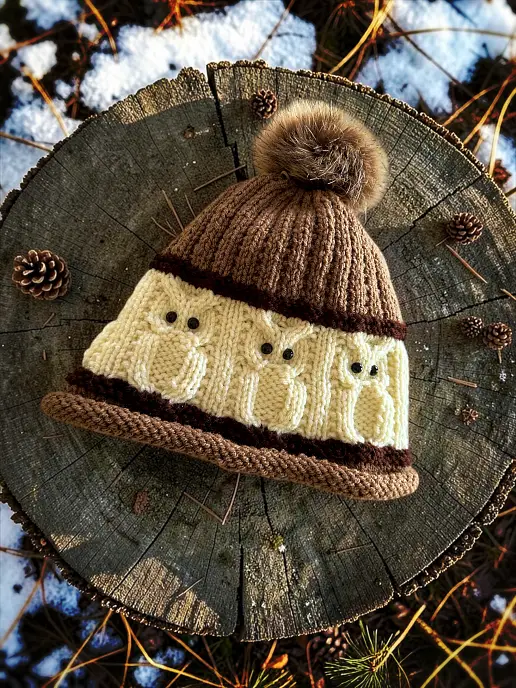
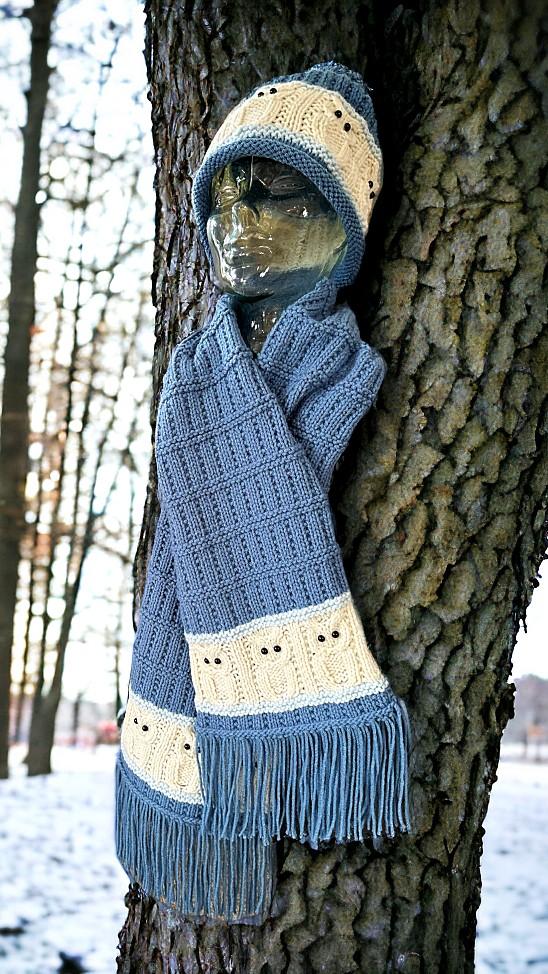
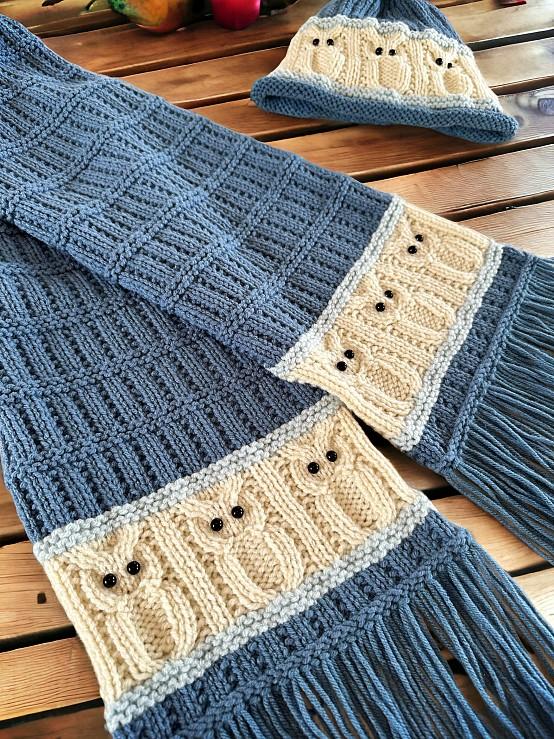
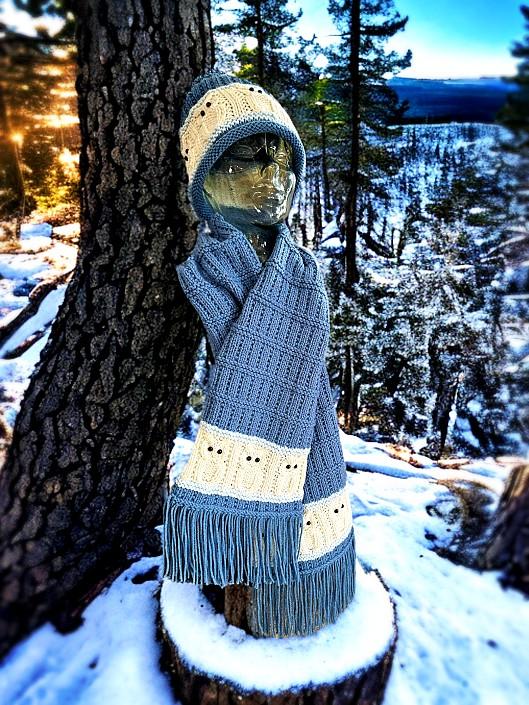
https://kweenbee.com/how-to-knit-a-beanie-hat-with-owls-free-knitting-pattern/This scarf is made to match my very popular Owl Beanie; also knit flat on two needles. If you can make the scarf, I guarantee that you will be able to make the owl toque, if you haven’t already 😉 You can read that pattern for free on my website here: Knit a Beanie – with OWLS!
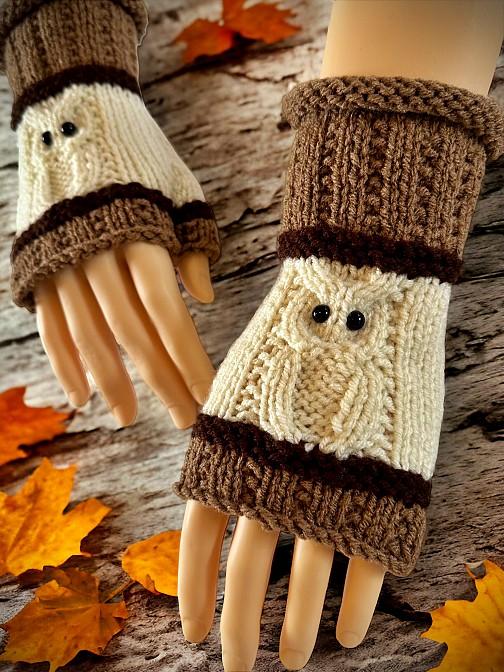
And in case you haven’t found it yet, there is also a pattern for the matching owl fingerless gloves! These are also knit flat on 2 needles and are seamed along the side of hand along the little finger side. If you would like to read that pattern, you can find it here – How to Knit Fingerless Gloves – with OWLS!


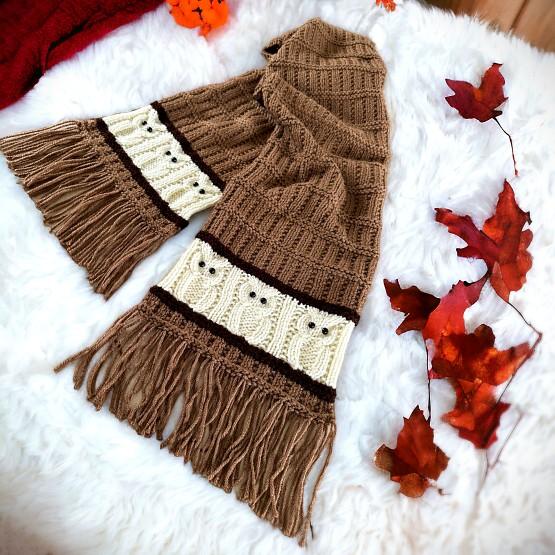
You may be wondering why there is a seam to sew and why this isn’t made in one piece. The owls look a bit different when you make cables from the top (head to feet) and from the bottom (feet to head). Also, the band on the end needs to change from knit stitches (garter) to purl stitches. It’s just all around more complicated than it needs to be. Besides, the seam is nearly invisible and less effort than going through the effort of trying to make the ends match if made in one piece. Trust me. I did try to make it one piece. I even wrote it down as I made it. One out of 10. Do not recommend.
If you are not a fan of ads or following a pattern online, I also have printable PDF version for sale for a small fee. You can purchase and download the pattern from my Shopify shop – Knit Owl Scarf – Knit Flat on 2 Straight Needles, from my Etsy shop, Ravelry, and the Kindle version is available on Amazon.
If you are a member of mine on Buy Me A Coffee, the printable PDF is FREE with your monthly support. You can see the pattern here – Knit Flat on Straight Needles – Owls on Scarf and learn more about it here 👇🏼
Another way to avoid ads and pop-ups, get instant, PRINTABLE downloads of this pattern and others, is by becoming a Member. When you become a Website Supporter at $4/month, you’ll gain access to exclusive member only posts on Buy Me A Coffee. You can download as many patterns as you like for the same $4 each month. You can go to this page to learn more, become a member and support my work… Exclusive Member Area
If you enjoy this pattern and my other free online knitting patterns, please consider making a small donation or helping me out by visiting my Help Support My Work page. If that’s not possible, that’s totally fine too! Even sharing this page on your social media helps me out immensely. You can use the buttons below to do so easily.
Things You Need
Worsted weight yarn – either complimentary colours or single colour. How much depends on how long you want to make the scarf and if you want fringe.
5 mm (Size 8 US) single pointed knitting needles
4 mm (Size 6 US) single pointed needles (optional but strongly suggested)
Cable needle
Crochet hook (for fringe. Size doesn’t matter as long as you can use it for yarn)
Tapestry needle to sew seam and work in ends
Gauge
In stockinette
9 sts = 2 inches (5 cm)
12 rows = 2 inches (5 cm)
Gauge isn’t really important, but if you are making the beanie or hat to match, you’ll want the gauge to be the same as the hat.
The scarf is one size fits all.
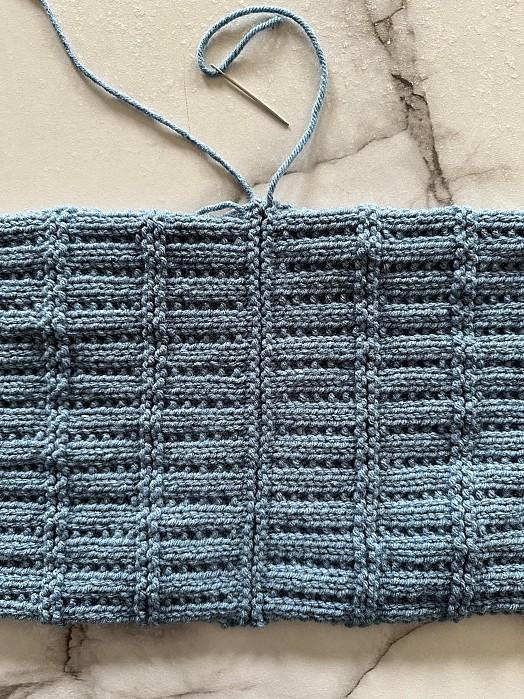
The Pattern
Cast on 40 sts with the 4 mm needles (you don’t have to use the smaller needles but it helps keep the starting edge from splaying out wider than the scarf).
♠ Row 1: Knit (If using the smaller size needles, switch to the 5 mm needles. Only knit the 1st row with the smaller size needles. All subsequent repeats are done with the size 5 mm needle).
Row 2: (K1 P2) until 1 st remains. K1 ♠ Repeat from ♠ to ♠ for a total of 6 rows. (Change colour at the START of row 7 if desired.)
To save yourself time if you’re changing colours, I suggest that you Work in the Ends While Knitting. You can click that link or watch tis video.
Row 7-11: Knit (Change colour at the START of row 11 if desired.)
Row 12 ♦ K1 P2 K1 P8 ♦ Repeat from ♦ to ♦ 2 more times.. K1 P2 K1
Row 13: ♣ K4 C4B C4F ♣ Repeat from ♣ to ♣ 2 more times K4
If you are uncertain how to make the C4B or C4F, you can either click the link or watch the videos.
Row 14: ♥ K1 P2 K1 P2 K4 P2 ♥ Repeat from ♥ to ♥ 2 more times. K1 P2 K1
Row 15 K6 ☺ P4 K8 ☺ Repeat from ☺ to ☺ once. P4 K6
Row 16: As row 14
Row 17: As row 15
Row 18: As row 14
Row 19: As row 15
Row 20: As row 14
Please share this page!
More FREE patterns
Click the pic to read online!!


![]()
![]()


FREE Knitting Graph Paper for Colorwork Knitting


Row 21: As row 15
Row 22: As row 14
Row 23: ♣ K4 C4B C4F ♣ Repeat from ♣ to ♣ 2 more times K4
Row 24: ♦ K1 P2 K1 P8 ♦ Repeat from ♦ to ♦ 2 more times.. K1 P2 K1
Row 25: Knit
Row 26: As row 24
Row 27: Knit
Row 28: As row 24
Row 29: Knit
Row 30: As row 24
Row 31: ♣ K4 C4B C4F ♣ Repeat from ♣ to ♣ 2 more times K4
Row 32: as row 24 (Change colour at the START of row 33 if desired.)
Row 33 – 36: Knit (Change colour at the START of row 37 if desired.)
▲ ♠ Row 37: Knit
Row 38: (K1 P2) until 1 st remains. K1 ♠ Repeat from ♠ to ♠ for a total of 10 rows.
Row 47 – 50: Knit. ▲ Repeat from ▲ to ▲ as many times as you want. REMEMBER – make it HALF as long as you want the final scarf. See further suggestions in the Hints and Tips section.
When making the last repeat finish with Row 48. Cast of on the RIGHT side.
Cast off.
Make another half to match.
More of my stuff on Etsy
You can make a widget like this for your blog or website, too.
Instructions are on my website here: How to Display Etsy Items on Your Website
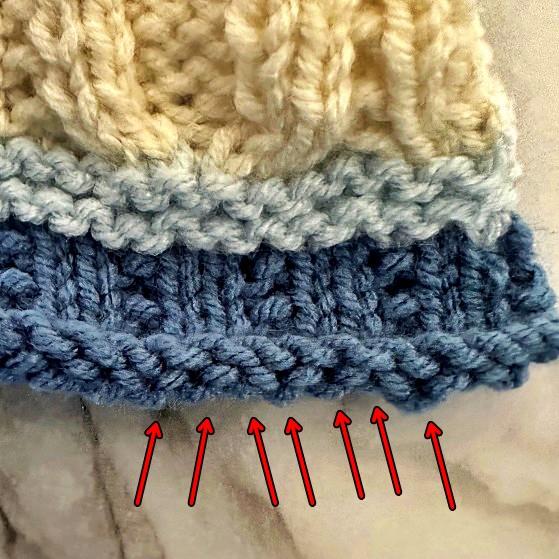
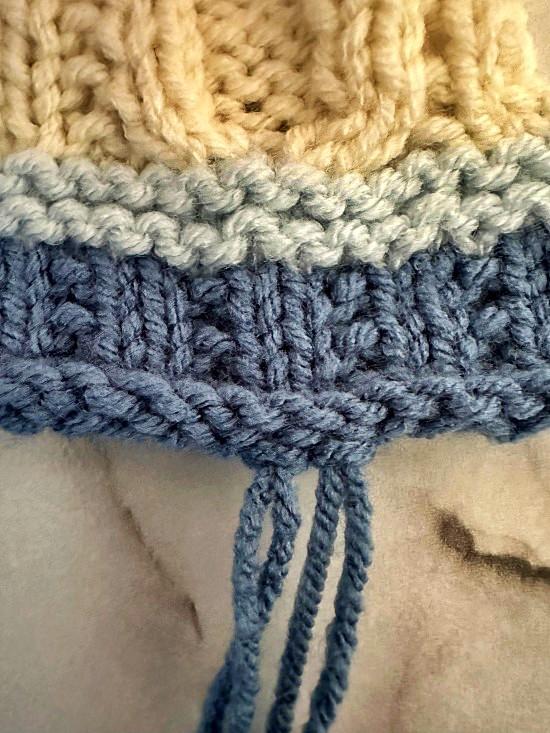
Sewing the Seam
Sew the seam to join the two halves. When joining leave a length of yarn on one of the halves to use to sew this seam.
When making the seam, pull the sides together so they are snug but not tight. There is a bit of slack naturally between the rows of garter stitch. You want to mimic this as closely as possible.
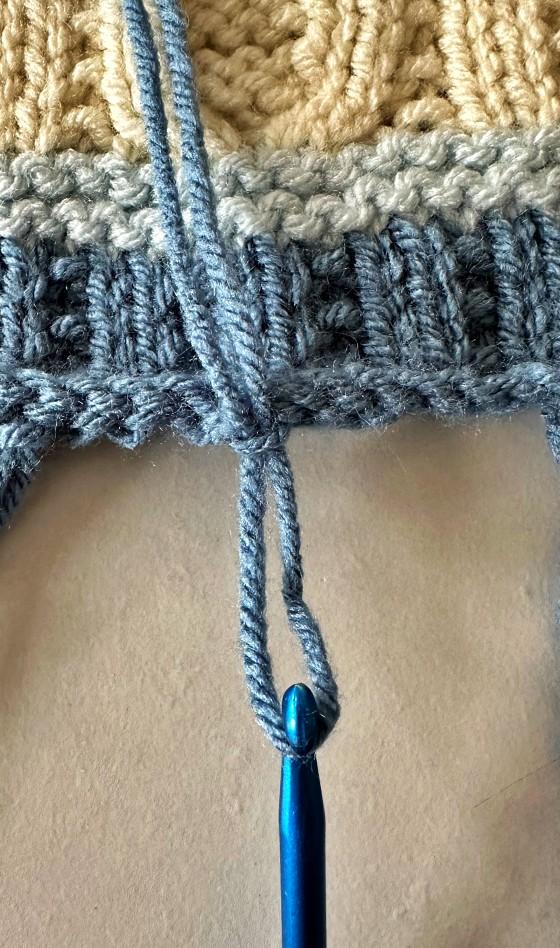
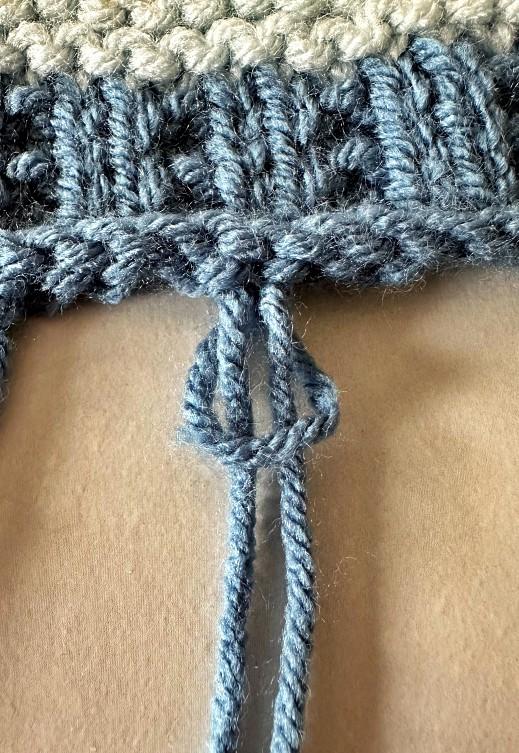
To join the ends, you’ll work between the cast off edge and row 48. You can see in the photo some previously joined stitches. Note where the yarn end is coming out.
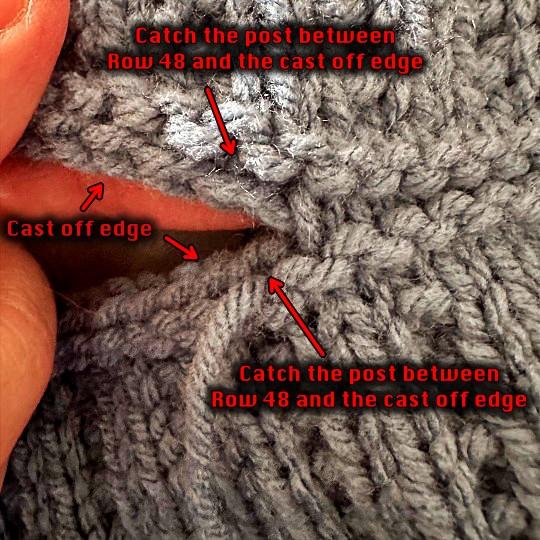
With your tapestry needle, pick up the bar that is between the bump of the stitch and the cast off row.
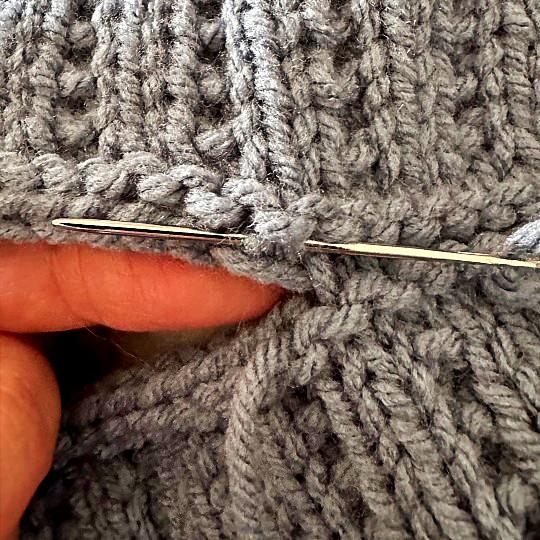
Pull snug.
Pick up the bar that is between the cast off row and the bump of the stitch.
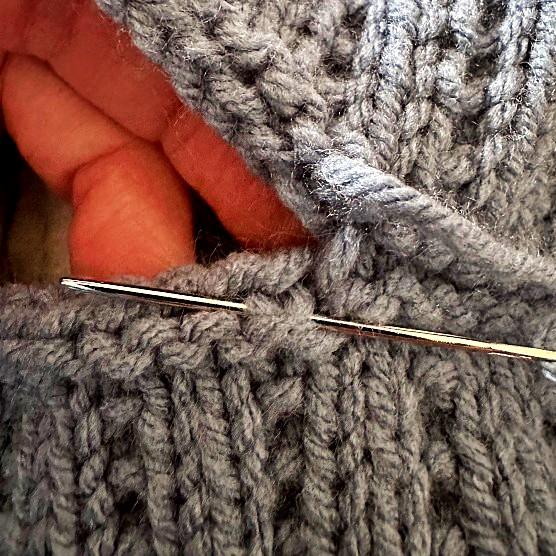
Continue down the length of the seam. It should look like the other garter bands on the scarf. You can pull the two ends apart a bit to get the stitches to even out the tension along the seam.
Making the Fringe
This is optional. If you are not a fringe person, don’t add a fringe. You may prefer a different style of fringe than what I did. Whatever you prefer is perfect.
When you switched from the smaller 4 mm needles to the larger, there became a bend at the end. Along that bend are stitches that run along the bottom. These are perfect for adding the fringe.
I preferred to make the fringe with one strand drawn through. You may want more strands and alternate with every other stitch. There are a lot of fringe tutorials and variations online that you may like more. It’s worth taking a look. Regardless, I’ve provided the instructions to show you how I made my fringe.
Cut lengths of yarn for twice the length you want your fringe. Insert your crochet hook in one stitch from the wrong side to the front. Fold one length of yarn in half. Catch with the crochet hook and pull part way through the stitch.
Catch the 2 ends of the yarn and pull through the loop on your hook. Pull the ends snug.
Repeat down the length of the edge.
Hints and Tips
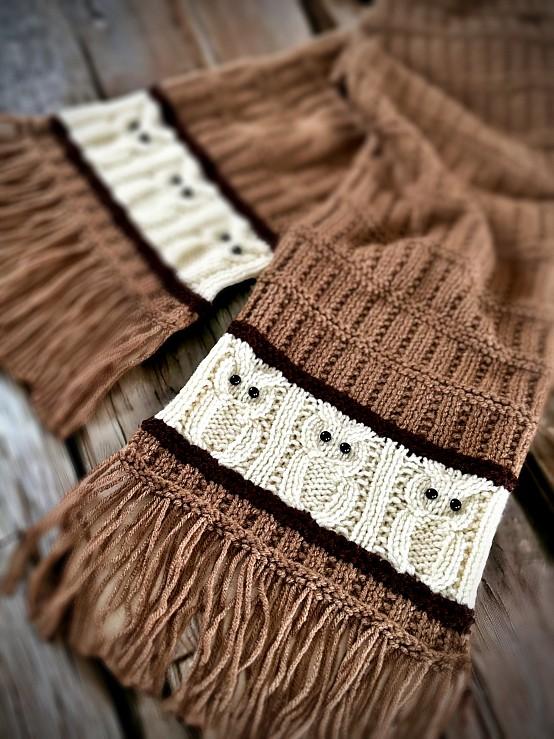
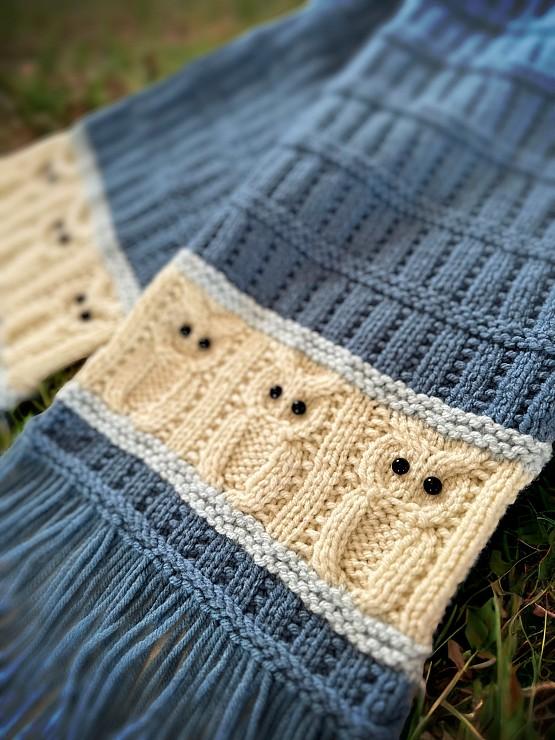
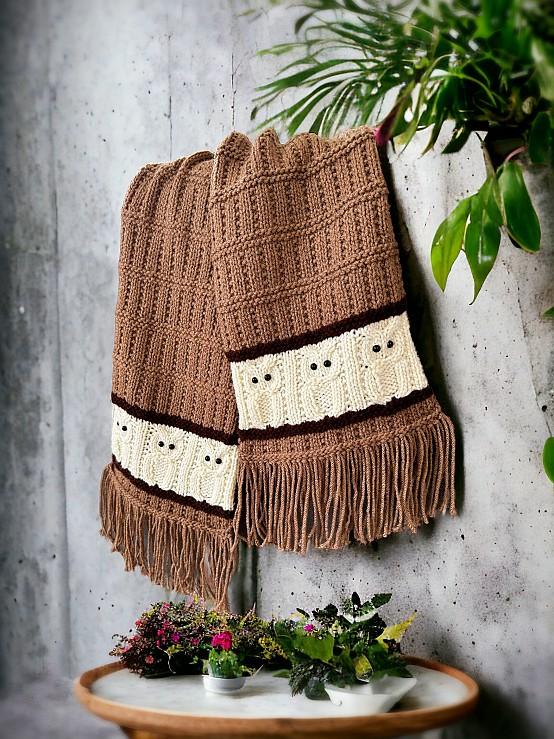
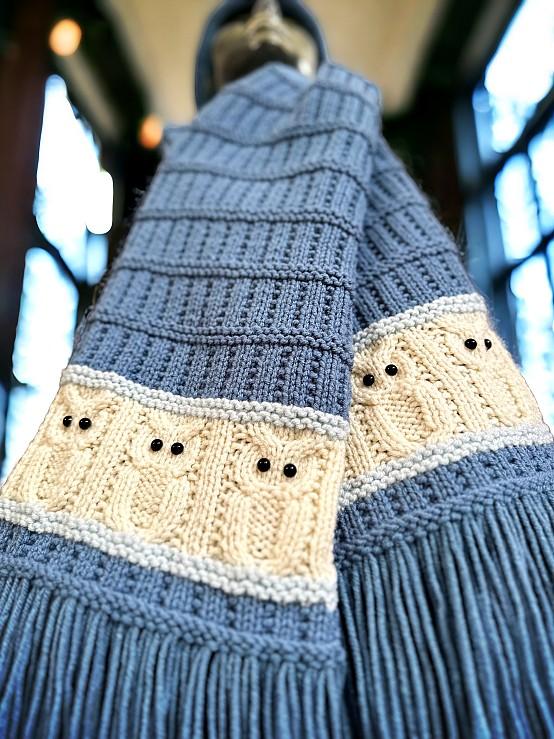
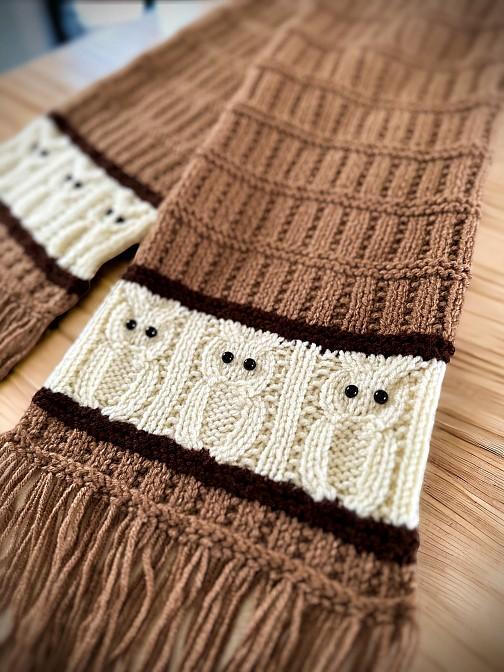
You can use whatever you like for eyes. Buttons will work. I used 8 mm flat back cabochons. They come in a variety of colours and sizes. I looked for more realistic owl eyes but all I could find were ones for taxidermy and they were too big, and expensive. I also recommend gluing them on as sewing will take a bit of time.
Because this is meant to be flat you’ll need to block or press it. Use your method of preference. A few tips on pressing – make a test piece to see how your yarn will react and adjust accordingly. I used acrylic yarns for my demo pieces. I made sure my iron was set to a low temperature. I then used a spray bottle to wet it on the WRONG side. I then pressed carefully on the WRONG side. Check the front as you press to make sure it isn’t flattening the stitches more than you want.
Your scarf halves don’t have to be the same length. If you know there is a particular way you want to wear it, such as very long, wrapped once around your neck and the ends hanging down, you may want the seam on one side instead of the middle, right in the front.
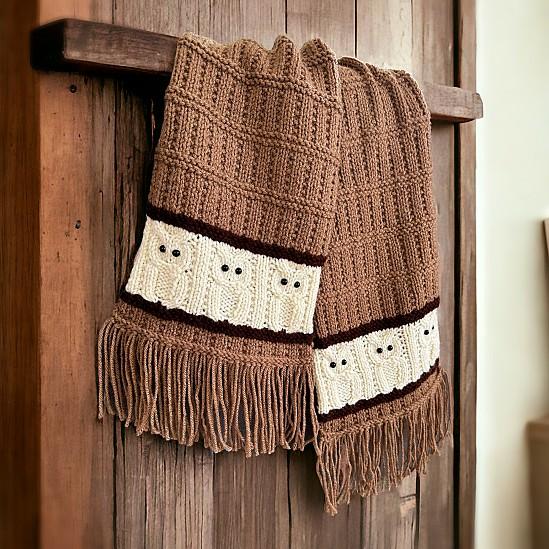
I made my brown scarf as an equal divide. I repeated from ▲ to ▲ 12 times more for a total of 13 sections. It’s long enough to wrap around my neck and dangle on each side just like in the photo.
Abbreviations
k – knit
p – purl
k2tog – knit 2 sts together
st – stitch
sts – stitches
Side note: I use both versions of the terminology when it comes to cable stitches. I’ve been corrected that I’m using the wrong one for both occasions so it’s a no win for me. What I mean is that C4F is the same technique as C2F. Just like how C2B is the same as C4B. Do you think of it as the just the stitches you’re pulling or the number of stitches you’re using in total when you do it? It’s a personal choice, I guess.
C4F – Pick up the next 2 stitches with your cable needle. Pull the stitches to the FRONT of your work. Knit the next 2 stitches on your non-working needle. Knit the 2 stitches from the cable needle. Watch this video to see how. How to C4F or Cable 4 Forward.
C4B – Pick up the next 2 stitches with your cable needle. Pull the stitches to the BACK of your work. Knit the next 2 stitches on your non-working needle. Knit the 2 stitches from the cable needle. Watch this video to see how. How to C4B or Cable 4 Back
Like all of my patterns you have my permission to sell and/or give away the physical items that you make using this pattern. You are NOT permitted to reprint this pattern in any form unless you have obtained my written permission to do so.


Hello!
I’m sorry, I’m new to reading patterns, can you please tell me what the card suit symbols are for?
They’re symbols used to show what parts (stitch and row combinations) you need to repeat. The symbol itself doesn’t matter. It differentiates between the repeating parts. If yo need more help I suggest a specific search on how to read a knitting pattern.
When you sew the 2 pieces together do you sew with the right sides facing up or the wrong sides facing up. The instructions don’t have that information.
Thank you!
Seams are on the wrong side or inside the garment. This scarf is not different.
I ordered the owl scarf pattern, the money was taken from my account, but I did not receive the printed/downloadable pattern.
Please advise.
Did you check your junk mail folder for the email with the link? Once your payment goes through it is automatically sent to you. Depending on your email settings it may have been placed there.
The other way to download your pattern is to log in to the website. Go to “your downloads” in the menu bar at the top of every page. The purchase with the download link is there.