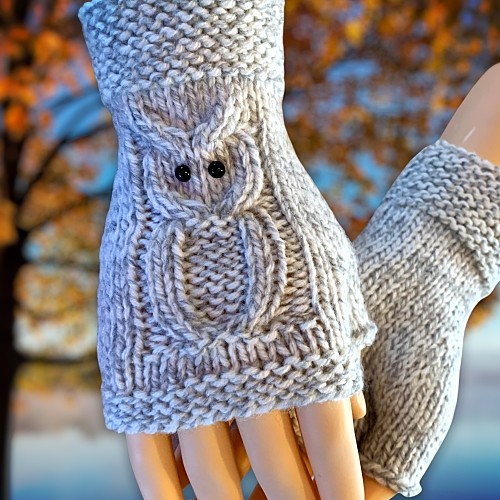
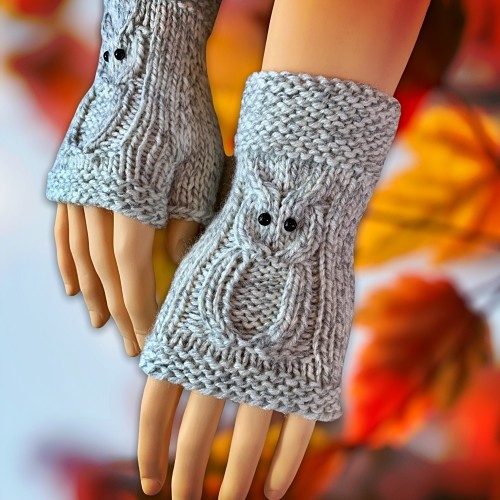
Well, since the how-to video showing how to knit these gloves in the round went over like a lead balloon, I’ve put in the effort and redesigned the gloves so they can be knit flat on 2 needles. Perfect for a newbie knitter wanting to learn new techniques!

** 👉🏼 In case you still want to learn how to knit in the round or want the seamless version, you can read the pattern here – How to Knit Owl Fingerless Gloves. 👈🏼 ** The video is embedded on that page too, if you want to watch it.
If you are looking to knit a pair of plain gloves without the owls, the original version this pattern is available here – Super Simple Fingerless Gloves. It’s also knitted flat on 2 needles with a seam on the outside of the hand and inside of the thumb.
If you are so inclined and like to have matching sets of things, I have completed the matching hat or beanie! You could also call it a toque. Whatever floats your boat. It’s free to read on this website too. If you’d like to, click this link – How To Knit A Beanie Hat – With OWLS! – FREE Knitting Pattern


Once again, I’ve made the gloves as one pattern and adjusted the needle size to change the sizes. This makes it a heck of a lot easier to design and keeps the proportion of the owl the same on all sizes. Frankly, the overall look is better.
I am finished creating the downloadable pdf for this pattern and it’s available in all my usual online selling venues including Ravelry, Etsy, and this website – Super Easy to Knit Fingerless Gloves – with OWLS! Click any of those links to avoid the ads and purchase it for a nominal fee.
Another way to avoid ads and pop-ups, get instant, PRINTABLE downloads of this pattern and others, is by becoming a Member. When you become a Website Supporter at $4/month, you’ll gain access to exclusive member only posts on Buy Me A Coffee. You can download as many patterns as you like for the same $4 each month. You can go to this page to learn more, become a member and support my work… Exclusive Member Area
I’ve also created videos for you to see how the stitches are done, if any of them are giving you problems. I do have all the basic stitch videos here – Learn Basic Knitting Stitches, but links to the slightly more advanced stitches that show you how to M1, PM1, C4F and C4B are provided on this page. Clicking the links will take you to the video, but will leave this page window open in your browser. You can also scroll down to the bottom of the page to see the stitch abbreviations that also contain the embedded video you can watch right from this page.
Are you looking for a knitting pattern for a pair of mitts with the same owl motif? You’re now in luck! You can make these thick owl mittens with the pattern here – Extra Thick and Quick to Knit Owl Mittens. You can also click or tap on the photo below.

Love the free patterns? You can say thanks in a couple of ways. You can read more about how you can Support My Work by clicking that link or make a small donation and Buy Me a Coffee. That is a website where you can make a one time donation as a thanks. If you don’t want to or are unable to make a financial donation, sharing this pattern through social media is a great way to help out too! The links below are a super easy way for you to do so.
Gauge
This is important to follow for correct sizing. This is when using the US size 6 (4 mm) knitting needles.
2″ (5 cm) = 10 sts
2″ (5 cm) – 16 rows
in stockinette
Things You Need:
You can click any link below to see what you need.
Knitting needles:
Small – Size 3 US (3.25 mm) knitting needles
Medium – Size 6 US (4 mm) knitting needles
Large – Size 8 US (5mm) knitting needles
Cable Needle – There are a number a styles but I prefer the hook version
Stitch holder – It looks like a big safety pin
Left Hand
Cast on 33
Rows 1-14: Knit across
Row 15: Knit across
Row 16: Purl across
Row 17: Knit across
Row 18: Purl across
Row 19: Knit across
Row 20: P5 K1 P8 K1 P to the end of the row
Row 21: K13 M1 K1 M1 K4 P1 C4F C4B P1 K to the end of the row
Row 22: P5 K1 P8 K1 P to the end of the row
Row 23: K20 P1 K8 P1 K to the end of the row
Please share this page!
More FREE patterns
Click the pic to read online!!


![]()
![]()


FREE Knitting Graph Paper for Colorwork Knitting


Row 24: P5 K1 P8 K1 P4 PM1 P3 PM1 P to the end of the row
Row 25: K22 P1 K8 P1 K to the end of the row
Row 26: P5 K1 P8 K1 P to the end of the row
Row 27: K13 M1 K5 M1 K4 P1 K8 P1 K to the end of the row
Row 28: P5 K1 P8 K1 P to the end of the row
Row 29: K24 P1 C4F C4B P1 K to the end of the row
Row 30: P5 K1 P2 K4 P2 K1 P4 PM1 P7 PM1 P to the end of the row
Row 31: K26 P1 K2 P4 K2 P1 K to the end of the row
Row 32: P5 K1 P2 K4 P2 K1 P to the end of the row
Row 33: K13 M1 K9 M1 K4 P1 K2 P4 K2 P1 K to the end of the row
Row 34: P5 K1 P2 K4 P2 K1 P to the end of the row
Row 35: K28 P1 K2 P4 K2 P1 K to the end of the row
Row 36: P5 K1 P2 K4 P2 K1 P4 PM1 P11 PM1 P to the end of the row
Row 37: K30 P1 K2 P4 K2 P1 K to the end of the row
Row 38: P5 K1 P2 K4 P2 K1 P to the end of the row
Row 39: K13 Pass the next 13 sts onto a stitch holder. K4 P1 K2 P4 K2 P1 K to the end of the row
Row 40: P5 K1 P2 K4 P2 K1 P to the end of the row
Row 41: K17 P1 C4F C4B P1 K to the end of the row
Row 42: P5 K10 P to the end of the row
Row 43: Knit across
Row 44: Purl across
Row 45-50: Knit across
Cast off.
Making the Thumb
Pick up the 13 stitches on the stitch holder
Row 1: Knit across
Row 2: Purl across
Row 3: Knit across
Row 4: Purl across
Cast off.
Sew seam along the side of the glove and the inside of the thumb. Work in ends.
More of my stuff on Etsy:
You can make a widget like this for your blog or website, too.
Instructions are on my website here: How to Display Etsy Items on Your Website
Right Hand
Cast on 33
Rows 1-14: Knit across
Row 15: Knit across
Row 16: Purl across
Row 17: Knit across
Row 18: Purl across
Row 19: Knit across
Row 20: P18 K1 P8 K1 P to the end of the row
Row 21: K5 P1 C4F C4B P1 K4 M1 K1 M1 K to the end of the row
Row 22: P20 K1 P8 K1 P to the end of the row
Row 23: K5 P1 K8 P1 K to the end of the row
Row 24: P13 PM1 P3 PM1 P4 K1 P8 K1 P to the end of the row
Row 25: K5 P1 K8 P1 K to the end of the row
Row 26: P22 K1 P8 K1 P to the end of the row
Row 27: K5 P1 K8 P1 K4 M1 K5 M1 K to the end of the row
Row 28: P24 K1 P8 K1 P to the end of the row
Row 29: K5 P1 C4F C4B P1 K to the end of the row
Row 30: P13 PM1 P7 PM1 P4 K1 P2 K4 P2 K1 P to the end of the row
Row 31: K5 P1 K2 P4 K2 P1 K to the end of the row
Row 32: P26 K1 P2 K4 P2 K1 P to the end of the row
Row 33: K5 P1 K2 P4 K2 P1 K4 M1 K9 M1 K to the end of the row
Row 34: P28 K1 P2 K4 P2 K1 P to the end of the row
Row 35: K5 P1 K2 P4 K2 P1 K to the end of the row
Row 36: P13 PM1 P11 PM1 P4 K1 P2 K4 P2 K1 P to the end of the row
Row 37: K5 P1 K2 P4 K2 P1 K to the end of the row
Row 38: P30 K1 P2 K4 P2 K1 P to the end of the row
Row 39: K5 P1 K2 P4 K2 P1 K4 Pass the next 13 sts onto a stitch holder. K to the end of the row
Row 40: P17 K1 P2 K4 P2 K1 P to the end of the row
Row 41: K5 P1 C4F C4B P1 K to the end of the row
Row 42: P17 K10 P to the end of the row
Row 43: Knit across
Row 44: Purl across
Row 45-50: Knit across
Cast off.
Making the Thumb
Pick up the 13 stitches on the stitch holder
Row 1: Knit across
Row 2: Purl across
Row 3: Knit across
Row 4: Purl across
Cast off.
Sew seam along the side of the glove and the inside of the thumb. Work in ends.
Hints and Tips
Make your seams as narrow as possible when sewing them. The bulkier the seam the more noticeable and possibly uncomfortable for the wearer.
You can make these gloves with a ribbed cuff and around the fingers like the original Owl Fingerless Gloves. You can easily do a K1 P1 ribbing to make that happen.
Abbreviation
K – knit
P – purl
M1 – Make one (knit wise). Increase one stitch between the stitches. Pick up the yarn between the stitches. Twist slightly. Place it on your non-working needle. Knit the stitch. Watch this video below to see how.
PM1 – Make one (purl wise). Increase one stitch between the purl stitches. Pick up the yarn between the stitches. Place it on your non-working needle. Purl the stitch as you regularly would.
C4F – Pick up the next 2 stitches with your cable needle. Pull the stitches to the FRONT of your work. Knit the next 2 stitches on your non-working needle. Knit the 2 stitches from the cable needle.
C4B – Pick up the next 2 stitches with your cable needle. Pull the stitches to the BACK of your work. Knit the next 2 stitches on your non-working needle. Knit the 2 stitches from the cable needle.


On the flat pattern, row 13, it says “cast on 13 stitches” How is that done to keep them connected to the body of the mitt?
You don’t do that with the thumb in this pattern. Any pattern that you cast on for the thumb has a link to the video showing you how. If you’re on the website, the video is embedded into the pattern.
Where do I find the directions for knitting in the round? Thanks
Here – https://kweenbee.com/how-to-knit-fingerless-gloves-with-owls/
How do I know what size to make? My granddaughter’s hand measures about 8-8.5 inches in around.
I’ve made about 8 pairs now of the double pointed needle pattern, decided to do a pair on straight. Thanks so much for the pattern!
Hi there, I absolutely love this pattern, thank you so much! I’m a beginner knitter and this helped me out so much!
I was wondering, if I didn’t want to make it fingerless so like a mitten/glove how would you recommend doing so??
Thank you so much!
I would keep knitting in the round after I made the thumb for however long you need it. You can do some decreasing rows at the end then draw all the stitches together. Or, you can end it like a sock and grafts the stitches like you would the toe of a sock. I show how to do that on my sock pattern.
Why do you cast on 36 stitches when knitting in the round and knitted on straight needles you only cast on 33?
It all has to do with gauge. The stitches are tighter when knitting in the round because you’re consistently knitting into every stitch. When flat, you are purling the stitches on the wrong side. Purl stitches are naturally a looser stitch. Hence, the difference in the number of stitches to cast on. It’s all about gauge. It’s not a mistake. It actually improves the fit of the flat knit version.