
The perfect knitting project for binge watching the latest series on Netflix and incidentally, how I developed this pattern. To Breaking Bad, if you must know. I’m sure Walter White would be proud. FYI this pattern was written back in 2015 so that reference was a lot more timely back then.


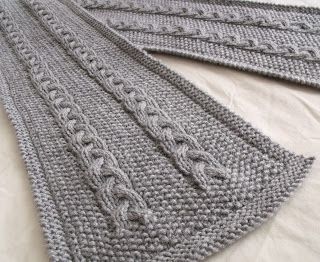
This free cable scarf knitting pattern includes a full step-by-step video tutorial and a printable PDF so you can download and knit along. It’s a cozy project that’s perfect for relaxing evenings or binge-watching your favourite show. The easy cable design looks impressive but is simple to make, even if you’re newer to knitting. You’ll learn how to knit cables, follow the pattern repeat, and finish a beautiful handmade scarf that makes a great gift or personal winter essential.
The pattern is easy to follow and repeats the same eight rows for the length of the scarf, which can be as long or as short as you like. If you have never knitted cables before, the pattern includes photos and instructions how to do it. By the time you’re finished this project, you’ll have mastered the art of the cable stitch, have a lovely scarf and hopefully have closure for all your favourite characters. Now in 2020, it’ll probably be something like Stranger Things.
If you need help with the pattern, you can view the complete how to from start to finish with my YouTube video: Knit a Cable Scarf (The video is embedded further along). If you know how to knit but need a little extra help with forming the cables, you can watch how to do the C2F, the C2B with my videos: C2F and C2B. Or if starting the cable pattern is giving you trouble, I have a video for that too: Starting the Cable Pattern. All the video links open to a new page so you won’t lose this one.
If you’re looking for more scarf/dishcloth designs I have a bunch of others you may be interested in. You can click any of the following links to check some of them out.
Bars and Stripes Knitted Dishcloth Pattern – Learn How to Knit
Diamonds Dishcloth and Coasters – FREE Knitting Pattern
Cute AF Bows Dishcloth – FREE Knitting Pattern
Textured Easy to Knit Scarf, Dishcloth and Coaster Pattern
Another way to avoid ads and pop-ups, get instant, PRINTABLE downloads of this pattern and others, is by becoming a Member. When you become a Website Supporter at $4/month, you’ll gain access to exclusive member only posts on Buy Me A Coffee. You can download as many patterns as you like for the same $4 each month. You can go to this page to learn more, become a member and support my work… Exclusive Member Area
Download and Print the Pattern
To get the pattern, click the button to open a new browser window. You can save this document to your device. It varies depending on what device (phone, tablet, computer) and what operating system you are using.
You can come back to the page and download as many times as you like.
No log in or personal info is required to gain access to this pattern.
Things you need
If you are having a tough time finding what you need, click any of the links below to get everything you need to make this scarf.
200 gr of worsted weight yarn (This could be more of less depending on how long you want your scarf).
Size 5 (US size 8) single pointed knitting needles or whatever size to obtain correct gauge.
Cable knitting needle
Tapestry Needle – for working in the ends
Gauge
12 rows stockinette = 2″
9 stitches stockinette = 2″
If your gauge is off your scarf will be either narrower or wider, but it really isn’t overly important for this project.
Loving this free knitting pattern? Do you know someone who would love it as much as you? Please share it on your social media or email it to a friend.
And just so you know, this is one of the first videos I ever made. It is old. Try not to judge too harshly.
The Pattern
Cast on 40
Row 1: Knit across
Row 2-7: Sl st as if to knit. Knit across.
Row 8: Sl st as if to knit. K3 P32 K4.
Row 9: Sl st as if to knit. K2 P1 (K1 P1) 16 times. P1 K3.
Row 10: Sl st as if to knit. K3 (P1 K1) 16 times K4.
Repeat rows 9-10, 4 times more for an additional 8 rows.
🦊 Next row: Sl st as if to knit. K2 P1 (K1 P1) 3 times. K6 P1 (P1 K1) 3 times. P1 K6 P1 (P1 K1) 2 times. P2 K3.
🦋 Next row: Sl st as if to knit. K3 (P1 K1) 3 times. P6 K1 (K1 P1) 3 times. K1 P6 K1 (K1 P1) 2 times. K5.
🌸 Next row: Sl st as if to knit. K2 P1 (K1 P1) 3 times.C2F K2 P1 (P1 K1) 3 times. P1 C2F K2 P1 (P1 K1) 2 times. P2 K3.
Please share this page!
More FREE patterns
Click the pic to read online!!


FREE Knitting Graph Paper for Colorwork Knitting


![]()
![]()


Next row: Repeat row with 🦋
Next row: Repeat row with 🦊
Next row: Repeat row with 🦋
Next row: Sl st as if to knit. K2 P1 (K1 P1) 3 times. K2 C2B P1 (P1 K1) 3 times. P1 K2 C2B P1 (P1 K1) 2 times. P2 K3.
Next row: Repeat row with 🦋 (🐌 end with this row when scarf is the desired length.)
Next row: Repeat row with 🦊
Next row: Repeat row with 🦋 🌸
Repeat rows from 🌸 to 🌸. These 8 rows form the cable pattern. End the cable pattern with the row marked with 🐌.
Repeat until the scarf is the desired length, keeping in mind that the finished edge adds another 2 1/2 inches on to the length.
Next rows: Repeat rows 9-10 6 times for a total of 12 rows.
Next row: Sl st as if to knit. K2 P1 K32 P1 K3.
Next rows: Repeat rows 2-7.
Cast off.
Hints and Tips
Be very careful to get the stitches right at the beginning when forming the cable pattern. Once the pattern become more set, it becomes easy to see where you need to purl and knit and what stitches form the cable.
The back of the cables are ALWAYS purl stitches and the stitch on either side of them is ALWAYS a knit.
The stitch at the beginning of each row is slipped off and not knitted. This gives the edges of the scarf less stretch and lets the scarf hold its edge through wear and washings. If you don’t want to and would prefer to just knit, that’s ok. Just be consistent whether you knit it or not.
The easiest way to make any cable pattern is to see the pattern as panels versus individual rows. Unfortunately, there’s no other way to write a knitting pattern other than rows. If you see the scarfs pattern as the knitted edge, the moss stitch panel (the K1 P1 portions), the cable, moss stitch panel, another cable, moss stitch panel, knitted edge, it becomes very easy to do.
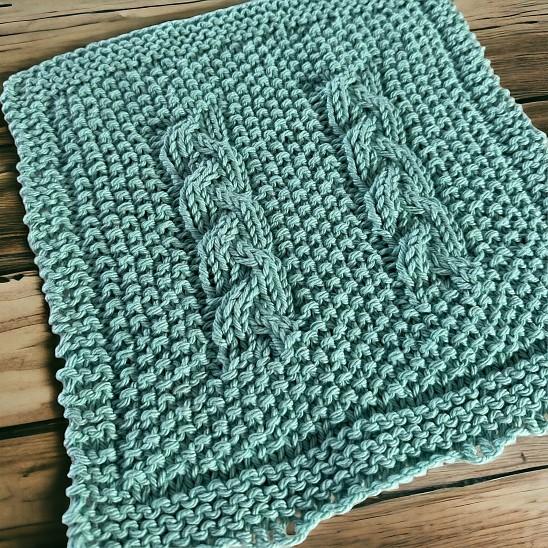
I did end up making a dishcloth version of this pattern. Do I love it? No. Do I hate it? No. Would I make it again? No. To be square there isn’t many repeats of the cable. I did four. It looks ok. If I was to redo it, I’d use a smaller gauge needle for sure. I would also cast on with a smaller needle than what I was going to knit the rest of the scarf/dishcloth.
Abbreviations
K – Knit
P – Purl
sts – stitches
Sl st – Slip 1 stitch off
C2F – Cable 2 forward. With your cable needle, slip 2 stitches off the needle and pull the stitches towards the front of your work. Knit the next 2 stitches. Knit the 2 stitches from the cable needle.
C2B – Cable 2 backward. With your cable needle, slip 2 stitches off the needle and pull the stitches towards the back of your work. Knit the next 2 stitches. Knit the 2 stitches from the cable needle.


Excellent tutorial. I will pass your URL on to others in need of learning from your gracious teachings.
Thank you.
Hello! Someone in my Myspace group shared this site with us so I came to take
a look. I’m definitely loving the information. I’m bookmarking and will be tweeting this to my followers!
Exceptional blog and great style and design.
I’ve been surfing online more than 4 hours today, yet I never found any
interesting article like yours. It’s pretty worth enough for me.
In my opinion, if all web owners and bloggers made good content as
you did, the internet will be a lot more useful than ever before.