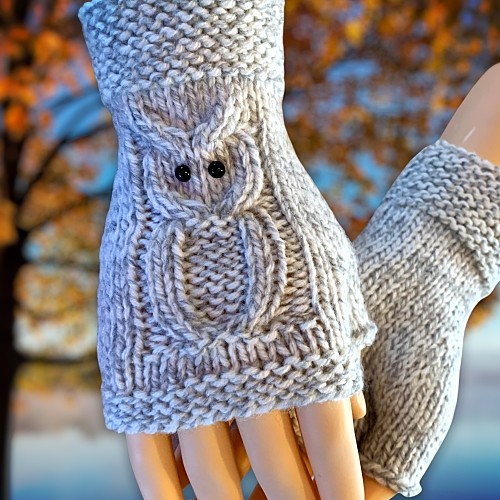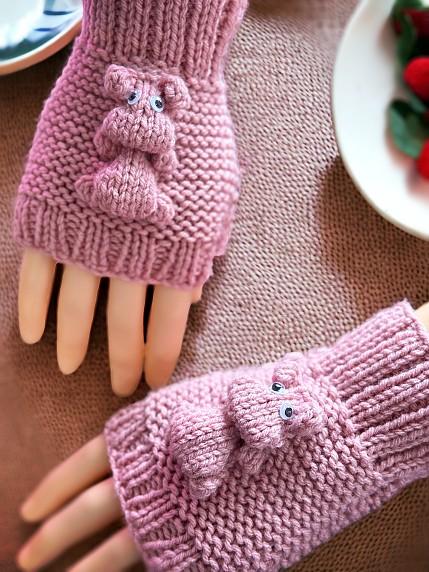
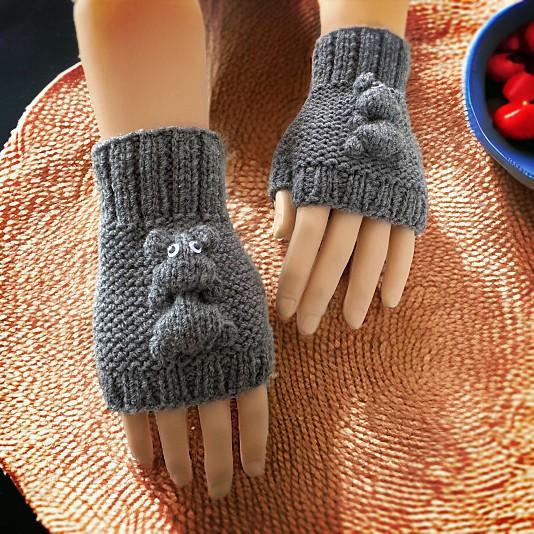
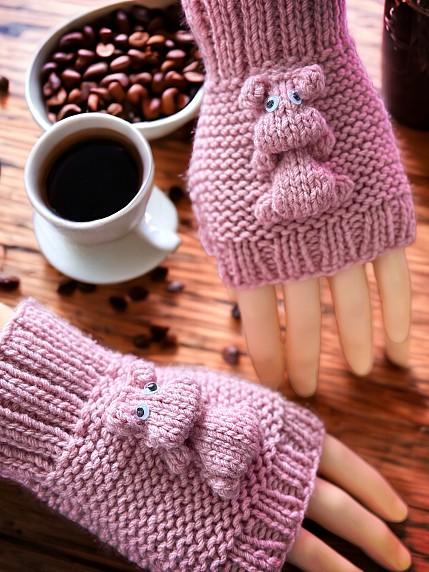
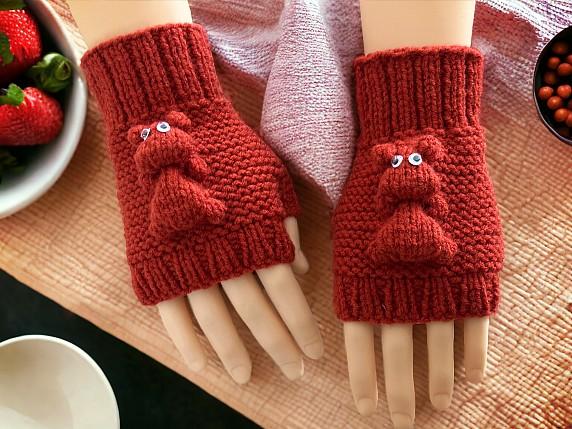
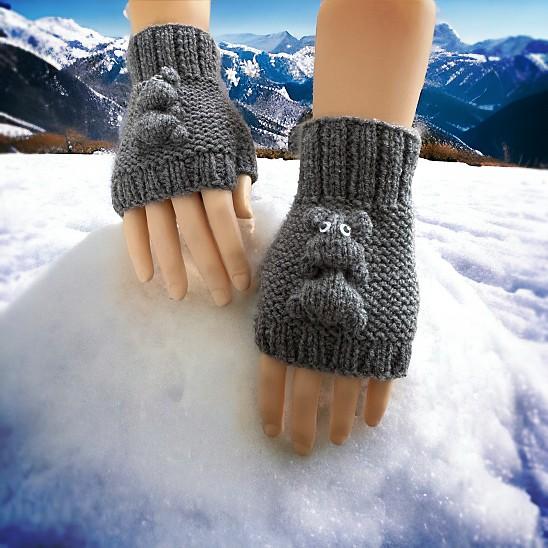
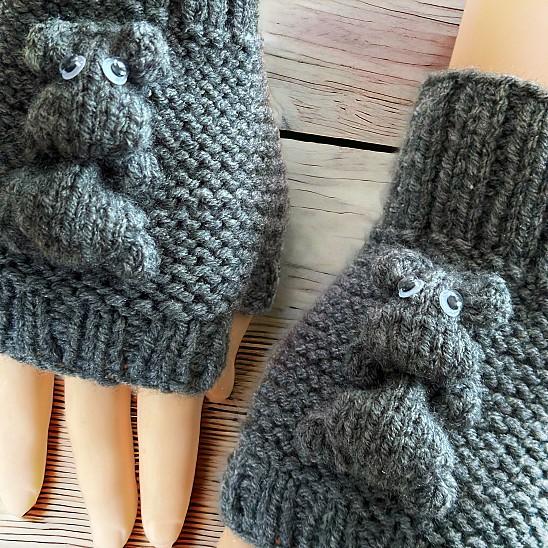
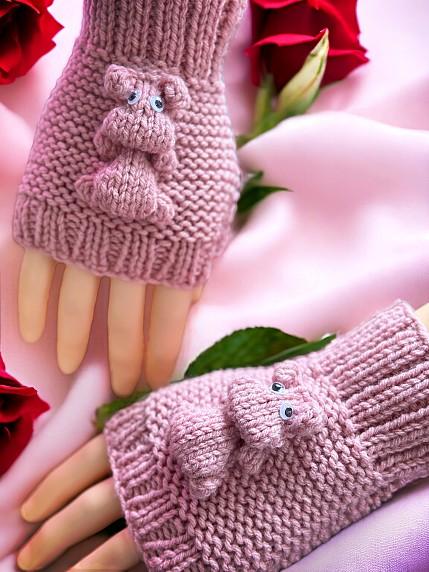
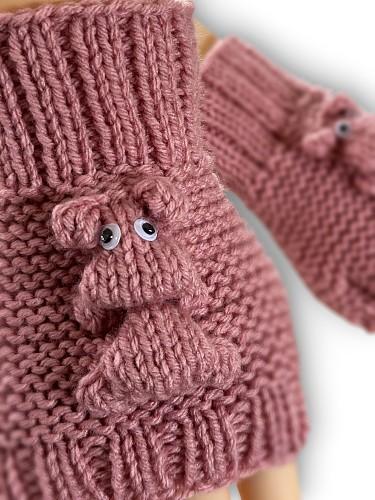
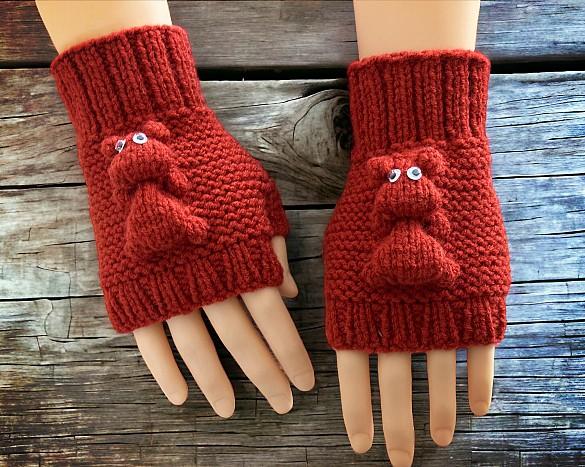
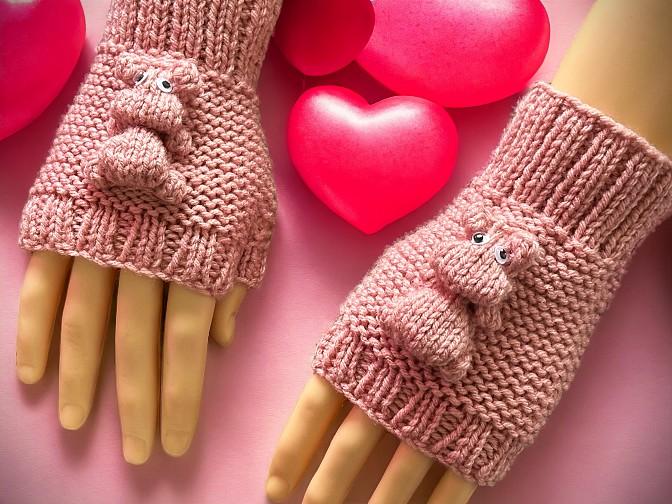
I originally started this 3D animal adventure with my very popular owl gloves (both knit flat and knit in the round. Those are clickable links btw ☺) It then progressed on to my Spider Gloves and Autumn Leaf Gloves. I wanted to make a cat sitting down on a pair of fingerless mitts. Well, that didn’t turn out as expected but it is how these hippo gloves came to be. I’m still working on the cat gloves…


When making these, I realized that I couldn’t make it in the traditional way by starting at the cuff and working my way to the fingers. I had to go the opposite way to be able to make the arms, legs, body, head and ears. No problem. I rewrote the basic glove pattern. That’s over on Amazon as an exclusive. It will be put on my website eventually so check out this website to see if it’s here at KweenBee.com.
If you are not a fan of ads or following a pattern online, I also have printable PDF version for sale for a small fee. You can purchase and download the pattern from this website – Hippo Fingerless Gloves or Mittens, from my Etsy shop, Ravelry, LoveCrafts, Google Books, CreativeFabrica and the Kindle and paperback version are both available on Amazon. This is linked to the USA version. If you’re from anther country make sure you switch over to where you live.
Anyways, the pattern is written separately for both the right and left hand. Because it is knit flat there is a seam that runs along the outside of the hand and along the pinky finger. The thumb is knitted once the hand is completed with picked up stitches. And also, the hippo will never fall off. It’s made as you make the glove by going back and forth and making formed bobbles. Other than the thumb, this is made in one piece.
Another way to avoid ads and pop-ups, get instant, PRINTABLE downloads of this pattern and others, is by becoming a Member on this website. When you become a Website Supporter for $3/month, you’ll gain access to exclusive member only posts. These posts contain one click downloads of the patterns. Simply click the Download & Print button. The PDF will automatically download to your computer or smart device. You can then read it on your device or print it at your leisure. You can download as many patterns as you like for the same $3 each month. You can go to this page to learn more, become a member and support my work… Exclusive Member Area
If you enjoy this pattern and my other free online knitting patterns, please consider making a small donation or helping me out by visiting my Help Support My Work page. If that’s not possible, that’s totally fine too! Even sharing this page on your social media helps me out immensely. You can use the buttons below to do so easily.
Things You Need
Worsted weight yarn – 1 standard ball of yarn (215 yards/197 m). Any colours of your choosing.
Knitting needles:
Small – Size 3 US (3.25 mm) knitting needles
Medium – Size 6 US (4 mm) knitting needles
Large – Size 8 US (5 mm) knitting needles
Tapestry needle – to sew the seam and work in the ends.
0.27 inch (7mm) wiggle eyes or small buttons. You can also embroider eyes on if you prefer.
Gauge
In stockinette stitch
Small
size 3.5 mm (US size 4) knitting needles
11 stitches every 2 inches (5 cm)
16 rows every 2 inches (5 cm)
Medium
size 4 mm (US size 6) knitting needles
10 stitches every 2 inches (5 cm)
14 rows every 2 inches (5 cm)
Large
size 5 mm (US size 8) knitting needles
9 stitches every 2 inches (5 cm)
12 rows every 2 inches (5 cm)
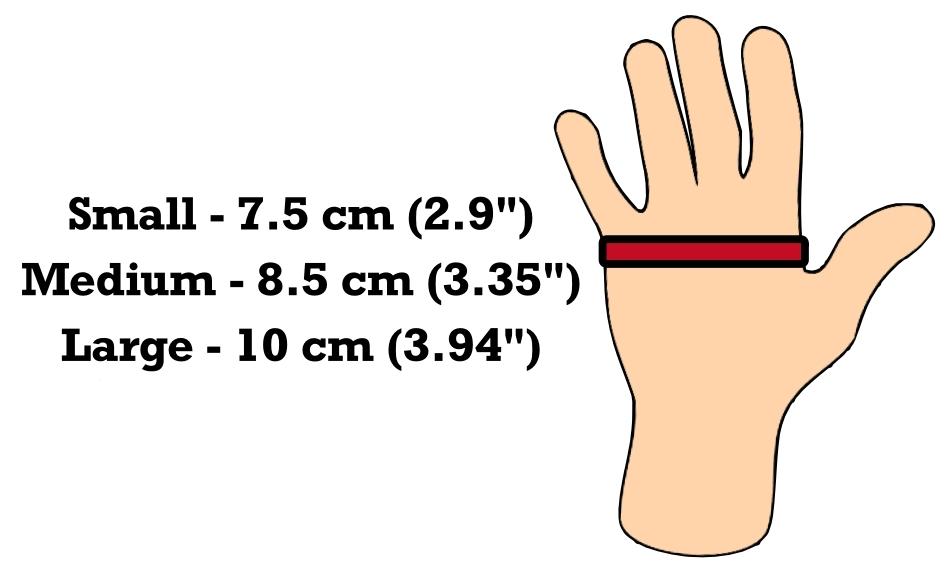
Sizing
Like my other fingerless mitt patterns, I’ve made this as one pattern and adjusted the needle size to change the sizes. This makes it a heck of a lot easier to design and keeps the proportion of the hippo the same on all sizes. Frankly, the overall look is better.
To help with the hand sizing, I’ve included a handy infographic (pun intended). Keep in mind, the garter stitch is very forgiving and will stretch and contract as needed to fit.
PLEASE Note!
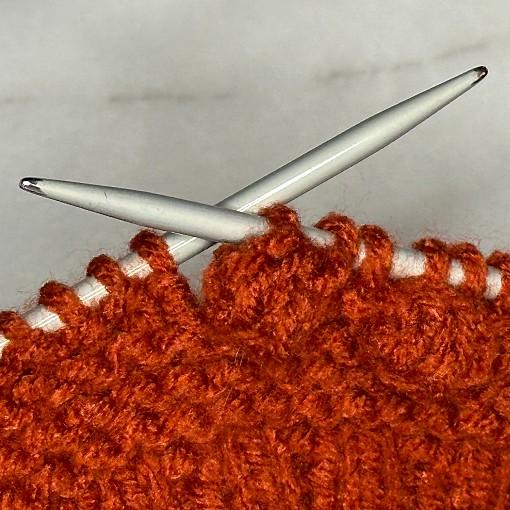
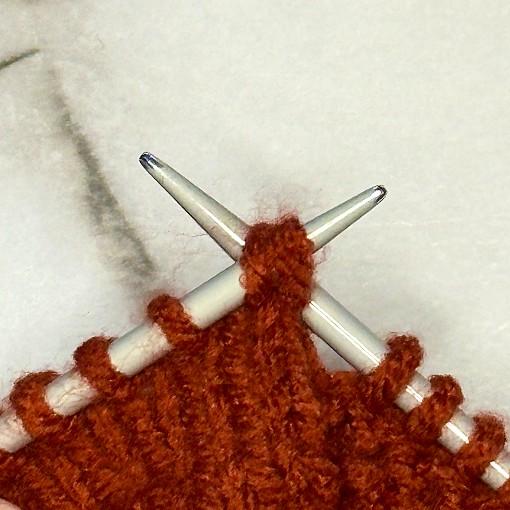
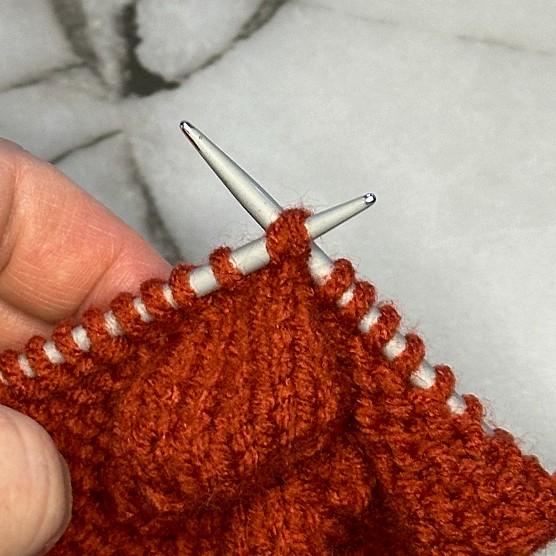
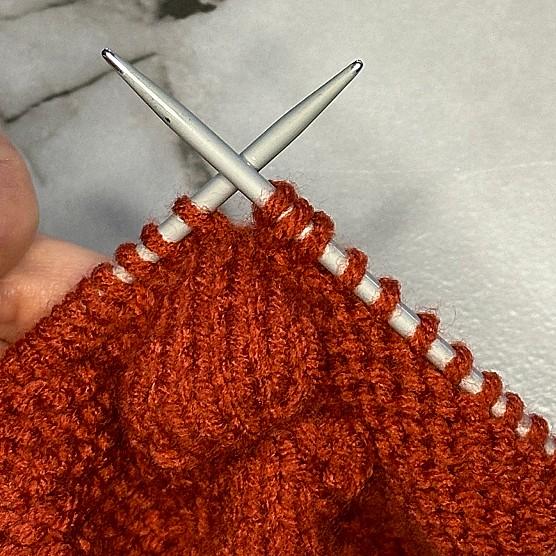
I’ve added photos in the rows of the pattern that have trickier parts like making the bobbles, belly and decreases. If you are a seasoned knitter and don’t need the photos, I’ve written out the rows again without the photos. Regardless…you only need to knit each row once!
RIGHT Hand
Cast on 34
Row 1: (P1 K2). Repeat to the last st. P1.
Row 2: (K1 P2) Repeat to the last st. K1.
Repeat these 2 rows for a total of 6 rows. (If you want to change colours, do so now.)
Row 7 – 12: Knit across
Row 13: K14 Cast on 13 sts. K20. (47 sts) If you need help with casting on you can watch this video.
Row 14: Knit across
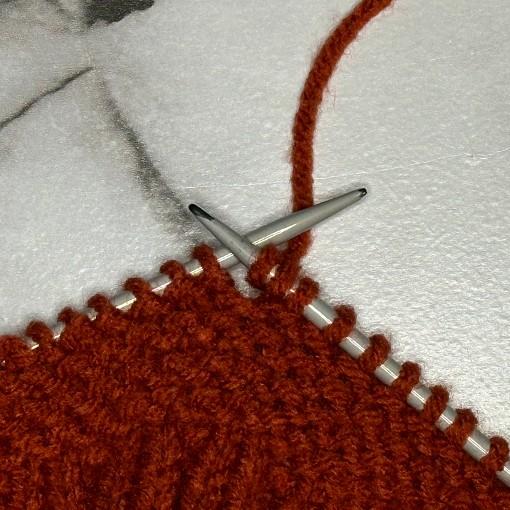
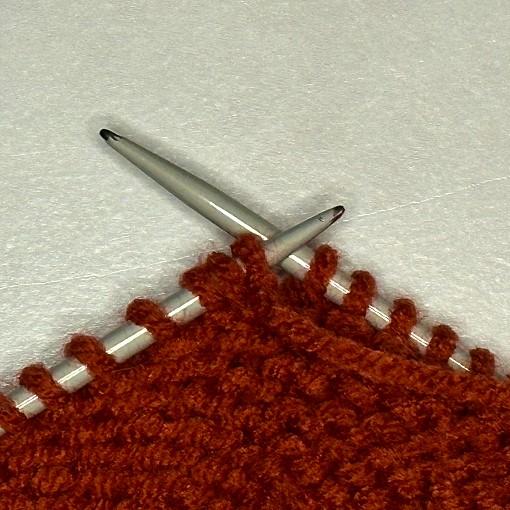
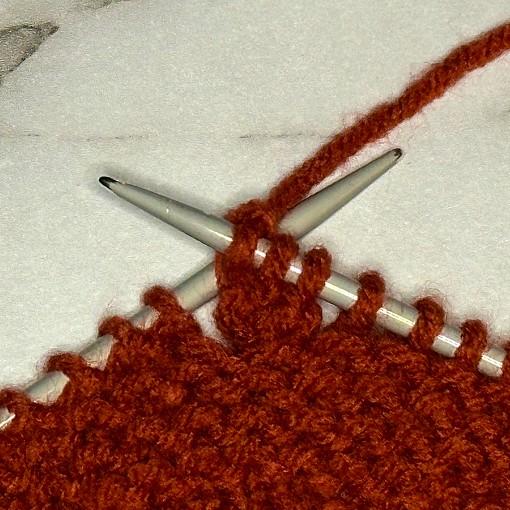
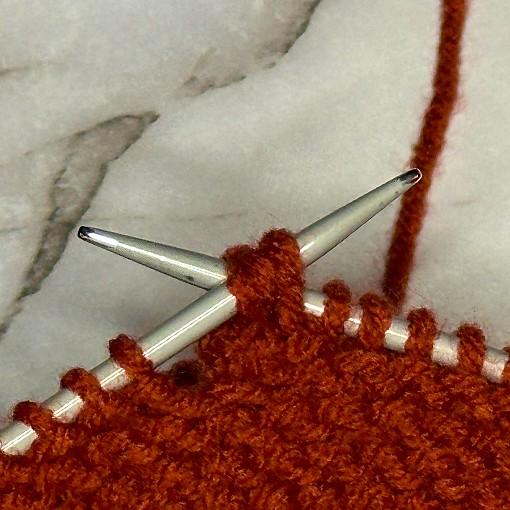
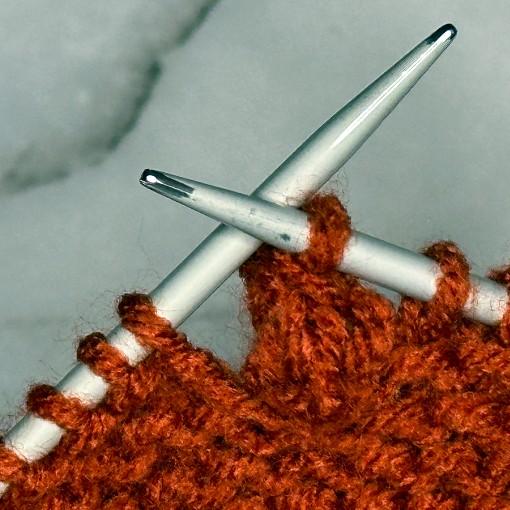
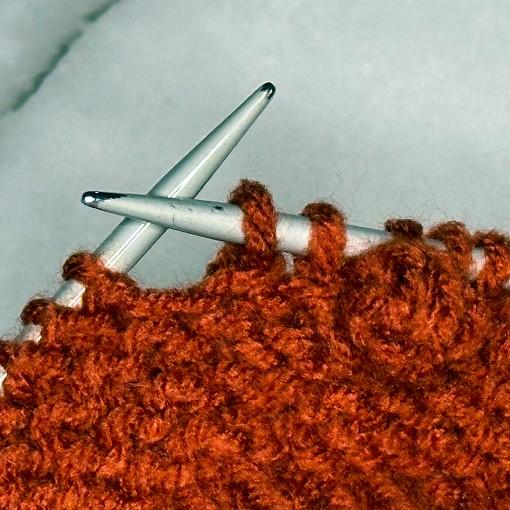
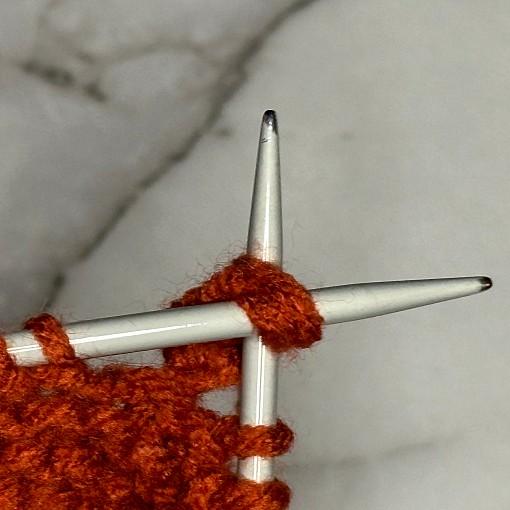
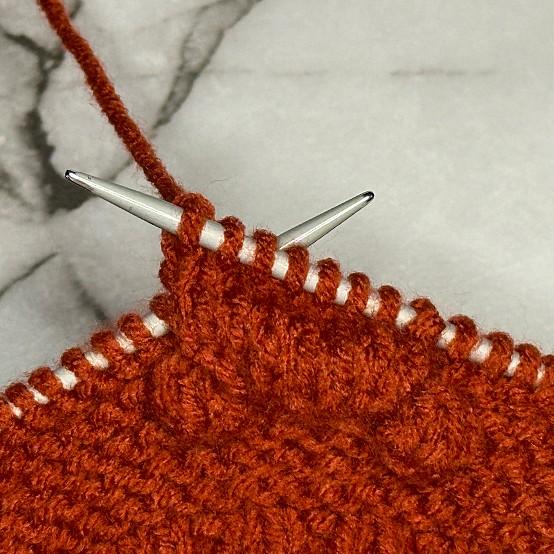
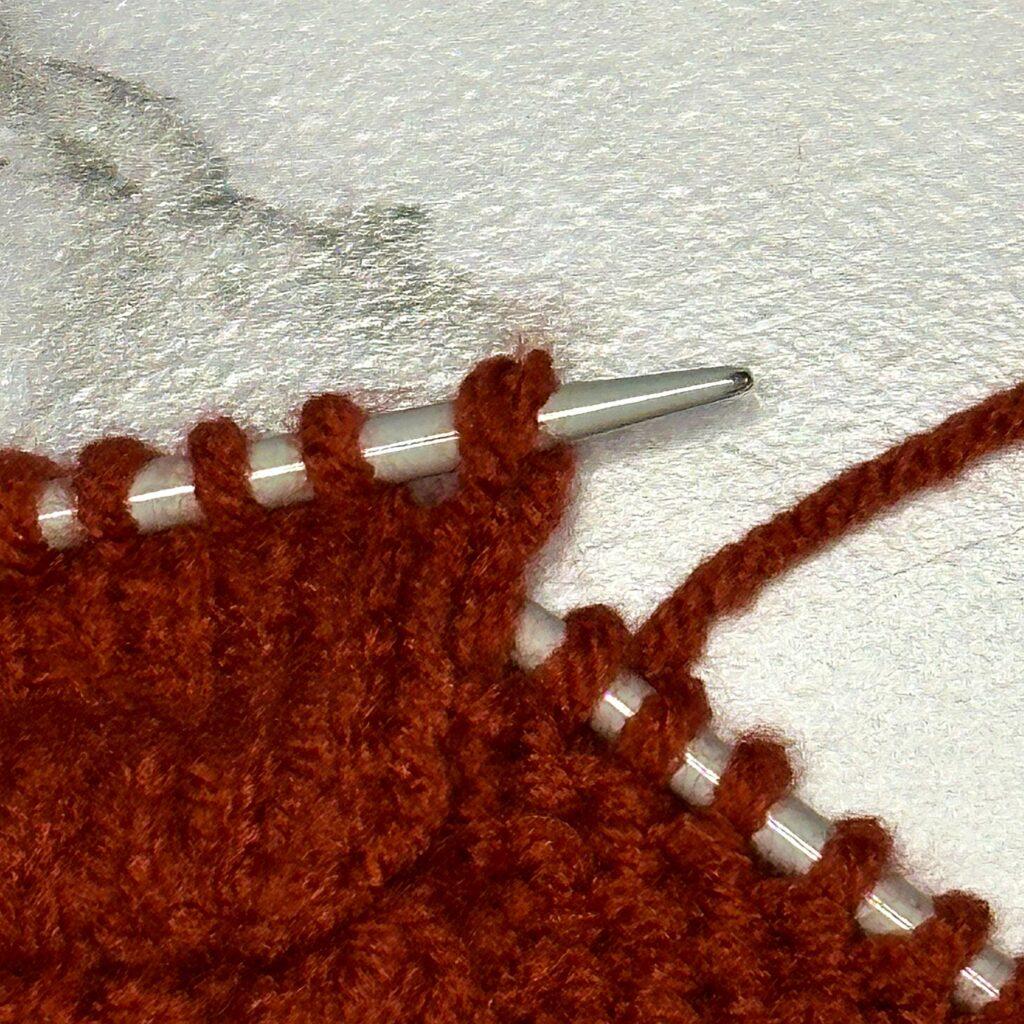
Row 15 (Feet): K35 Bobble 3 (K3 into one stitch. by alternating knitting into the front, the back and the front of the stitch, turn. Working the following rows into the 3 stitches in the one stitch, P3, turn, K3, turn, P3, turn, K3tog (do NOT turn).
Please share this page!
More FREE patterns
Click the pic to read online!!


![]()
![]()


FREE Knitting Graph Paper for Colorwork Knitting


K2,
Bobble 3 (as before),
K8.
***Row 15 repeated without the photos***
Row 15 (Feet): K35 Bobble 3 (K3 into one stitch. by alternating knitting into the front, the back and the front of the stitch, turn. Working the following rows into the 3 stitches in the one stitch, P3, turn, K3, turn, P3, turn, K3tog (do NOTturn). K2, Bobble 3 (as before), K8.
Row 16: K8 P4 K35
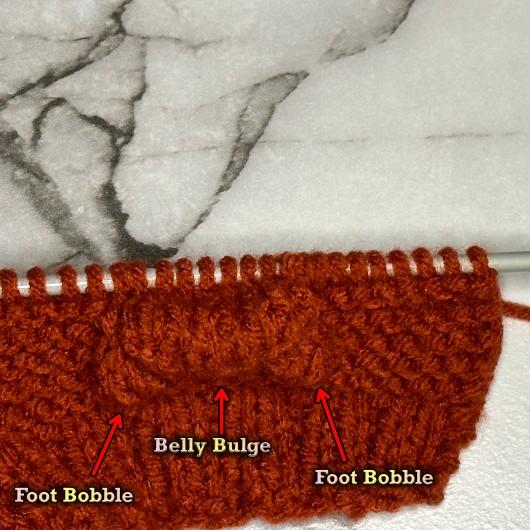
Row 17 (Belly): K14, K2tog K9, K2tog, K9. (K3 into one stitch) twice. Turn. Working the following rows into the 6 stitches in the two stitches,
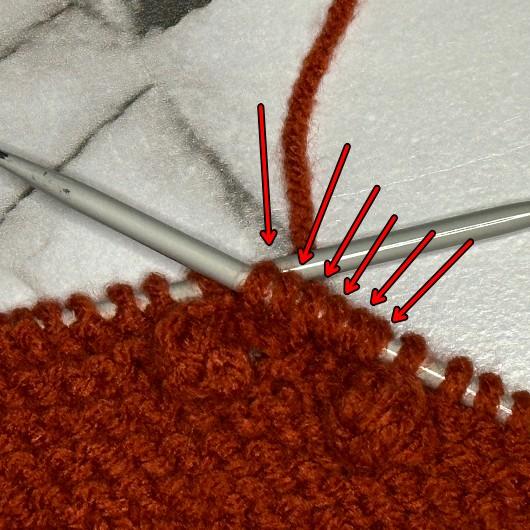
P6, turn, K1, M1 K4 M1, K1 turn,
P8, turn, K8, turn, P8, turn, K8 (do NOT turn.
Continue to work the remaining stitches of the row) K9. (51 sts)
***Row 17 repeated without the photos***
Row 17 (Belly): K14, K2tog K9, K2tog, K9. (K3 into one stitch) twice. Turn. Working the following rows into the 6 stitches in the two stitches, P6, turn, K1, M1 K4 M1, K1 turn, P8, turn, K8, turn, P8, turn, K8 (do NOT turn. Continue to work the remaining stitches of the row) K9. (51 sts)
Row 18: K9 P8 K34
Row 19: K across
Row 20: K9 P8 K34
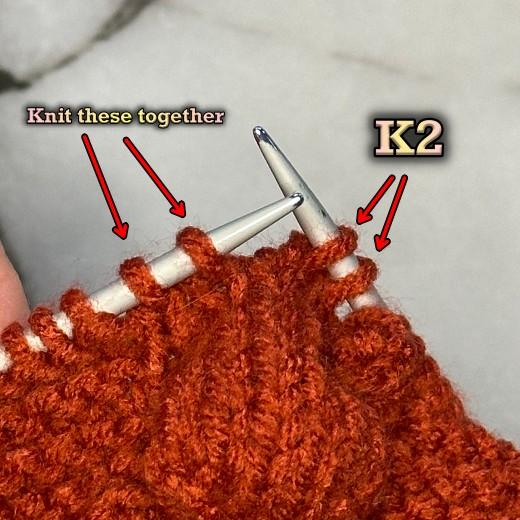
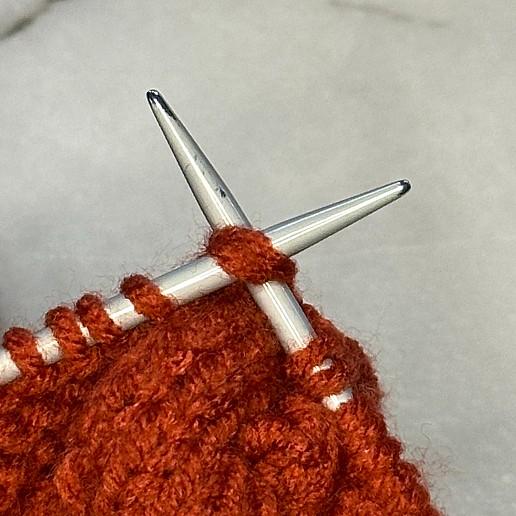
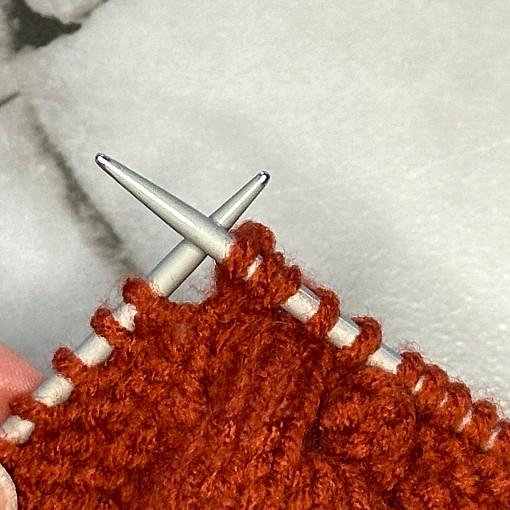
Row 21: K14, K2tog K7 K2tog, K9, K2tog (When making this stitch, pick up a stitch as if to knit. Twist the stitch and place it back on your non-working needle. Knit the 2 stitches together from right to left.)
There is a video I made for another pattern that shows how to twist the stitch to get the nice edge.
K4 K2tog (knit the stitches together from left to right as you normally would.), K9. (47 sts)
***Row 21 repeated without the photos***
Row 21: K14, K2tog K7 K2tog, K9, K2tog (When making this stitch, pick up a stitch as if to knit. Twist the stitch and place it back on your non-working needle. Knit the 2 stitches together from right to left.) K4 K2tog (knit the stitches together from left to right as you normally would.), K9. (47 sts)
Row 22: K9 P6 K32
Row 23 (Arms): K31 Bobble 3, K2tog (like you did before: pick up, twist, knit right to left) K2, K2tog (knit the stitches together from left to right.), Bobble 3, K8. (45 sts)
Row 24: K9, P4 K32
Row 25 (Neck): K14, K2tog K5 K2tog, K9, K2tog (like you did before: pick up, twist, knit right to left), K2tog (knit the stitches together from left to right.) K9. (41 sts)
Row 26: K9 P2 K30
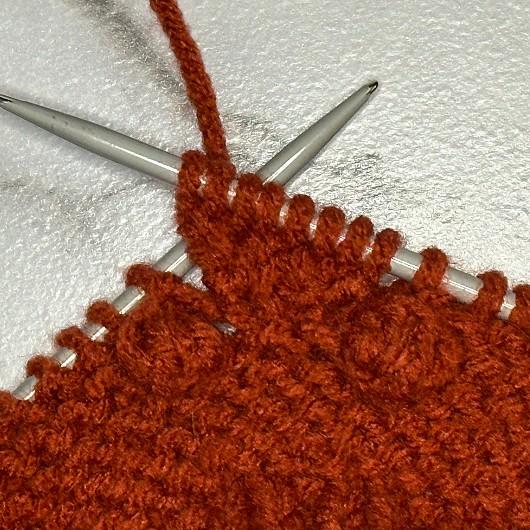
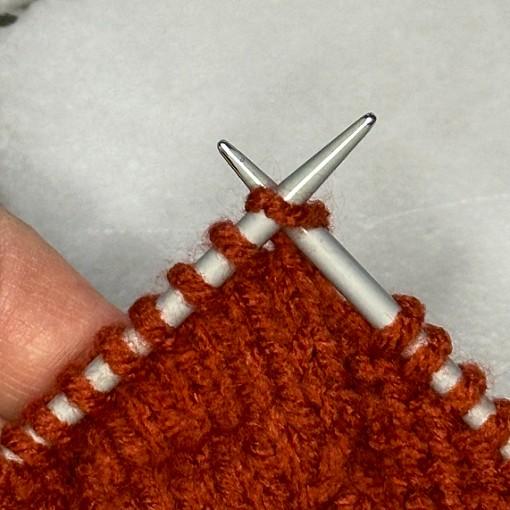
Row 27 (Head): K30 (K3 into one stitch) twice. Turn. Working the following rows into the 6 stitches in the two stitches, P6, turn, K1, M1 K4 M1, K1 turn, P8, turn, K8, turn, P8, turn, K8, turn, P8, turn, K8 (do NOT turn. Continue to work the remaining stitches of the row), K9. (47 sts)
Row 28: K9 P8 K30
Row 29: K14, K2tog K3 K2tog, K9, K2tog (like you did before: pick up, twist, knit right to left) K4 K2tog (knit the stitches together from left to right.), K9. (43 sts)
Row 30: K9 P6 K28
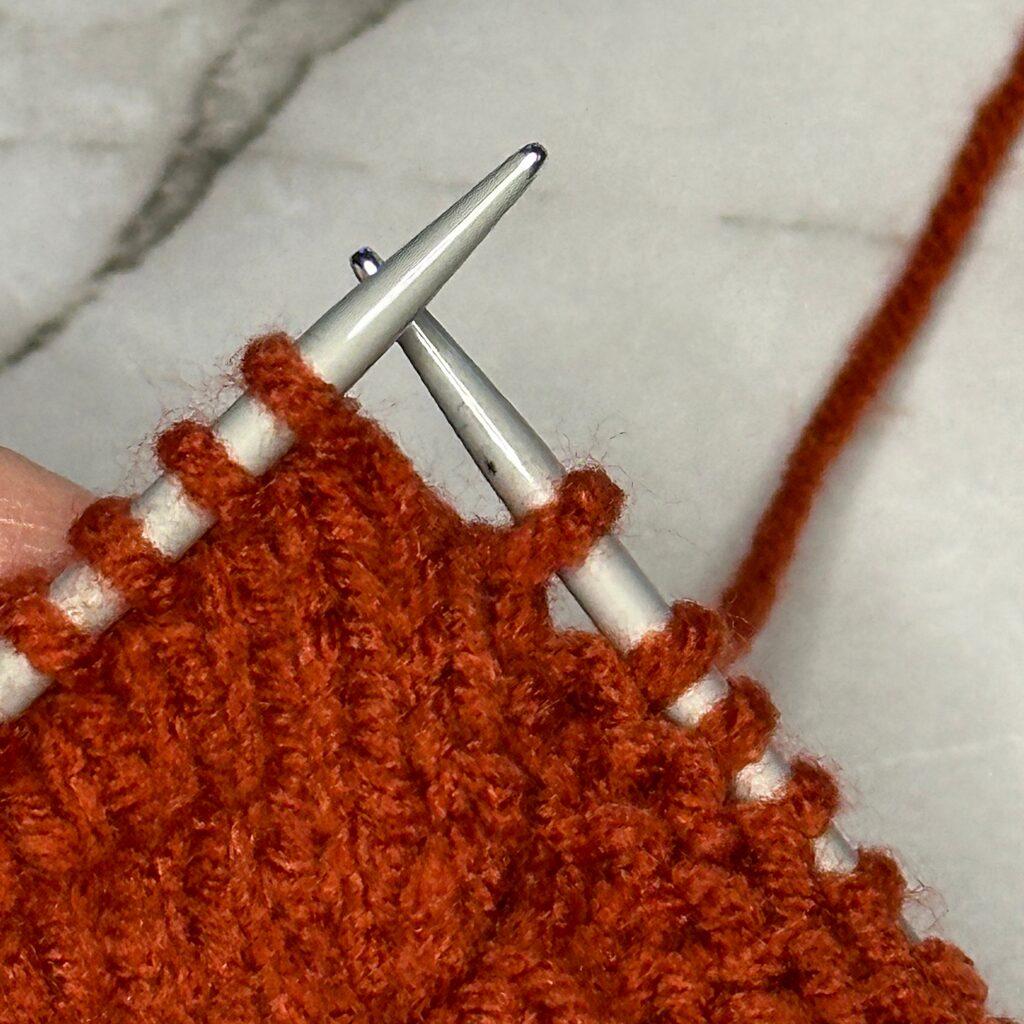
Row 31 (Ears): K28 K2tog (as you did before) AND make a Bobble 3 (pick up 3 sts by knitting into the front, back and front of the 2 sts you’re knitting together).
Continue to make a Bobble 3 like before.
K2, K2tog AND make Bobble 3,
K9. (41 sts)
***Row 31 repeated without the photos***
Row 31 (Ears): K28 K2tog (as you did before) AND make a Bobble 3 (pick up 3 sts by knitting into the front, back and front of the 2 sts you’re knitting together). K2, K2tog AND make Bobble 3, K9. (41 sts)
Row 32: K across
Row 33: K14, K2tog K1 K2tog, K8, K2tog, K2 K2tog, K8 (37 sts)
♥ Row 34 – 38: Knit across
With the RIGHT side facing (If you want to change colours, do so now.)
*Row 39: (P1 K2). Repeat to the last st. P1.
Row 40: (K1 P2) Repeat to the last st. K1.*
Repeat from * to * for a total of 12 rows.
Cast off. Be sure to follow the P1 K2 pattern to create a nice, finished edge.
Make the Thumb
With the RIGHT side facing, Pick up 13 sts from the additional sts you cast on in Row 13. Pick up the st in the twist formed from casting on. If you need help you can watch this video.
With the WRONG side facing
Row 1: (K1 P2) Repeat to the last st. K1.
Row 2: (P1 K2) Repeat to the last st. P1.
Row 3: Repeat row 1
Cast off following maintaining the P1 K2 pattern.
Sew the seams on the thumb and side of the glove.
More of My Stuff on Etsy
You can make a widget like this for your blog or website, too.
Instructions are on my website here: How to Display Etsy Items on Your Website
LEFT Hand
Cast on 34
Row 1: (P1 K2). Repeat to the last st. P1.
Row 2: (K1 P2) Repeat to the last st. K1.
Repeat these 2 rows for a total of 6 rows. (If you want to change colours, do so now.)
Row 7 – 12: Knit across
Row 13: K20 Cast on 13 sts. K14. (47 sts)
Row 14: Knit across
Row 15 (Feet): K8 Bobble 3 (K3 into one stitch. by alternating knitting into the front, the back and the front of the stitch, turn. Working the following rows into the 3 stitches in the one stitch, P3, turn, K3, turn, P3, turn, K3tog (do NOT turn). K2, Bobble 3 (as before), K35.
Row 16: K35 P4 K8
Row 17 (Belly): K9, (K3 into one stitch) twice. Turn. Working the following rows into the 6 stitches in the two stitches, P6, turn, K1, M1 K4 M1, K1 turn, P8, turn, K8, turn, P8, turn, K8 (do NOT turn. Continue to work the remaining stitches of the row) K9, K2tog K9, K2tog. K14. (51 sts)
Row 18: K34 P8 K9
Row 19: K across
Row 20: K34 P8 K9
Row 21: K9, K2tog (When making this stitch, pick up a stitch as if to knit. Twist the stitch and place it back on your non-working needle. Knit the 2 stitches together from right to left.) K4 K2tog (knit the stitches together from left to right.), K9 K2tog K7 K2tog, K14. (47 sts)
Row 22: K32 P6 K9
Row 23 (Arms): K8 Bobble 3, K2tog (like you did before: pick up, twist, knit right to left) K2, K2tog (knit the stitches together from left to right.), Bobble 3, K31. (45 sts)
Row 24: K32, P4 K9
Row 25 (Neck): K9, K2tog (like you did before: pick up, twist, knit right to left), K2tog (knit the stitches together from left to right.) K9, K2tog K5 K2tog, K14. (41 sts)
Row 26: K30 P2 K9
Row 27 (Head): K9 (K3 into one stitch) twice. Turn. Working the following rows into the 6 stitches in the two stitches, P6, turn, K1, M1 K4 M1, K1 turn, P8, turn, K8, turn, P8, turn, K8, turn, P8, turn, K8 (do NOT turn. Continue to work the remaining stitches of the row), K30. (47 sts)
Row 28: K30 P8 K9
Row 29: K9, K2tog (like you did before: pick up, twist, knit right to left) K4 K2tog (knit the stitches together from left to right.), K9, K2tog K3 K2tog, K14. (43 sts)
Row 30: K28 P6 K9
Row 31 (Ears): K9 K2tog AND make a Bobble 3 (pick up 3 sts by knitting into the front, back and front of the 2 sts you’re knitting together). K2, K2tog AND make Bobble 3, K28. (41 sts)
Row 32: K across
Row 33: K8, K2tog, K2 K2tog, K8, K2tog K1 K2tog K14. (37 sts)
♥ Row 34 – 38: Knit across
With the RIGHT side facing (If you want to change colours, do so now.)
*Row 39: (P1 K2). Repeat to the last st. P1.
Row 40: (K1 P2) Repeat to the last st. K1.*
Repeat from * to * for a total of 12 rows.
Cast off. Be sure to follow the P1 K2 pattern to create a nice, finished edge.
Make the Thumb
With the RIGHT side facing, Pick up 13 sts from the additional sts you cast on in Row 13. Pick up the st in the twist formed from casting on.
With the WRONG side facing
Row 1: (K1 P2) Repeat to the last st. K1.
Row 2: (P1 K2) Repeat to the last st. P1.
Row 3: Repeat row 1
Cast off following maintaining the P1 K2 pattern.
Sew the seams on the thumb and side of the glove.
Hints and Tips
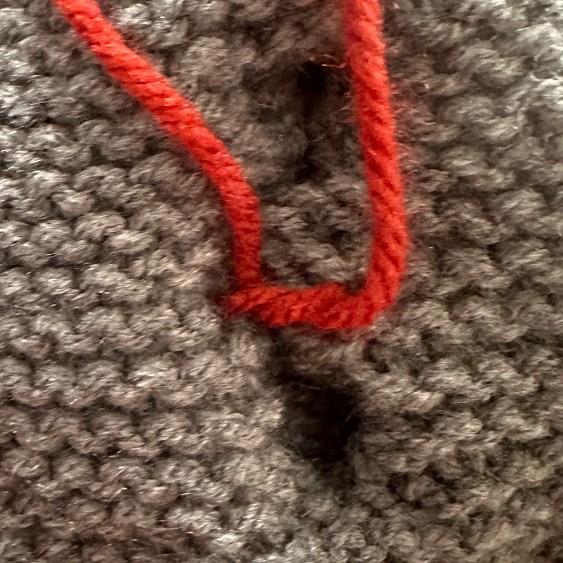
While not necessary, I like to pull the arms closer together for a thinner neck and more noticeable belly. From the back, pass your needle to the front. Pass the yarn over the noticeable decrease stitch beside the arm and under the chest. Go up on the other side of the chest, catch the decrease stitch and pass through the hole next to the arm. Pull together as tight as you like. I leave a bit of slackness.
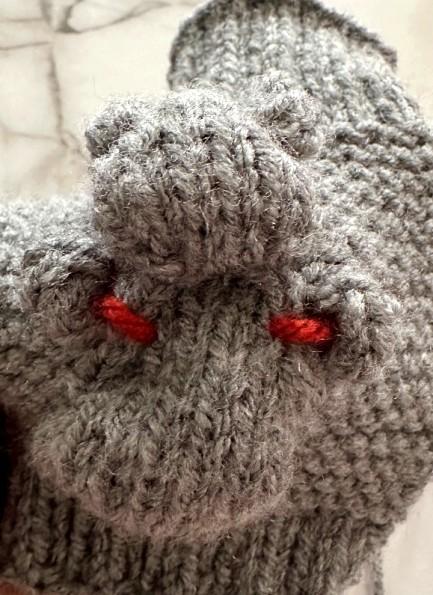
Use the same colour as your hippo.
I used a contrasting colour to showcase the sts.

If you would like a longer glove, make more rows than indicated with the row marked with the ♥ If you are making a longer glove, cast the stitches off loosely to allow for more stretch.
If you want the cuff to be a different colour than the rest of the glove, I’ve indicated when to switch colours. The cuff on the fingers, wrist and thumb are done with the K1 P2 ribbing sections.
You don’t need to add the extra ribbing for the thumb. It is a finished edge so it won’t come undone. You may want to do a quick single crochet around to give it a bit of a fancy edging.
Abbreviations
k – knit
p – purl
k2tog – knit 2 sts together
K3tog – knit 3 sts together
st – stitch
sts – stitches
M1 – Make one (knit wise). Increase one stitch between the stitches. Pick up the yarn between the stitches. Twist slightly.
Like all of my patterns, you have my permission to sell and/or give away the physical items that you make using this pattern. You are NOT permitted to reprint this pattern in any form unless you have obtained my written permission to do so.