Bring a little extra cheer to your holiday season with this free knitting pattern for Christmas reindeer slippers! Designed with a bright red nose and a snug, cozy fit, these handmade knit slippers are the perfect way to keep your feet warm while celebrating the holidays. With slipper sizes for kids and adults, you can make a pair for nearly the whole family and enjoy matching reindeer slippers that are just as fun to knit as they are to wear. They also make wonderful handmade Christmas gifts and are small enough to tuck into stockings as cozy holiday stocking stuffers.


I’ll also be adding more reindeer-themed knitting patterns to go along with these slippers. At the time of writing this, I’m now done on a pair of knitted fingerless gloves. I’m working on a pair of mitts as of writing this. Keep an eye out, or do a quick search above to see if they’re ready, along with plenty of other free knitting patterns for slippers, gloves, hats, and holiday gift ideas you can knit for friends and family.

You can tap on the photo to see the fingerless gloves pattern. It’s in adult sizes only, but if you’d like smaller sizes, let me know in the comments below. Here’s the link too – Rudolf Fingerless Gloves
This is not a beginner-friendly pattern, so you’ll need a solid understanding of knitting techniques before starting. You should be comfortable using a cable needle, working with color changes, and carrying yarn behind your work when switching colors. While there isn’t a video tutorial for this pattern specifically, all the stitches are explained in the Abbreviations section, complete with helpful videos.
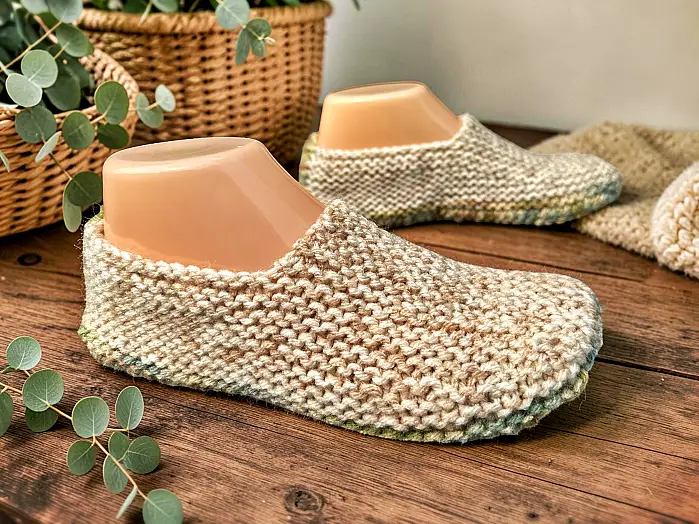
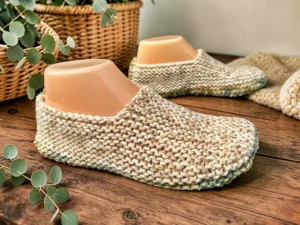
If you are looking for a similar slipper without Rudolph the Red Nosed Reindeer, I have that too! You can click this link to make it for adults and this one to make it for children.
If you would to prefer to support my work and have access to a printable, ad-free version of this pattern, I offer that too. To get the downloadable pattern for a small fee you can get it in my Etsy Shop, LoveCrafts, Buy Me A Coffee and from the shop section in my Shopify shop – KweenBee on Shopify.
If you would prefer to order a Kindle or printed paperback version from Amazon, you can now do so! Shipping is free if you are an Amazon Prime member. Make sure you select the country you are in to take advantage of the free shipping. Click the following link for your country – United States, United Kingdom, Canada, and Australia. The Kindle download and paperback versions are available in English only.
Another way to avoid ads and pop-ups, get instant, PRINTABLE downloads of this pattern and others, is by becoming a Member. When you become a Website Supporter at $4/month, you’ll gain access to exclusive member only posts on Buy Me A Coffee. You can download as many patterns as you like for the same $4 each month. You can go to this page to learn more, become a member and support my work… Exclusive Member Area
Don’t forget to share this page!
Things You Need
WORSTED weight yarn in the following colours The amount for the main colour depends on the size. Adult sizes will take less than one standard ball (482 yards/ 440 m)
MC – main colour
DFC – deer face colour
AC – antler colour
CC – cuff colour
2 sets of 4 mm knitting needles
Cable needle
googly eyes
pom poms
Gauge
In garter stitch
34 rows – 4 inches
18 sts – 4 inches
Size are written as such:
Sizes Child and Women 7-8 (9-10, 11-12, 13-1, 2-3, 4-5, 6-7, 8-9, 10-11, 12)
Men x(x, x, x, x, x, 6, 7-8, 9-10, 11-12)

Men’s sizes are one size smaller than women. A woman size 7 is the same as a man’s size 6, a woman size 11 is the same as a man’s size 10, and so forth.)
Toe Flap
With MC
Cast on 10 (10, 10, 10, 12, 12, 14, 14, 14, 14)
* Row 1: Knit across
Row 2: Knit across * Repeat from * to * for a total of 8 (10, 10, 10, 12, 12, 14, 14, 14, 16) rows
Next row: K4 (4, 4, 4, 5, 5, 6, 6, 6, 6) In DFC (K3 into one stitch) twice. Turn. Working the following rows into the 6 stitches in the two stitches, P6, turn, K1, M1 K4 M1, K1 turn, P8, turn, K8, turn, P8, turn, K8 (do NOT turn). In MC K4 (4, 4, 4, 5, 5, 6, 6, 6, 6).
Next row: In MC K4 (4, 4, 4, 5, 5, 6, 6, 6, 6). In DFC P8. In MC K4 (4, 4, 4, 5, 5, 6, 6, 6, 6).
Next row: In MC K4 (4, 4, 4, 5, 5, 6, 6, 6, 6). In DFC K8. In MC K4 (4, 4, 4, 5, 5, 6, 6, 6, 6).
Next row: In MC K4 (4, 4, 4, 5, 5, 6, 6, 6, 6). In DFC P8. In MC K4 (4, 4, 4, 5, 5, 6, 6, 6, 6).
Next row: In MC K4 (4, 4, 4, 5, 5, 6, 6, 6, 6). In DFC TWK2tog. K4 K2tog. In MC K4 (4, 4, 4, 5, 5, 6, 6, 6, 6).
Please share this page!
More FREE patterns
Click the pic to read online!!


![]()
![]()


FREE Knitting Graph Paper for Colorwork Knitting


Next row: In MC K4 (4, 4, 4, 5, 5, 6, 6, 6, 6). In DFC P6. In MC K4 (4, 4, 4, 5, 5, 6, 6, 6, 6).
Next row: In MC K4 (4, 4, 4, 5, 5, 6, 6, 6, 6). In DFC TWK2tog. K2 K2tog. In MC K4 (4, 4, 4, 5, 5, 6, 6, 6, 6).
Next row: In MC K4 (4, 4, 4, 5, 5, 6, 6, 6, 6). In DFC P4. In MC K4 (4, 4, 4, 5, 5, 6, 6, 6, 6).
Next row: K3 (3, 3, 3, 4, 4, 5, 5, 5, 5). In DFC K3 into one stitch by alternating knitting into the front, the back and the front of the stitch, turn. Working the following rows into the 3 stitches in the one stitch, P3, turn, K3, turn, P3, turn, TWK3tog (do NOT turn). In AC TWK2tog K2tog. In DFC K3 into one stitch by alternating knitting into the front, the back and the front of the stitch, turn. Working the following rows into the 3 stitches in the one stitch, P3, turn, K3, turn, P3, turn, K3tog (do NOT turn). In MC K3 (3, 3, 3, 4, 4, 5, 5, 5, 5). Break DFC yarn.
Next row: In MC K4 (4, 4, 4, 5, 5, 6, 6, 6, 6). In AC P2 In MC K4 (4, 4, 4, 5, 5, 6, 6, 6, 6).
Next row: In MC K3 (3, 3, 3, 4, 4, 5, 5, 5, 5). Pick up the next st with the cable needle. Pull the st BACK. In AC K the st on the non-working needle. In MC K the st on the cable needle. Pick up the next st with the cable needle. Pull the st FORWARD. In MC K the st on the non-working needle, In AC K the st on the cable needle. In MC K3 (3, 3, 3, 4, 4, 5, 5,5, 5).
Next row: In MC K3 (3, 3, 3, 4, 4, 5, 5, 5, 5). In AC P. In MC K2. In AC P. In MC K3 (3, 3, 3, 4, 4, 5, 5, 5, 5).
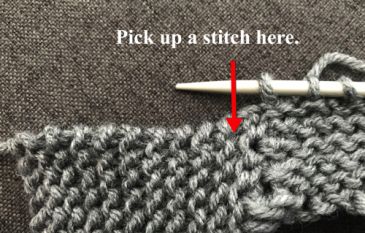
Next row: In MC K2 (2, 2, 2, 3, 3, 4, 4, 4, 4) Pick up the next st with the cable needle. Pull the st BACK, In AC K the st on the non-working needle, IN MC K the st on the cable needle. In AC pick up and K the st BELOW (see photos). In MC K2 . In AC pick up and K in the 2nd st BELOW. Pick up the next st with the cable needle. Pull the st FORWARD. In MC K the st on the non-working needle, In AC K the st on the cable needle. In MC K2 (2, 2, 2, 3, 3, 4, 4, 4, 4).
First Antler


Second Antler


Next row: K2 (2, 2, 2, 3, 3, 4, 4, 4, 4). In AC P. In MC K. In AC P. In MC K2. In AC P. In MC K. In AC P. In MC K2 (2,2, 2, 3, 3, 4, 4, 4, 4).
Next row: In MC K1 (1, 1, 1, 2, 2, 3, 3, 3, 3). Pick up the next st with the cable needle. Pull the st BACK. In AC K the st on the non-working needle. In MC K st on the cable needle. K the next st on the non-working needle. In AC K. In MC K2. In AC K. In MC K. Pick up the next st with the cable needle. Pull the st FORWARD. In MC K the st on the non-working needle, In AC K the st on the cable needle. In MC K1 (1, 1, 1, 2, 2, 3, 3, 3, 3).
Next row: In MC K1 (1, 1, 1, 2, 2, 3, 3, 3, 3). In AC P. In MC K2. In AC P. In MC K2. In AC P. In MC K2. In AC P. In MC K1 (1, 1, 1, 2, 2, 3, 3, 3, 3)..
Next row: In MC K1 (1, 1, 1, 2, 2, 3, 3, 3, 3). In AC K. In MC K8. In AC K. In MC K1 (1, 1, 1, 2, 2, 3, 3, 3, 3).
Next row: In MC K1 (1, 1, 1, 2, 2, 3, 3, 3, 3). In AC P. In MC K8. In AC P. In MC K1 (1, 1, 1, 2, 2, 3, 3, 3, 3). Break AC yarn. (12, 12, 12, 12, 14, 14, 16, 16, 16, 16 sts).
♠ Next row: In MC K across
Next row: K across ♠ Repeat from ♠ to ♠ one more time for Women’s sizes (8-9, 10-11, 12) and Men’s sizes (7-8, 9-10, 11-12)
Next row: K across. Cast on 7 (8, 9, 10, 10, 11, 11, 12, 13, 14). (19, 20, 21, 22, 24, 25, 27, 28, 29, 30 sts)
Next row: K across. Cast on 7 (8, 9, 10, 10, 11, 11, 12, 13, 14). (26, 28, 30, 32, 34, 36, 38, 40, 42, 44 sts)
♦ Next row: K across.
Next row: K across. ♦ Repeat from ♦ to ♦ 2 (2, 2, 2, 2, 2, 3, 3, 3, 4) times more. Break MC
Next row: In CC ♣ K5 M1 ♣ Repeat from ♣ to ♣ to the end of the row. Knit any remaining sts after the last M1 (it will be 4 sts or less).
Next row: P across
♪ Next row K across
Next row: P across. Repeat from ♪ to ♪ 2 times more for all sizes.
Cast off.

Sides of the Slipper
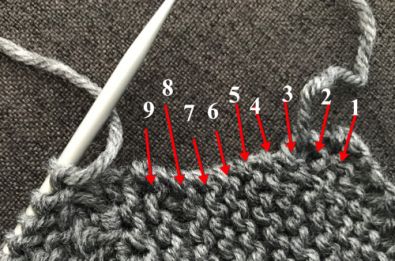
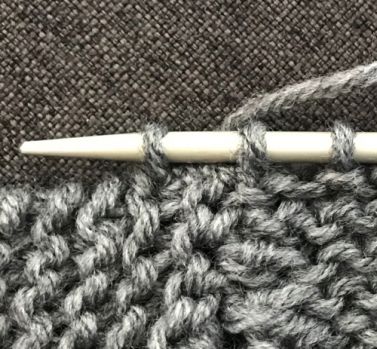
With MC, and the 1st knitting needle, pick up 7 (8, 9, 10, 10, 11, 11, 12, 13, 14) along the bottom of the cuff. Pick up evenly 14 (15, 16, 17, 18, 19, 21, 22, 23, 24) along the side of the toe. With the 2nd knitting needle, pick up 8 (8, 8, 8, 10, 10, 12, 12, 12, 12) along the tip of the toe. With the 3rd knitting needle, pick up evenly 14 (15, 16, 17, 18, 19, 21, 22, 23,24) along the side of the toe. Pick up 7 (8, 9, 10, 10, 11, 11, 12, 13, 14) along the side of the slipper.

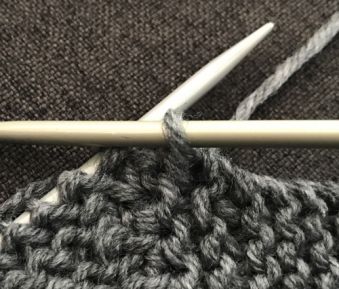
You should now have 3 needles holding stitches with all the points pointing as shown below when laid flat. You also have one spare needle to knit with. You are now going to knit in rows, back and forth with these three needles. Once you finish knitting all the stitches on one needle, move on to the next needle (the point of the needle is right there) until you complete the row.

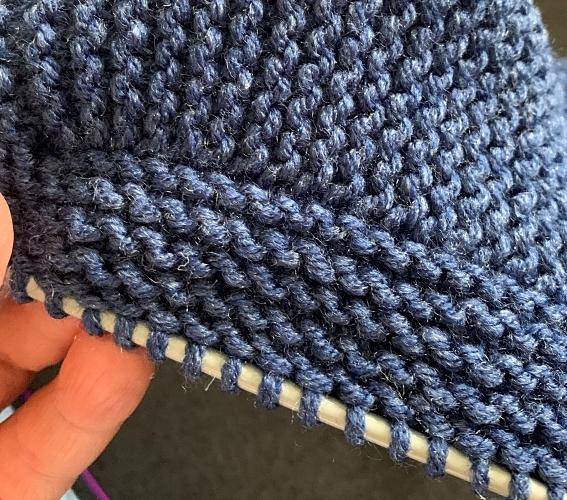
Knit the next 6 (8, 8, 8, 10, 10, 10, 12, 14, 16) rows
There are 3 (4, 4, 4, 5, 5, 5, 6, 7, 8) ridges on the tip of the toe.
The following photo shows the 5 ridges for the women’s size 8-9 or the men’s 7-8.
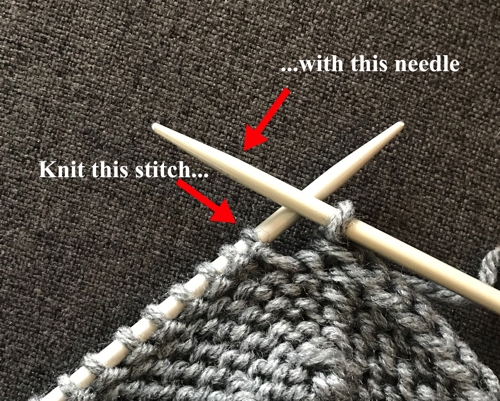
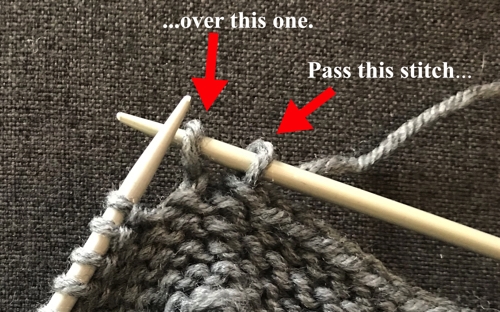
Next Row: With WRONG side facing. Cast off all the stitches from the first needle
loosely. You’ll need to pass the last stitch from the first needle over the first stitch of the toe flap stitches (second needle).
Using the same needle that now has one stitch, knit the remaining 7 (7, 7, 7, 9, 9, 11, 11, 11, 11) stitches of the toe flap. Cast off all the stitches from the third needle loosely. Break yarn.
More of My Stuff on Etsy
You can make a widget like this for your blog or website, too.
Instructions are on my website here: How to Display Etsy Items on Your Website
Making the Sole
If you need more help making the sole you can watch the how-to video. It’s done the same way for this pattern and the one shown in the video.
Next row: In MC, with the RIGHT side facing, attach yarn and knit the first stitch of the cast off stitches by the toe flap (cast off stitch on the right by the point of the needle). K2tog. Knit to the last 2 stitches K2tog. Pick up the cast off stitch by the point of your needle. 8 (8, 8, 8, 10, 10, 12, 12,12, 12 stitches).
Quick tip – wrap the yarn counterclockwise around your needle and turn it down to pull the yarn through the cast off stitch on the right. If you have a hard time doing this, you can also use a crochet hook to pull the loop through and place that loop on your working needle.
You now are working back and forth along the bottom of the foot picking up one cast off stitch on each side as you go.
Next row: Knit across.
ʤ Next row: Pick up the next stitch of the cast off stitches. K2tog. Knit to the last 2 stitches K2tog. Pick up the cast off stitch on the other side of the slipper by the point of your needle. (
8, 8, 8, 8, 10, 10, 12, 12, 12, 12 stitches).
Next row: Knit across ʤ
Repeat from ʤ to ʤ down the entire length of the foot. There are equal number of cast off stitches along each side. How many rows varies depending on the size of slipper you’re making. Be sure to end with a completed knit across row.
Making the Heel
If you need more help making the heel you can watch the how-to video. It’s done the same way for this pattern and the one shown in the video.
You’re now going to make a small triangle to fit in the back of the heel. You’re going to fill this space in the slipper.
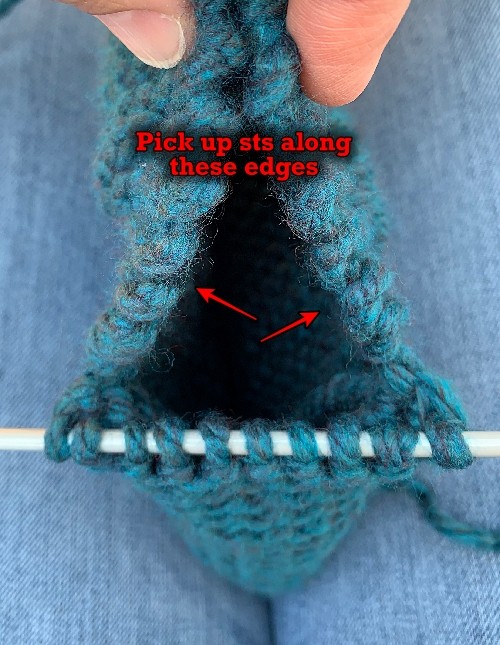
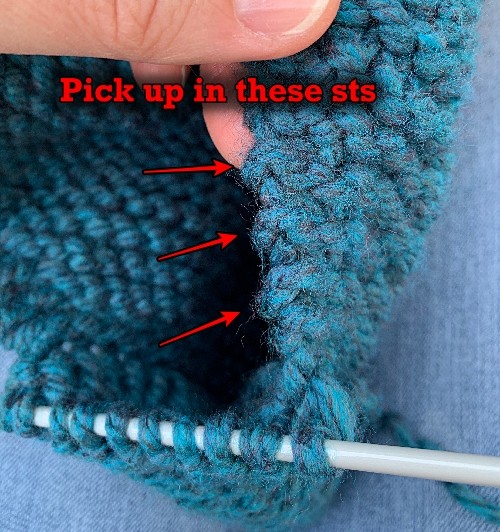
Ҩ Next row: With the RIGHT side facing, pick up a stitch in the row closest to the sole of the slipper. Count how many ridges it is for the size you are making. K2tog twice. Knit to the last 4 stitches. K2tog twice. Count down the same number of ridges on the other side and pick up a stitch in the space beneath it. (6, 6, 6, 6, 8, 8, 10, 10, 10, 10) stitches).
These are rows you knit to form the edges of the slipper.
Next row: Knit across.
Next row: Count down one ridge less than the previous row and pick up a stitch in the space beneath it. K2tog. Knit until the last 2 stitches. K2tog. Count down the same number of ridges and pick up a stitch in the space beneath it on the other side.
Next row: Knit across. Ҩ Repeat from Ҩ to Ҩ until 6 stitches remain. End with the K across row.
Next row: Count down one ridge less than the previous row and pick up a stitch in the space beneath it. K2tog 3 times. Count down the same number of ridges and pick up a stitch in the space beneath it on the other side.
Next row: Knit across.
Next row: Pick up a st along the side as you’ve done before. K2tog, K1, K2tog. Pick up a st along the other side.
Next row: (WRONG side facing you) K2tog, K1, K2tog.
Next row: Knit the 3 sts together.
Break yarn leaving a length of yarn long enough (8ish inches) to sew up the seam and cuff. The cuff will automatically roll over when done.
Make another slipper.
Yes, they do look a little boxy when they’re done and not on a foot. The stretch of the garter stitch allows these slippers to stretch around the contours of any foot easily.
Hints and Tips
Picking up the stitch to make the second branch of the antler is sort of up to you. If you pick up the stitch right below where you just knitted, it won’t be a disaster. Most deer antlers aren’t perfectly symmetrical in real life anyways. In fact, the more off they are, the more desirable; especially if it has a drop tine.
If you want a longer cuff at the top, work more rows than stated in the rows designed with ♪.
When picking up stitches from the cast off row for the sole, be sure you’re really moving on to the next cast off stitch! It’s an easy mistake to pick up a stitch in a stitch you already picked up. If in doubt, give the needle holding the stitches a bit of a tug. You’ll see the yarn move slightly at the very back, closest to the needle. Pick up a stitch at the NEXT cast off stitch.
If you don’t have the same number of stitches on both sides when you are forming the sole, you may have picked up a stitch twice in one stitch or missed one. Don’t worry! This is fixable. You can skip one cast off stitch if you need to make it even, or pick up a cast off stitch twice on the other side. There’s enough stretch in the slipper that any puckering this causes won’t be overly visible if you’re off by a stitch or two.
To speed up finishing the slippers and not have so many ends to sew in, hold the yarn ends to the back of your work as you knit. You can watch the how to video here – how to work in the ends while knitting these slippers.
Abbreviations
K – knit
P – Purl
K2tog – knit 2 together
st – stitch
sts – stitches
M1 – Make one (knit wise). Increase one stitch between the stitches. Pick up the yarn between the stitches. Twist it slightly and place it on your non-working needle. Knit the stitch.
TWK2tog – (Twist and Knit 2 sts together) – Pick up a stitch as if to knit. Twist the stitch and place it back on your non-working needle. Knit the 2 stitches together from right to left. Yes, the video is showing how to make a mushroom, but I’ve cued up how to make the st.
TWK3tog – same as TWK2tog but knit 3 stitches together instead of 2.