Posted on 1 Comment

How to Crochet – Fans Bracelet Pattern – FREE Crochet Pattern

Fans crochet bracelet pattern - how to crochet

I do loves me a good crocheted bracelet. Don’t ask me why…

This is a fairly simple bracelet to make and doesn’t involve any complicated or unusual stitches. If you have successfully completed other crocheted projects, this should be easy for you to make. 

If you are looking to make some extra cash and sell these, which I’m always cool with btw, the cost to make these is next to nothing. You can purchase crochet cotton thread for very reasonable costs, and reuse buttons you’ve collected, found at second hand stores, or even for cheap at many big box stores.


If you’d prefer to download an ad free version of this pattern instead of reading it online, you can get it here Crocheted Fans Bracelet. This crochet pattern is also available for download from my Etsy Shop and Ravelry if you are more comfortable using those retailers. If you like crocheted jewelry as much as I do, I have a number of other jewelry patterns, free and for sale, available.

If you are enjoying the free patterns and would like to see more, then please share my work social media! Those handy little icons down there ?? you do it easily and help me so much ?. If you’d like more information on how you can keep things free, learn how you can Help Support My Work.


Things you need:

1 ball of crochet cotton thread (Main colour)

1 ball complimentary colour of crochet cotton thread (accent colour or whatever you’d like the edging to be).

Size 10 (1.3 mm) crochet hook.

A pretty button

Gauge:

It’s not really important for this project as there isn’t a specific size needed. This pattern can be made as long as you like and you can easily adjust the length to what you want when you’re making it. Each fan adds approximately 3/16″ or 0.5 cm. Generally speaking, I make my bracelets approximately 7 inches (17.5 cm) in length making 27 fans total

The 2 additional rounds added make it about 1/2 inch longer, so if you need a specific length keep that in mind. Another point to remember, is it will stretch a bit longer as the stitches relax over time or if you press it with an iron.

The Pattern:

Chain 4.

Row 1: With main colour of thread, 2dc in 1st ch. Ch2, 3dc in 1st ch of original ch 4 again. Ch3. Turn.

Row 2: 3dc in ch2 space of previous row. Ch2. 3Dc in ch2 space. Tc in the top of the ch3 of previous round. Ch3. Turn.

Repeat row 2 until work measures the desired length. Break thread.

Round 1: You’ll now be working in rounds going around the bracelet. With the start of the bracelet on your right and the last fan you made on your left and with the complimentary colour of thread, join with a sl st in any ch3 or tc space (counts as a dc). Ch2, dc in same space. *Dc in the top of the ch3 or tr of the fan (see photo A). 2 dc in next ch3 or tc space.* Repeat from * to * down the length of the bracelet ending with the 2 dc in the space ch3 or tc space. Dc in the top of each dc of fan. 5dc in the ch2 space of fan. Dc in the top of each dc. Repeat from * to * down the length of the bracelet. Make 3 dc along the length of the dc or ch3 of the original fan (see photo B). 5Dc in the ch1 in the base of the original fan. Make 3 dc along the length of the dc or ch3 of the original fan. Repeat from * to * until at the beginning ch2 of this round. Join with sl st to the top of the 2nd chain. Break thread.

Photo A:

DC in these stitches

Photo B:

Work 3 dc here

Round 2: Start with the first fan on your right and the last fan you made on your left. With the main colour of thread, and working in the back loop of each dc, join thread in back loop of any dc of previous round along the length. Ch1, sc in same st as join. Sc in each dc down the length to the 1st dc of the 5dc of the previous round. 2sc in the first dc of the 5 dc, sc in the next dc. Sc in the 3rd dc, ch10 (or how many you need to go around your button), sl st in the sc you just made. Sc in the 3rd dc again. Sc in the next dc. 2sc in the next dc. Sc in each dc down the length of the bracelet to the 1st dc of the 5dc of the previous round. 2sc in the 1st dc of the 5dc, sc in the next st. 3sc in the middle dc of the 5dc. Sc in the next st. 2sc in the next st. Sc in each dc until reaching the 1st sc of round. Join with sl st to first sc. Break thread.

Sew button to the end opposite the loop.

Work in thread ends.

Wear, give away or sell with pride!

More of My Stuff on Etsy:

ALL patterns on Etsy are
40% off
until March 30


You can make a widget like this for your blog or website, too.
Instructions are on my website here: How to Display Etsy Items on Your Website

Hints and Tips:

No matter what, don’t stretch out the fan portion before you are finished crocheting the entire piece! If you do, it won’t lay flat when you are done.

To save work of sewing in ends, work in the ends of the threads as you are making the bracelet. Hold the thread behind your work and catch it as you make the next 4-5 stitches. Position the joins so there aren’t too many ends in one area.

You can use 1 to 3 colours to make this bracelet. I’ve included an example above with 3 colours. One colour works particularly well to highlight a button.

When making the loop to secure the bracelet, chain as many stitches as you think you may need. Sl st to the sc and pass the button through the loop. If it is too small, undo the sl st and add more chains. If too long, undo the sl st and take some stitches out. It’s easier to check now than later.

Abbreviations:

sc – single crochet

dc – double crochet

tc – treble (or triple) crochet

ch – chain

sl st – slip stitch

st – stitch

sts – stitches

If you have any questions, please feel free to leave a comment or send me your questions here.

If you love this pattern, be sure to check out my other bracelet patterns: Crocheted Waves Bracelet.

Like all my patterns, you are allowed to sell or give away any of the bracelets that you make, but you are not permitted to redistribute this pattern in any way.

Posted on Leave a comment

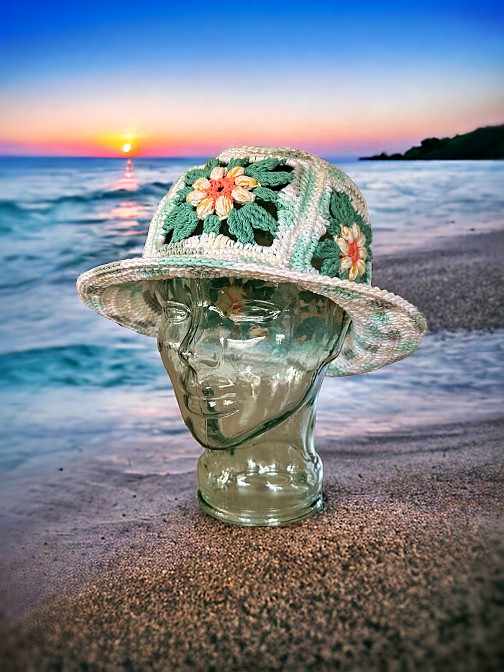
Crocheted Sun Hat and Bucket Hat – FREE Crochet Pattern

Crochet hat pattern - sun hat bucket hat cowboy hat

Gussy it up or wear it plain, this crocheted hat pattern is extremely versatile and makes hats for nearly anyone. Anyone but my 14 year old son apparently, who said, with his usual unenthusiastic honesty, “I don’t like it but it fits OK”. How do I know this? I needed to borrow his head to see how the smaller size fit and felt when wearing, so I guess it’s at least fit approved ¯\_(‘~’)_/¯

This hat can be made a number of ways, either as a wider brimmed sun hat with a flower, plain with the brim shaped similar to a cowboy/cowgirl hat, or with a narrower brim to be a bucket hat. Any way you choose is going to be a success! It’s easy to make, and as long as you know the basics of crochet. Literally if you know how to chain, single crochet (sc) and do a slip stitch (sl st), you’ll be able to make the hat. The flower can be a bit more tricky but I’ve included many photos and detailed descriptions to help you along.

The hat is made with 2 strands worsted weight yarn (or one strand of super bulky yarn) and a larger crochet hook. The stitches need to be fairly tight so the hat will hold it’s shape. Anything larger than the gauge given will make it floppy and the sizing may not work out as written. But, like all my patterns, play with it! If you want a floppy hat, no one said you can’t.

There aren’t any specific measurements for the hat sizing. It’s all very general as there is some stretch to the hat when finished and will form to fit the head it’s covering. If you want your hat to fit a little looser, go for the bigger size. 

The way I thought of it when I was designing this hat, if it fit the glass head, it’s a small/medium size. In other words, a regular sized head. If it fits me and looks a little too big on the glass head, it’s a large/extra large. Let me put it this way. I know I have a big head. If you have ever thought you too might have a big head because hats don’t always fit you, hello fellow large head! If this statement makes no sense to you, go for the small/medium.

If you are looking to make the flower and the leaves, they each have their own page on the website. This pattern turned into a bit of a beast as it is. Both patterns are included with the printable PDF version of the sun and bucket hat.

Love the free patterns? You can say thanks in a couple of ways. You can read more about how you can Support My Work by clicking that link or make a small donation and Buy Me a Coffee. ?? That is a website where you can make a one time donation as a thanks. (FYI I have some great offers if you would like to buy me multiple coffees. You can see those by clicking on the Extras tab or you can click this link Janis Frank Extras).

If you don’t want to or are unable to make a financial donation, sharing this pattern through social media is a great way to help out too! The links below are a super easy way for you to do so.

If you would like to avoid the ads on this page or would like to print the pattern, you can purchase the PDF for a small fee from this website at Sun Hat with Gorgeous Flower or Simple Bucket Hat – Printable Crochet Pattern, through my Etsy shop, LoveCrafts or on Ravelry.

Another way to avoid ads and pop-ups, get instant, PRINTABLE downloads of this pattern and others, is by becoming a Member on this website. When you become a Website Supporter for $3/month, you’ll gain access to exclusive member only posts. These posts contain one click downloads of the patterns. Simply click the Download & Print button. The PDF will automatically download to your computer or smart device. You can then read it on your device or print it at your leisure. You can download as many patterns as you like for the same $3 each month. You can go to this page to learn more, become a member and support my work… Exclusive Member Area

Like all of my patterns you have my permission to sell and/or give away the physical items that you make using this pattern. You are NOT permitted to reprint this pattern in any form unless you have obtained my written permission to do so. 

Abbreviations

Ch – chain

sc – single crochet

sl st – slip stitch

hdc – half double crochet

dc – double crochet

trc – treble crochet

st – stitch

sts – stitches

Things You Need:

6 mm (US 10 or J) crochet hook (or what ever size hook you need to get the correct gauge)

3.5 mm (US 4 or E) crochet hook for top edging, flowers and leaves (all optional)

2 balls Worsted Weight yarn or 1 ball Super Bulky yarn (for the hat itself)

For the sun hat you’l need:

106 gr or 3.7 oz each of the worsted weight colours (216 m or 237 yards)

or

173 gr or 6 oz Super Bulky yarn (170 m or 185 yards) of course it’s less yarn for the bucket hat.

Worsted weight yarn (for band, flowers, leaves and edging)

Stitch markers (at least 8 but it never hurts to have more. See Hints and Tips section)

Tapestry needle (to sew band and flowers, work in the ends)

Gauge

With 2 strands of worsted weight yarn or 1 strand of super bulky yarn

13 sts = 4”

14 rows = 4”

Check your gauge to obtain correct sizing and density of the final fabric created. The stitching needs to be tight to hold the hat shape.

Small/Medium

With 2 strands of worsted weight yarn or 1 strand of super bulky yarn and your 6 mm (US 10 or J) crochet hook…

Ch 2 (make the first chain large enough to fit in all the stitches for Round 1)

Round 1: 12sc around. Do NOT join. The following rounds are worked without joining.

Round 2: Sc in first sc of previous round. 2sc in the next stitch. *Sc in next stitch. 2sc in the next stitch.* Repeat from * to * around. Place stitch marker. (18 sts)

Round 3: *2sc. 2sc in the next stitch.* Repeat from * to * around to stitch marker.

Round 4: *3sc. 2sc in the next stitch.* Repeat from * to * around to stitch marker. 

Round 5: *4sc. 2sc in the next stitch.* Repeat from * to * around to stitch marker.

Round 6: *5sc. 2sc in the next stitch.* Repeat from * to * around to stitch marker.

Round 7: *3sc. 2sc in the next stitch. 2sc. 2sc in the next stitch.* Repeat from * to * around to stitch marker. (54 sts)

Round 8: *4sc. 2sc in the next stitch. 3sc. 2sc in the next stitch.* Repeat from * to * around to stitch marker. (66 sts)

Round 9: Sc around in the back loop.

Crochet in back of loop

Round 10-20: Sc around.

Round 21: *5sc. 2sc in the next stitch.* Repeat from * to * around to stitch marker. (77 sts)

***Please note – If you are making the BUCKET HAT, crochet these stitches as you normally would (through both loops of the stitch). 

  • If you are making the SUN HAT, crochet these stitches through the front loop ONLY!

Round 22: *8sc. 2sc in the next stitch. 9sc. 2sc in the next stitch.* Repeat from * to * around. Sc in the last st. (or crochet as many stitches as you have at the end of the round). (Mark each increase with a stitch marker as you go for a total of 8 markers. You will use these later on. I’m no longer giving final stitch counts. See the Hints and Tips section for clarification if needed).

Round 23: 4sc. 2sc in the next stitch. *9sc. 2sc in the next stitch.* Repeat from * to * around (Crochet as many stitches as you have to the end of the round but there should be 0).

Round 24: *10sc. 2sc in the next stitch. 11sc. 2sc in the next stitch.* Repeat from * to * around. 2sc (or crochet as many stitches as you have to the end of the round). 

***Please note – If you are making the BUCKET HAT sc around and continue on the Round 31.

Round 25: 5sc. 2sc in the next stitch. *11sc. 2sc in the next stitch. 12sc. 2sc in the next stitch.* Repeat from * to * around 2 more times. 11sc. 2sc in the next stitch. 8sc. (or crochet as many stitches as you have to the end of the round).

Round 26: Sc around.

Round 27: *Sc to the next stitch marker. Sc as you normally would. Sc to the next stitch marker. 2sc in this stitch.* Repeat from * to * around.

Other ways to state this round…Increase 4 times evenly around. Or…Increase every other stitch marker.

Round 28: Sc around.

Round 29: *Sc to the next stitch marker. 2sc in this stitch. Sc to the next stitch marker. Sc as you normally would.* Repeat from * to * around. 

Round 30: Sc around and join with a slip stitch. Tie off and break yarn.

Round 31: With the inside of the hat facing you and with one strand of worsted weight yarn and the same hook you made the hat with, sc around. Join with a slip st. Tie off and break yarn.

Top or Crown Edging (Optional)

With 3.5 mm (US 4 or E) crochet hook and a single strand of worsted weight yarn

In the loops left from Round 9, sc in each stitch around. Join with a slip st. Tie off and break yarn.

Work in all ends.

Large/Extra Large 

With 2 strands of worsted weight yarn or 1 strand of super bulky yarn and your 6 mm (US 10 or J) crochet hook…

Ch 2 (make the first chain large enough to fit in all the stitches for Round 1)

Round 1: 12sc around. Do NOT join. The following rounds are worked without joining.

Round 2: Sc in first sc of previous round. 2sc in the next stitch. *Sc in next stitch. 2sc in the next stitch.* Repeat from * to * around. Place stitch marker. (18 sts)

Round 3: *2sc. 2sc in the next stitch.* Repeat from * to * around to stitch marker.

Round 4: *3sc. 2sc in the next stitch.* Repeat from * to * around to stitch marker. 

Round 5: *4sc. 2sc in the next stitch.* Repeat from * to * around to stitch marker.

Round 6: *5sc. 2sc in the next stitch.* Repeat from * to * around to stitch marker.

Round 7: *3sc. 2sc in the next stitch. 2sc. 2sc in the next stitch.* Repeat from * to * around to stitch marker. (54 sts)

Round 8: *5sc. 2sc in the next stitch.* Repeat from * to * around to stitch marker. (63 sts)

Round 9: *8sc. 2sc in the next stitch.* Repeat from * to * around to stitch marker. (70 sts)

Round 10: Sc around in the back loop. 

Crochet in back of loop
Crochet in back loop

Round 11-23: Sc around.

Round 24: *4sc. 2sc in the next stitch.* Repeat from * to * around to stitch marker. (84 sts)

***Please note – If you are making the BUCKET HAT, crochet these stitches as you normally would (through both loops of the stitch). 

  • If you are making the SUN HAT, crochet these stitches through the front loop ONLY!

Round 25: *9sc. 2sc in the next stitch. 10sc. 2sc in the next stitch.* Repeat from * to * around to the beginning of the row. (Mark each increase with a stitch marker as you go for a total of 8 markers. You will use these later on. I’m no longer giving final stitch counts. See the Hints and Tips section for clarification if needed).

Round 26: 6sc. 2sc in the next stitch. *11sc. 2sc in the next stitch. 10sc. 2sc in the next stitch.* Repeat from * to * around 2 more times. 10sc. 2sc in the next stitch. 5sc. (or crochet as many stitches as you have to the end of the round).

Round 27: *11sc. 2sc in the next stitch. 12sc. 2sc in the next stitch.* Repeat from * to * around 3 more times. 

***Please note – If you are making the BUCKET HAT sc around and continue on the Round 34.

Round 28: 6sc. 2sc in the next stitch. *12sc. 2sc in the next stitch. 13sc. 2sc in the next stitch.* Repeat from * to * around 2 more times. 12sc. 2sc in the next stitch. 7sc. (or crochet as many stitches as you have to the end of the round).

Round 29: Sc around.

Round 30: *Sc to the next stitch marker. Sc as you normally would. Sc to the next stitch marker. 2sc in this stitch.* Repeat from * to * around.

Other ways to state this round…Increase 4 times evenly around. Or…Increase every other stitch marker.

Round 31: Sc around.

Round 32: *Sc to the next stitch marker. 2sc in this stitch. *Sc to the next stitch marker. Sc as you normally would.* Repeat from * to * around. 

Round 33: Sc around and join with a slip stitch. Tie off and break yarn.

Round 34: With the inside of the hat facing you and with one strand of worsted weight yarn and the same hook you made the hat with, sc around. Join with a sl st. Tie off and break yarn.

Top or Crown Edging (Optional)

With 3.5 mm (US 4 or E) crochet hook and a single strand of worsted weight yarn

In the loops left from Round 10, sc in each stitch around. Join with a slip st. Tie off and break yarn.

Work in all ends.

Band (Optional)

With a single strand of worsted weight yarn and your large 6mm (US 10 or J) crochet hook: 

Small/Medium – Chain 74 

Large/Extra Large – Chain 79

In second chain from hook, sc in each chain. Bring the ends of the band together and sc in the first sc of previous row. Be sure not to twist. We are now working in rounds. 

Round 2-3: Sc around. Join with a slip st. Tie off and break yarn.

Working in the bottom loop of the original chains…

Work 3 rounds of sc evenly. Join with a slip st. Tie off and break yarn. Work in ends. Attach to the hat sewing the bottom edge of the band to where the brim joins the hat.

Add flowers or other embellishments of your choice.

Click a button to go to the flowers and leaf patterns

Hints and Tips

Colour choice of the 2 different worsted weight yarns can make a huge difference to your final hat. I mixed 2 tones of one colour for the cowboy/cowgirl hat, white and beige for the yellow flower hat, camo and black for the camo bucket hat. Variegated yarns should be used with a solid colour of yarn for the best effect.

Stitch markers make this so much easier. Pieces of yarn also work. I like to use a single bobby pin to note where the round starts and use regular stitch markers for where I’m making the increases. 

Using stitch markers for the sun hat

In regards to the stitch markers, if you don’t want to use the stitch counts given for the rows, you can use the stitch markers instead. Think of it as increase 8 times evenly around. I did the math to figure out what was even spacing and to stagger the increases between the rows around the brim for the crochet purists.

I like to move my start of the round stitch marker as I make each row (the bobby pin in the photos). I leave the increases for the brim where they are. It makes things go a little quicker and avoids keeping track of stitch counts.

Speaking of stitch counts. This is crocheted in the round, meaning if your stitch counts become a little off, too many or not enough between the increases, it will still work out in the long run. I gave the number of stitches between the increases mainly to avoid repeating increases along the brim. It looked very noticeable and unsightly to me when the increases in increases lined up, but I’m a bit of a stickler for things like that. If you could care less how it look, have at it!

Edging is done with worsted weight yarn! If you are using a double strand of worsted weight yarn, select one of the colours and go with that. If you are using Super Bulky yarn, you’ll need to use any complimentary colour of worsted weight yarn you like. You don’t need very much.

Why I made the band the way I did. It’s very easy to twist the band if you join the chain right away. It’s considerably easier to avoid this if you sc in each chain first then bring the ends together.

The cowboy/cowgirl hat is the sun hat but with the brim formed into a more familiar cowboy hat style. 

Crochet cowboy hat - free crochet pattern

The band on the cowboy/cowgirl hat has daisy chain embellishments. You can either embroider them on or use your crochet hook. Place your yarn at the back of the band and pull up a loop to the front. Push your hook through the next hole and pull up a loop. Keep going down the length of the band.

Crochet band for the cowboy and sun hat

Like all of my patterns you have my permission to sell and/or give away the physical items that you make using this pattern. You are NOT permitted to reprint this pattern in any form unless you have obtained my written permission to do so. 

Posted on Leave a comment

How to Crochet Jewelry – Waves Bracelet – FREE Crochet Pattern

Pink Waves Bracelet - FREE Crochet Pattern

I came up with this crochet bracelet design years ago and have been selling the occasional one online for quite some time. They are a great little money maker too! It doesn’t cost much in either material or time so are a great thing to put on your table at the next craft fair you attend. I sell them in my online shop on Etsy. Right now, I’m focused on the more gothic, dark colour version. The lighter, more delicate ones are soon to make an appearance. I do alright with them. It’s one thing that people don’t know they want until they see them so I’m finding marketing a bit of a challenge.

This crochet pattern is short and simple. It’s also easy to make and is a great way to use up those awesome, one of a kind buttons that are just a bit too nice to get rid of but you don’t know what else to do with them.


If you are enjoying the free patterns and would like to see more, then please share my work! Those handy little icons up there ☝? let you do it easily. If you’d like more information on how you can keep things free, learn how you can Help Support My Work

Without further ado, here’s the pattern so you can get your crochet on. And the link in case you’d like to download the ad free version of the pattern instead – Waves Bracelet Crochet Pattern.

If you’re more experienced downloading from Etsy, you can also get that pattern here – Crochet Pattern – How to Crochet a Beautiful Bracelet How to Crochet Jewelry Waves Bracelet

Things you need:

1 ball of crochet cotton thread (Main colour, Size 10)

1 ball complimentary colour of crochet cotton thread (accent colour or whatever you’d like the edging to be. Also size 10).

Size 10 (1.3 mm) crochet hook.

A pretty button (doesn’t matter what size but bigger than your average dress shirt button)

Gauge:

It’s not really important for this project as there isn’t a specific size needed. The pattern, as written, makes a bracelet that is approximately 7 inches (17.5 cm) in length. If you’re so inclined, you can make this bracelet either longer or shorter in 1.5 cm or 5/8 inch increments. For example, if it is too long by 5/8 of an inch, then chain 6 less stitches (69 chains). If you needed the bracelet to be 3 cm longer, chain 12 more stitches than what the instructions give (87 chains).

The Pattern:

Chain 75.

Round 1: With main colour of thread, sc in 2nd chain from hook. Sc in each chain to the end. In the last chain, 5sc. On the opposite side (there is a small loop on the bottom of each sc you made down the chain), sc to the end of the chain. In the last chain 4sc. Join with sl st to the first sc made. Break thread.

Round 2: With complimentary colour of thread, join the thread in the 3rd sc after join of last round. Ch 1, sc in same st as ch 1. 2sc. * ch5, skip next 3 sts, 3sc * repeat from * to * 10 more times. Ch7, sc in middle st of 5sc of previous round. C7, skip next 3 sts, 3sc, repeat from * to * 11 more times. Ch7, sc in top sc of previous round. Ch7, join with sl st to 1st sc of round. Break thread.

Round 3: With main colour of thread, join in 1st ch5 loop of previous round. Working in the loop, ch2, 9dc. 10dc in the each ch5 and ch7 loop around. Join with sl st to top of ch2. Break thread.

Round 4: With complimentary colour of thread, and working in the back loop of each dc, join thread in back loop of the 5thdc of previous round. Ch1, sc in same st as join. Sc in each dc leaving the last dc of shell unworked. In this unworked dc and the 1st dc of next shell, sc2tog. (In other words, sc2tog between the last dc of this shell and 1st dc of the following shell. ) * 8sc, sc2tog * repeat from * to * 9 more times. 8sc. (You should be at the end of the bracelet between the shells) ch 10 (or however many sts you need to slide over your selected button). Sl st in sc just made forming a loop. Sc2tog in the last dc of this shell and in the 1st dc of the next shell. * 8sc, sc2tog * repeat from * to * 11 more times. 8sc. (You should be at the opposite end of the bracelet between the shells). Sc2tog over last and first dc of the end shells. Sc in remaining dc. Sl st to first sc made in the round. Break thread.

Sew button to the end opposite the loop as shown above.

Work in thread ends.

More of my stuff on Etsy:

ALL patterns on Etsy are
40% off
until March 30


You can make a widget like this for your blog or website, too.
Instructions are on my website here: How to Display Etsy Items on Your Website

Hints and Tips:

The counts for how many time you repeat the * to * sections of rounds 2 and 4 will change if you’ve made the bracelet longer or shorter than the 7 inches than I wrote this pattern.

To save work of sewing in ends, work in the ends of the threads as you are making the bracelet.

Hold the thread behind your work and catch it as you make the next 4-5 stitches. The joins are positioned along the pattern so there isn’t too many ends in one area.

You can use 1 to 4 colours to make this bracelet. Just because I’ve only shown examples with 2 colours, doesn’t mean you can’t try something different.

When making the loop to secure the bracelet, chain as many stitches as you think you may need. Sl st to the sc and pass the button through the loop. If it is too small, undo the sl st and add more chains. If too long, undo the sl st and take some out. It’s easier to check now than later. And always easier to sl st to the sc to make sure it’s a good length.

Abbreviations:

sc – single crochet

dc – double crochet

ch – chain

sl st – slip stitch

st – stitch

sts – stitches

2sctog – single crochet 2 stitches together

Posted on 1 Comment

YOuR PaTtERnS ArEn’t FreE – I dON’t LIkE tHE AdS

Pearl Clutching Karen.

There’s an ongoing issue that I want to address. I get emails (social media comments and reviews) similar to the ones I included below, on a weekly basis. I think it’s time I let everyone know how hurtful and demoralizing it is to receive these messages.

A direct email I received.
This was posted publicly by this person on my YouTube video. They knew it would be public. That’s why their username is visible.

For years, I have been designing and writing knitting (and a few crochet) patterns and publishing them through various distributors. One of these has been my website. It’s gone though many iterations over the course of my career but my patterns have ALWAYS been free to read online. I make my designs accessible to EVERYONE. They are the complete patterns with links to how-to videos, photos and more. I do this so anyone can access my work. No strings attached. No login required. 

Yes, they are ad supported. I also advertise what I make through other marketplaces like Amazon, Etsy, etc. It’s how I can make a living from doing this without charging users directly. I see it as a win-win for everyone. But here is where the problem lies. It’s the printing of my patterns…

I had to disable printing on my website because people would print off everything on my site, without so much as a thank you. My work that I had literally spent weeks designing and more weeks into formatting and publishing. Yes. It does take that long. 

To offset the loss of ad revenue from the “print users” not being on or returning to the website, I charge a small fee ($3 USD) to print my patterns. I chose this price keeping in mind that a standard ball of acrylic yarn available at a big box store is a little less than $4. This is the yarn users need to make my patterns. I didn’t think it was too much to ask for my work. Apparently, to some, it is. And somehow translates into accusations like those in the attached email and YouTube comment. Messages that illicit some strong emotions in me. But I digress. 

Tbh, these comments are completely inaccurate. Printing of the patterns isn’t necessary. You can pull up my website on your phone or tablet and scroll along with the pattern as you knit. Wanting a paper copy is a preference, not a requirement to read the pattern. 

The impetus of making this post is how I continually feel like I need to defend the choices I make in how I disseminate my patterns. I’m tired of defending my right to be financially compensated for my work. I shouldn’t be berated over a $3 purchase or membership subscription fee because someone doesn’t want to scroll down a webpage to read the pattern. Or even worse, being accused of lying that the patterns aren’t free. If you can read it in its entirety, how is that not free?

In short…Please stop sending me messages like this. 

For the sake of my mental health, I will selectively acknowledge or respond to the selfish, entitled haters. If you don’t like it, don’t use my work. It’s the simplest solution to the “problem”.

If you’re reading this, I probably sent you the link in response to your very unnecessary message. Keep that in mind when you feel the need to “reach out” to creators on the internet. We’re real people. What you said was hurtful. And untrue.

But if you stumble upon this inadvertently and are a supporter of my work, thank you soooo much! To those who have purchased my patterns and given me great reviews; you are why I keep going and I truly thank you!! 

TL;DR – Stop bitching about my patterns not being free or about the ads. You CAN read them for free on my website. I’m allowed to profit from my work. 

Posted on Leave a comment

Patreon Shop – KweenBee Knitting Patterns

Patreon Shop - KweenBee Knitting Patterns

I’m now selling my patterns on Patreon! So far I have listed 9 of my knitting patterns for a variety of knitted slippers and my fingerless gloves. More are coming soon. If there is anything you’d like to see now, let me know in the comments below.

Click the button below to view my shop now!

But wait! There’s more…

Become a patron on Patreon to get the patterns for FREE! All of the patterns for sale in my shop become available to you to download, ad free. I currently have a list of over 28 crochet, but mostly, knitting patterns you can download with a single click. These are listed as posts on my Patreon.

If you have any questions, please let me know. You can contact me through my online form here – Contact Me.

Posted on Leave a comment

Fox Takes On A Badger – Fox Attacks Badger Video with Highlight Shorts

Fox attacks badger - Fox v Badger video still

Watch the full documentary style video that tells the entire story of the fox and badger interaction. Click to watch ??

Watch the highlight from the videos with the shorts

Thanks for watching! I know that this set of videos doesn’t reflect the overall direction and niche of this website. This was such a unique thing to watch that I just wanted to share it with as many folks as I could. And for the record though I didn’t mention it anywhere else, everyone present was Team Fox. And somehow the badger was a “He” and the bad guy. I tried to present this as unbiased as possible but after watching the foxes all spring (my parents) and I hearing about them, it was hard not to feel attached to the foxes.

Posted on Leave a comment

Seven Crochet Jewelry Patterns

How to crochet jewelry with seven crochet patterns

It’s taken me a while to get around to adding this to my website for some reason. Not sure why that happened? Anywho, for those who enjoy crocheting something different or want quick, fast and cheap things to sell online or in craft markets, these crochet patterns are for you.

All of them are available for FREE on my website to read. They always will be. If you want or prefer to have a printed version, I have the downloadable and printable versions available through a number of retailers. You can get it from my:

Etsy shop

this website

if you would prefer a paperback version, you can order it through Amazon. Below I’ve included the countries that its available in. Be sure to pick your country, or the one closest to you so you won’t have to pay for shipping if you are an Amazon Prime member.

United States

United Kingdom

Canada

Australia

If you would prefer to read the patterns for free on my website, you can click any of the titles below and it will take you directly to the pattern. Not all of them are on here. I’m not sure why?? I plan to fix this ASAP.

Crocheted Victorian Charm Bracelet and Necklace

Quick to Make Crochet Bracelet

Crocheted Waves Bracelet

Crocheted Fans Bracelet

Crochet Flower and Friendship Bracelets

Beads and Ladders Crochet Bracelet

Crochet a Necklace: Mandala & Flower

I’ve made a note to myself about the last two patterns not being on my website for free. I’m very sorry about that. Trust me, it’s in the pile of things to do.

Posted on Leave a comment

How to Crochet Leaves – FREE Crochet Pattern to Make a Leaf for Sun Hat

FREE Crochet Leaf Pattern

This crocheted leaf pattern was designed to go along with a flower made for my sun hat (Crochet sun hat pattern coming soon!). As I was getting the photos ready, I was thinking how these could also be used to highlight many things, especially a crocheted wreath for autumn. I like how the leaves look in the variety of fall colours.

The leaves by themselves aren’t really much to look at. I didn’t want them to be. I want them to be fill behind the flowers highlighting the flowers themselves.

I’m going to add buttons so you can easily go to the pages with the flower pattern and the hat (when it’s done).

This pattern isn’t available alone as a downloadable and printable PDF. It will be included with the sunhat/bucket hat/cowboy/cowgirl hat along with the flower. It was easier to divide the hat, flower and leaf into separate pages on the website.

If you know someone you think would like this post, by all means, share it! The more eyeballs on my work the better. If you are enjoying the free patterns, this is a great way to support my work. You can also Buy Me A Coffee or check out the other options when you check out the Help Support My Work page. If you’re looking for something new to share with your friends on your website or on social media, these links will help you do it.

The hints and tips for how to finish and press the flowers is written below the pattern. You can also ask any questions in the comments section.

Abbreviations

ch – chain 

sc – single crochet

hdc – half double crochet

dc – double crochet

trc – treble crochet

sl st – slip stitch

st – stitch

sts – stitches

Things You Need

Worsted weigh yarn (small quantities from your stash)

3.5 mm (US E or 4) crochet hook.

Stitch marker. (A piece of yarn or bobby pin will do).

The Pattern

Please note: 

The rounds end in various places on the bottom of the leaf. Regardless, the stitch counts work. Round 4 evens out the stitches giving the leaf shape.

Ch 2 (make the first chain large enough to fit in all the stitches for Round 1)

Round 1: 11sc in 2nd chain from hook. Do NOT join. Begin to work in the round.

Round 2: In the 1st sc from the last round, sc. 2sc in the next st. In the next st, sc, hdc. In the next st, hdc, dc. 2dc in the next 2 sts. In the next st, dc, hdc. In the next st, hdc, sc. 2sc in the next st. Sc.

Round 3: *2sc in the next st, sc* Repeat from * to * 2 more times. In the next st, sc, hdc. (Mark the hdc with a stitch marker). In the next st, hdc, dc. 2dc in the next st. In the next st, dc, trc. In the next st, trc, dc. 2dc in the next st. In the next st, dc, hdc. In the next st, hdc, sc. *Sc, 2sc in the next st* Repeat from * to * 2 more times.

Round 4: *2sc, 2sc in the next st* Repeat from * to * 2 more times. (Or as many sc as you need to get to the stitch marker). Sc in the stitch marked with the marker. As you normally would, proceed as follows, hdc, 4dc. In the next st (the 1st trc from the previous round), dc, trc. Ch 2 sl st in the 2nd chain from hook. In the next st, trc, dc. As you normally would, proceed as follows, 4dc, hdc, sc. *2sc, 2sc in the next st* Repeat from * to * 4 more times. 2Sc. Sl st in the next st. Break yarn. Tie off.

Work in the ends and sew into place.

More of my stuff on Etsy

ALL patterns on Etsy are
40% off
until March 30


You can make a widget like this for your blog or website, too.
Instructions are on my website here: How to Display Etsy Items on Your Website

Hints and Tips

Add extra embroidered details to the leaves as you see fit. Maybe some extra veining lines or stitches around the edge in a slightly darker shade? It really is up to you.

As much as I wanted to avoid pressing anything, the leaves also need to be pressed to have them lie flat. Be sure to do a test swatch BEFORE you press anything. Acrylic is notorious for melting and losing all constructive properties when pressed. It melts to give a flat, melted look. Press with your iron at the lowest setting possible. Press with a damp cloth between the iron and the leaf. Iron the leaves from the BACK only! 

Posted on Leave a comment

How to Crochet a Flower – FREE Crochet Pattern to Make a Multi-Layer Flower

FREE crochet flower pattern

This flower is specifically designed to go with a crochet sun hat/bucket hat/cowboy/cowgirl hat that I’m making. The downloadable and printable version of this pattern is available in the pattern for the multi-hat. It was too much to add to the pattern for the hat on the website. It was easier to make its own page.

I have a number of tips and suggestions if you run into problems making the flower. Scroll down to the bottom of the page to read them or to leave a question in the comments.

Though the flower is made with yarn in this example, I originally designed it to be made with crochet cotton thread and a small crochet hook. You can add it to a band and make a bracelet with it. I have a number of bracelet designs that it will work with Waves BraceletFans Bracelet PatternQuick Crochet Bracelet and my Friendship Flower Bracelet. The last one has a flower already made for it but you could easily switch that flower out for this one.

I’m not making any promises, but I do hope to post other flowers and leaves on my website. I have a number of different designs I’d like to get on there. At the moment I have two flowers (3 if you count the one included with my crocheted slippers) that you can take a look at. The flowers are done with crochet cotton thread and I’m not sure how large the final flower would be when made with yarn. I’ll leave that up to you. The one that would also work with the yarn is my Free Crochet Flower Pattern. It should be slightly smaller than the flower I designed to go with the hat.

If you know someone you think would like this post, by all means, share it! The more eyeballs on my work the better. If you are enjoying the free patterns, this is a great way to support my work. You can also Buy Me A Coffee or check out the other options when you check out the Help Support My Work page. If you’re looking for something new to share with your friends on your website or on social media, these links will help you do it.

Abbreviations

ch – chain 

sc – single crochet

hdc – half double crochet

dc – double crochet

sl st – slip stitch

st – stitch

sts – stitches

More of my stuff on Etsy:

ALL patterns on Etsy are
40% off
until March 30


You can make a widget like this for your blog or website, too.
Instructions are on my website here: How to Display Etsy Items on Your Website

Things You Need

3 to 4 colours of worsted weigh yarn (all small amounts from your stash)

3 mm (US E or 4) crochet hook

Tapestry needle

The Pattern

With the colour you want for your centre…

Ch 2 (make the first chain large enough to fit in all the stitches for Round 1)

Round 1: 10sc in 2nd chain from hook. Join with sl st in first sc. Break yarn. Tie off.

Round 2: With the 2nd colour of your choice, join in any sc. 2sc in same st as join, 2sc around. Join with sl st to 1st sc of the round. 

Round 3: Ch 1. Sc in same st as join. *Ch 4. Starting in 2nd ch from hook, sc in each chain. (3sc total). Join with sl st in the starting sc of the Ch 4. Sc in the next 2 stitches. Ch 5. Starting in 2nd ch from hook, sc in each chain. (4sc total). Join with sl st in the starting sc of the Ch 5. Sc in the next 2 stitches.* Repeat from * to * around, ending with 1sc instead of the 2sc. Join with sl st to 1st sc of the round. Break yarn. Tie off.

Round 3 completed

Round 4: Working in the Ch 4 petals only! And with your third colour choice…

Join with sl st in 1st sc before Ch 4 petal. *In the bottom loops of the chain from the previous round, sc, hdc in 1st loop. Hdc, dc in the 2nd loop, 2dc in the 3rd loop. In the top loop, 2dc, ch 2 sl st in 2nd chain from hook, 2dc. Working on the other edge of the petal, 2dc in the 1st st, dc, hdc in the 2nd st, hdc, sc in the 3rd st. Sl st in the sl st of the previous round. Hold the next Ch 5 petal back, sc in the next 2nd sc between the Ch 5 and the next Ch 4 petal.* Repeat from * to * around. Join with sl st in the 1st sc of the round. Break yarn. Tie off.

How to crochet a flower - free crochet pattern

Round 5: Working in the Ch 5 petals only! And with your third (or fourth) colour choice…

Join with a sl st to the 1st loop of the chain. *2sc in the same loop, 2hdc in the 2nd loop, 2dc in the 3rd and 4th loops. In the top loop, 2dc, ch 2 sl st in 2nd chain from hook, 2dc. Working on the other edge of the petal, 2dc in the 1st and 2ndsts, 2hdc in the 3rd st, 2sc in the 4th st. Ch1. Hold the ch 4 petal forward and working in the next ch 5 petal.* Repeat from * to * around. Join with a sl st to the 1st sc of the round. Break yarn. Tie off.

Work in all the ends. Attach to the hat. Link coming soon!

Hints and Tips

Add extra embroidered details to the flowers as you see fit. I made the white/blue flower with one solid colour with the middle and inside leaves to see what it would look like. I didn’t like it so did some quick stitches around to make it green. 

Advice for working in the ends of the flowers. It’s easier to hold the yarn to the back of your work and catch the yarn for 4 or 5 sts as you are making the flower. It works the ends in automatically and involves less to fix at the end.

As much as I wanted to avoid pressing anything, the flowers need to be pressed to have the petals lie flat. Be sure to do a test swatch BEFORE you press your flower. Acrylic is notorious for melting and losing all constructive properties when pressed. It melts to give a flat, melted look. Press with your iron at the lowest setting possible. Press with a damp cloth between the iron and the flower petals. Iron the flower from the BACK

It’s not overly important where you single crochet between the petals on Round 4. As long as it’s only 1sc and consistent.

I like to stagger where I join the next colour of yarn to make the flower. That way the joins and end points don’t all congest at one point.

Posted on Leave a comment

Members Only Demo – Easy Downloads and Printing

Not sure if you want to become a member of this site? Use this sample page to see how easy it is to read, download and print the patterns in the paid member areas. All ad and pop-up free.

If you would like to access the other patterns on this site, please click the button below to help support this website and future patterns by becoming a member. Downloads are unlimited and you always have access to the exclusive Members Only pattern pages as long as your subscription is up to date. Cancel your subscription at any time.

Netflix & Knit (this scarf)

Hipster Wine Cozy

Fun and Easy Monster Purse

Click the button above ????if you wish to access the patterns in the member only areas.

Posted on Leave a comment

How to Crochet Jewelry – Make a Friendship Flower Bracelet

Crochet Jewelry - Flower and Friendship Bracelet

Back on the bracelet train! This time it’s for a beautiful flower that you can wear on your wrist. I really enjoy making these. It’s fun to see how the flower will turn out based on the colour choices you choose.

The bracelet itself is a very basic design and can easily be made as a stand alone item. Originally, I was going to publish the bracelet alone but figured if you wanted to make just the bracelet you could make that choice all on your own.

And if you are looking to make some extra cash and sell these, which I’m always cool with btw, the cost to make these is next to nothing. You can purchase crochet cotton thread for very reasonable costs at second hand stores and at many big box stores.

Like all my crochet patterns, if you would prefer to read this off line, you can also download the ad free, PDF version for a small fee/donation from another section of my website. To do so, please click on the following link – How to Crochet – Flower and Friendship Bracelet. If you’d prefer, you can also get the download through my Etsy Shop or on Ravelry. (You can click any of those blue links to download.)

Crochet Jewelry - Flower and Friendship Bracelet

Another way to avoid ads and pop-ups, get instant, PRINTABLE downloads of this pattern and others, is by becoming a Member on this website. When you become a Website Supporter for $3/month, you’ll gain access to exclusive member only posts. These posts contain one click downloads of the patterns. Simply click the Download & Print button. The PDF will automatically download to your computer or smart device. You can then read it on your device or print it at your leisure. You can download as many patterns as you like for the same $3 each month. You can go to this page to learn more, become a member and support my work… Exclusive Member Area

If you are enjoying the free patterns and would like to see more, then please share my work! Those handy little icons down there ?? let you do it easily and helps me so much. If you’d like more information on how you can keep things free, learn how you can Help Support My Work.


Things you need:

3 balls of complimentary colours of crochet cotton thread 

(a darker one for center, a mid-range colour for the inner flower and a lighter colour for the outside petals. Choose one of these colours to make the bracelet. The yellow bracelet uses a dark center, medium colour for the interior flower and bracelet and a variegated thread colour for the outside petals. Mix it up with more thread colours if you like!).

Size 10 (1.3 mm) crochet hook

Crochet Jewelry - Flower and Friendship Bracelet

Gauge:

It’s not really important for this crochet project as there isn’t a specific length needed. Make the bracelet as long as you like, keeping in mind that the stitches will relax and stretch a bit over time. The flower shouldn’t be too floppy though. You want the stitches tight enough to hold the shape of the outside petals.

Bracelet:

Ch 10

Sc in 2nd chain from hook. 3 sc. 3 sc in next ch. 4 sc. Ch 1. Turn.

Next row: Skip the 1st st. Work the remaining sts in the back loop of the sts of the previous row (creates the ridge effect). 4 sc. 3 sc in the next st. 3 sc. Sc2tog. Ch 1. Turn.

Repeat this row until the bracelet is the length you want. Remember, it will stretch a bit over time!

Don’t turn your work when working the last row!

Edging (optional): If you are making the edging a different colour, don’t ch 1! Break your thread and rejoin with new colour in the last st you made.

1 sc in each row down the length of the bracelet. 3 sc in the corner st. 2 sc. Pull up a loop in the next 3 sts. Draw through all 3 loops on the hook. 2 sc. 3 sc in the corner st. 1 sc in each row down the length of the bracelet to the corner. 3 sc in the corner. Sl st in each st to the corner. Join to original corner.

More of my stuff on Etsy


You can make a widget like this for your blog or website, too.
Instructions are on my website here: How to Display Etsy Items on Your Website

Flower:

Ch 2.

Round 1: 6 sc in 2nd ch from hook. Join with sl st to 1st sc.

Round 2: Ch 1. 2 sc in same st. 2 sc in each sc of previous round. Join with sl st in the back loop of 1st sc. (12 sc). Break thread.

Round 3 – Inner Flower (with mid-range colour): Work all of the following sts in the back loop of previous round. Ch 3 (counts as 1st dc). 3 trc. 1 dc. Drop the loop from hook. Insert hook through the top of the Ch 3 of this round and the loop you just dropped.

Inner petal - crocheted flower

Draw the loop through the top of the ch 3.

Inner petal - crocheted flower

Ch 3. *1 dc, 3 trc, 1 dc. Drop the loop from hook. Insert hook through the top of the dc at the start of this petal and the loop you just dropped. Draw a loop through the top of the 1st dc of this petal. Ch 3.* Repeat from * to * around. Join with sl st to the top of starting ch 3 of this round. Break thread.

Round 4 – Base of Outer Petals (with lightest colour): *Ch 11. Sl st in 10th ch from hook. Sl st in the st behind next petal of previous round (the stitch you created when you dropped the loop and pulled it through the dc).* Repeat from * to * around. Join last sl st to 1st ch 1 of the round.

Round 5 – Outer Petals: *Make the stitches between these symbols { } in the 10 ch loop. {1 sc. 1 hdc. 4 dc. 2 trc. Ch 3. Sl st in top of last trc made (picot made). 2 trc. 4 dc. 1 hdc. 1 sc. Sl st.} Sl st in the space behind the next petal of the inner flower (dropped stitch space).* Repeat from * to * around. Join last sl st to base of first petal. Break thread. Work in ends.

Make Ties:

Cut 4 strands of thread approximately 8 inches long. They can be the same colour as the bracelet, one of the colours used for the flower or a combination of all the thread colours. Fold in half. Insert your crochet hook through the front of your bracelet. Catch the middle where folded and pull through to form a small loop. Feed the 8 ends of the thread through the loop. Pull tight. Trim ends so they are all the same length. Repeat for the other end.

crochet flower bracelet - how to make the tie

Hints and Tips:

No matter what, don’t stretch out the bracelet before you are completely finished crocheting the entire piece! If you do, it won’t lay flat when you are done.

To save work of sewing in ends, work in the ends of the threads as you are making your project. Hold the thread behind your work and catch it as you make the next 4-5 stitches.

I decided to use ties to secure this bracelet so you can tighten it as the stitches relax and the bracelet loosens over time. This way, you can make it tighter to keep from spinning around the wrist when worn. It drives me nuts when bracelets do that ?

Instead of making ties, you can use a button to secure the bracelet. When making the edging, add the loop to pass over the button. I’ve also used a snap to secure it when making only the bracelet with no flower. If you decide to use a button or snap, it’s best to overlap the bracelet a bit by an inch or so. Make it longer than you would if using ties.

bracelet ends.

Using variegated thread for the bracelet and/or flower will give unique effects. In particular, it will make stripes on the bracelet and blotches of colour for the petals. You may need to play with it a bit to see what kind of effect you’ll get. Colour changing threads vary in how much change there is and how much thread is dyed the colours.

You can make the bracelet thicker than what is written here. You can easily add stitches. Make sure they’re equal on both sides. For example, this row could read… Skip the 1st st. Work the remaining sts in the back loop of the sts of the previous row (creates the ridge effect). 6 sc (instead of 4). 3 sc in the next st. 5 sc (instead of 3). Sc2tog. Ch 1. Turn. You’d chain 14 instead of 10 at the start. Just remember to keep the 3 sc in the middle, forming the point, the same.

Abbreviations:

ch – chain

sc – single crochet

hdc – half double crochet

dc – double crochet

trc – treble (or triple) crochet

sc2tog – single crochet 2 stitches together

sl st – slip stitch

st – stitch

sts – stitches

If you have any questions, please feel free to leave a comment or send me your questions here


Posted on 3 Comments

How to Crochet Slippers for Children and Adults – FREE Crochet Pattern!

Crochet Slippers for Children Adults - FREE Crochet Pattern!

There is a certain charm to handmade slippers. Whether they be knitted or crocheted, it is always nice to be able to give someone a handmade gift, even if that gift is for yourself! Made with basic crochet stitches, you can make these very cute and practical slippers for just about anyone. With this pattern you can make slippers from a child’s size 11 to 4, a women’s size 5 to12 and a men’s size 6 to 11). This pattern includes instructions detailing how to make the adorable flower, though the more manly types may not appreciate the extra splash of colour. 

How to crochet slippers

If you would prefer to have a permanent copy of this pattern on your smartphone, tablet or computer, you can also download it directly from my website here: Crocheted Ribbed Slippers. A new window will open when you click the link so you won’t lose this page.

And if you are enjoying the free videos and patterns, then please share my work! Those handy little icons along the side or bottom of the page let you do it easily and help me more than you know ?. If you’d like more information on how you can keep things free, learn how you can Help Support My Work.


Gauge in sc

9 sts = 5 cm

9 rows = 5 cm

Things You Need:

220 gr of any colour worsted weight yarn

Size 4.25 crochet hook (or whatever size you need to obtain the correct gauge)

Darning needle (to sew seams and work in the ends)

The Pattern:

The first set of brackets are are written for children’s sizes (11-12, 1-2, 3-4). The second set of brackets are women’s sizes (5-6, 7-8, 9-10, 11-12) and men’s (*-*, 6-7, 8-9, 10-11). Men’s size 6-7 are the same as a women’s 7-8. A men’s 8-9 the same as a woman’s size 9-10. A men’s 10-11 the same as a woman’s size 11-12. There is no men’s size 4-5 given.

How to Crochet Slippers

Ch (22, 26, 30) (30, 32, 32, 36). Sc in 2nd chain from the hook and each remaining ch. Ch 1, turn.

(21, 25, 29 sts) (29, 31, 31, 35 sts)

Row 2: Sc in back loops of next (6, 8, 10) (10, 10, 10, 12) sts. Hdc in next (9, 9, 9) (9, 11, 11, 11) sts. Sc in back loops of next (6, 8, 10) (10, 10, 10, 12) sts. Ch 1, turn. (The sc in the back loops forms the ribbed pattern.)

Row 3: (6, 8, 10) (10, 10, 10, 12) sc in back loops. (9, 9, 9) (9, 11, 11, 11) hdc. (6, 8, 10) (10, 10, 10, 12) sc in back loops. Ch 1, turn. Repeat this row until work measures (6.5, 7.5, 8.5) (8.5, 9, 9.5, 11) cm from the edge. (21, 25, 29 sts) (29, 31, 31, 35 sts)

Next row: (6, 8, 10) (10, 10, 10, 12) sc in back loops. (2, 2, 2) (2, 3, 3, 3) hdc, inc 1 hdc in next hdc, 3 hdc, inc 1 hdc in next hdc, (2, 2, 2) (2, 3, 3, 3) hdc, (6, 8, 10) (10, 10, 10, 12) sc in back loops. Ch 1, turn. (23, 27, 31 sts) (31, 33, 33, 37 sts)

Next row: (6, 8, 10) (10, 10, 10, 12) sc in back loops, (11, 11, 11) (11, 13, 13, 13) hdc, (6, 8, 10) (10, 10, 10, 12) sc in back loops. Ch 1, turn. Repeat this row until work measures (9, 10, 11) (11, 12, 13, 14) cm from the edge.

Next row: (6, 8, 10) (10, 10, 10, 12) sc in back loops, (3, 3, 3) (3, 4, 4, 4) hdc, inc 1 hdc in next hdc, (3, 3, 3) (3, 5, 5, 5) hdc, inc 1 hdc in next hdc, (3, 3, 3) (3, 4, 4, 4) hdc, (6, 8, 10) (10, 10, 10, 12) sc in back loops. Ch 1, turn. (25, 29, 33 sts) (33, 35, 35, 39 sts)

Next row: (6, 8, 10) (10, 10, 10, 12sc in back loops, (13, 13, 13) (13, 15, 15, 15) hdc, (6, 8, 10)(10, 10, 10, 12sc in back loops. Ch 1, turn. Repeat this row until work measures (11, 13, 14)(14, 15, 16, 17) cm from the edge.

More of my stuff on Etsy

ALL patterns on Etsy are
40% off
until March 30


You can make a widget like this for your blog or website, too.
Instructions are on my website here: How to Display Etsy Items on Your Website

Create the Top of the Slipper

Next row: Ch (6, 6, 6)(6, 8, 8, 8), turn. (You should have the ch 1 from your previous row already completed.) Sc in 2nd chain from the hook and each remaining ch. (6, 8, 10)(10, 10, 10, 12) sc in back loops, (13, 13, 13) (13, 15, 15, 15) hdc, (6, 8, 10) (10, 10, 10, 12) sc in back loops. (31, 35, 39 sts)(39, 43, 43, 47 sts)

Next row: Ch (7, 7, 7) (7, 9, 9, 9), turn. Sc in 2nd chain from the hook and each remaining ch. 10 sc in back loops, 15 hdc, 18 sc in back loops. Ch 1, turn. (37, 41, 45 sts) (45, 51, 51, 55 sts)

Next row: (12, 14, 16) (16, 18, 18, 20) sc in back loops, (13, 13, 13) (13, 15, 15, 15) hdc, (12, 14, 16) (16, 18, 18, 20) sc in back loops. Ch 1, turn. Repeat this row until work measures (13.5, 15, 17) (17, 18, 19, 20.5) cm from edge.

Shape Toe:

Children’s Size (11-12) 

Next row: *Sc, 2 sctog in back loops* (repeat from * to * 3 times more), 13 hdc, *2 sctog, sc in back loops* (repeat from * to * 3 times more). Ch 1, turn. (29 sts)

Next row: 8 sc in back loops, 13 hdc, 8 sc in back loops. Ch 1, turn.

Next row: 8 sc in back loops, 2 sctog, 9 hdc, 2 sctog, 8 sc in back loops. Ch 1, turn. (27 sts)

Next row: 8 sc in back loops, 11 hdc, 8 sc in back loops. Ch 1, turn.

Next row: *Sc, 2 sctog in back loops* (repeat from * to * 2 times more), 2 sc in back loops, 11 hdc, 2 sc in back loops, *2 sctog, sc in back loops* (repeat from * to * 2 times more). Ch 1, turn. (23 sts)

Next row: 6 sc in back loops, 11 hdc, 6 sc in back loops. Ch 1, turn.

Next row: 6 sc in back loops, 2 sctog, 7 hdc, 2 sctog, 6 sc in back loops. Ch 1, turn. (21 sts)

Next row: 6 sc in back loops, 9 hdc, 6 sc in back loops. Ch 1, turn.

Next row: *2 sctog in back loops* (repeat from * to * 4 times more), 1 hdc, *2 sctog in back loops* (repeat from * to * 4 times more). Ch 1, turn. (11 sts)

Last row: Pull up a loop (scroll to bottom for photos) in each st. (12 loops on hook). Break yarn and draw yarn through each loop. Pull tight. Sew up toe seam.

Children’s Size (1-2)

Next row: *Sc, 2 sctog in back loops* (repeat from * to * 3 times more), 2 sc in back loops, 13 hdc, 2 sc in back loops, *2 sctog, sc in back loops* (repeat from * to * 3 times more). Ch 1, turn. (33 sts)

Next row: 10 sc in back loops, 13 hdc, 10 sc in back loops. Ch 1, turn.

Next row: 10 sc in back loops, 2 sctog, 9 hdc, 2 sctog, 10 sc in back loops. Ch 1, turn. (31 sts)

Next row: 10 sc in back loops, 11 hdc, 10 sc in back loops. Ch 1, turn.

Next row: *Sc, 2 sctog in back loops* (repeat from * to * 2 times more), sc in back loop, 11 hdc, sc in back loop, *2 sctog, sc in back loops* (repeat from * to * 2 times more). Ch 1, turn. (25 sts)

Next row: 7 sc in back loops, 11 hdc, 7 sc in back loops. Ch 1, turn.

Next row: 7 sc in back loops, 2 sctog, 7 hdc, 2 sctog, 7 sc in back loops. Ch 1, turn. (23 sts)

Next row: 7 sc in back loops, 9 hdc, 7 sc in back loops. Ch 1, turn.

Next row: *2 sctog in back loops* (repeat from * to * 2 times more), sc in back loops, 2 sctog twice, 1 hdc, 2 sctog twice, sc in back loops *2 sctog in back loops* (repeat from * to * 2 times more). Ch 1, turn. (15 sts)

Last row: Pull up a loop (scroll to bottom for photos) in each st. (16 loops on hook). Break yarn and draw yarn through each loop. Pull tight. Sew up toe seam.

Children’s Size (3-4) Women’s Size (5-6)

Next row: *Sc, 2 sctog in back loops* (repeat from * to * 4 times more), sc in back loops, 13 hdc, sc in back loops, *2 sctog, sc in back loops* (repeat from * to * 4 times more). Ch 1, turn. (35 sts)

Next row: 11 sc in back loops, 13 hdc, 11 sc in back loops. Ch 1, turn.

Next row: 11 sc in back loops, 2 sctog, 9 hdc, 2 sctog, 11 sc in back loops. Ch 1, turn. (33 sts)

Next row: 11 sc in back loops, 11 hdc, 11 sc in back loops. Ch 1, turn.

Next row: *Sc, 2 sctog in back loops* (repeat from * to * 2 times more), 2 sc in back loop, 11 hdc, 2 sc in back loop, *2 sctog, sc in back loops* (repeat from * to * 2 times more). Ch 1, turn. (27 sts)

Next row: 8 sc in back loops, 11 hdc, 8 sc in back loops. Ch 1, turn.

Next row: 8 sc in back loops, 2 sctog, 7 hdc, 2 sctog, 8 sc in back loops. Ch 1, turn. (25 sts)

Next row: 8 sc in back loops, 9 hdc, 8 sc in back loops. Ch 1, turn.

Next row: *2 sctog in back loops* (repeat from * to * 3 times more), 2 sctog twice, 1 hdc, 2 sctog twice, *2 sctog in back loops* (repeat from * to * 3 times more). Ch 1, turn. (13 sts)

Last row: Pull up a loop in each st. (14 loops on hook). Break yarn and draw yarn through each loop. Pull tight. Sew up toe seam.

Women’s Size (7-8, 9-10) Men’s Size (6-7, 8-9)

Next row: 18 sc in back loops, 2 sctog, 11 hdc, 2 sctog, 18 sc in back loops. Ch 1, turn. (49 sts)

Next row: 18 sc in back loops, 13 hdc, 18 sc in back loops. Ch 1, turn.

Next row: *Sc, 2 sctog* (repeat from * to * 5 times more) in back loops, 13 hdc, *2 sctog, sc* (repeat from * to * 5 times more) in back loops. Ch 1, turn. (37 sts)

Next row: 12 sc in back loops, 13 hdc, 12 sc in back loops. Ch 1, turn.

Next row: 12 sc in back loops, 2 sctog, 9 hdc, 2 sctog, 12 sc in back loops. Ch 1, turn. (35 sts)

Next row: 12 sc in back loops, 11 hdc, 12 sc in back loops. Ch 1, turn.

Next row: *Sc, 2 sctog* (repeat from * to * 3 times more) in back loops, 11 hdc, *2 sctog, sc* (repeat from * to * 3 times more) in back loops. Ch 1, turn. (27 sts)

Next row: 8 sc in back loops, 11 hdc, 8 sc in back loops. Ch 1, turn.

Next row: 8 sc in back loops, 2 sctog, 7 hdc, 2 sctog, 8 sc in back loops. Ch 1, turn. (25 sts)

Next row: 8 sc in back loops, 9 hdc, 8 sc in back loops. Ch 1, turn.

Next row: *2 sctog in back loops* (repeat from * to * 3 times more), 2 sctog twice, 1 hdc, 2 sctog twice, *2 sctog in back loops* (repeat from * to * 3 times more). Ch 1, turn. (13 sts)

Last row: Pull up a loop (scroll to bottom for photos) in each st. (14 loops on hook). Break yarn and draw yarn through each loop. Pull tight. Sew up toe seam.

Women’s Size (11-12) Men’s Size (10-11)

Next row: *Sc, 2 sctog in back loops* (repeat from * to * 5 times more), 2 sc in back loops, 15 hdc, 2 sc in back loops, *2 sctog, sc in back loops* (repeat from * to * 5 times more). Ch 1, turn. (43 sts)

Next row: 14 sc in back loops, 15 hdc, 14 sc in back loops. Ch 1, turn.

Next row: 14 sc in back loops, 2 sctog, 11 hdc, 2 sctog, 14 sc in back loops. Ch 1, turn. (41 sts)

Next row: 14 sc in back loops, 13 hdc, 14 sc in back loops. Ch 1, turn.

Next row: *Sc, 2 sctog in back loops* (repeat from * to * 3 times more), 2 sc in back loop, 13 hdc, 2 sc in back loop, *2 sctog, sc in back loops* (repeat from * to * 3 times more). Ch 1, turn. (33 sts)

Next row: 10 sc in back loops, 13 hdc, 10 sc in back loops. Ch 1, turn.

Next row: 10 sc in back loops, 2 sctog, 9 hdc, 2 sctog, 10 sc in back loops. Ch 1, turn. (31 sts)

Next row: 10 sc in back loops, 11 hdc, 10 sc in back loops. Ch 1, turn.

Next row: *2 sctog in back loops* (repeat from * to * 4 times more), 2 sctog twice, 3 hdc, 2 sctog twice, *2 sctog in back loops* (repeat from * to * 4 times more). Ch 1, turn. (17 sts)

Last row: Pull up a loop (scroll to bottom for photos) in each st. (18 loops on hook). Break yarn and draw yarn through each loop. Pull tight. Sew up toe seam.

Make the Heel

With the wrong side facing you and toe facing down.

Row 1: Sc in the each hdc of sole of slipper along starting edge (the loop left from the original chain stitches). Ch 1, turn. (9, 9, 9,)(9, 11, 11, 11 sts)

Row 2-4: Sc in back loops, Ch 1, turn.

Row 5: 2 sctog, (5, 5, 5,)(5, 7, 7, 7) sc, 2 sctog. Ch 1, turn. (7, 7, 7,)(7, 9, 9, 9 sts)

Row 6: (7, 7, 7,)(7, 9, 9, 9) sc in back loops. Ch 1, turn.

Row 7: 2 sctog, (3, 3, 3,)(3, 5, 5, 5) sc, 2 sctog. Ch 1, turn. (5, 5, 5,)(5, 7, 7, 7 sts)

STOP HERE for children’s size 11-12 and 1-2. Skip to row 10.

Row 8: Sc in back loops. Ch 1, turn.

Row 9: 2 sctog, (1,)(1, 3, 3, 3 sts) sc, 2 sctog. Ch 1, turn. (3)(3, 5, 5, 5 sts)

Edging Around Slipper

Row 10: Sc in back loops. Do NOT make ch st or turn! Sc in each row and stitch around the edge of the slipper.

Row 11: Sc in each st around. Finish off.

Flower:

Rnd 1: Ch 2 (second ch counts as 1 sc) work 9 sc in 2nd ch from hook. Join with sl st to ch 1. (10 sc)

Rnd 2: Ch 3, 1 dc, 1 trc, 1 dc, ch 3. Sl st in the same sc as join. *Sl st in next 2 sc. In same st as the 2nd sl st, ch 3, 1 dc, 1 trc, 1 dc, ch 3. Sl st in the same sc.* Repeat from * to * around. End with st st in the next sc. (5 flower petals).

Pull up a Loop

Pull up a loop in each stitch as if you were going to make a single crochet. Don’t work the loop. Leave the loop on the hook.

How to crochet slippers - end toe

Leave the loop on the hook. 12 sts will make 13 loops including the original ch 1.

How to crochet slippers

Draw the yarn through all the loops.

How to crochet slippers

Cut the yarn and pull the yarn through all the loops.

How to crochet slippers

Draw tight.

How to crochet slippers

Tips and Hints:

If your slipper is a little too big when you finish, one way to tighten it up a bit is to decrease some stitches when making the second round on the edging. Sc two stitches every 4 or 5 stitches will help.

To add a little more awesomeness to your slipper you can layer multiple flowers. Make each flower a different colour or you can change the size of your hook to make each flower smaller and stack them.

Work in your ends; don’t knot them off. Knots rub and can hurt the wearer’s foot.

Abbreviations:

sc – single crochet

hdc – half double crochet

dc – double crochet

trc – treble crochet

ch – chain

sl st – slip stitch

st – stitch

sts – stitches

2 sctog – single crochet 2 stitches together

If you have any questions, please feel free to leave a comment or send me your questions here

Posted on 2 Comments

How to Crochet Jewelry – Make a Victorian Steampunk Necklace and Bracelet

How to crochet jewelry

I originally published this pattern way back in 2016; seems like a lifetime ago these days. Back then, I was charging for it, but like all my patterns, I’m making this crochet pattern free for anyone who would like it. This particular pattern started off as a bracelet design, then subsequently morphed into necklaces because I liked it so much. Also, I found some way cool charms and pendants that I just had to use. 

As far as the difficulty of the pattern, adding the charms may be a little tricky at first, especially if you’re using charms that have one good side. If the charms are printed or carved, like the teacups or Buddhas shown above in the bracelets, then it’s not so important. If you find one sided charms, no worries. There are a bunch of pictures I’ve included that show you how to attach the charms so they’ll face the right direction.


To make things a smidgen easier for you here is the link if you want to make the bracelet and this is the link for the necklace. I’ve included all the photos in both versions to make it easier for you. If recommend starting with the bracelet so you can get the feel of how to do it. And if you would prefer a ad free, PDF downloadable version of the pattern instead of being online, you can get that for a small fee/donation here – Crocheted Victorian Charm Bracelet and Necklace or here in my Etsy shop.

Lovin’ the free patterns and want to help support this website? Please share this pattern on your social media and send an email to anyone you think may like it. Those handy links up there will certainly help you do it. I’m also fond of any financial donation you may see fit to give. You can go to my Help Support My Work page to find out how.

Things you need:

1 ball of crochet cotton thread

Size 10 (1.3 mm) crochet hook

7 charms for a bracelet (1 more or 1 less if you need it longer or shorter, respectively)

11 charms for a necklace. (I used 18 little keys for the choker in the cover photo and 7 crosses for the necklace in the photo montage above.)

A pretty button

Gauge: 

It’s not really important for this project as there isn’t a specific size needed. This pattern can be made as long as you like and you can easily adjust the length to what you want when you’re making it. Each fan adds approximately 25/32″ or 2 cm. Generally speaking, I make my bracelets approximately 7 inches (17.5 cm) in length making 9 fans total. Necklaces vary depending on the length you want. I wrote the instructions for a necklace approximately 18 7/64 inches or 46 cm and 24 fans long.

Change the charms to get a different feel. I tend to be a little more on the dark and gothic side.

Another point to remember, your final product will stretch a bit longer as the stitches relax over time or if you press it with an iron.


Crocheted Victorian Charm Necklace

Chain 194. (Instructions are for 11 charm necklace)

Row 1: Dc 3rd chain from hook. Dc in each chain. Ch1. Turn.

Row 2: 4sc *ch2 skip next st. 3sc. Ch3. Skip next st. 3sc.* Repeat from * to * ending with ch2. Skip next st. 3sc. Ch1. Turn. (Click here if you have too many or not enough dc’s)

Row 3: *7trc in ch2 space. Ch2. Sc in ch3 space. Ch2.* Repeat from * to * 6 more times ending the last repeat with the sc in the ch3 space. Ch1. 

Add charm as follows:

With the loop already on your hook, pull to make larger. Drop the loop from the hook.

How to add charms to a crochet necklace

Pick up the charm and put hook through the hole from BACK to FRONT.

Pull loop through the hole. Make sure that the loop isn’t twisted. Slightly pull on it to make sure the thread pulls easily on the LEFT side.

Pass the loop over the charm and pull snug but not tight.

Put the hook through the top of the sc in the ch3 space.

Hook the thread and pull the thread through. 

You now have a loop on your hook to continue crocheting. This stitch also turns the charm to the front.

*Ch2. 7trc in ch 2 space. Ch2. Sc in ch 3 space. Ch1. Add charm.* Repeat from * to * until all the charms have been added.

Ch2 *7trc in ch2 space. Ch2. Sc in ch3 space. Ch2.* Repeat from * to * 6 more times ending the last repeat with the 7trc in ch2 space. 3sc in the 1st sc of the 4sc of the previous row (forms the corner for the edging).

Row 4: Working along the edge, sc in the post of the dc. 

3Sc in the back loop of the original ch. 

For a Round Necklace:

Sc in the loop of each ch to the end of the necklace to the last ch.

For a V-Shaped Necklace (or using a heavy middle charm)

Find the st above the middle charm. Count back 6 stitches. Mark this stitch with a stitch marker, safety pin, etc. Sc in the back loop of the original ch until you reach this marked stitch. Sc2tog 6 times (these 12 stitches are now 6). Sc in the back loop of each ch to the end of the necklace to the last ch

Instructions regardless of shape

3sc in the corner ch. Sc around the post of the dc. Ch as many chains as required to slip over your selected button. Sl st in the last sc you made. Sc around the sc post. Sc in corner st. 

Break thread.

Sew button to the end opposite the loop.

Work in thread ends.

Wear, give away or sell with pride!


Crocheted Victorian Charm Bracelet

Chain 73. (Instructions are for 7 charms)

Row 1: Sc in 2nd chain from hook. Sc in each chain. Ch1. Turn.

Row 2: 4sc *ch2 skip next st. 3sc. Ch3. Skip next st. 3sc.* Repeat from * to * ending with ch2. Skip next st. 3sc. Ch1. Turn. (Click here if you have too many or not enough sc’s)

Row 3: *7trc in ch2 space. Ch2. Sc in ch3 space. Ch1.

Add charm as follows:

With the loop already on your hook, pull to make larger. Drop the loop from the hook.

How to add charms to a crochet necklace

Pick up the charm and put hook through the hole from BACK to FRONT.

Pull loop through the hole. Make sure that the loop isn’t twisted. Slightly pull on it to make sure the thread pulls easily on the LEFT side.

Pass the loop over the charm and pull snug but not tight.

Put the hook through the top of the sc in the ch3 space.

Hook the thread and pull the thread through. 

You now have a loop on your hook to continue crocheting. This stitch also turns the charm to the front.

*Ch2. 7trc in ch 2 space. Ch2. Sc in ch 3 space. Ch1. Add charm.* Repeat from * to * until all the charms have been added.

Ch2 *7trc in ch2 space. Ch2. Sc in ch3 space. Ch2. 7trc in ch2 space. 3sc in the 1st sc of the 4sc of the previous row (forms the corner for the edging.)

Row 4: Working along the edge, sc in the post of the sc.

3Sc in the back loop of the original ch. 

Sc in the loop of each ch to the end of the bracelet to the last ch.

3sc in the corner ch.

Sc around the post of the sc. Ch as many chains as required to slip over your selected button. Sl st in the last sc you made. Sc around the sc post. Sc in corner st. .

Break thread.

Sew button to the end opposite the loop.

Work in thread ends.

Wear, give away or sell with pride!

More of my stuff on Etsy:


You can make a widget like this for your blog or website, too.
Instructions are on my website here: How to Display Etsy Items on Your Website

Hints and Tips:

It is very easy to either miss a chain, chain the wrong number, or chain twice by accident in the same chain. This will throw off the counts for Row 2 and you may end up with too many or not enough dc for the necklace (sc for the bracelet) to work Row 3 over. Don’t panic! Make it work with what you have. A stitch or 2 more or less won’t ruin the final piece. You can either sc stitches together if too many or sc 2 stitches in one stitch if you don’t have enough. FYI making things work like this, works great for all projects. Many times it can be hidden in a seam or the back of the work 😉

It’s best to pick charms that have a large hole that you can pass your crochet hook through. If not you can twist up the loop and feed it through the hole. This can be difficult and time consuming though. If the charm’s hole is sideways (hole is left to right), you can use a jump ring to get it to hang correctly.

Not sure where to get charms for your project? If you can’t find what you’re looking for locally, be sure to try Amazon, Ebay or even Etsy. Always shop local when you can and see what your craft store has in stock!

If you want to make either the bracelet or necklace longer or shorter, add or take away 8 stitches. Each group of 8 stitches is approximately 25/32″ or 2 cm. For example, if you would like the bracelet to be 1 1/2″ longer, add 16 stitches. This of course, will make the repeats for adding charms either more or less for the necklace. 

If you don’t want to make a v-neck and would prefer a choker or rounded edge, sc in the loop of each chain without sc any of them together. It will form a rounded edge. If your center charm is large or heavy the weight of the charm will naturally form a v regardless whether you gather the stitches. It will buckle awkwardly if you don’t gather the stitches.

You don’t always need to make a loop for a necklace. A long length of chains can also work. Wrap the length of chains a few times around the button to hold the necklace snug. This works great for a choker as the circumference of necks can vary and will fit more comfortably. If you’ve used heavy charms, make the loop. This fastener won’t hold it in place.

Sew the button to the final piece as shown here:

No matter what, don’t stretch out the necklace or bracelet before you are completely finished crocheting the entire piece! If you do, it won’t lay flat when you are done.

To save work of sewing in ends, work in the ends of the threads as you are making your project. Hold the thread behind your work and catch it as you make the next 4-5 stitches. 

When making the loop to secure the bracelet or necklace, chain as many stitches as you think you may need. Sl st to the sc and pass the button through the loop. If it is too small, undo the sl st and add more chains. If too long, undo the sl st and take some stitches out. It’s easier to check now than later. 

Abbreviations:

sc – single crochet

dc – double crochet

trc – treble (or triple) crochet

sc2tog – single crochet 2 stitches together

ch – chain 

sl st – slip stitch

st – stitch

sts – stitches

If you have any questions, please feel free to leave a comment or send me your questions at [email protected].

See! It can be less morbid!
Posted on Leave a comment

How to Crochet – Free Crochet Flower Pattern

How to Crochet a Flower

Nice idea, but what can I do with a crocheted flower, you may be asking yourself? Well, you can do a lot with them actually. In particular, I designed this pattern to be the perfect size to be a ring. Make a matching set and you have a pair of earrings. Sew the flowers together and you can make a necklace or choker. Add them as an embellishment on one of my existing crochet bracelet patterns. You can see those by click these links: Quick and Easy Bracelet, Fans Bracelet, and Waves Bracelet. If you come up with more ideas, I loved to read about them in my comment section below ?.

How to crochet a flower
Crochet flower sewn to Fans Bracelet. Click this link to get that pattern.

I have been designing crochet flowers for number of years but never really got around to publishing any of them to share. Most are done on the fly, free from crochet if you will, with more and more detail being added to each time I make a new crochet flower.


I have shared a few of my flower designs, in particular my Friendship and Flower Bracelet crochet pattern that has been relatively popular. Mostly I’ve been making flowers to add to my art projects like you can see in my Etsy shop and here:


Depending on the response to this, my first stand alone crochet flower pattern, I may add the others.

While I wouldn’t consider this project crochet for beginners, if you know your basic crochet stitches, this is quick and fairly easy to make. Originally when I designed this I was aiming for a crochet sunflower. While it is a bit small to be a sunflower, It does have a sunflower type feel to it. At least I feel it does. Depending on your colour selections, you really can make this be any sort of generic “crochet flower”.

But without further ado, except for the handy share icons ?, here is how to crochet a flower step by step and what you will need.


Things You Will Need:

Crochet cotton thread (size 10) – 2 colours of your choice

Size 10 (1.3 mm) crochet hook

Ring base (I prefer the kind that is pictured here. It gives more security when you tie it on and fits any size finger.)

Needle to sew in the ends and attach to ring base.

Crocheting the Flower:

With the centre colour crochet thread

Ch 2 (make the first loop slightly larger so you can fit in the sc coming up).

Row 1: 9 sc in 2nd ch from the hook. Join with sl st in the top of the first sc (not the ch. Ignore it. It’ll be fine. Trust me.)

Row 2: Ch 2. *(Sc, ch 1)* in the next sc of previous round. Repeat from * to * in each sc around. Join in the first ch 1 of first ch 2. Break thread.

Row 3: Join petal colour thread in any ch 1 space. Ch 2, tr (wrap thread 2 times around hook), tr +1 (wrap thread 3 times around hook), tr, dc. Ch 1. Turn. Join with sl st to top of ch 2. Ch 2. *In next ch 1 space, dc, tr , tr +1 , tr, dc. Ch 1. Turn. Join with sl st to top of the first dc. Ch 2.* Repeat around. Join with a sl st to the sl st at the top of the ch 2 of first petal made. Break thread.

Work in the ends. Sew the flower to the ring base.


Hints and Tips:

When starting your flower, leave a generous tail when you make your original ch 2. You can use this thread to sew the flower to the ring.

Hold your thread to the back of your work when making the petals if you can. If you catch the thread when making a few stitches, it will stay in place without any extra sewing. (I really need to show how to do this with some photos at some point. It’s a huge time saver.)

If you can’t find the shade of crochet cotton thread that you want, you’ll be able to find the embroidery thread (aka embroidery floss) that is the correct colour. For the life of me I can’t find any brown crochet cotton thread locally so I decided to use embroidery thread instead. It worked great! It’s actually the centre of the crochet sunflower. Couldn’t tell could you ?. You will have to separate 2 or 3 threads from the skein to acquire the same thickness as the crochet cotton thread. I found 2 pulled out worked best but it may be different depending on what embroidery thread you’re using.

You can make as many petals on the flowers as you like. Either add more original sc at the beginning and corresponding number of sc, ch 1 on the second row. Be carful though. Too many and the flower won’t lie flat. Not enough and it will look less full and not be enough to go around.

If you ended up with more or less petals than 9, technically, you made it wrong. It doesn’t really matter. But if you’re trying to make a product to sell or make a matching set for earrings or a choker, make sure you do it the same way every time. You want to be consistent. To get 9 ch 1 spaces exactly each time, I count the number of ch 1’s I make INCLUDING the first ch 1 at the start of row 2 (the first ch of the ch 2 is really a sc. The 2nd ch is creating the ch 1 space), then I join in the first ch 1 space I made.

You can adjust the size of the petals by changing up the stitches used to make them. Smaller stitch combo’s such as sc, hdc, dc, hdc, sc in each ch 1 space will make it smaller. Tr, tr +1, (3 times around hook), dtr (4 times around the hook) tr tr, tr can give some interesting effects.

I prefer the ring type that I’ve shown in the affiliate link (yes, I’ll make a bit of money from the sale) but you may prefer something else. I’ve tried a variety of glues and double sided tape (even professional grade) and none of the products worked to my satisfaction in holding the final crochet flower to the ring base. I found sewing it on by passing the thread through the middle hole and around the sides held it securely. And I could also find these bases easily at my local big box craft store. ?

Crochet flower sewn to the ring.

I never ironed my crochet flower before sewing it to the base. It wouldn’t hurt but it’s a very stitch dense item and I don’t think it would really do much to the finished crochet flower.


Abbreviations:

Sl st – slip stitch

Ch – chain

sc – single crochet

dc – double crochet. Wrap the thread 1 time around the hook.

tr – treble crochet. Wrap the thread 2 times around the hook.

tr +1 – treble crochet plus one additional thread wrap. Wrap the thread 3 times around the hook. (This isn’t a standard stitch so I just made up the most logical name and abbreviation).

Posted on Leave a comment

Crochet a Skull and Crossbones Dishcloth

crochet skull and crossbones dishcloth

Because even pirates and rock stars need to do the dishes, I’ve created the coolest dishcloth known to man.  That’s right! A crocheted dishcloth that’s reversible with a skull and crossbones on it. Now who DOESN’T want that in their kitchen! Crazy people, that’s who.

crochet skull dishcloth

This dishcloth is very easy to make and a great project for beginners as it uses very basic crochet stitches that are easy to master. For the tougher points, like making the teeth (simply an elongated double crochet) and the edging, there are photos and a video to help you along. Or you can keep scrolling down the page to watch it here.

I also have made this pattern available for download here – Download the Skull and Crossbones pattern


Get the PDF version of the pattern from my website. A PDF file will work on any device (iPad, tablet, smartphone, computer, etc.) however you will need Adobe Reader to open and view the file. This is a free program which can be downloaded here – http://get.adobe.com/reader/

Liking the free patterns and would like to see more? Consider supporting my work with a small donation through PayPal or by making a purchase of any of my hand made items. You can do both by going to this page – Help Support My Work. Clicking and sharing this pattern, and my other patterns, on social media also helps me out immensely. I’ve provided links above that enable you to do so easily.

Things you need:

Size 4.25 crochet hook (Size doesn’t really matter but if you use a larger hook, the dishcloth will be larger, and with a smaller hook, it will be smaller)

50 gr (1 3/4 oz) ball of cotton yarn (you’ll have leftovers).

Darning needle (to work in ends)

Ch 34

Dc in 3rd ch from hook and remaining 32 ch. Ch 2 (counts as 1st dc of next row), turn. (33 sts)

Row 2: Dc in each dc. Ch 2, turn.

Row 3: 7 dc, ch 2, skip next 2 sts, 13 dc, ch 2, skip next 2 sts, 8 dc. Ch 2, turn.

Row 4: 9 dc, ch 1, skip next st, 11 dc, ch 1 skip next st, 10 dc. Ch 2, turn.

Row 5: 10 dc, ch 1, skip next st, 9 dc, ch 1 skip next st, 11 dc. Ch 2, turn.

Row 6: 11 dc, ch 1, skip next st, 7 dc, ch 1 skip next st, 12 dc. Ch 2, turn.

Row 7: 11 dc, ch 1, skip next st, 7 dc in each dc (click that link or scroll down the page to see photos to help you along) st below, ch 1 skip next st, 12 dc. Ch 2, turn.

Row 8: 9 dc, ch 1, skip next st, 11 dc, ch 1 skip next st, 10 dc. Ch 2, turn.

Row 9: 8 dc, ch 1, skip next st, 6 dc, ch 1, skip next st, 6 dc, ch 1 skip next st, 9 dc. Ch 2, turn.

Row 10-11: 8 dc, ch 1, skip next st, 13 dc, ch 1, skip next st, 9 dc. Ch 2, turn.

Row 12: 8 dc, ch 1, skip next st, 3 dc, ch 2, skip next 2 sts, 3 dc, ch 2, skip next 2 sts, 3 dc, ch 1, skip next st, 9 dc. Ch 2, turn.

Row 13: 7 dc, ch 1, skip next stitch, 1 dc, ch 1, skip next stitch, 11 dc, ch 1, skip next stitch, 1 dc, ch 1, skip next stitch, 8 dc. Ch 2, turn.

Row 14: 6 dc, ch 1, skip next st, 3 dc, ch 1, skip next st, 9 dc, ch 1, skip next st, 3 dc, ch 1, skip next st, 7 dc. Ch 2, turn.

Row 15: 5 dc, ch 1, skip next st, 5 dc, *ch 1, skip next st, dc* (repeat from * to * 4 times more) 4 dc, ch 1, skip next st, 6 dc. Ch 2, turn.

Row 16: 3 dc, ch 2, skip next 2 sts, 21 dc, ch 2, skip next 2 sts, 4 dc. Ch 2, turn.

Row 17: Dc in each dc. Ch 2, turn.

Row 18: Dc in each dc. Ch 1.


Edging:

With right side facing, Bsc (backwards single crochet) around edge. Bsc between every 2nd dc along the top and bottom edges and around each dc and ch 2 post along the sides. Not sure how to do a backwards single crochet? Watch my how-to video on YouTube here: Crochet Edging for Dishcloths.

Hints and tips:

Use any cotton yarn that you like. Cotton only! Acrylic doesn’t work well for dish washing, and wool will felt and look pretty disgusting after a while. Also, I’ve written the pattern to use less than one ball of the most common cotton yarns available in big box stores (one starts with a “W”). These make great gifts that are extremely affordable to make.

When skipping a stitch you may be making a dc in either a ch or a dc. St is used regardless to make the pattern easier to read.

Hold the starting yarn end behind the your work when making the edging. That way you only have the final end to sew in when done.

You can make the edging in a different colour for a bit of extra pizzazz. I don’t because I strongly dislike sewing in ends. An extra colour means extra work ?

Find more of my stuff on Etsy:


You can make a widget like this for your blog or website, too.
Instructions are on my website here: How to Display Etsy Items on Your Website

Abbreviations:

ch – chain

dc – double crochet

Bsc – backwards single crochet


dc in dc below –

Instead of passing the hook through the top of the stitch, pass the hook through the bottom.


Hook the yarn and pull it through the hole. Pull the yarn up and level with the previous stitches.


Hook your yarn and pull through the first two loops.


Hook the yarn and pull through the last two loops.


Posted on 2 Comments

How to Crochet an Afghan…or How to Do Tunisian Crochet

Tunisian Stitch Afghan

This is more than a common granny square…this is what is known as an afghan stitch or tunisian crochet. A few months ago I decided to make another afghan using this method. It’s the second one I’ve made, but this time instead of using my left over yarn I came up with the idea to make it a little more fancy. The house and star patterns are done in a basic cross-stitch and really could be anything you want. What I didn’t realize was how long it was going to take me to finish this project. It was a mammoth undertaking but slowly it’s came together. Since the chances of me making another one like this in the near future is slim to none, I figured I might as well share it with everyone.

To start with, you can make the squares any size you like. For my project I’m making them 41 stitches across and 40 rows long. I found an actual afghan hook at my local Michael’s store but you can use a regular crochet hook in whatever size you want. An afghan hook is very long and has an end on it like the end of a knitting needle. If you can’t find one you can use a traditional style hook. To keep the stitches from falling off the end of a regular crochet hook, you can wrap a rubber band around the end to help hold them on. The size of the hook you use can be whatever you like. I’m using a size 5 mm (size 8 US) hook and the next size smaller for doing the edging around each square once it’s was completed.

Tunisian Stitch Afghan

Like my knitted sock pattern, this is a read online only pattern. I never had the gumption to make it available as a download. If you’d like to see that change, please contact me and I’ll see what I can do.


To Do the Afghan Stitch (or How to Tunisian Crochet):

Chain 41

1st Row: In the second chain from the hook, pull up a loop as if you were making a single crochet.

Without completing the previous stitch, pull up a loop through the next chain.

Pull up a loop through the next chain and repeat until you get to the end of the chain.  You will have 41 loops on your crochet hook.

With the 1st loop on the end of your hook, chain 1.

With the loop you just made, pull up a loop through this stitch and the next loop on your hook.

Pull up a loop through the loop you just made and the next loop on your hook.  Repeat this until there is only one loop remaining on your hook.

More of my stuff on Etsy


You can make a widget like this for your blog or website, too.
Instructions are on my website here: How to Display Etsy Items on Your Website

2nd Row: There will be a vertical bar formed by each stitch from the last row.  You work the stitches along these bars.

Place your hook under the first bar.  Draw up a loop as if making a single crochet. Do not complete the stitch.

Place your hook under the next bar draw up another loop.  Repeat this with all of the bars. 

The last stitch looks like two chains.  Draw up a loop through the top chain.  You will have 41 loops on your hook.

With the first loop on your hook, chain 1.

Draw a loop through the loop you just made and the next loop on your hook.  Repeat until there is only one loop remaining on your hook.

Repeat row 2 for each subsequent row. 

You can make the squares as long as you want.  For my project I’m making 40 rows.

To finish:

There will be one loop on your hook.  Place your hook under the vertical bar.  Draw up a loop but this time, complete the single crochet. Repeat with all the bars.  Once again the last stitch looks like 2 chains.  Draw up a loop through the top chain and complete the single crochet. Finish off.

When your square is completed they tend to roll up. A quick ironing will help the fibers relax and lie flat. Be sure to read the care instructions that came with your yarn. Some may have specific recommendations on temperature settings or blocking.

To create the edging on your pieces, you can do whatever you like. You may want to surround it with a combination of rows like double crochet and single crochet, or you may want single crochet with the following rows in the back stitch of previous rows. It really doesn’t matter and is your personal preference. Just be sure that your work lies flat. You may need to use a smaller crochet hook than the one you used to make the squares to create a flat edge or decrease where necessary.

My project is 2 rows of double crochet and one row of single crochet on the 2 side edges. I’m then stitching the squares together along these edges making a long strip. I then do 2 rows of double crochet and one row of single crochet along the tops and bottoms of these strips. Then, I’m sewing the strips together and working in the ends. 

For a more interesting effect you can try using two colours of yarn and alternate the colours for each row. The yarn will naturally keep to the back when you switch between colours. You can also try using a very fine yarn or fingering with a regular worsted weight yarn. Work them together as if they are one strand.

For myself, I think that this will be my first and last afghan like this. I’ve been considering maybe making pillows with this stitch and doing more elaborate cross-stitch decorations on them. I’ve also considered wall hangings to be more like art pieces, but I always have a list as long as my arm of to-do projects in the works. 

I hope you found this helpful or at the very least inspiring. If you are enjoying the free patterns and how-to pics, then please share my work! Those handy little icons along the side or bottom of the page let you do it easily and helps me tremendously. If you’d like more information on how you can keep things free, learn how you can Help Support My Work.

If you need more help than what I’ve given here, by all means feel free to contact me here.  

Posted on 3 Comments

How to Crochet Jewelry – Quick Crochet Bracelet

If you’ve crocheted before and are familiar with most of the stitches, this will be a snap for you to make. If you’re new, it may push you a bit, but is still totally doable. It’s extremely repetitive and once you catch on, the repeated sections will be second nature to you.

I’ve written instructions to make the bracelet in one colour (easiest if you’re new to crocheting) and separate instructions for the two-tone version. Only Round 2 is a bit different, but I figured it would be easier to have it written out in full for both versions instead of having to scroll back to look. Keep scrolling down the page to read the two-tone instructions.

If you’re making the single colour bracelet, selecting a variegated thread could add some interesting variations to the look of the bracelet. Sorry I never made a one colour one though. I’m rather fond of two colour…

Please Share this Pattern with Others

Not a fan of reading online? You can always download the pattern fro a small fee from my website – Quick and Easy Crochet Bracelet or my Etsy shop. Some things never change ?

Another way to avoid ads and pop-ups, get instant, PRINTABLE downloads of this pattern and others, is by becoming a Member on this website. When you become a Website Supporter for $3/month, you’ll gain access to exclusive member only posts. These posts contain one click downloads of the patterns. Simply click the Download & Print button. The PDF will automatically download to your computer or smart device. You can then read it on your device or print it at your leisure. You can download as many patterns as you like for the same $3 each month. You can go to this page to learn more, become a member and support my work… Exclusive Member Area

But let’s get to the pattern.

2 tone purple bracelet

Things you need:

1 or 2 balls of crochet cotton thread

Size 10 (1.3 mm) crochet hook

A pretty button ( approximately 1/2” or 1.5 cm diameter)

Gauge:  

It’s not really important for this project as there isn’t a specific size needed. This pattern can be made as long as you like and you can easily adjust the length to what you want when you’re making it. Each loop adds approximately 25/32″ or 2 cm. It depends how tightly you crochet. Generally speaking, I make my bracelets approximately 7 inches (17.5 cm) in length. I make 10 loops total for this pattern but you can add or make less as you see fit.

Another point to remember, your final product will stretch a bit longer as the stitches relax over time or if you press it with an iron.

Abbreviations:

sc – single crochet

dc – double crochet

hdc – half double crochet

trc – treble (or triple) crochet

tr-trc – triple treble crochet (wrap the thread around the hook 6 times)

ch – chain

sl st – slip stitch

st – stitch

sts – stitches

More of my stuff for sale on Etsy


You can make a widget like this for your blog or website, too.
Instructions are on my website here: How to Display Etsy Items on Your Website

Single Colour Bracelet  

(keep scrolling if you want the 2 colour version)

Starting loop:

Chain 7. Tr-trc (triple treble crochet – wrap the thread 6 time around the hook) in 7th  chain from hook.

Additional loops:

Chain 8. Tr-trc in 7th chain from hook. Repeat 8 more times for 10 loops total. You can add more or make less loops depending on the length you want.

Round 1:  Ch1. *12 sc in loop just formed. Sl st in ch between loops.* Repeat from * to * down the length of the bracelet. Work 24 sc in last loop. Repeat from * to * down the length of the bracelet. 12 sc in last loop. Join with sl st to first sc.

Round 2:  *2 sc. Work 2 sc in next st.* Repeat from * to * 2  more  times. Ch 6.  In the next loop after sl st in space between loops, skip next 3 sts and starting in the 4th  st,  ?  5 sc, ch 6.  ?ᅠRepeat from  ?ᅠto  ?ᅠdown the length of the bracelet. In last loop starting after the sl st between loops, skip first 3 sts and starting in the 4th st  ⛄  2 sc. Work 2 sc in next st.⛄  Repeat from  ⛄  to  ⛄  5  more  times. Ch 6. Repeat from  ?ᅠto  ?ᅠdown the length of the bracelet. In last loop after the sl st between loops and starting in the 4th st, repeat from * to * 3 times total. Join with sl st  in the back loop  of the first sc of the round.

Quick crochet Bracelet

Round 3:  Sc in the back loop of every sc of previous round. (Sc, hd, dc, trc, dc, hdc, sc) in every ch 6 space. Join with sl st to first sc of the round.

Break thread.

Sew button to the end opposite of either loop.

Work in thread ends.

Wear, give away or sell with pride!

Two-Tone Bracelet

Starting loop:

Chain 7. Tr-trc (triple treble crochet – wrap the thread 6 time around the hook) in 7th  chain from hook.

Additional loops:

Chain 8. Tr-trc in 7thchain from hook. Repeat 8 more times for 10 loops total. You can add more or make less loops depending on the length you want.

Round 1:  Ch1. *12 sc in loop just formed. Sl st in ch between loops.* Repeat from * to * down the length of the bracelet. Work 24 sc in last loop. Repeat from * to * down the length of the bracelet. 12 sc in last loop. Join with sl st to first sc. Break thread.

Round 2:In any loop other than a loop on the end, and starting after the sl st between loops, skip the first 3 sts join the thread in the 4th  st, ch 1 (counts as first sc), 4  sc, ch 6.  ?ᅠ5 sc, ch 6.?ᅠRepeat from  ?ᅠto  ? down the length of the bracelet. In last loop after the sl st between loops, skip first 3 sts and starting in the 4th st  ?ᅠ2 sc. Work 2 sc in next st.  ?ᅠRepeat from  ?ᅠto  ?ᅠ5  more  times. Ch 6. Repeat from  ?ᅠto  ?ᅠdown the length of the bracelet. In last loop after the sl st between loops, and starting in the 4th st, repeat from ?ᅠto  ?ᅠ6 times total. Ch 6. Join with sl st  in the back loop  of the first sc of the round.

Quick crochet Bracelet

Round 3:  Sc in the back loop of every sc of previous round. (Sc, hdc, dc, trc, dc, hdc, sc) in every ch 6 space. Join with sl st to first sc of the round.

Break thread.

Sew button to the end opposite of either loop.

Work in thread ends.

Wear, give away or sell with pride!

Hints and Tips:

It is very easy to either miss a chain, chain the wrong number, or sc the wrong number by accident in Round 1. This will throw off the counts for Round 2 and you may end up with too many or not enough sc. Don’t panic! Round 3 is very forgiving and will hide all. As long as your skipped stitches on either side of the 5 sc clusters are the same, you won’t really be able to tell; even if you only make 4 stitches or make it 6 sc. Make it work with what you have. Another fix, you can either sc stitches together if too many or sc 2 stitches in one stitch if you don’t have enough. FYI making things work like this, works great for all projects. Many times it can be hidden in a seam or the back of the work 😉

No matter what, don’t stretch out the necklace or bracelet before you are completely finished crocheting the entire piece! If you do, it won’t lay flat when you are done.

To save work of sewing in ends, work in the ends of the threads as you are making your project. Hold the thread behind your work and catch it as you make the next 4-5 stitches.

Be sure you don’t twist your loops when adding the sc’s in Round 1. The chains should be on the  BOTTOM  of the loop and the tr-trc on the  TOP.

A simple rule to follow for this very repetitive pattern, after the 5 sc clusters and the large numbers of sc’s made on the end loops, always remember to ch 6. Simply put, every time you run across the sl st between the loops, ch 6.

And the best tip of all, if you like this pattern and would like to see more in the future, Help Support My Work!

Like all of my patterns you have my permission to sell and/or give away the bracelets that you make using this pattern. You are NOT permitted to reprint this pattern in any form unless you have obtained my written permission from me to do so. 

Posted on 1 Comment

How to Crochet a Dishcloth – A Beginner’s Pattern

How to crochet a dishcloth - Free pattern

The pattern itself is very easy to do and definitely one that a person new to crocheting could follow.  I’ve also provided the pattern with two different edges.  My personal preference is to end it with a backwards single crochet, but a single crochet in each stitch and row will also work.

If you are new to crocheting, I’ve included links to points in the video to help you with specific rows and stitches. If you’d like to watch the video from the beginning you can use this link: Crochet a Dishcloth or you can scroll down to watch the video from this page. If you’d like to download the ad free version of this crochet pattern, you can download it for a small fee/donation from my website: Crochet a Dishcloth.


To help you with some of the more tricky parts, all the rows (and a few of the stitches) are clickable links that will take you to the correct point in the video that demonstrates exactly how to do it. The links will take you off this site and on to YouTube. If you want to watch the video here, scroll to the bottom of the page to view it.

If you like this crochet pattern, be sure to check out my crochet skull dishcloth.

Enjoying the free videos and patterns and would like to see more? Then please share my work! Those handy little icons along the side or bottom of the page let you do it easily and help me immensely ?. If you’d like more information on how you can keep things free, learn how you can Help Support My Work.

Things you will need:

Size 8 (5 mm) crochet hook

50 gr (1 3/4 oz) ball of crochet cotton (Click that link to see what I mean. It’s NOT the regular acrylic yarn but 100% cotton.)

Ch 42

Row 1: Sc in 4th ch from the hook.  *Ch 1, skip a ch, sc in next ch.*  Repeat from * to * until the end of the chain.  Ch 2, turn. (20 sc)  If you have too many chains see how to fix that here: How to Undo Chain Stitches.

Row 2: Sc in the ch 1 space.  *Ch 1, sc in next ch 1 space.*  Repeat from * to * until the end of the row.  Sc in the ch 4 space from the beginning chain.  Ch 2, turn.

Row 3: Sc in the ch 1 space.  *Ch 1, sc in next ch 1 space.*  Repeat from * to * until the end of the row.  Sc in the ch 2 space from the previous row.  Ch 2, turn.

Repeat row 3 until the dishcloth is square or the desired length.

How to crochet a dishcloth

Edging:

Single Crochet (White dishcloth as shown above):

Row 1: Sc in each row along the left edge of the dishcloth.  3 sc in the corner st.  1 sc in each sc along bottom edge.  3 sc in corner st.  Sc in each row along the right edge of the dishcloth.  3 sc in the corner st.  1 sc in each sc along top edge.  Finish off.

More of my patterns on Etsy


You can make a widget like this for your blog or website, too.
Instructions are on my website here: How to Display Etsy Items on Your Website

Backwards Single Crochet (Purple dishcloth as shown above):

Row 1: Complete 1 bsc (backwards single crochet) in every 2nd stitch of the row you just made. 1 bsc in the corner st.  1 bsc in every 2nd row along the right edge of the dishcloth.  1 bsc in the corner st.  1 bsc in every 2nd st along the bottom edge of the dishcloth.  1 bsc in the corner st.  1 bsc in every 2nd row along the left edge. 1 bsc in the corner st.  Finish off.

How to do a bsc (backwards single crochet):

Here’s the video that can show you how.  Keep scrolling down the page to see the pictorial how-to.

Unlike regular crochet stitches and instead of working from right to left in regular crochet (if you’re right handed), you’re going to work from left to right.

Step 1:  Insert the hook from front to back in the next st.

How to crochet a dishcloth

Step 2: Hook the yarn and draw the loop through the front of your work.

Unlike regular crochet stitches and instead of working from right to left in regular crochet (if you're right handed), you're going to work from left to right. Step 1: Insert the hook from front to back in the next st.

Step 3:  Hook the yarn and draw through the two loops.  Pretty simple, huh?

Unlike regular crochet stitches and instead of working from right to left in regular crochet (if you're right handed), you're going to work from left to right. Step 1: Insert the hook from front to back in the next st.

You can adjust the size as you see fit.  I prefer a smaller dishcloth but you may like it larger. You can either add more chains at the start of the cloth or you can make more rows. Either way will work but remember to buy more yarn if you want it larger. You can also use a larger size hook to make the stitches looser.

And as promised, here is the complete step-by-step video for you to watch.