
Keep your hands warm and your fingers free with this cozy collection of free knitting patterns. You’ll find a variety of designs here — from simple beginner fingerless gloves and mitts to more detailed cable and motif styles. Each pattern includes clear instructions and plenty of photos, plus helpful video links for specific stitches or full how-to tutorials on YouTube.
Whether you knit flat on two needles or in the round on double-pointed needles, there’s a pattern that fits your skill level and knitting style. Follow along on your phone or tablet — no printing needed — and make something warm, handmade, and uniquely yours.
Do you know someone who would enjoy these knitted fingerless glove patterns? Maybe you know someone who would love the flip mitts or the texting gloves. Be sure to share this page with the handy links below so they can see them too.
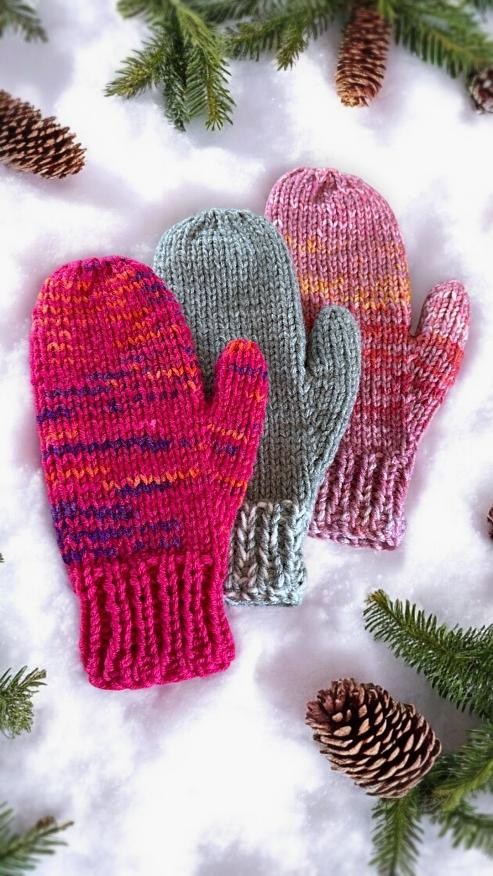
Quick and Easy to Knit Mittens – Free Knitting Pattern
I’ve been wanting to design a super simple mitten pattern for a while now—something warm, easy to make, and knit flat on two needles. And here it is! These adult-sized mittens are thick, cozy, and knit up surprisingly fast. Whether you’re newer to knitting or just want a no-fuss project to whip up in an evening or two, this free mitten pattern is a great one to try. They’re available in sizes small to extra-large, so you can make a pair for just about anyone. I used basic stitches and construction, and I’ve included lots of helpful how-to videos in the Abbreviations section if you have difficulty with any of the knitting techniques. If you’re looking for an easy knitting pattern for mittens that doesn’t require double-pointed needles, I think you’ll love how simple (and warm!) these turn out. And if you would like to make a pair that’s a little fancier, I also have the same mittens, but made with an owl motif on the back of the hand. It’s also free to read on my website. You can read it here – Extra Thick Owl Mitts. They are also knit flat on 2 needles and include videos to help you along. When you click the link or photo, a new window opens. You won’t lose this page. If you would to prefer to support my work and have access to a printable, ad-free version of this pattern, I offer that too. To get the downloadable pattern for a small fee you can get it in my Etsy Shop, Ravelry, LoveCrafts, Buy Me A Coffee and from the shop section on this website – KweenBee.com. If you would prefer to order a Kindle or printed paperback version from Amazon, you can now do so! Shipping is free if you are an Amazon Prime member. Make sure you select the country you are in to take advantage of the free shipping. Click the following link for your country – United States, United Kingdom, Canada, and Australia. The Kindle download and paperback versions are available in English only. Love the free patterns? You can say thanks in a couple of ways. You can read more about how you can Support My Work by clicking that link or make a small donation and Buy Me a Coffee. 👈🏼 That is a website where you can make a one time donation as a thanks. If you don’t want or are unable to make a financial donation, sharing this pattern through social media is a great way to help out too! The links below are a super easy way for you to do so. Things You Need You can make the mittens with either 2 strands of worsted weight yarn, or one strand of super bulky yarn. Take your pick. But please note, you don’t need both. Choose one or the other. Worsted weight yarn – 2 (two) balls of yarn (215 yards/197 m). You’ll have leftover yarn. or Super Bulky yarn – (186 yards/170 m) like Bernat or Lion brand. Not all super bulky yarn is as thick as others. A Bulkyyarn may also work if it’s on the thicker side. As long as your gauge is the same your sizing will be accurate. 5 mm (8 US) single point needles Tapestry needle – to sew seams and work in ends Sizing My standard for sizing was my and my son’s hands and designed the knitting pattern to fit us comfortably. Our hands are fairly standard in size and the measurements I used for the mitten sizes are similar to those used for rubber glove sizing. I’ve included a infographic to give you an idea of the measurements of the hands.You may need to use different sized needles to get the correct gauge and accurate sizing. Gauge In stockinette stitch Size 5 mm (US size 8) single pointed needles 13 stitches every 4 inches (10 cm) 20 rows every 4 inches (10 cm) Sizes are written as such: S (M, L, XL) ** If you need help with any stitch or technique, there are video links at the end of the pattern in the Abbreviations section to help you ** Left Hand Cast on 24 (26, 26, 28) Row 1-12: ◊ K1 P1 ◊ Repeat from ◊ to ◊ across. Row 13: K1 (2, 2, 3) INC * K6 INC * Repeat from * to * 2 more times. K the remaining 1 (2, 2, 3) sts. (28, 30, 30, 32 sts) Row 14: P across Row 15: K across Row 16: P across Row 17: K11 (12, 12, 13) M1 K1 M1 K16 (17, 17, 18). (30, 32, 32, 34 sts) Row 18: P across Row 19: K across Row 20: P16 (17, 17, 18) PM1 P3 PM1 P11 (12, 12, 13). (32, 34, 34, 36 sts) Row 21: K across Row 22: P across Row 23: K11 (12, 12, 13) M1 K5 M1 K16 (17, 17, 18). (34, 36, 36, 38 sts) Row 24: P across Row 25: K across Row 26: P16 (17, 17, 18) PM1 P7 PM1 P11 (12, 12, 13). (36, 38, 38, 40 sts) Row 27: K across Row 28: P across Row 29: K11 (12, 12, 13) M1 K9 M1 K16 (17, 17, 18). (38, 40, 40, 42 sts) Row 30: P across Row 31: K across ** Stop here if making the M, L and XL size mittens ** Go to the row marked with ✪ Continue with ❤ Row 32 for SMALL ❤ Row 32: P across Row 33: K11 Pass the next 11 sts onto your st holder. K16 (27 sts) Row 34: P16 PM1 (remake the st used for the thumb) P11 (28 sts) ** Stop here if making the SMALL size mitten ** Go to the row marked with a ♦ Continue for M, L and XL ✪ Row 32: P0 (17, 17, 18) PM1 P11 PM1 P0 (12, 12, 13). (0, 42, 42, 44 sts) Row 33: K across Row 34: P across ** Stop here if making the EXTRA LARGE size mitten ** Go to the row marked with a ✿ Continue with ✚ Row 35 for MEDIUM and LARGE ✚ Row 35: K12 Pass the next 13 sts onto your st holder. K17 (29 sts) Row 36: P17 PM1 (remake the st used for the thumb) P12 (30 sts) ** Stop here if making the MEDIUM and LARGE size mitten ** Go to the row marked with a ♦ Continue for XL ✿ Row 35: K13 M1 K13 M1 K18. (46 sts) Row 36: P across Row 37: K13 Pass the next 15 sts onto your st holder. K18 (31 sts) Row 38: P18 PM1 (remake the st used for the thumb) P13 (32 sts) Go to the Read more
Read more
Easy To Knit Fingerless Gloves – Knit Flat On Straight Needles
For this version of my fingerless gloves, I’m doing something different. Instead of starting at the cuff, I’m starting at the fingers and working to the cuff. Why? Because I’m starting to design gloves with 3D animals, characters, figures, designs, etc. Sometimes these figures can only be made from the bottom up and to do this, I needed to design a basic fingerless glove pattern. Because most of the figures are done with stockinette stitches, I wanted the figures to stand out even more. So, I designed the glove to be done with a garter stitch to contrast with the stockinette. Whew! That was a lot of extra info you probably didn’t want. But now that you know the plan, you can check out my website to see when I start publishing the new gloves. It could be right away. It could be 6 months. We’ll see how it goes… (FYI I already did 😊 You can check out the hippo fingerless gloves by clicking the link – Super Cute Hippo Fingerless Gloves or Mitts – FREE Knitting Pattern. If you would prefer a PDF printable version of the pattern, you can download it for a small fee/donation from a number of places. In particular, my Shopify shop here – Basic Fingerless Gloves. You can also get it at a number of other online book retailers such as Ravelry, LoveCrafts, and Etsy 👈🏼 (40% off on Etsy until the end of March). The Kindle and Paperback version is also on Amazon. If a link isn’t working I either haven’t formatted and published it on that retailer, I am waiting for approval, or I forgot to come back and add the link. Another way to avoid ads and pop-ups, get instant, PRINTABLE downloads of this pattern and others, is by becoming a Member on this website. When you become a Website Supporter for $3/month, you’ll gain access to exclusive member only posts. These posts contain one click downloads of the patterns. Simply click the Download & Print button. The PDF will automatically download to your computer or smart device. You can then read it on your device or print it at your leisure. You can download as many patterns as you like for the same $3 each month. You can go to this page to learn more, become a member and support my work… Exclusive Member Area Become a Member Become a Patron on Patreon If you enjoy this pattern and my other free online knitting patterns, please consider making a small donation or helping me out by visiting my Help Support My Work page. If that’s not possible, that’s totally fine too! Even sharing this page on your social media helps me out immensely. You can use those buttons below to do so easily. Anyways, the pattern is written separately for both the right and left hand. The seam runs along the outside of the hand and along the pinky finger. The thumb is knitted once the hand is completed with picked up stitches. Things You Need And because this pattern is so basic with no pattern of any sort, it’s a great knitting pattern to highlight the colour of your yarn. I have a weakness for variegated/shaded yarns. Don’t ask me why… My grandma did too. It must be genetic. I find the self-striping looks terrible and give it a 1/10. Would not recommend. Worsted weight yarn – 1 standard ball of yarn (215 yards/197 m). Any colours of your choosing. Size 4 mm (size 6 US) knitting needles (or whatever you require to get the correct gauge). Tapestry needle – to sew the seam and work in the ends. Gauge In garter stitch 20 rows = 5 cm or 2.5 inches 9 sts = 5 cm or 2.5 inches To help with the hand sizing, I’ve included a handy infographic (pun intended). I don’t usually design extra large gloves, but you’re smart. You can extrapolate from the sizes I’ve given. Keep in mind, the garter stitch is very forgiving and will stretch and contract as needed to fit. RIGHT Hand Cast on 31 (34, 37, 40) Row 1: (P1 K2). Repeat to the last st. P1. Row 2: (K1 P2) Repeat to the last st. K1. Repeat these 2 rows for a total of 6 rows. If you want to switch colours, do so now. Row 7 – 12: Knit across Row 13: K12 (14, 16, 18) Cast on 13 (13, 15, 15) sts. K19 (20, 21, 22). Total of 44 (47, 52, 55) sts. Click this link if you need help with casting on. Row 14 – 16: Knit across Row 17: K12 (14, 16, 18) K2tog K9 (9, 11, 11,) K2tog K19 (20, 21, 22). Total of 42 (45, 50, 53) sts Row 18 – 20: Knit across Row 21: K12 (14, 16, 18) K2tog K7 (7, 9, 9,) K2tog K19 (20, 21, 22). Total of 40 (43, 48, 51) sts Row 22 – 24: Knit across Row 25: K12 (14, 16, 18) K2tog K5 (5, 7, 7,) K2tog K19 (20, 21, 22). Total of 38 (41, 46, 49) sts Row 26 – 28: Knit across Row 29: K12 (14, 16, 18) K2tog K3 (3, 5, 5,) K2tog K19 (20, 21, 22). Total of 36 (39, 44, 47) sts Row 30 – 32: Knit across Row 33: K12 (14, 16, 18) K2tog K1 (1, 3, 3,) K2tog K19 (20, 21, 22). Total of 34 (37, 42, 45) sts Stop here for SMALL and MEDIUM sizes. Skip ahead to the row marked with ♥ Row 34 – 36: Knit across For the LARGE and X-LARGE Next row: K0 (0, 16, 18) K2tog K0 (0, 1, 1,) K2tog K0 (0, 21, 22). Total of 34 (37, 40, 43) sts ) ♥ Next 13 rows: K across If you want to switch colours, do so now. With the RIGHT side facing Next row: (P1 K2). Repeat to the last st. P1. Next row: (K1 P2) Repeat to the last st. K1. Repeat for a total of 10 rows. Cast off. Be sure Read more
Read more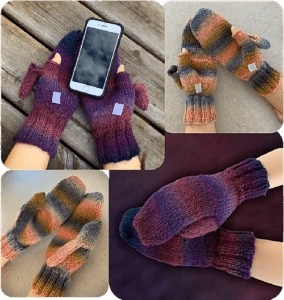
FREE Knitting Pattern – How to Knit Texting Mittens
Improve your texting in cold climates with these thumbless mittens. More than just a pair of fingerless gloves, these keep your hands warm and only expose your thumbs when needed. The thumb pocket is sewn on and the flap is secured at the base of the palm with Velcro* for easy access. The flap hangs in the back out of the way to enable your texting abilities. Plan on using your thumbs for a while? Then simply tuck the flap into the thumb pocket. The sizes are each written separately as each size is a bit different in row and stitch counts. Scroll down this post to the size you would like to make. Medium fits the average lady’s hand, large for men, and small for pre-teens. Don’t forget to share this post! Don’t want to come back here to read the pattern? You can download the pattern to your tablet, phone or computer from my website at Knit a Pair of Texting Mitts. You can also get it from other ebook retailers such as Ravelry, Etsy, and LoveCrafts. If the link isn’t working, I haven’t uploaded it to the site yet. It will be ASAP. If you enjoy this and my other free knitting and crochet patterns, please Help Support My Work. It doesn’t have to be financial, though that’s always appreciated. Every like, share and follow also helps me keep this website running. Another way to get instant, PRINTABLE downloads of this pattern and more, is by becoming a patron and supporting me on Patreon. When you support my work at the $4/month level or higher, the locked posts become visible and you can immediately access the download link. No waiting for an email. Simply click the PDF link at the bottom of the Patreon post and the download is now on your computer, smart phone, tablet or whatever device you’re using. You can then read it on your device or print it at your leisure. You can download as many patterns as you like for the same $4 each month. You can go to this website to become a patron and support my Things you need Yarn (a standard ball of worsted weight yarn will be more than enough) Size 4.5 mm double pointed needles Stitch holder Hook and loop fastener (AKA – Velcro) Glue FREE Knitting Pattern – Texting MittsFREE Knitting Pattern – Texting MittsFREE Knitting Pattern – Texting MittsFREE Knitting Pattern – Texting MittsFREE Knitting Pattern – Texting MittsFREE Knitting Pattern – Texting MittsFREE Knitting Pattern – Texting MittsFREE Knitting Pattern – Texting Mitts Gauge 10 stitches = 2 inches 13 rows = 2 inches Small The Mitt Cast on 32 sts (loosely). Divide these evenly as possible on three of the double pointed needles. Round 1 – 15: K2, P2 (Creates knit 2 purl 2 ribbing). Round 16 – 18: Knit Round 19: K1, pick up a st (scroll down to the bottom of the page if you want to see photos of how I do this), k1, pick up a stitch. Knit remaining sts. Round 20 – 21: Knit Round 22: K1, pick up a st, k3, pick up a stitch. Knit remaining sts. Round 23 – 24: Knit Round 25: K1, pick up a st, k5, pick up a stitch. Knit remaining sts. Round 26 – 27: Knit Round 28: K1, pick up a st, k7, pick up a stitch. Knit remaining sts. Round 29 – 30: Knit Round 31: K1, pick up a st, k9, pick up a stitch. Knit remaining sts. Round 32 – 33: Knit Round 34: K1, place next 11 sts onto the stitch holder. Knit the remaining sts.. There should be 31 sts divided on the three needles. Round 35 and on: Knit in the round on these remaining 31 sts until work measures approximately 3.5 inches from the stitches held back to form the thumb. Form Fingertips Next round: K1, k2tog, K10 K2tog, K2, K2tog, K9, K2tog, K1. Next two rounds: Knit Next round: K1, K2tog, K8, K2 tog, K2, K2tog, K7, K2tog, K1. Next two rounds: Knit Next round: K1, K2tog, K6, K2 tog, K2, K2tog, K5, K2tog, K1. Next two rounds: Knit Transfer the stitches onto two needles being sure that the stitches held back for the thumb are along the fold. Break yarn leaving enough to graft the fingertips (if you scroll to the end of the post there are photos showing you how to do this) and sew in ends. 12 inches is plenty. Finishing the Thumb Worked over the 11 sts on the stitch holder. Leave the end you attach to complete the thumb longer than you normally would. You can use this to sew the thumb flap onto the mitten. Pick up and divided the 11 sts on the stitch holder between the 3 double pointed needles. One of the needles will have more sts than the others. Round 1 – 5: Knit Bind off loosely. Thumb Flap Using 2 of your double pointed needles and working back and forth. Cast on 3 sts. Row 1: Knit Row 2: Purl Row 3: K1, pick up a st, K1 pick up a st, K1. (5 sts) Row 4: Purl Row 5: Knit Row 6: Purl Row 7: Knit Row 8: Purl Row 9: K1, pick up a st, K3, pick up a st, K1. (7 sts) Row 10: Purl Row 11: Knit Row 12: Purl Row 13: Knit Row 14: Purl Row 15: With the right side of your work facing you, cast on 3 sts. Working over the 3 sts you just cast on, K3. Leave these 3 sts on the needle you used to knit them. With another double pointed needle, knit the 7 sts from the previous row. With the wrong side of you work facing you, cast on 3 sts. Transfer these 3 sts onto another double pointed needle. You will now start knitting in the round. With the right side of your work facing you: Round 16 – Read more
Read more
Butterfly Fingerless Gloves – Easy Knit Flat Fingerless Mitts Pattern with Video!
I’ve always avoided designing anything that required extra sewing because, truth be told, I really dislike it. But I realized that avoiding finishing work was limiting what I could create. And maybe, just maybe, not everyone abhors sewing as much as I do. Once I came to terms with that, it opened up a whole new world of possibilities. I tried my darndest to come up with a one-piece design for these gloves—just like my reindeer, owl, spider, mushroom, and hippo fingerless gloves—but after an afternoon of experimenting, the wings never looked quite right. That’s when I decided to take a different approach. The result is a pair of fingerless gloves with a beautiful butterfly on the back of the hand. The butterfly’s body is worked right into the mitt, making it a great way to dip your toes into colour work if you’ve never tried it before. The wings are made separately and attached afterward, giving them a lovely 3D effect that really makes the design stand out. If you’ve never knitted fingerless gloves before, don’t worry—I’ve got you covered! You can start with my Simple Fingerless Gloves pattern, which is perfect for beginners and will give you the skills you need before trying the butterfly version. Also, it has a full how-to video showing how to knit them from start to finish and sew the seams. Click the pic below if you would like to read the pattern and watch the video. If you would to prefer to support my work and have access to a printable, ad-free version of this pattern, you can get the downloadable pattern for a small fee you can get it in my Etsy Shop, Ravelry, LoveCrafts, Buy Me A Coffee and from the shop section on this website – KweenBee.com. If you would prefer to order a Kindle or printed paperback version from Amazon, you can now do so! Shipping is free if you are an Amazon Prime member. Make sure you select the country you are in to take advantage of the free shipping. Click the following link for your country – United States, United Kingdom, Canada, and Australia. The Kindle download and paperback versions are available in English only. . Don’t forget to share this page on Facebook, Pinterest, and the like. Use the icons below for easy click sharing! Your share helps promote my work and helps this website 😊 Things You Need Worsted weight yarn – 1 standard ball of yarn (215 yards/197 m) for the MC. Any colours of your choosing for the body and wings. It won’t take much to make these parts. WC – wing colour MC – main colour BC – body colour Knitting needles: Small – Size 4 US (3.5 mm) knitting needles Medium – Size 6 US (4 mm) knitting needles Large – Size 8 US (5 mm) knitting needles Wings – Size 3 US (3.25 mm) knitting needles Tapestry needle – to sew the seam and work in the ends. Gauge All use stockinette for gauge. Small size 3.5 mm (US size 4) 11 stitches every 2 inches (5 cm) 16 rows every 2 inches (5 cm) Medium size 4 mm (US size 6) 10 stitches every 2 inches (5 cm) 14 rows every 2 inches (5 cm) Large size 5 mm (US size 8) 9 stitches every 2 inches (5 cm) 12 rows every 2 inches (5 cm) Wings (regardless of size) Size 3.25 mm (US size 3) 8 stitches every 2 inches (5 cm) 10 rows every 2 inches (5 cm) You can use 3.5 mm (US size 4) needles too. The sts need to be small and tight for the wing to hold its shape. Sizing Like my other fingerless mitt patterns, I’ve made this as one pattern and adjusted the needle size to change the sizes. This makes it a heck of a lot easier to design and keeps the proportion of the creature the same on all sizes. Frankly, the overall look is better. To help with the hand sizing, I’ve included a handy infographic (pun intended). And because I just couldn’t let newer knitters struggle with making the head, body or wings, I made a quick video to help explain these parts and specific stitches. https://youtu.be/vWKsTmDaY7I Left Glove With the needles you need for the size you want (3.5, 4 or 5 mm) cast on 34 sts with MC Row 1: *P1 K2* Repeat from * to * across. P last st. Row 2: ♠ K1 P2 ♠ Repeat from ♠ to ♠ across. K last st. Repeat rows 1 and 2 for a total of 10 rows. Row 11: K across Row 12: P across Row 13: K across Row 14: P across Row 15: K12 M1 K1 M1 K21 (36 sts) Row 16: P across Row 17: K across Row 18: P11 In BC P1 In MC P9 PM1 P3 PM1 P12 (38 sts) Row 19: In MC K26. In BC make Head Bobble (K3 into one stitch by alternating knitting into the front and back and front of the stitch, turn. Working the following rows into the 3 stitches in the one stitch, P3, turn, K1 M1 K1 M1 K1, turn, P5 turn, TWK2tog K1 K2tog turn, P3 turn, TWK2tog. Pass this st over to the non-working needle. Pass the st on the LEFT over the st on the RIGHT. Pass the st back over to the working needle (do NOT turn). In MC K11 (38 sts) If you need help with making the head, the video below is cued up to help you with this specific part. https://youtu.be/vWKsTmDaY7I?si=xQYEo-4uAJdjniMq&t=15 Row 20: In MC P11. In BC P1 in MC P26 Row 21: In MC K12 M1 K5 M1 K9. In BC K3 into one stitch by alternating knitting into the front and back and front of the stitch. In MC K11 (42 sts) Watch the video below if you need help starting the body. https://youtu.be/vWKsTmDaY7I?si=PhacuBzF8llXg7NZ&t=208 Row 22: In MC P11. In BC P3. In MC P28 Row 23: In MC K28. In BC K3. In MC K11 Row 24: In MC P11. In BC P3. In MC P9 PM1 P7 PM1 P12 (44 sts) Row 25: In MC K30. In BC K3. In MC K11 Row 26: In MC P11. In BC P3. In Read more
Read more
Extra Thick and Quick to Knit Owl Mittens – FREE Pattern
Whooo’s ready to knit some cozy mittens? These extra-thick owl mitts are the perfect project to keep your hands warm and your knitting fun! Knit flat on straight needles, with either 2 strands of worsted weight yarn or super bulky yarn, they’re a fast and easy make, even if you’re newer to knitting. The adorable owl motif adds a charming touch, while the simple construction makes them great for new knitters looking to tackle their first mitten project. Whether you’re making a pair for yourself or as a thoughtful gift, these mitts will fly off your needles in no time! These owl mitts are designed to fit adult hands from small to large, so you can make a pair for just about anyone. Using super bulky yarn, they knit up quickly and create an extra-thick, cozy fabric that’s perfect for chilly weather. Plus, I’ve included helpful videos to guide you through making the owl motif, so even if you’re new to knitting with decorative details, you’ll have all the support you need to bring these charming mitts to life! Not a fan of owls or want something in bigger sizes and more basic. I rewrote this pattern just for that! You can read that version here – Quick and Easy to Knit Mittens – Free Knitting Pattern If you would to prefer to support my work and have access to a printable, ad-free version of this pattern, I offer that too. To get the downloadable pattern for a small fee you can get it in my Etsy Shop, Ravelry, LoveCrafts, Buy Me A Coffee and from the shop section on this website – KweenBee.com. If you would prefer to order a printed paperback version from Amazon, you can now do so! Shipping is free if you are an Amazon Prime member. Make sure you select the country you are in to take advantage of the free shipping. Click the following link for your country – United States, United Kingdom, Canada, and Australia. The downloads and paperback versions are available in English only. Love the free patterns? You can say thanks in a couple of ways. You can read more about how you can Support My Work by clicking that link or make a small donation and Buy Me a Coffee. 👈🏼 That is a website where you can make a one time donation as a thanks. If you don’t want or are unable to make a financial donation, sharing this pattern through social media is a great way to help out too! The links below are a super easy way for you to do so. Things You Need You can make the mittenss with either 2 strands of worsted weight yarn, or one strand of super bulky yarn. Take your pick. But please note, you don’t need both. Choose one or the other. Worsted weight yarn – 2 (two) balls of yarn (215 yards/197 m). You’ll have leftover yarn. or Super Bulky yarn – (186 yards/170 m) like Bernat or Lion brand. Not all super bulky yarn is as thick as others. A Bulky yarn may also work if it’s on the thicker side. As long as your gauge is the same your sizing will be accurate. 5.5 mm (9 US) Small/Medium single point needles or 6 mm (10 US) Large single point needles Cable needle Tapestry needle – to sew seams and work in ends Sizing Like my fingerless gloves I’ve designed, I use the size of the needles to change the size of the mitt. This keeps the proportion of the design consistent to the size of the mitten. My standard for sizing was my hand and designed the knitting pattern according to what kind of rubber gloves fit me comfortably. I wear a medium sized rubber glove and the medium sized mitt of this pattern fits perfectly. You may need to use different sized needles to get the correct gauge and accurate sizing. Gauge In stockinette stitch Small/Medium (this size will fit most hands comfortably) Size 5.5 mm (US size 9) single pointed needles 13 stitches every 4 inches (10 cm) 22 rows every 4 inches (10 cm) Large Size 6 mm (US size 10) single pointed needles 12 stitches every 4 inches (10 cm) 18 rows every 4 inches (10 cm) Choose Your Cuff You have a choice of cuff to make with this mitten pattern. If you prefer a looser cuff with a more solid feel, you can make the first version. If you prefer a tighter, ribbed cuff you can follow the instructions for the K1 P1 version for 12 rows. Choose one or the other. Don’t do both. Once you choose your cuff, move on to row 13. ** If you need any help with any stitch or technique, there are videos at the end of the pattern to help you. ** Click here to watch videos Left Hand Cast on 28 * Row 1: K across Row 2: K1 P2 across. K last st * Repeat from * to * for a total of 12 rows. The cuff looks like this when done. If you would prefer a ribbed cuff, make the following for the 12 rows: Row 1-12: ◊ K1 P1 ◊ Repeat from ◊ to ◊ across. It will look like this when done. ♠ Row 13: K across Row 14: P across ♠ Repeat from ♠ to ♠ one more time. Row 17: K11 M1 K1 M1 K16 (30 sts) Row 18: P across Row 19: K across Row 20: P16 PM1 P3 PM1 P11 (32 sts) Row 21: K across Row 22: P across Row 23: K11 M1 K5 M1 K16 (34 sts) Row 24: P3 K1 P8 K1 P21 Row 25: K21 P1 C4F C4B P1 K3 Row 26: P3 K1 P8 K1 P3 PM1 P7 PM1 P11 (36 sts) Row 27: K23 P1 K8 P1 K3 Row 28: P3 K1 P8 K1 P23 Row 29: K11 M1 K9 M1 K3 P1 K8 P1 K3 (38 sts) Row 30: P3 K1 P8 K1 P25 Row 31: K25 P1 K8 P1 K3 Row 32: P3 K1 P8 K1 P25 Row 33: K11 Pass the next 11 sts onto your st holder. K3 P1 C4F C4B P1 K3 (27 sts) Row 34: P3 K1 P2 K4 P2 K1 P3 PM1 (remake the st used for Read more
Read more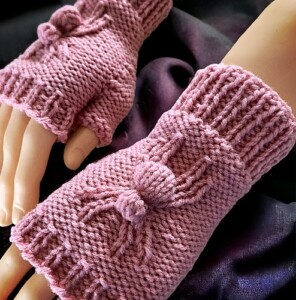
How to Knit Fingerless Gloves – With SPIDERS!! – FREE Knitting Pattern
Creepy? No. Awesome? YES! Knit a pair of fingerless gloves with a spider motif on the back of the hand. Guaranteed to never fall off, the 3D spider is created as you make the mitten. Did you stumble upon this pattern but wanted to buy a pair of spider gloves? Head over to my Etsy shop and you can buy a pair in nearly any colour – CUSTOM MADE Hand Knit Adult Spider Fingerless Granny Gloves Don’t forget to share this post! This isn’t a pattern for beginners. You’ll need to think out of the box a bit for this one; making bobbles and working selectively over given stitches to create the body and head. But the basic glove portion is the same as every other glove with a thumb increase you’ve made, just like my Super Simple Fingerless Gloves only done with a purl stitch to make the spider stand out even more. This pattern has been in the works for a number of years now. It originally started as a knit in the round design, but because of the extensive purling, there were always lines left where the needles met. I couldn’t live with that. So, there was a change in plans from the initial design. First change; it’s knit flat on 2 needles. The second is that instead of including a bunch of how-to pictures, and there were going to be a lot, I decided it was time to utilize links to how-to videos. Everything that may be challenging, particularly rows 25 – 27 can be a little confusing. I made videos that show the trickier parts of these rows. To watch the video, click the link provided. The video opens a new page on the website and you can watch the embedded YouTube video here. Too much blib blab for you? Want to just print the damn pattern already? You have some options available to you. Because of the request by many that they would prefer a PDF download, it’s DONE! You can download this pattern for a small fee/donation. You can get it from a number of places. You can download it from a number of places. In particular, my site here – Knit a Pair of Spider Fingerless Gloves – now with VIDEOS! You can also get it at a number of other online book retailers such as Ravelry, LoveCrafts, and Etsy. And the paperback version is also available on Amazon! It’s available to order in most countries. Be sure to make your purchase in the country you love so you can get free shipping with your Amazon Prime membership. Become a Member Wrong Stitch Counts It is very easy to have the wrong number of stitches created around the spider. This can happen between the gusset for the thumb and the spider, or for the shorter side. If that happens you can take it apart. The other option is to just go with it. Being a stitch or two off won’t be noticable to the wearer. If you decide to “just go for it”, line up the stitches done to create the spider to previous spider stitches. In general, this is just the legs. They are very obvious. Keep in mind that you always knit the legs on the right side and purl the legs on the wrong side. Adjust the background of the mitt with your incorrect count of purl stitches on the right side and the knit stitches on the wrong side. For example, if you’re making Row 30, instead of K7 at the start of the row you made a mistake and now have K8. Knit the 8 stitches instead and start the rest of the pattern from there. Example row: Row 30: K7 *P1 K1* Repeat from * to * 2 more times. P1 K6 M1 K11 M1 K12 Abbreviations If you need help with the less common stitches in the abbreviations list below, all are included in this playlist below. Specific videos for rows 25-27 are included in this list and also embedded below each row for the Left Hand glove. https://youtube.com/playlist?list=PLFPwDkPBTKo_KnsA6xojQkhRUVUq_i7tO K – Knit P – Purl st – stitch sts – stitches PM1 – Make one (purl wise). Increase one stitch between the stitches. Pick up the yarn between the stitches. Twist it slightly and place it on your non-working needle. Knit the stitch. Watch this video on How to PM1 or Purl Make 1 to see how. M1 – Make one (knit wise). Increase one stitch between the stitches. Pick up the yarn between the stitches. Twist it slightly and place it on your non-working needle. Knit the stitch. Watch this video on How to M1 or Make 1 to see how. P3tog – Purl 3 stitches together P2tog – Purl 2 stitches together K2tog – Knit 2 stitches together K3tog – Knit 3 stitches together C1B – Cable 1 back. Pick up next stitch on a cable needle. Pull this stitch to the BACK of your work. Knit the next stitch. Purl the stitch on the cable needle. Watch this video on Cable 1 Back to see how. C1F – Cable 1 forward. Pick up the next stitch on a cable needle. Pull this stitch to the FRONT of your work. Purl the next stitch. Knit the stitch on the cable needle. Watch this video on Cable 1 Forward to see how. FB2 – Knit in the front and back of the next stitch. This is also known as an increase one in the next stitch. I’m labeling it as this because it is very easy to make a mistake here and pick up an extra stitch. This way I know I have your attention and made you look ? No need to thank me..or complain. Both seem to be a likely response tbh. Things You Need Worsted weight yarn – a standard ball of yarn (215 yards/197 m) Knitting needles – described below in sizing and gauge Cable Needle Stitch Holder Tapestry needle to sew the seam and work in the ends Sizing & Gauge Like my other fingerless gloves I’ve designed such as my owl fingerless gloves, Read more
Read more
Christmas Snowman Fingerless Gloves – Free Knitting Pattern
These snowman fingerless gloves started as a little experiment and quickly became one of my favourite designs to work on. I’ve been doing this style of colourwork for years without realizing it actually falls under intarsia, only with my own twist that adds a bit of 3D shaping to make the snowman pop. This isn’t a beginner project, but it is a really satisfying knit if you enjoy something a little more detailed. One of the best parts is how customizable the snowman is. You can decorate it any way you like, and I included a handful of simple embroidery techniques so you can add your own touches and give your snowman its own personality. It’s a fun winter project and perfect for anyone who loves unique holiday knitting patterns. ❄️ ☃️ If you have never made fingerless gloves from the fingers to the cuff, you may want to practice with the basic pattern first. It will help you get comfortable with the construction before jumping into the snowman version. If you would like to try it, click this link – Basic Fingerless Gloves. If you would to prefer to support my work and have access to a printable, ad-free version of this pattern, I offer that too. To get the downloadable pattern for a small fee you can get it in my Etsy Shop, Ravelry, LoveCrafts, Buy Me A Coffee and from the shop section on this website – KweenBee on Shopify. If you would prefer to order a Kindle or printed paperback version from Amazon, you can now do so! Shipping is free if you are an Amazon Prime member. Make sure you select the country you are in to take advantage of the free shipping. Click the following link for your country – United States, United Kingdom, Canada, and Australia. The Kindle download and paperback versions are available in English only. Don’t forget to share this page! Table of Contents Things You Need Worsted weight yarn in three colours: Main Colour (MC): approx. 50 g Snowman Colour (SC): a small amount (15 gram) Cap Colour (CC): hardly anything (6 grams) 1 set of single pointed knitting needles – See notes on sizing for knitting needles required. Tapestry needle – to sew the seam and work in the ends. 2 mini pom-poms – optional for top of cap Assorted colours of yarn or embroidery thread for facial features and arms. Gauge In stockinette stitch Small size 3.5 mm (US size 4) single pointed needles 11 stitches every 2 inches (5 cm) 16 rows every 2 inches (5 cm) Medium size 4 mm (US size 6) single pointed needles 10 stitches every 2 inches (5 cm) 14 rows every 2 inches (5 cm) Large size 5 mm (US size 8) single pointed needles 9 stitches every 2 inches (5 cm) 12 rows every 2 inches (5 cm) Sizing Like my other fingerless mitt patterns, I’ve made this as one pattern and adjusted the needle size to change the sizes. This makes it a heck of a lot easier to design and keeps the proportion of the creature the same on all sizes. Frankly, the overall look is better. To help with the hand sizing, I’ve included a handy infographic (pun intended). LEFT Hand With MC, cast on 34. Row 1: With MC (P1 K2). Repeat to the last st. P1. Row 2: (K1 P2) Repeat to the last st. K1. Repeat these 2 rows for a total of 4 rows. Row 5 – 10: Knit across Row 11: K14 Cast on 13 sts. K20. (47 sts) If you need help with casting on I’ve cued up the video below and it will show you how. The video is for the basic fingerless gloves without the snowman but is done the same way. For this pattern, cast on 13 sts regardless of size. https://youtu.be/9Xvauq-EWQI?si=O4jyPu-RLjzJItdG&t=7 Row 12 – 14: Knit across. Row 15: K14 K2tog K9. K2tog K20. (45 sts) Row 16 – 18: Knit across. Row 19: K14. K2tog K7 K2tog K9. With SC Bobble 4 twice (K4 into one stitch by alternating knitting into the front and back of the stitch, turn. Working the following rows into the 8 stitches in two stitches, P8, turn, K8, turn, P8, turn, K8, turn, P8, turn, K8, turn, P8, turn, TWK2tog two times, K2tog two times, turn, P4, turn, TWK2tog K2tog (do NOT turn).With MC K9. (43 sts) If you don’t know how to TWK2tog, this video will show you how. https://youtu.be/UlRMP-b_w8o?si=eZnrHgGtPPDfREK-&t=818 Row 20 – 24: Knit across. Row 25: K14. K2tog K5 K2tog K9. With SC Bobble 3 twice (K3 into one stitch by alternating knitting into the front and back of the stitch, turn. Working the following rows into the 6 stitches in two stitches, P6, turn, K6, turn, P6, turn, K6, turn, P6, turn, TWK2tog, K2tog two times, Pass the 2 sts back onto your non-working needle. Pass the LEFT st over the RIGHT st. Pass this st over to the working needle. Pass the st on the RIGHT over the st on the LEFT. (do NOT turn). With MC K9. (40 sts) Row 26 – 28: Knit across. Row 29: K14. K2tog K3 K2tog K9. With SC Bobble 5 (K5 into one stitch by alternating knitting into the front and back of the stitch, turn. Working the following rows into the 5 stitches in one stitch, P6, turn, K6, turn, P6, turn, K6, turn, P6, turn, TWK2tog, K, K2tog, Pass the 2 sts back onto your non-working needle. Pass the LEFT st over the RIGHT st. Pass this st over to the working needle. Pass the st on the RIGHT over the st on the LEFT. (do NOT turn). With MC K9. (38 sts) Row 30 – 32: Knit across. Row 33: K14. K2tog K1 K2tog K19. (36 sts) Row 34 – 36: Knit across. Row 37: K14 K2tog two times. K18. (34 sts) Row 38 – 40: Knit across. *Row 41: (P1 K2). Repeat to the last st. P1. Row 42: (K1 P2) Repeat to the last st. K1. * Repeat from * to * for a total of 12 rows of ribbing. Cast off. Make the Thumb With the RIGHT side facing, Pick up 13 sts from the additional sts you cast on in Row 11. Pick up the st in the twist formed from casting on. If you need help you can watch this video. https://youtu.be/9Xvauq-EWQI?si=h5SK9aWSfC7qYWsD&t=59 With the WRONG side facing Row 1: (K1 P2) Repeat to the last st. K1. Row Read more
Read more
Free Holiday Knitting Pattern – Christmas Reindeer Fingerless Gloves
Bring the magic of the holidays to your knitting with this Reindeer Fingerless Gloves knitting pattern! Designed in adult sizes only, these cozy and festive gloves feature a sweet reindeer motif with little antlers that make them extra fun for winter wear. Whether you’re getting ready for Christmas parties, enjoying a holiday market, or just want something cozy and seasonal, these fingerless mitts are a perfect choice. The pattern is not for beginners, but it does include step-by-step photos showing exactly how to create the antlers and work through the trickier details. If you love making handmade Christmas gifts, these reindeer gloves are a great project—ideal as stocking stuffers, gifts for knit-worthy friends, or a special treat just for you. Inspired by the holiday classic Rudolph the Red-Nosed Reindeer, these festive fingerless gloves capture the charm of winter’s favourite reindeer while keeping your hands warm and practical for everyday wear. Love the reindeer motif? I also have Christmas slippers with the same deer face you can make for the entire family. Click this link – Reindeer Slippers for the Whole Family or tap the photo. If you would to prefer to support my work and have access to a printable, ad-free version of this pattern, I offer that too. To get the downloadable pattern for a small fee you can get it in my Etsy Shop, Ravelry, LoveCrafts, Buy Me A Coffee and from this website – KweenBee on Shopify. If you would prefer to order a Kindle or printed paperback version from Amazon, you can now do so! Shipping is free if you are an Amazon Prime member. Make sure you select the country you are in to take advantage of the free shipping. Click the following link for your country – United States, United Kingdom, Canada, and Australia. The Kindle download and paperback versions are available in English only. Don’t forget to share this page on Facebook, Pinterest, and the like. Use the icons below for easy click sharing! Your share helps promote my work and helps this website 😊 Things You Need Worsted weight yarn – 1 standard ball of yarn (215 yards/197 m). Any colours of your choosing. MC – main colour DFC – deer face colour AC – antler colour CC – cuff colour Knitting needles: (See notes on sizing) Small – Size 3 US (3.25 mm) knitting needles Medium – Size 6 US (4 mm) knitting needles Large – Size 8 US (5 mm) knitting needles Cable needle Tapestry needle – to sew the seam and work in the ends. 0.27 inch (7mm) wiggle eyes or small buttons. You can also embroider eyes on if you prefer. Pom poms Gauge In stockinette stitch Small size 3.5 mm (US size 4) knitting needles 11 stitches every 2 inches (5 cm) 16 rows every 2 inches (5 cm) Medium size 4 mm (US size 6) knitting needles 10 stitches every 2 inches (5 cm) 14 rows every 2 inches (5 cm) Large size 5 mm (US size 8) knitting needles 9 stitches every 2 inches (5 cm) 12 rows every 2 inches (5 cm) Sizing Like my other fingerless mitt patterns, I’ve made this as one pattern and adjusted the needle size to change the sizes. This makes it a heck of a lot easier to design and keeps the proportion of the hippo the same on all sizes. Frankly, the overall look is better. To help with the hand sizing, I’ve included a handy infographic (pun intended). Keep in mind, the garter stitch is very forgiving and will stretch and contract as needed to fit. RIGHT Hand With MC or CC – cast on 34 Row 1: (P1 K2). Repeat to the last st. P1. Row 2: (K1 P2) Repeat to the last st. K1. Repeat these 2 rows for a total of 6 rows. (If you want to change to MC, do so now.) Row 7 – 12: Knit across Row 13: K14 Cast on 13 sts. K20. (47 sts) Watch the video below if you need help with casting on. https://youtu.be/9Xvauq-EWQI Row 14-16: Knit across Row 17: K14, K2tog K9, K2tog, K20. (45 sts) Row 18-20: K across Row 21: K14, K2tog K7 K2tog, K9, In DFC (K3 into one stitch) twice. Turn. Working the following rows into the 6 stitches in the two stitches, P6, turn, K1, M1 K4 M1, K1 turn, P8, turn, K8, turn, P8, turn, K8 (do NOT turn). In MC K9. (49 sts) Row 22: In MC K9 In DFC P8. In MC K32 Row 23: In MC K32 In DFC K8. In MC K9. Row 24: In MC K9 In DFC P8. In MC K32 Row 25 : In MC K14, K2tog K5 K2tog, K9, In DFC DFC TWK2tog. K4 K2tog. In MC K9. (45 sts) Row 26: In MC K9 In DFC P6. In MC K30 Row 27: In MC K30 In DFC TWK2tog. K2 K2tog. In MC K9. (43 sts) Row 28: In MC K9 In DFC P4. In MC K30 Row 29: In MC K14, K2tog K3 K2tog, K8, In DFC K3 into one stitch by alternating knitting into the front, the back and the front of the stitch, turn. Working the following rows into the 3 stitches in the one stitch, P3, turn, K3, turn, P3, turn, TWK3tog (do NOT turn). In AC TWK2tog K2tog. In DFC K3 into one stitch by alternating knitting into the front, the back and the front of the stitch, turn. Working the following rows into the 3 stitches in the one stitch, P3, turn, K3, turn, P3, turn, K3tog (do NOT turn). In MC K8. (39 sts) Break DFC yarn. Row 30: In MC K9 In AC P2 In MC K28 Row 31: In MC K27 Pick up the next st with the cable needle. Pull the st BACK. In AC K the st on the non-working needle. In MC K the st on the cable needle. Pick up the next st with the cable needle. Pull the st FORWARD. In MC K the st on the non-working needle. In AC K the st on the cable needle. In MC In MC K8. (39 sts) Row 32: In MC K8. In AC P1. In MC K2. In AC P1. In MC K27. Row 33: In MC K14, K2tog K1 K2tog, K7, Pick up the next st with the cable needle. Pull the st BACK, In AC K the st on the non-working needle, IN MC K the st on the cable needle. In AC pick up and K Read more
Read more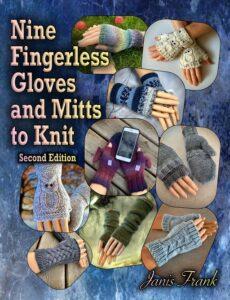
Nine Fingerless Gloves and Mitten Patterns to Knit
I’ve been busy as of late! I’ve updated photos and rewritten a few of my fingerless glove and mitt patterns over the last few weeks to bring you yet another compilation of my mitt and glove patterns! In this edition, there are a total of 9 patterns with all the classic favourites, plus a couple that were so old you may not have even known they existed! If you don’t want to purchase the collection, that’s cool too! 😁 I have 2 options for you. Scroll down the page to the links to the free-to-read online versions further down the page. Or… …if you would like to purchase a copy, you can purchase and print the PDF yourself . It is cheaper that way, of course. You can purchase it from my Shopify shop here – Nine Fingerless Gloves and Mitten Patterns to Knit or from my Etsy shop here – Nine Knitting Patterns! – Fingerless Gloves and Mitten Collection. Either way I would like you to know it’s 93 pages. It’s a lot to print, but if you are comfortable reading PDF’s on your tablet or phone, this a very economical option. All of the mitts and gloves shown in the photos below are included in this pattern collection. Flip mitts – over the fingersFlip mitts – fingers exposedFlip mitts with no flap attachedFREE Knitting Pattern – Texting MittsGrey Cable Fingerless Gloves Taupe Fingerless GlovesBlue bow fingerless mittsGreen bow fingerless arm warmers This collection contains patterns for fingerless gloves knit flat on 2 needles and seamless gloves and mittens knit in the round on double pointed needles (DPN). This compilation also includes mitts that are specifically designed for texting. And lastly, another design to free your fingers when you need them but cover your fingers when required. In short, this collection meets all your fashion and functionality requirements. If you want to purchase the printed, paperback book, delivered to your door, you can buy it from Amazon. If you’re an Amazon Prime member, shipping is FREE. To make sure you’re getting the best deal for where you live, please click the country you are in or closest to: United States United Kingdom Canada Australia This publication is available in English only. Like always, all of the patterns are free to read on this website. They are ad supported and unprintable. Sorry, but too many people were just printing the pages leaving me with nothing but a bill for web hosting costs. You may not realize this, but with each illegal print, you cost me advertising revenue. I am writing patterns to help support me and my family. I’m not a charity. I can only give so much folks! The list of the patterns in this collection include the following (all titles are clickable links to the read online pattern btw): Super Simple Fingerless Gloves Easy to Knit Owl Fingerless Gloves How to Knit Fingerless Gloves How to Knit Fingerless Gloves – with OWLS! Basic Long Fingerless Gloves Cable Fingerless Gloves or Mitts Knit a Pair of Flip Mittens or Fingerless Gloves Knit a Pair of Texting Mitts Arm Warmers or Gloves – with BOWS! I’ve also organized it so there is a specific page with all of the glove and mitten patterns in one place. You can see that here: Fingerless Gloves and Flip Mitts – FREE Knitting Patterns Happy knitting everyone!!!
Read more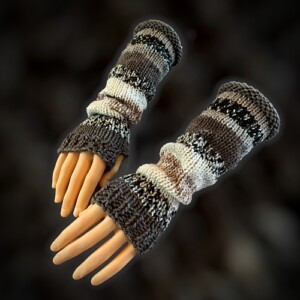
How to Knit Long Fingerless Gloves – FREE Knitting Pattern
Quickly knit a pair of long fingerless gloves with this FREE knitting pattern. Knit 2 different styles with just one pattern!
Read more
How to Knit Fingerless Gloves
I’m not sure if this happens to anyone else, but I found some fantastic yarn on clearance that I absolutely had to have. Of course, I had no idea what to do with it. Then I got on my fingerless glove kick. I have written other patterns in the past such as my Owl Fingerless Gloves, Flip Mitts, and Texting Mitts, but they were all made with standard worsted weight yarn. The yarn I couldn’t leave behind was light weight; 3 as by North American terminology. So, a redesign of my gloves was in order! I absolutely love that these are a lighter, more delicate version of my previous patterns. AND I can use colour changing yarn and it works! If this is your first time using one of my patterns, I kinda got a thing for shaded yarns…just sayin’. And if you were looking to buy a pair of these beauties but accidentally wound up here, click this link Hand Knit Fingerless Gloves and you can purchase a finished pair from my website. Or if you prefer to order through Etsy, you can get them there too – Fingerless Gloves by KweenBee on Etsy. Like my other fingerless mitts, these are knitted on double point needles, also known as DPN. Though this sounds intimidating, it really is very simple. This is definitely not a beginner’s knitting project, but knitting in the round is the same as knitting flat. Only difference is you don’t flip your work back in forth; it’s done a continuous circle. Plain Cuff Fingerless Gloves If you are looking to make a pair of longer fingerless mitts, I can help you with that too! The striped fingerless glove pattern is basically the same as this one, but I’ve worked out the decreases to make them go all the way up to the elbow. You can click this link (or the photos) to read the pattern online. And they don’t need to be striped. For the pair in the photo I used self-striping yarn so no ends to work in. But you can also make a more plain style like the green ones. The sizing for mittens, like socks or slippers, is somewhat general. The small size will fit someone with a smaller hand. Think a younger teenager. A medium is an average lady’s hand. I’m a medium when it comes to rubber gloves and I designed the medium mitt to fit my hand. Large is for a larger size hand. Each size is written out in full as the row and stitch counts differ for each. Enjoying the free patterns and would like to Help Support My Work, GREAT! Please give what you can and like, share and follow me on social media. You can use the links above to easily do so. The PDF is also available for your viewing pleasure. If you are tired of the ad supported version, you can download the PDF for a small fee from my website – How to Knit Fingerless Gloves, Ravelry or Etsy. All are the same price no matter where you get it from. Another way to get instant, PRINTABLE downloads of this pattern and more, is by becoming a Member on this website. When you become a Website Supporter for $3/month, you’ll gain access to exclusive member only posts. These posts contain one click downloads of the patterns. Simply click the Download & Print button. The PDF will automatically download to your computer or smart device. You can then read it on your device or print it at your leisure. You can download as many patterns as you like for the same $3 each month. You can go to this page to learn more, become a member and support my work… Exclusive Member Area Things you need Yarn (a standard ball of light weight yarn (3 weight) will be more than enough) Size 4 mm (US size 6) double pointed needles (or whatever size needles you need to get the correct gauge). Stitch holder Gauge 11 stitches = 2 inches 17 rows = 2 inches Small The Mitt Cast on 32 sts (loosely). Divide these evenly as possible on three of the double pointed needles. Round 1 – 12: K1, P1 (Creates knit 1 purl 1 ribbing). Round 13 – 15: Knit Round 16: K1, M1, K1, M1, K30. Round 17 – 18: Knit Round 19: K1, M1, K3, M1, K30. Round 20 – 21: Knit Round 22: K1, M1, K5, M1, K30. Round 23 – 24: Knit Round 25: K1, M1, K7, M1, K30. Round 26 – 27: Knit Round 28: K1, M1, K9, M1, K30. Round 29 – 30: Knit Round 31: K1, M1, K11, M1, K30. Round 32 – 33: Knit Round 34: K1, place next 13 sts onto the stitch holder. K30. Round 35 – 42: K around. Round 43 – 47: K2tog, P1, *K1, P1* Repeat from * to * around. Bind off loosely. The Thumb Worked over the 13 sts on the stitch holder. Pick up and divided the 13 sts on the stitch holder between the 3 double pointed needles. One of the needles will have more sts than the others. Round 1 – 3: Knit Bind off loosely. Medium The Mitt Cast on 36 sts (loosely). Divide these evenly as possible on three of the double pointed needles. Round 1 – 15: K1, P1 (Creates knit 1, purl 1 ribbing). Round 16 – 18: Knit Round 19: K1, M1, K1, M1, K34. Round 20 – 21: Knit Round 22: K1, M1, K3, M1, K34. Round 23 – 24: Knit Round 25: K1, M1, K5, M1, K34. Round 26 – 27: Knit Round 28: K1, M1, K7, M1, K34. Round 29 – 30: Knit Round 31: K1, M1, K9, M1, K34. Round 32 – 33: Knit Round 34: K1, M1, K11, M1, K34. Round 35 – 36: Knit Round 37: K1, M1, K13, M1,K34. Round 38 – 39: Knit Round 40: K1, place next 15 sts onto the stitch holder. K34. Round 41 Read more
Read more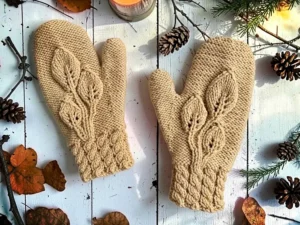
Free Knitting Pattern for Leaf Mittens on Straight Needles
If you’re looking for a free knitting pattern for leaf mittens knit flat on straight needles, these Autumn Leaves Mittens are a cozy and elegant choice for fall and winter. Designed with three textured leaf motifs across the back of the hand, this pattern brings a beautiful nature-inspired detail to classic knit mittens. The leaves are worked in different sizes to fit naturally across the hand, creating a balanced and eye-catching design. Best of all, these mittens are knit flat and seamed, making them perfect for knitters who prefer working with straight needles instead of double pointed needles. This intermediate mitten knitting pattern is ideal for knitters who are comfortable with basic stitches and ready to try textured knitting techniques. The leaf motif uses simple shaping to create depth and dimension, and video tutorials are included to help guide you through the more detailed steps. If you’ve been searching for a free knit mitten pattern on straight needles, a flat knit mitten pattern with a leaf design, or cozy handmade mittens for women, this pattern is a rewarding project that results in warm, stylish mittens. If you need help with sts, check the Abbreviations section. I’ve included descriptions of how to make them and embedded videos where I could. Scroll down the page or use the Table of Contents. If you would prefer the printable version of the pattern, I have a number of online retailers you can buy it from including my online KweenBee on Shopify, Etsy, and Buy Me A Coffee. I also have the paperback booklet and Kindle versions available on Amazon. Links coming soon! Don’t forget to share this pattern with anyone you think may like it on your social media accounts. It’s free for everyone to use and it’s a great way to support my work without paying a single cent. I even included the handy share button right here 👇🏼 If you would like to make a matching winter set, you can! Right now I have the matching headband/ ear warmer, a bobble beanie and slouchy hat. I’m planning n making a matching scarf too. I’m not sure when I’ll get to it. I’ve got a lot going on right now 😊 You can tap or click on either pic below if you would like to read the FREE patterns on this website. Things You Will Need Worsted weight yarn (less than a standard ball will be more than enough). I used Red Heart worsted weight yarn when designing the pattern but any kind will do. Set of single pointed needles (see note on sizing) Stitch holder Tapestry needle to sew the seams and work in ends Cable needle Sizing Like my other fingerless gloves I’ve designed such as my owl fingerless gloves, I use the size of the needles to change the size of the mitt. This keeps the proportion of the design consistent to the size of the mitten. My standard for sizing was my hand and designed the knitting pattern according to what kind of rubber gloves fit me comfortably. I wear a medium sized rubber glove and the medium sized glove fits perfectly. You may need to use different sized needles to get the correct gauge. Gauge In stockinette stitch Small size 3.5 mm (US size 4) single pointed needles 11 stitches every 2 inches (5 cm) 16 rows every 2 inches (5 cm) Medium size 4 mm (US size 6) single pointed needles 10 stitches every 2 inches (5 cm) 14 rows every 2 inches (5 cm) Large size 5 mm (US size 8) single pointed needles 9 stitches every 2 inches (5 cm) 12 rows every 2 inches (5 cm) Right Hand Cast on 41 Row 1: * P1 K4 * Repeat from * to * to the last st. P1 Row 2: ◊ K1 P4 ◊ Repeat from ◊ to ◊ to the last st. K1 ♥ Row 3: * P1 C4f * Repeat from * to * to the last st. P1 Row 4: as row 2 Row 5: as row 1 Row 6: as row 2 ♥ Repeat from ♥ to ♥ two more times. Row 15: As row 3 Row 16: As row 2 Row 17: P5 P2tog P3 P2tog K1 PM1 K2 P5 * P2tog P3 * Repeat from * to * 3 more times. P4. (36 sts) Row 18: K22 P2 K1 P1 K10 Row 19: P10 K1 P1 K2 P22 Row 20: K22 P2 K1 P1 K10 Row 21: P9 C1B P1 K2 P22 Row 22: K13 INC K1 INC K6 P2 K2 P1 K9 (38 sts) Row 23: P9 M1 K1 M1 P2 K1 C1F P23 (40 sts) Row 24: K23 P1 K1 P1 K2 P3 K9 Row 25: P9 K1 YO K1 YO K1 P2 K1 P1 C1F P22 (42 sts) Row 26: K13 INC K3 INC K4 P1 K2 P1 K2 P5 K9 (44 sts) Row 27: P9 K2 YO K1 YO K2 P2 K1 P2 K1 P24 (46 sts) Row 28: K24 P1 M1 K2 P1 K2 P7 K9 (47 sts) Row 29: P9 TWK2tog K3 K2tog P2 K1 P3 M1 K1 M1 P24 (47 sts) Row 30: K13 INC K5 INC K4 P3 K3 P1 K2 P5 K9 (49 sts) Row 31: P9 TWK2tog K1 K2tog P2 K1 P3 K1 YO K1 YO K1 P26 (49 sts) Row 32: K26 P5 K3 P1 K2 P3 K9 Row 33: P9 Sl as if to knit K2tog PSSO P2 K1 P3 K2 YO K1 YO K2 P26 (49 sts) Row 34: K13 INC K7 INC K4 P7 K3 P1 K12 (51 sts) Row 35: P11 C1B P3 K3 YO K1 YO K3 P28 (53 sts) Row 36: K28 P9 K4 P1 K11 Row 37: P11 M1 K1 M1 P4 TWK2tog K5 K2tog P28 (53 sts) Row 38: K13 INC K9 INC K4 P7 K4 P3 K11 (55 sts) Row 39: P11 K1 YO K1 YO K1 P4 TWK2tog K3 K2tog P30 (55 sts) Row 40: K30 P5 K4 P5 K11 Row 41: P11 K2 YO K1 YO K2 P4 TWK2tog K1 K2tog P30 (55 sts) Row 42: K13 INC K11 INC K4 P3 K4 P7 K11 (57 sts) Row 43: P11 K3 YO K1 YO K3 P4 Sl as if to knit K2tog. PSSO. P4. Pass the next Read more
Read more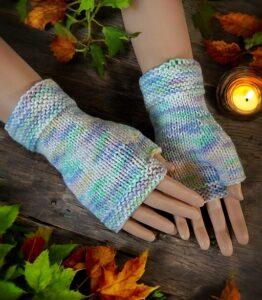
Super Simple Fingerless Gloves – FREE Knitting Pattern – Now with How-to Video!
Are you just learning to knit? Tired of making dishcloths and scarves and want to make something awesome? Here is something that will make you look like a pro when it comes to knitting. A total brag-worthy design that any knitting newbie can make. I’ve written a bunch of beginner patterns for slippers, but never for fingerless gloves. It was a common request, but for some reason, I never felt compelled to do so. After a bit of false starts and redesigns, I’ve finally come up with a fingerless glove pattern that I am happy with. I’ve kept the seams to a minimum and placed the seam along the outside of the hand and inside of the thumb. If you’re not a fan of seams my other fingerless gloves and mitts knitted on dpn can be found here – Fingerless Gloves – with OWLS, How to Knit Texting Mittens, How to Knit Fingerless Gloves and How to Knit Flip Mitts. I’ve also jazzed up this basic design a bit. If you want to knit owl gloves flat on 2 needles just like this pattern is, You can use this link – Easy to Knit Owl Fingerless Gloves to read the free knitting pattern online. I also made another variation of this pattern. This time it’s for a pair with a butterfly on the back of the hand – Butterfly Fingerless Gloves – Easy Knit Flat Fingerless Mitts Pattern. The video how’s you how to make the 🦋 butterfly. These mitts are knitted completely flat, on 2 needles and are perfect for the beginner. There is use of a stitch holder and picking up those stitches to complete the thumb, but it isn’t difficult. Slide them on to the holder, slide them back on the needle when instructed and knit them like any other set of stitches. And finally, after much procrastinating, the complete how-to video is done! I even show how to sew up the seams and work in the ends. I know there have been a few of you out there that don’t like how their seams turn out. This is how I make mine flat and even. https://youtu.be/_lXjIhWnpks I’ve also written the pattern to fit different sizes – small, medium and large. Once again I’ll use the analogy of what fits my hand. I wear a medium rubber glove and the medium size fits my hand perfectly. I wash dishes and scrub my toilets. I wear gloves when I do. If you never wear rubber or latex gloves, this won’t make any sense to you, I guess. I’m only saying this because I have had complaints about my sizing references. I don’t live in a gloveless kind of world but I’m glad some people do. It always amazes me what some “Karens” feel the need to bitch about. If you want to go to a specific size you can try these links. If I’ve done my code correctly, it should take you to the right point on the webpage: Small Medium Large I’ve made a PDF download for this pattern. I didn’t think it was going to be this long until I wrote it out. I made the decision to write each size and hand out separately to make it even easier for the new knitters out there who want to give this pattern a go. And btw, you can totally do it! To get the downloadable pattern for a small fee you can get it in my Etsy Shop, Ravelry, LoveCrafts, Buy Me A Coffee and from my Shopify shop. If you would prefer to order a printed paperback version from Amazon, you can now do so! Shipping is free if you are an Amazon Prime member. Make sure you select the country you are in to take advantage of the free shipping. Click the following link for your country – United States, United Kingdom, Canada, and Australia. Available in English only. Love the free patterns? You can say thanks in a couple of ways. You can read more about how you can Support My Work by clicking that link or make a small donation and Buy Me a Coffee. 👈🏼 That is a website where you can make a one time donation as a thanks. If you don’t want or are unable to make a financial donation, sharing this pattern through social media is a great way to help out too! The links below are a super easy way for you to do so. Gauge This is important to follow for correct sizing. 2″ (5 cm) = 10 sts 2″ (5 cm) – 16 rows If You Need Help with the M1 or P1 Scroll down to the end of the page to watch quick how-to videos showing how to do these simple stitches. There’s a video showing how to use a stitch holder too! Things You Need: Worsted weight yarn – one regular ball will be more than enough Size 6 US (4 mm) knitting needles Stitch holder – It looks like a big safety pin Tapestry needle Small Right Hand Cast on 31 Rows 1-14: Knit across Row 15: Knit across Row 16: Purl across Row 17: Knit across Row 18: Purl across Row 19: Knit across Row 20: Purl across Row 21: Knit across Row 22: Purl across Row 23: K18 M1 K1 M1 K12 Row 24: Purl across Row 25: Knit across Row 26: P12 PM1 P3 PM1 P18 Row 27: Knit across Row 28: Purl across Row 29: K18 M1 K5 M1 K12 Row 30: Purl across Row 31: Knit across Row 32: P12 PM1 P7 PM1 P18 Row 33: Knit across Row 34: Purl across Row 35: K18 M1 K9 M1 K12 Row 36: Purl across Row 37: K18. Slip the next 11 stitches onto a stitch holder. K12. Row 38: Purl across Row 39: Knit across Row 40: Purl across Row 41-48: Knit across Cast off. Making the Thumb Pick up the 11 stitches on the stitch holder Row 1: Read more
Read more
Autumn Leaf Half Gloves – FREE Knitting Pattern for Fingerless Gloves Knit on Straight Needles
The inspiration of this pattern came from my previous Spider Fingerless Gloves pattern. I really like incorporating the design into the final wearable piece. I’ve always liked the leaf pattern and this seemed to be a great way to use it. There isn’t a full-on how to for this pattern, by I have included helpful videos to show you how to do certain parts of the pattern. These will certainly help with any of the tricker parts like knitting the wrong side of the YO K1 YO and drawing the edges of the leaves together to a point. Click the link and it will open and automatically play the YouTube video. If you would like to purchase a copy of this pattern that you can download and print, I have a number of options for you. You can buy the pattern on this website – Autumn Leaf Half Gloves – with How-to VIDEOS, Ravelry, Etsy, LoveCrafts, Creative Fabrica, Google Books and Amazon. Amazon has the book in both paperback and Kindle formats. Use these 👇🏼 to share on social media 🥰 If you are loving this and all my other free patterns, please help out financially by visiting my Help Support My Work Page. If you can’t give cash, and I get that not everyone can, please do your part and share this where you can. Every share on social media helps promote my work and expose it to even more people. I’ve made it super easy for everyone to do that. By clicking those links up there 👆🏼 you can share it nearly everywhere. Gauge This is important to follow for correct sizing. This is when using the US size 6 (4 mm) knitting needles in stockinette. 2” (5 cm) – 10 sts 2” (5 cm) – 15 rows Things You Need Knitting needles: Small – Size 3 US (3.25 mm) knitting needles Medium – Size 6 US (4 mm) knitting needles Large – Size 8 US (5 mm) knitting needles Worsted weight yarn – any standard size ball will do Cable Needle – There are a number a styles but I prefer the hook version Stitch holder – It looks like a big safety pin Tapestry needle Sizing Like my other fingerless mitt patterns, I’ve made this as one pattern and adjusted the needle size to change the sizes. This makes it a heck of a lot easier to design and keeps the proportion of the leaves the same on all sizes. Frankly, the overall look is better. If you are making the small or large size glove, check the gauge for the size 6 US (4 mm). Adjust to the size of the needles to obtain the correct gauge. If you are making the large size, increase your needle size by a size US (mm). For example, you need to use a size 7 US (4.5 mm) to get the correct gauge, use size 9 US (5.5 mm) knitting needles for the large. If you are making a small, use size 5 US (3.75 mm). To know what size you should make, you can use the infographic below on how to measure your hand, or the hand of whomever you are making them for. Abbreviations are at the END of the Pattern Left Hand Cast on 34 Row 1: (P1 K2) Repeat to last st. P1 Row 2: (K1 P2) Repeat to last st. K1 ♥ Row 3: (P1 TB) Repeat to last st. P1 Row 4: As row 2 ♥ Repeat from ♥ to ♥ 3 times more. (Counts as rows 5-10). Row 11: P1 P2tog P21 K3 P7 (33 sts) Row 12: K7 P3 K23 Row 13: P23 K2 C1F P6 Row 14: K6 P1 K1 P2 K23 Row 15: P23 K2 P1 C1F P5 Row 16: K5 P1 K2 P2 K23 Row 17: P22 C1B K1 P2 YO K1 YO P5 (35 sts) https://youtu.be/d547q0mAQ1A Row 18: K5 P3 K2 P1 K1 P1 K22 (35 sts) https://youtu.be/yYs3gx5JbW4 Row 19: P21 C1B P1 K1 P2 (K1 YO) twice K1 P5 (37 sts) Row 20: K5 P5 K2 P1 K2 P1 K21 (37 sts) Row 21: P21 K1 P2 K1 P2 K2 YO K1 YO K2 P5 (39 sts) Row 22: K5 P7 K2 P1 K2 P1 K21 (39 sts) Row 23: P21 K1 P2 K1 P2 K2tog (When making this stitch, pick up a stitch as if to knit. Twist the stitch and place it back on your non-working needle. Knit the 2 stitches together from right to left.) K3 K2tog (knit the stitches together from left to right.) P5 (37 sts) https://youtu.be/Vkf6E35cAK8 Row 24: K5 P5 K2 P1 K2 P1 K21 (37 sts) Row 25: P21 K1 P2 K1 P2 K2tog (like you did before: pick up, twist, knit right to left) K1 K2tog (knit left to right) P5 (35 sts) Row 26: K5 P3 K2 P1 K2 P1 K21 (35 sts) Row 27: P14 PM1 P1 PM1 P6 YO K1 YO P2 K1 P2 Sl St (as if to knit) K2tog (knit left to right) PSSO P5 ( 37 sts) Row 28: K8 P1 K2 P3 K23 (37 sts) Row 29: P23 (K1 YO) twice. K1 P2 K1 P8 (39 sts) Row 30: K8 P1 K2 P5 K6 M1 K3 M1 K14 (41 sts) Row 31: P25 K2 YO K1 YO K2 P2 K1 P8 (43 sts) Row 32: K8 P1 K2 P7 K25 (43 sts) Row 33: P14 PM1 P5 PM1 P6 K2tog (pick up, twist, knit right to left) K3 K2tog (knit left to right ) P2 C1F P7 (43 sts) Row 34: K7 P1 K3 P5 K27 (43 sts) Row 35: P27 K2tog (pick up, twist, knit right to left ) K1 K2tog (knit left to right) P3 K1 P7 (41 sts) Row 36: K7 P1 K3 P3 K6 M1 K7 M1 K14 (43 sts) Row 37: P29 Sl St (as if to knit) K2tog (knit left to right) PSSO P3 YO K1 YO P7 (43 sts) Row 38: K7 P3 K33 (43 sts) Row 39: P14 PM1 P9 PM1 P10 (K1 YO) twice K1 P7 (47 sts) Row 40: K7 P5 K35 (47 sts) Row 41: P35 K2 YO K1 YO K2 P7 (49 sts) Row 42: K7 P7 K10 M1 K11 M1 K14 (51 sts) Row 43: P37 Read more
Read more
Super Cute Hippo Fingerless Gloves or Mitts – FREE Knitting Pattern
I originally started this 3D animal adventure with my very popular owl gloves (both knit flat and knit in the round. Those are clickable links btw ☺) It then progressed on to my Spider Gloves and Autumn Leaf Gloves. I wanted to make a cat sitting down on a pair of fingerless mitts. Well, that didn’t turn out as expected but it is how these hippo gloves came to be. I’m still working on the cat gloves… When making these, I realized that I couldn’t make it in the traditional way by starting at the cuff and working my way to the fingers. I had to go the opposite way to be able to make the arms, legs, body, head and ears. No problem. I rewrote the basic glove pattern. That’s over on Amazon as an exclusive. It will be put on my website eventually so check out this website to see if it’s here at KweenBee.com. If you are not a fan of ads or following a pattern online, I also have printable PDF version for sale for a small fee. You can purchase and download the pattern from this website – Hippo Fingerless Gloves or Mittens, from my Etsy shop, Ravelry, LoveCrafts, Google Books, CreativeFabrica and the Kindle and paperback version are both available on Amazon. This is linked to the USA version. If you’re from anther country make sure you switch over to where you live. Anyways, the pattern is written separately for both the right and left hand. Because it is knit flat there is a seam that runs along the outside of the hand and along the pinky finger. The thumb is knitted once the hand is completed with picked up stitches. And also, the hippo will never fall off. It’s made as you make the glove by going back and forth and making formed bobbles. Other than the thumb, this is made in one piece. Another way to avoid ads and pop-ups, get instant, PRINTABLE downloads of this pattern and others, is by becoming a Member on this website. When you become a Website Supporter for $3/month, you’ll gain access to exclusive member only posts. These posts contain one click downloads of the patterns. Simply click the Download & Print button. The PDF will automatically download to your computer or smart device. You can then read it on your device or print it at your leisure. You can download as many patterns as you like for the same $3 each month. You can go to this page to learn more, become a member and support my work… Exclusive Member Area Become a Member Become a Patron on Patreon If you enjoy this pattern and my other free online knitting patterns, please consider making a small donation or helping me out by visiting my Help Support My Work page. If that’s not possible, that’s totally fine too! Even sharing this page on your social media helps me out immensely. You can use the buttons below to do so easily. Things You Need Worsted weight yarn – 1 standard ball of yarn (215 yards/197 m). Any colours of your choosing. Knitting needles: Small – Size 3 US (3.25 mm) knitting needles Medium – Size 6 US (4 mm) knitting needles Large – Size 8 US (5 mm) knitting needles Tapestry needle – to sew the seam and work in the ends. 0.27 inch (7mm) wiggle eyes or small buttons. You can also embroider eyes on if you prefer. Gauge In stockinette stitch Small size 3.5 mm (US size 4) knitting needles 11 stitches every 2 inches (5 cm) 16 rows every 2 inches (5 cm) Medium size 4 mm (US size 6) knitting needles 10 stitches every 2 inches (5 cm) 14 rows every 2 inches (5 cm) Large size 5 mm (US size 8) knitting needles 9 stitches every 2 inches (5 cm) 12 rows every 2 inches (5 cm) Sizing Like my other fingerless mitt patterns, I’ve made this as one pattern and adjusted the needle size to change the sizes. This makes it a heck of a lot easier to design and keeps the proportion of the hippo the same on all sizes. Frankly, the overall look is better. To help with the hand sizing, I’ve included a handy infographic (pun intended). Keep in mind, the garter stitch is very forgiving and will stretch and contract as needed to fit. PLEASE Note! I’ve added photos in the rows of the pattern that have trickier parts like making the bobbles, belly and decreases. If you are a seasoned knitter and don’t need the photos, I’ve written out the rows again without the photos. Regardless…you only need to knit each row once! RIGHT Hand Cast on 34 Row 1: (P1 K2). Repeat to the last st. P1. Row 2: (K1 P2) Repeat to the last st. K1. Repeat these 2 rows for a total of 6 rows. (If you want to change colours, do so now.) Row 7 – 12: Knit across Row 13: K14 Cast on 13 sts. K20. (47 sts) If you need help with casting on you can watch this video. https://youtu.be/9Xvauq-EWQI Row 14: Knit across Row 15 (Feet): K35 Bobble 3 (K3 into one stitch. by alternating knitting into the front, the back and the front of the stitch, turn. Working the following rows into the 3 stitches in the one stitch, P3, turn, K3, turn, P3, turn, K3tog (do NOT turn). 3 sts in one st Turn and purl Done working the rows Knit 3 sts together from RIGHT to LEFT Stitch completed K2, Next 2 sts knitted and going to make another bobble. Bobble 3 (as before), Knit the 2 sts together in this bobble from LEFT to RIGHT 2nd bobble done K8. ***Row 15 repeated without the photos*** Row 15 (Feet): K35 Bobble 3 (K3 into one stitch. by alternating knitting into the front, the back and the front of the stitch, turn. Working the following rows into the 3 stitches in the one stitch, P3, turn, K3, turn, P3, Read more
Read more
Zigzag Elegance – FREE Fingerless Gloves Knitting Pattern
Looking for a fun and easy knitting project? Check out this FREE pattern for zigzag elegance fingerless gloves! Designed to be knit flat on straight needles with worsted weight yarn, these gloves are perfect for knitters of all levels. And with adjustable sizing based on the size of your needles, you can customize the gloves to fit your hands perfectly. With a funky zigzag design and plenty of room for personalization, these gloves are sure to become a go-to accessory for chilly fall days. So why not give them a try and add some style to your wardrobe?
Read more
Easy to Knit Owl Fingerless Gloves – FREE Knitting Pattern
Well, since the how-to video showing how to knit these gloves in the round went over like a lead balloon, I’ve put in the effort and redesigned the gloves so they can be knit flat on 2 needles. Perfect for a newbie knitter wanting to learn new techniques! ** 👉🏼 In case you still want to learn how to knit in the round or want the seamless version, you can read the pattern here – How to Knit Owl Fingerless Gloves. 👈🏼 ** The video is embedded on that page too, if you want to watch it. If you are looking to knit a pair of plain gloves without the owls, the original version this pattern is available here – Super Simple Fingerless Gloves. It’s also knitted flat on 2 needles with a seam on the outside of the hand and inside of the thumb. If you are so inclined and like to have matching sets of things, I have completed the matching hat or beanie! You could also call it a toque. Whatever floats your boat. It’s free to read on this website too. If you’d like to, click this link – How To Knit A Beanie Hat – With OWLS! – FREE Knitting Pattern Once again, I’ve made the gloves as one pattern and adjusted the needle size to change the sizes. This makes it a heck of a lot easier to design and keeps the proportion of the owl the same on all sizes. Frankly, the overall look is better. I am finished creating the downloadable pdf for this pattern and it’s available in all my usual online selling venues including Ravelry, Etsy, and this website – Super Easy to Knit Fingerless Gloves – with OWLS! Click any of those links to avoid the ads and purchase it for a nominal fee. I’ve also created videos for you to see how the stitches are done, if any of them are giving you problems. I do have all the basic stitch videos here – Learn Basic Knitting Stitches, but links to the slightly more advanced stitches that show you how to M1, PM1, C4F and C4B are provided on this page. Clicking the links will take you to the video, but will leave this page window open in your browser. You can also scroll down to the bottom of the page to see the stitch abbreviations that also contain the embedded video you can watch right from this page. Are you looking for a knitting pattern for a pair of mitts with the same owl motif? You’re now in luck! You can make these thick owl mittens with the pattern here – Extra Thick and Quick to Knit Owl Mittens. You can also click or tap on the photo below. Love the free patterns? You can say thanks in a couple of ways. You can read more about how you can Support My Work by clicking that link or make a small donation and Buy Me a Coffee. That is a website where you can make a one time donation as a thanks. If you don’t want to or are unable to make a financial donation, sharing this pattern through social media is a great way to help out too! The links below are a super easy way for you to do so. Gauge This is important to follow for correct sizing. This is when using the US size 6 (4 mm) knitting needles. 2″ (5 cm) = 10 sts 2″ (5 cm) – 16 rows in stockinette Things You Need: You can click any link below to see what you need. Knitting needles: Small – Size 3 US (3.25 mm) knitting needles Medium – Size 6 US (4 mm) knitting needles Large – Size 8 US (5mm) knitting needles Worsted weight yarn Cable Needle – There are a number a styles but I prefer the hook version Stitch holder – It looks like a big safety pin Tapestry needle Left Hand Cast on 33 Rows 1-14: Knit across Row 15: Knit across Row 16: Purl across Row 17: Knit across Row 18: Purl across Row 19: Knit across Row 20: P5 K1 P8 K1 P to the end of the row Row 21: K13 M1 K1 M1 K4 P1 C4F C4B P1 K to the end of the row Row 22: P5 K1 P8 K1 P to the end of the row Row 23: K20 P1 K8 P1 K to the end of the row Row 24: P5 K1 P8 K1 P4 PM1 P3 PM1 P to the end of the row Row 25: K22 P1 K8 P1 K to the end of the row Row 26: P5 K1 P8 K1 P to the end of the row Row 27: K13 M1 K5 M1 K4 P1 K8 P1 K to the end of the row Row 28: P5 K1 P8 K1 P to the end of the row Row 29: K24 P1 C4F C4B P1 K to the end of the row Row 30: P5 K1 P2 K4 P2 K1 P4 PM1 P7 PM1 P to the end of the row Row 31: K26 P1 K2 P4 K2 P1 K to the end of the row Row 32: P5 K1 P2 K4 P2 K1 P to the end of the row Row 33: K13 M1 K9 M1 K4 P1 K2 P4 K2 P1 K to the end of the row Row 34: P5 K1 P2 K4 P2 K1 P to the end of the row Row 35: K28 P1 K2 P4 K2 P1 K to the end of the row Row 36: P5 K1 P2 K4 P2 K1 P4 PM1 P11 PM1 P to the end of the row Row 37: K30 P1 K2 P4 K2 P1 K to the end of the row Row 38: P5 K1 P2 K4 P2 K1 P to the end of the row Row 39: K13 Pass the next 13 sts onto a stitch holder. K4 P1 K2 P4 K2 P1 K to the end of the Read more
Read more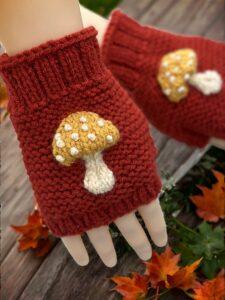
Knit Flat Mushroom Fingerless Gloves – Free Knitting Pattern
Add a little forest magic to your wardrobe with these cozy mushroom fingerless gloves! Featuring a charming toadstool motif, this whimsical knitting pattern is perfect for fall walks, cottagecore vibes, or just showing off your love of fungi. Knit flat on two needles, it’s a fun project for anyone comfortable with the basics—and there’s a helpful step-by-step video tutorial to guide you through each row. Grab your yarn and let’s get a little spore-tacular! If you stumbled upon this pattern but don’t know how to knit, have no fear! I have finished granny gloves available to purchase in my Etsy shop. Use this link to buy a pair 👉🏼 CUSTOM MADE Hand Knit Mushroom Granny Gloves For this pattern, you’ll need to pull the stitches together so the mushroom stands out from the background. To do this, pass the yarn behind your work and catch it when knitting on the right side. It’s done the same way you do any colour work when knitting. Only with this, pull it snug – tighter than you normally would if making a flat colour motif. The video shows how to do this. Please watch them to make sure you are doing it correctly. The video is queued to the right spot for each row as you knit the mushroom. I only added the video to the right hand. If you need to see how to make a stitch when making the left hand, you can easily go back to the same numbered row in the right hand. If you would like to have a matching warm and cozy set, I wrote a pattern for a delightful mushroom beanie. It’s the perfect addition to your winter knitted collection. Tap the photo or this link for the pattern If you have never made fingerless gloves from the fingers to the cuff, you may want to practice with the basic pattern first. If you would like to, click this link or tap the photo. If you would to prefer to support my work and have access to a printable, ad-free version of this pattern, I offer that too. To get the downloadable pattern for a small fee you can get it in my Etsy Shop, Ravelry, LoveCrafts, Buy Me A Coffee and from my Shopify shop – KweenBee.com on Shopify. Things You Need Worsted weight yarn in three colours: Main Colour (MC): approx. 50 g Stem Colour (SC): small amount Cap Colour (CC): approx. 15 g 1 set of single pointed knitting needles – See notes on sizing for knitting needles required. Tapestry needle – to sew the seam and work in the ends. Gauge In stockinette stitch Small size 3.5 mm (US size 4) single pointed needles 11 stitches every 2 inches (5 cm) 16 rows every 2 inches (5 cm) Medium size 4 mm (US size 6) single pointed needles 10 stitches every 2 inches (5 cm) 14 rows every 2 inches (5 cm) Large size 5 mm (US size 8) single pointed needles 9 stitches every 2 inches (5 cm) 12 rows every 2 inches (5 cm) RIGHT Hand With MC, cast on 34. Row 1: With MC (P1 K2). Repeat to the last st. P1. Row 2: (K1 P2) Repeat to the last st. K1. Repeat these 2 rows for a total of 4 rows. Row 5 – 12: Knit across Row 13: K14 Cast on 13 sts. K20. (47 sts) Click this link if you need help with casting on. For this pattern, only cast on 13 sts. https://youtu.be/9Xvauq-EWQI?si=Sp00QScBA-XbPmE7&t=7 Row 14: Knit across. Row 15: K35. With SC K1 M1 K1 M1 K1,Turn. Leave remaining sts unworked. P5. Turn. K5. Turn. P5. Turn. K5. With MC K9. (49 st) https://youtu.be/UlRMP-b_w8o?si=yf9bDA9xrbYcSE6K&t=135 Row 16: K9. With SC P5. With MC K35. Row 17: K14 K2tog K9. K2tog K8. With SC TWK2tog. K1. K2tog. With MC K9. (45 sts) https://youtu.be/UlRMP-b_w8o?si=xLy1M7TXOJhXRctd&t=345 Row 18: K9. With SC P3. With MC K33. https://youtu.be/UlRMP-b_w8o?si=gH0pCPlP-OdU2w-m&t=414 Row 19: K33. With SC K3. With MC K9. Row 20: As row 18. Row 21: K14. K2tog K7 K2tog K8. With SC K3. With MC K9. (43 sts) Row 22: K9. With SC P3. With MC K31. Row 23: K29. With CC K1 M1 K1 M1 K1 M1 K1 M1 K1 M1 K1 M1 K1. Turn. Leave remaining sts unworked. P13. Turn. K13. Turn. P13. Turn K13. With MC K7. (49 sts) https://youtu.be/UlRMP-b_w8o?si=F2AVVNseleDgb09e&t=477 Row 24: K7. With CC. P2tog P9 TBLP2tog. With MC K29. (47 sts) https://youtu.be/UlRMP-b_w8o?si=IkV_-9e3ZmeM2-nx&t=747 Row 25: K14. K2tog K5 K2tog K6. With CC TWK2tog K7 K2tog. With MC K7. (43 sts) https://youtu.be/UlRMP-b_w8o?si=jWG1nOYov9CMfmEC&t=806 Row 26: K7. With CC P2tog P5 TBLP2tog. With MC K27. (41 sts) Row 27: K26 M1 K1. With CC TWK2tog K3 K2tog. With MC K1 M1 K6. (41 sts) Row 28: K8. With CC P5.With MC K28. https://youtu.be/UlRMP-b_w8o?si=hfElPtbfGar-wQ2c&t=950 Row 29: K14 K2tog K3 K2tog K20. (39) sts https://youtu.be/UlRMP-b_w8o?si=kShxQUmVLAJo04GE&t=988 Row 30 – 32: Knit across. Row 33: K14 K2tog K1 K2tog K20. (37 sts) Row 34 – 36: Knit across. *Row 37: (P1 K2). Repeat to the last st. P1. Row 38: (K1 P2) Repeat to the last st. K1.* Repeat from * to * for a total of 12 rows. Cast off. Make the Thumb With the RIGHT side facing, Pick up 13 sts from the additional sts you cast on in Row 13. Pick up the st in the twist formed from casting on. If you need help you can click this link – Pick up Thumb Stitches. https://youtu.be/9Xvauq-EWQI?si=h5SK9aWSfC7qYWsD&t=59 With the WRONG side facing Row 1: (K1 P2) Repeat to the last st. K1. Row 2: (P1 K2) Repeat to the last st. P1. Row 3: Repeat row 1 Cast off. Sew the seams on the thumb and side of the glove. Watch the video below for help on finishing and catching any loose stitches. https://youtu.be/UlRMP-b_w8o?si=bJt2tM4CQb6KSN0h&t=1032 More of My Stuff On Etsy Left Hand With MC, cast on 34. Row 1: With MC (P1 K2). Repeat to the last st. P1. Row 2: (K1 P2) Repeat to the last st. K1. Repeat these 2 rows for a total of 4 rows. Row 5 – 12: Knit across Row 13: K20 Cast on 13 sts. K14. (47 sts) Row 14: Knit across. Row 15: K9. With SC K1 M1 K1 M1 K1,Turn. Leave remaining sts unworked. P5. Turn. K5. Turn. P5. Turn. K5. With Read more
Read more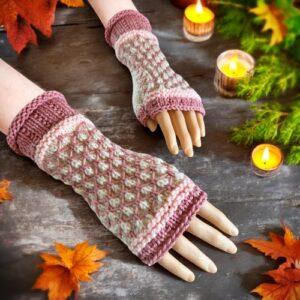
Lattice Fingerless Gloves, Mitts, Wrist Warmers – FREE Knitting Pattern
I want to start this intro off with making everyone aware that this pattern is NOT for beginners. If you are looking for something a little easier or plain I have a couple options that may work better for you. You can try Super Simple Fingerless Gloves – FREE Knitting Pattern or see what all the options are available by going to the Fingerless Mitts and Glove section on the website. Even though an experienced knitter will be able to make these, I have provided some photos to help with the pattern. I’m assuming you know how to carry yarn behind your work to change colours. It’s not hard to do, but you do need to watch the tension and make sure that it is neither too tight or loose and is consistent. I really like how this pattern turned out, though it did take some fiddling to figure out how to incorporate the lattice pattern into the gloves. Now that I’ve figured it out, I thinking about other patterns I can add this detail to ☺. Yes, I am thinking slippers! If you would prefer a PDF printable version of the pattern, you can download it for a small fee from a number of places. In particular, my site here – Lattice Fingerless Gloves. You can also get it at a number of other online book retailers such as Ravelry, LoveCrafts, Creative Fabrica and Etsy. The Kindle and Paperback version is also on Amazon. Another way to avoid ads and pop-ups, get instant, PRINTABLE downloads of this pattern and others, is by becoming a Member on this website. When you become a Website Supporter for $3/month, you’ll gain access to exclusive member only posts. These posts contain one click downloads of the patterns. Simply click the Download & Print button. The PDF will automatically download to your computer or smart device. You can then read it on your device or print it at your leisure. You can download as many patterns as you like for the same $3 each month. You can go to this page to learn more, become a member and support my work… Exclusive Member Area Become a Member Become a Patron on Patreon If you enjoy this pattern and my other free online knitting patterns, please consider making a small donation or helping me out by visiting my Help Support My Work page. If that’s not possible, that’s totally fine too! Even sharing this page on your social media helps me out immensely. You can use those buttons below to do so easily. Things You Need Worsted weight yarn – 1 standard ball of yarn (215 yards/197 m) will make the gloves in one colour. Any colour combinations of your choosing will work. Knitting needles: Small – Size 6 US (4 mm) knitting needles Medium – Size 8 US (5 mm) knitting needles Large – Size 10 US (6 mm) knitting needles Tapestry needle – to sew the seam and work in the ends. Sizing Like my other fingerless gloves I’ve designed such as my owl fingerless gloves, I use the size of the needles to change the size of the mitt. This keeps the proportion of the design consistent to the size of the glove. My standard for sizing was my hand and designed the knitting pattern according to what kind of rubber gloves fit me comfortably. I wear a medium sized rubber glove and the medium sized glove fits perfectly. You may need to use different sized needles to get the correct gauge. Gauge In stockinette stitch Small size 4 mm (US size 6) knitting needles 10 stitches every 2 inches (5 cm) 14 rows every 2 inches (5 cm) Medium size 5 mm (US size 8) knitting needles 9 stitches every 2 inches (5 cm) 12 rows every 2 inches (5 cm) Large size 6 mm (US size 10) knitting needles 8 stitches every 2 inches (5 cm) 10 rows every 2 inches (5 cm) Colours MC – Main colour. The colour of the cuffs and lattice design BG – Background colour. The colour the lattice is on. The palm and back of the hand. HC – Highlight colour. The band at the end of the wrist section and start of the cuff at the fingers Continue using the colour until stated to change in the pattern. You can use more colours than the 3 colours listed. You can use one colour and made tone on tone fingerless mitts. It’s up to you. Right Hand Cast on 33 sts Row 1: With MC K across Row 2: P across. Repeat row 1 and 2 for a total of 8 rows. Row 9: K across Row 10: *K1 P2* Repeat from * to * to the end of the row. Repeat rows 9 and 10 for a total of 10 rows. Carry yarn behind your work for row 23 (saves an end to work in) Row 19: With HC K5 *M1 K6* Repeat from * to * 3 times more. M1 K4 (38 sts This count is constant until you start making the thumb gusset. Stitch counts are given for the increases.) Row 20 – 22: K across. Break yarn at the end of row 22. Row 23: *With MC K. With BG K5* Repeat from * to * 3 times more. With MC K. With BG K13. Break BG colour. Row 24: Pass next 13 sts onto working needle. With MC YF, Sl st as if to purl. *YB Sl 5sts as if to purl, YF Sl st as if to purl,* repeat to the end of the row. (Don’t work this stitch. Let yarn hang). Row 25: Join BG K across. Row 26: P across. ☼ ♣ Row 27: With MC K1. Keep YB for this row. Sl 2sts as if to purl *LK, Sl 5sts as if to purl* Repeat from * to * 2 more times more. LK, Sl 2sts purl-wise K next st. Leave remaining sts unworked. Turn. (see Abbreviations for photos to LK). ♦ Row 28: With MC YF Sl st. YB Sl 2sts purl-wise *YF Sl st purl-wise, Read more
Read more
FREE Knitting Pattern – Cable Fingerless Gloves
The season is getting colder again, the few apples on my trees are turning red and my mind turns back towards knitting. And oh boy, am I coming up with a bunch of knitting designs! Now here’s to finding the time to publish them all. Work is also back to full-time so that’s great news ? A couple of things about this knitting pattern before we grab our favourite worsted weight yarn, double pointed and cable needles and get to work. Like my Owl Fingerless Gloves pattern, I am keeping the stitch count the same and only changing the needles size to change the size of the glove. The pattern on the back of the hand stays proportional in size and placement on the glove remains the same for a better overall look. I made a number of different lengths of the glove too, for demonstrative purposes. The taupe with flecks (apparently it’s also known as tweed, who knew) is the pattern exactly as written. I repeated the cable pattern once for the grey pair and 4 times for the purple tweed/flecked. There’s a note in the pattern what rows make up the 5 plait cable pattern. Why do 3 cables when you can do 5? I’ve always been a bit of an overachiever. The downloadable PDF version is completed and uploaded it to all my distributors. You can find it on the following fine and upstanding websites – Etsy, Ravelry, LoveCrafts and in my Shopify shop. If you don’t want or can’t afford to give anything. I get it. You can give a shoutout or share on your social media instead. It’s free to do and will only take you a minute. Handy links are below Want other knitted mitten patterns that are for texting or cover the ends of your fingers? I have those too. You can check out my How to Knit Texting Mittens and How to Knit Flip Mitts. And for those who actually take the time to read these long-winded intro’s, I also have – How to Knit Fingerless Gloves. It uses finer yarn, smaller needles and is sized with different stitch and row counts. It is very plain Jane and it’s the yarn that makes this one pop. Ok. Enough of that. Let’s get knitting!!! Things you will need: worsted weight yarn – I used Red Heart worsted weight (AKA size 4 or 8 ply) yarn when designing the pattern but any kind will do. Set of 4 double pointed needles (see note on sizing) Stitch holder Tapestry needle to sew the hole by the thumb and work in ends Cable needle A Note on Sizing: As I mentioned previously, the sizing for this pattern is done a little differently. Instead of different stitch counts which I normally do, I’m changing the size of the needles. Chances are good that if you know how to knit in the round, you already have these size needles anyways. If not, it’s a good excuse to go to your favourite yarn store to pick up the needles you’ll need. And since you’re there, check out the yarn sales. You’d be foolish not to. My standard for sizing was my hand and designed the knitting pattern according to what kind of rubber gloves fit me comfortably. I wear a medium sized rubber glove and the medium sized glove fits perfectly. You may need to use different sized needles to get the correct gauge, but this pattern is very forgiving if you’re a bit off. Small size 4 mm (US size 6) dpn 10 stitches every 2 inches (5 cm) 13 rows every 2 inches (5 cm) Medium size 5 mm (US size 8) dpn 9 stitches every 2 inches (5 cm) 12 rows every 2 inches (5 cm) Large size 6 mm (US size 10) dpn 8 stitches every 2 inches (5 cm) 11 rows every 2 inches (5 cm) Left Hand Cast on 36 Row 1-8: K1 P1 around Row 9: K4 P1 K15 P1 K15 Row 10: K4 P1 C6F twice. K3 P1 K15 (you can click the blue link for a description of how to do a C6F or scroll to the abbreviations section) Row 11 – 12: as row 9 Row 13: K4 P1 K3 C6B twice. P1 K15 (you can click the blue link for a description of how to do a C6B or scroll to the abbreviations section) Row 14 – 15: as row 9 Rows 10 to 15 make the cable pattern. Repeat these rows to make the gloves longer as described earlier. Next Row: K1 M1 K1 M1 K2 P1 C6F twice K3 P1 K15 (38 sts) Next 2 Rows: K6 P1 K15 P1 K15 Next Row: K1 M1 K3 M1 K2 P1 K3 C6B twice P1 K15 (40 sts) Next 2 Rows: K8 P1 K15 P1 K15 Next Row: K1 M1 K5 M1 K2 P1 C6F twice K3 P1 K15 (42 sts) Next 2 Rows: K10 P1 K15 P1 K15 Next Row: K1 M1 K7 M1 K2 P1 K3 C6B twice P1 K15 (44 sts) Next 2 Rows: K12 P1 K15 P1 K15 Next Row: K1 M1 K9 M1 K2 P1 C6F twice K3 P1 K15 (46 sts) Next 2 Rows: K14 P1 K15 P1 K15 Next Row: K1 M1 K11 M1 K2 P1 K3 C6B twice P1 K15 (48 sts) Next 2 Rows: K16 P1 K15 P1 K15 Next Row: K1 Pass the next 13 stitches onto a stitch holder. K2 P1 C6F twice K3 P1 K15 (35 sts) Next Row: K3 P1 K15 P1 K15 Next Row: K1 P1 around to last 2 sts. P2tog Next 4 Rows: K1 P1 around Cast off loosely. Make Thumb Pick up the 13 stitches from the stitch holder. Work 3 rounds even. Cast off loosely. More of my stuff on Etsy Right Hand Cast on 36 Row 1-8: K1 P1 around Row 9: K18 P1 K15 P1 K1 Row 10: K18 P1 C6F twice K3 P1 K1 Row 11 – 12: as row 9 Row 13: K18 P1 Read more
Read more
How to Knit Fingerless Arm Warmers or Mitts – with Bows!
FREE Knitting Pattern – Knit a fabulous pair of fingerless gloves or arm warmers with cute little bows running down the back of the arm and hand.
Read more
Easy to Knit Cable Fingerless Gloves – FREE Knitting Pattern
I’m thrilled to share my latest knitting pattern for fingerless mitts, and yes, my love for these cozy accessories shows no sign of stopping! This time around, I’ve added a twist—quite literally—with a unique cable pattern that elegantly winds its way down the back of the hand. It’s a design element that adds both texture and visual interest, making these mitts a true standout piece. If you’re someone who’s mastered the basics and is looking to elevate your knitting game, this pattern is the perfect next step. It’s designed to bridge the gap between a beginner and an experienced knitter. And if cabling is new to you, don’t worry—this is the ideal project to dive in and learn something new! I’ve made sure to include video tutorials in the Abbreviations section to guide you through the cabling process, so you’ll have all the support you need. But that’s not all! I’ve also added links to help you with any other potentially tricky parts of the pattern, like increasing for the thumb gusset. I want to ensure you feel confident and supported every step of the way. So, grab your needles, and let’s knit something beautiful together! If you would prefer a PDF printable version of the pattern, you can download it for a small fee from a number of places. In particular, my site here – Easy Cable Knit Fingerless Gloves. You can also get it at a number of other online book retailers such as Ravelry, LoveCrafts, Creative Fabrica and Etsy. The Kindle and Paperback version is also on Amazon. Another way to avoid ads and pop-ups, get instant, PRINTABLE downloads of this pattern and others, is by becoming a Member on this website. When you become a Website Supporter for $3/month, you’ll gain access to exclusive member only posts. These posts contain one click downloads of the patterns. Simply click the Download & Print button. The PDF will automatically download to your computer or smart device. You can then read it on your device or print it at your leisure. You can download as many patterns as you like for the same $3 each month. You can go to this page to learn more, become a member and support my work… Exclusive Member Area Become a Member Become a Patron on Patreon If you enjoy this pattern and my other free online knitting patterns, please consider making a small donation or helping me out by visiting my Help Support My Work page. If that’s not possible, that’s totally fine too! Even sharing this page on your social media helps me out immensely. You can use those buttons below to do so easily. Things You Will Need Worsted weight yarn (less than 100 grams was more than enough to make a pair of large knitted gloves as written. I know because I weighed them). I used Red Heart worsted weight yarn when designing the pattern but any kind will do. Set of single pointed needles (see note on sizing) Stitch holder Tapestry needle to sew the seams and work in ends Cable needle Sizing Like my other fingerless gloves I’ve designed such as my owl fingerless gloves, I use the size of the needles to change the size of the mitt. This keeps the proportion of the design consistent to the size of the glove. My standard for sizing was my hand and designed the knitting pattern according to what kind of rubber gloves fit me comfortably. I wear a medium sized rubber glove and the medium sized glove fits perfectly. You may need to use different sized needles to get the correct gauge. Gauge In stockinette stitch Small size 3.5 mm (US size 4) single pointed needles 11 stitches every 2 inches (5 cm) 16 rows every 2 inches (5 cm) Medium size 4 mm (US size 6) single pointed needles 10 stitches every 2 inches (5 cm) 14 rows every 2 inches (5 cm) Large size 5 mm (US size 8) single pointed needles 9 stitches every 2 inches (5 cm) 12 rows every 2 inches (5 cm) Left Hand Cast on 36 Row 1: P1 * K2 P2 * repeat from * to * to the last 3 sts. K2 P1 Row 2: K1 ✥ P2 K2 ✥ repeat from ✥ to ✥ to the last 3 sts. P2 K1 Repeat rows 1 and 2 for a total of 6 rows. Row 7: K15 P1 K16 P1 K3 ✰ Row 8: P3 K1 P16 K1 P15 ❀ Row 9: K15 P1 K4 C4F C4B K4 P1 K3 Row 10: Repeat ✰ Row 8 Row 11: K15 P1 C4F K8 C4B P1 K3 Row 12: Repeat ✰Row 8 ❀ Repeat from ❀ to ❀ 3 times more. If you would like longer gloves, make more repeats. Next row: K12 M1 K M1 K2 P1 K4 C4F C4B K4 P1 K3 (38 sts) Next row: P3 K1 P16 K1 P17 Next row: K17 P1 C4F K8 C4B P1 K3 Next row: P3 K1 P16 K1 P3 PM1 P PM1 P13 (40 sts) Next row: K19 P1 K4 C4F C4B K4 P1 K3 Next row: P3 K1 P16 K1 P19 Next row: K14 M1 K M1 K4 P1 C4F K8 C4B P1 K3 (42 sts) Next row: P3 K1 P16 K1 P21 Next row: K21 P1 K4 C4F C4B K4 P1 K3 Next row: P3 K1 P16 K1 P5 PM1 P PM1 P15 (44 sts) Next row: K23 P1 C4F K8 C4B P1 K3 Next row: P3 K1 P16 K1 P23 Next row: K16 M1 K M1 K6 P1 K4 C4F C4B K4 P1 K3 (46 sts) Next row: P3 K1 P16 K1 P25 Next row: K25 P1 C4F K8 C4B P1 K3 Next row: P3 K1 P16 K1 P7 PM1 P PM1 P17 (48 sts) Next row: K27 P1 K4 C4F C4B K4 P1 K3 Next row: P3 K1 P16 K1 P27 Next row: K12 Pass the next 13 sts onto a stitch holder K2 P1 C4F K8 C4B P1 K3 (35 sts) ❤ Next row: P3 K1 P16 K1 P14 Next row: K14 P1 K4 C4F C4B K4 P1 K3 Next row: Repeat row marked with ❤ ✪ Next row: ♦ P2 K2 ♦ Repeat from ♦ to ♦ to last 3 sts P2 K1 Next row: P1 ☺ K2 P2 ☺ Repeat from ☺ to ☺ to the last 2 sts. K2 ✪ Repeat from ✪ to ✪ one more time. Cast off Thumb Pass the 13 sts on the stitch holder back onto your Read more
Read more
Free Knitting Pattern – Knit Flip Mitts or Fingerless Gloves
Learn how to knit a pair of fingerless flip mittens with this free knitting pattern. Includes tons of how-to photos.
Read more
How to Knit Fingerless Gloves – with OWLS!
Also known as fingerless mittens, I seem to have a thing going on for this awesome owl motif. If you haven’t seen them already, I also have a Knitted Owl Slipper pattern that you may like. But more about these awesome fingerless gloves… They are fairly quick to make if you’re somewhat of an experienced knitter. If you don’t know how to knit in the round on double pointed needles (dpn), you’re in luck! I rewrote the pattern so anyone who loves the knitted owl motif, but not comfortable knitting in the round can still make an awesome pair of owl fingerless gloves. I have 2 knit flat owl fingerless gloves now. Both are a bit different from the other. Both patterns are free to read online, too! Click on other photo below to read the pattern. Owl Fingerless Gloves. Has matching scarf and beanie. Basic Knit Flat Owl Fingerless Gloves If you’re willing to learn how to knit on 4 needles, I’ve made a step-by-step video showing you every single round. You can watch it here if you need any help along the way – How to Knit Fingerless Gloves – with Owls! If you scroll furhterdown the page, I’ve also embedded the video so you won’t have to leave this page. Regardless if knitted flat or in the round, this is also a great pattern if you have a bit of left over yarn from other knitting projects. Like enough to knit one slipper, but you’re not sure if you’ll have enough to finish the whole pair. I know. We’ve all been there. Due to the number of folks contacting me via email and through the comments below, I am now offering a download of this pattern! You can download it directly from this site here – Owl Fingerless Gloves, or at other ebook retailers such as Ravelry, Etsy, and LoveCrafts. If you support me as a member on Buy Me A Coffee, you can download and print the pattern for free here – Seamless Owl Fingerless Gloves – Knit On DPN’s. What is this Buy Me A Coffee thing? A few quick words on sizing. Instead of going through all the effort to remake the pattern for different sizes, and to keep the proportion of the knitted owls the same, I’ve gone about adjusting the sizing by changing the size of your knitting needles. These are knitted in the round making them seamless with no scratchy seams to worry about. Because of being knitted in the round, the thumbs have to be on different sides so they fit correctly. You’ll have to make one for the left hand and the right hand. Instructions are given separately for both. You can click the links or scroll down the page. Loving the free knitting patterns? Then please help support this site. You can use these links below and share this and my other patterns through your social media. More eyeballs on my work helps a bunch. Want other knitted mitten patterns that are for texting or are more plain Jane and can cover the ends of your fingers? I have those too. You can check out my How to Knit Texting Mittens and How to Knit Flip Mitts. I forgot I even had those… huh! And for those who actually take the time to read these long-winded intro’s, I just finished another fingerless mitten pattern. It’s cleverly titled – How to Knit Fingerless Gloves. It uses finer yarn, smaller needles and is sized with different stitch and row counts. It also is very plain Jane and is owl free! Things you will need: worsted weight yarn (less than 50 grams was more than enough to make a pair of large knitted gloves. I know because I weighed them). I used Red Heart worsted weight yarn when designing the pattern but any kind will do. Set of 4 double pointed needles (see note on sizing) Stitch holder Tapestry needle to sew the hole by the thumb and work in ends Cable needle 4 – 4 mm half beads (aka flat back beads) for eyes. You can use larger ones or very small buttons, too. I’m using some jewels I found and gluing them on. More of my stuff on Etsy: A Note on Sizing: As I mentioned previously, the sizing for this pattern is done a little differently. Instead of different stitch counts which I normally do, I’m changing the size of the needles. Chances are good that if you know how to knit in the round, you already have these size needles anyways. If not, it’s a good excuse to go to your favourite yarn store to pick up the needles you’ll need. And since you’re there, check out the yarn sales. You’d be foolish not to. My standard for sizing was my hand and designed the knitting pattern according to what kind of rubber gloves fit me comfortably. I wear a medium sized rubber glove and the medium sized glove fits perfectly. the Grey mittens are a medium. The beige is a small if you like your gloves a bit on the snug side. I didn’t even bother trying to model the red. They were too big. You may need to use different sized needles to get the correct gauge, but this pattern is very forgiving if you’re a bit off. Small size 3.5 mm (US size 4) dpn 11 stitches every 2 inches (5 cm) 16 rows every 2 inches (5 cm) Medium size 4 mm (US size 6) dpn 10 stitches every 2 inches (5 cm) 14 rows every 2 inches (5 cm) Large size 5 mm (US size 8) dpn 9 stitches every 2 inches (5 cm) 12 rows every 2 inches (5 cm) Watch the Video! If you are having problems with a particular row, once you push play, you can scroll through the video to find the card with the row number written on it. If you watch the video on YouTube here – How to Knit Fingerless Read more
Read more
Eight Fingerless Gloves to Knit
Welcome to the next book in the series of my collection of knitting patterns! If you enjoyed my Nine Fingerless Gloves and Mitts to Knit, I’m sure you’ll enjoy this one just as much. This delightful collection of practical yet stylish fingerless glove designs is sure to inspire knitters of all skill levels. Each pattern is knit flat on two straight needles, making them accessible even to those who may be new to knitting or prefer simpler techniques. Whether you’re a beginner eager to complete your first project or an intermediate knitter looking to expand your repertoire with charming new details, this collection offers something for everyone. The designs range from playful, whimsical animals that add a touch of fun to your wardrobe, to elegant leaves and decorative motifs that showcase a refined sense of style. Each pattern is thoughtfully crafted with the perfect balance of simplicity and creativity, ensuring that the process is as enjoyable as the result. As you work through the patterns, you’ll find yourself fully supported by helpful step-by-step videos and detailed photos, making even the trickiest techniques feel approachable. With these resources, you’ll gain confidence in your knitting skills and be able to complete each glove with pride. This collection will not only add a unique flair to your knitting projects but will also fill your crafting time with joy and satisfaction. There are a number of options available to make the fingerless gloves. All the fingerless gloves patterns are free to read on this website. You can use this link – Fingerless Glove and Mitten Patterns to see all of them. I listed them all individually at the end of this post if you are looking for a specific one. 😁 Another option is to purchase and print the pattern yourself. If you are ok with printing the 104 page document, you can buy it from this website – Eight Fingerless Gloves to Knit or from my Etsy shop. You can click or tap either of those links to see the collection. If you would prefer to have the paperback version fully printed, bound and sent directly to your door, you can order the book online from Amazon. Be sure to click on your country so shipping will be as low as possible. If you are an Amazon Prime Member, the shipping is free! If you have a Kindle, the cheaper, digital version is available at the same links. United States United Kingdom Canada Australia I understand that not everyone is in the financial position to purchase patterns, and that’s ok. That’s why I offer them for free; to enable anyone to use my work and be able to enjoy and even profit from it. That’s why while I give permission for everyone to sell what they make from my patterns, I ask that you respect the patterns themselves. Do NOT make illegal copies of them. If you know someone who wants to use the patterns, send them the link so they can read the pattern online themselves. It helps me VERY much when you do this. More people on the website tell search engines that what is on my site is valuable and people like it. This makes it more likely that Google, Bing, Yahoo, etc will suggests my patterns when people do a search online. To make sharing the patterns even easier, there are floating share buttons along the side of this and every page of the website. All you need to do is click it to share it. You can also use these share buttons to share this page. Now that we’re through all that, here is the list of individual patterns that you can read online for free. Basic Fingerless Gloves Knitted Owl Fingerless Gloves Zigzag Elegance Easy to Knit Cable Fingerless Gloves Autumn Leaf Half Gloves Spider Fingerless Gloves Hippo Fingerless Gloves Lattice Fingerless Gloves I hope you enjoy this latest addition to my knitting compilations! Happy knitting everyone!!!
Read more
Easy Knit Mittens for Everyone – Free Knitting Pattern for Children, Teens, and Adults
If you’re looking for a simple, cozy project that fits anyone, this free knitting pattern is just what you need. These plain knit mittens are worked in basic stitches and include sizes for children, teens, and adults, so you can make a pair for everyone in the family. They’re perfect for gift-giving or keeping hands warm through the winter. This pattern is easy to follow and knits up quickly using worsted weight yarn and 4mm (US 6) knitting needles. Whether you’re an experienced knitter looking for a relaxing project or a beginner ready to take on mittens for the first time, this design is a great choice. Follow the step-by-step instructions and enjoy creating classic mittens that never go out of style. If you would like to avoid the ads on this page or would like to print the pattern, you can purchase the PDF for a small fee from this website – Easy Knit Mittens for Everyone: Simple Pattern In ALL Sizes, through my Etsy shop, LoveCrafts or on Ravelry. Members on Buy Me A Coffee can download and print the pattern here – Easy Knit Mittens for Everyone – Knitting Pattern for Children, Teens, and Adults . There is also a paperback booklet of the pattern available on Amazon! Click on your country , and if you hav Amazon Prime Shipping is free – United States, Canada, United Kingdom.. You can also get the Kindle edition here – Amazon Kindle If you’re not able to or prefer not to become a member, sharing this pattern on social media is another wonderful way to help! The links below make it quick and easy to share. Things You Need Worsted weight yarn Size 4 mm (US 6) single pointed knitting needles Stitch holder Tapestry needle – to sew the seam and work in the ends. Gauge In stockinette stitch size 4 mm (US size 6) single pointed needles 10 stitches every 2 inches (5 cm) 14 rows every 2 inches (5 cm) Sizing Is as such: child sm (child med, child large, adult sm, adult med, adult lg, adult xlg) My standard for sizing was my and my son’s hands and designed the knitting pattern to fit us comfortably with generous sizing for extra room. They fit loosely to allow for air space to keep your hands warm. Our hands are fairly standard in size and the measurements I used for the mitten sizes are similar to those used for rubber glove sizing. I’ve included a infographic to give you an idea of the measurements of the hands.You may need to use different sized needles to get the correct gauge and accurate sizing. ** If you need help with any stitch or technique, there are video links at the end of the pattern to help you ** RIGHT Hand Cast on 25 (28, 31, 34, 37, 40, 43) ♥ Row 1: ◊ P1 K2 ◊ Repeat from ◊ to ◊ to the last st. P1. Row 2: ☼ K1 P2 ☼ Repeat from ☼ to ☼ to the last st. K1. ♥ Repeat from ♥ to ♥ for 8 (8, 10, 12, 12, 12, 14) rows. Next row: K across for 4 (4, 4, 6, 6, 8, 8) rows. Next row: K1 M1 K13 (15, 17, 19, 21, 23, 25) M1 K1 M1 K5 (5, 6, 6, 7, 7, 8) M1 K 5 (6, 6, 7, 7, 8, 8) (29, 32, 35, 38, 41, 44, 47 sts) Next row: K across Next row: K1 M1 K to the end of the row. (30, 33, 36, 39, 42, 45, 48 sts) Next row: K across Next row: K16 (18, 20, 22, 24, 26, 28) M1 K3 M1 K to the end of the row. (32, 35, 38, 41, 44, 47, 50 sts) Next 3 rows: K across. Next row: K16 (18, 20, 22, 24, 26, 28) M1 K5 M1 K to the end of the row. (34, 37, 40, 43, 46, 49, 52 sts) Next 3 rows: K across. Next row: K16 (18, 20, 22, 24, 26, 28) M1 K7 M1 K to the end of the row. (36, 39, 42, 45, 48, 51, 54 sts) Next 3 rows: K across. For child small go to row marked with 🐝 Next row: K0 (18, 20, 22, 24, 26, 28) M1 K9 M1 K to the end of the row. (0, 41, 44, 47, 50, 53, 56 sts) Next 3 rows: K across. For child medium go to row marked with 🐝 Next row: K0 (0, 20, 22, 24, 26, 28) M1 K11 M1 K to the end of the row. (0, 0, 46, 49, 52, 55, 58 sts) Next 3 rows: K across. For child large and adult small go to row marked with 🐝 Next row: K0 (0, 0, 0, 24, 26, 28) M1 K13 M1 K to the end of the row. (0, 0, 0, 0, 54, 57, 60 sts) Next 3 rows: K across. For adult medium go to row marked with 🐝 Next row: K0 (0, 0, 0, 0, 26, 28) M1 K15 M1 K to the end of the row. (0, 0, 0, 0, 0, 59, 62 sts) Next 3 rows: K across. For adult large go to row marked with 🐝 Next row: K0 (0, 0, 0, 0, 0, 28) M1 K17 M1 K to the end of the row. (0, 0, 0, 0, 0, 0, 64 sts) Next 3 rows: K across. For adult extra large go to row marked with 🐝 🐝 Next row: K16 (18, 20, 22, 24, 26, 28). Pass the next 9 (11, 13, 13, 15, 17, 19) sts onto a st holder. K to the end of the row. (27, 30, 33, 36, 39, 42, 45 sts) Next row: K across for 31 (35, 39, 43, 47, 51, 59) rows. ♣ Next row: With the RIGHT side facing you, K2tog across. Knit the single st at the end of the row if there is one. Next row: K across. ♣ Repeat from ♣ to ♣ for all size. Break yarn leaving about 10 inches of length to sew the seam. Draw the sts together. Thumb Pick up the 9 (11, 13, 13, 15, 17, 19) sts from the st holder and put them on you knitting needle. Next row: K across for 14 (16, 16, 18, 18, 20, 22) rows. Next row: With the RIGHT side facing you, K2tog across. Knit the single st at the end of the row. Break yarn leaving about 6 inches of length to sew the seam. Draw yarn through. More of My Stuff On Etsy LEFT Hand Cast on 25 (28, 31, 34, 37, 40, 43) ♥ Row 1: ◊ P1 K2 ◊ Repeat from ◊ to ◊ to the last st. P1. Row 2: ☼ K1 P2 ☼ Repeat from ☼ to ☼ to the last st. K1. ♥ Repeat from ♥ to ♥ for 8 (8, 10, 12, 12, 12, 14) rows. Next row: K across for 4 (4, 4, 6, 6, 8, 8) rows. Next row: K5 (5, 6, 6, 7, 7, 8) M1 K5 (6, 6, 7, 7, 8, 8) M1 K1 M1 K13 (15, 17, 19, 21, 23, 25) M1 K1 (29, 32, 35, 38, 41, 44, 47 sts) Next row: K across Next row: K28 (31, 34, 37, 40, 43, 46) M1 K1. (30, 33, 36, 39, 42, 45, 48 sts) Next row: K across Next row: K11 (12, 13, 14, 15, 16, 17) M1 K3 M1 K to the end of the row. (32, 35, 38, 41, 44, 47, 50 sts) Next 3 rows: K across. Next row: K11 (12, 13, 14, 15, 16, 17) M1 K5 M1 K to the end of the row. (34, 37, 40, 43, 46, 49, 52 sts) Next 3 rows: K across. Next row: K11 (12, 13, 14, 15, 16, 17) M1 K7 M1 K to the end of the row. (36, 39, 42, 45, 48, 51, 54 sts) Next 3 rows: K across. For child small go to row marked with 🐝 Next row: K0 (12, 13, 14, 15, 16, 17) M1 K9 M1 K to the end of the row. (0, 41, 44, 47, 50, 53, 56 sts) Next 3 rows: K across. For child medium go to row marked with 🐝 Next row: K0 (0, 13, 14, 15, 16, 17) M1 K11 M1 K to the end of the row. (0, 0, 46, 49, 52, 55, 58 sts) Next 3 rows: K across. For child large and adult small go to row Read more
Read more
How to Knit Fingerless Gloves – With OWLS! – FREE Knitting Pattern
These colourful, cuffed owl fingerless mitts are made to match my very popular Owl Beanie and Owl Scarf, also knit flat on two needles. You can click the links if you would like to make either one; or both 😉. A new window will open so you won’t lose this page. I’ve made these owl wrist warmers similar to my original knit flat owl half gloves but with this version, they are knit from the fingers to the wrist cuff. The owls are made from feet to head, matching the aforementioned hat and scarf. There is a slight difference with the appearance of the owls when made from head to feet and I couldn’t live with that. Once you see it you can’t not see it, if you know what I mean. And since I was doing a redesign, I figured I should make the cuffs match. So I did. I did two versions of the glove. One with a rolled cuff edge (blue and brown) and one without (green). It is clearly marked in the pattern where to stop knitting and cast off depending on the edging you want. And speaking of the final appearance of the granny gloves, there is no reason that these gloves have to match anything. You can also knit them in a single colour. It really is up to you and what look you are after. To make the thumb gusset blend as much as possible and match on both sides of the thumb, there are different ways to knit and purl the stitches together. It changes whether it is on the left or the right side of the thumb. It is noted how to knit and purl the stitches in the pattern. I’ve also added links to a helpful how-to video to show you how. You don’t have to make the stitches the way I did, but it gives a much better overall look. There’s more about this in the Hints and Tips section. If casting on the 13 stitches for the thumb or picking up stitches is confusing for you, there is also a video to help you with that too. The link is after the Hints and Tips section. If you would prefer a PDF printable version of the pattern, you can download it for a small fee/donation from a number of places. In particular, my site here – Knit Owl Fingerless Gloves. You can also get it at a number of other online book retailers such as Ravelry, LoveCrafts, and Etsy. The Kindle and Paperback version is also on Amazon. The Amazon link goes to the US store. If ordering the paperback, make sure you pick the region where you live! Another way to avoid ads and pop-ups, get instant, PRINTABLE downloads of this pattern and others, is by becoming a Member on this website. When you become a Website Supporter for $3/month, you’ll gain access to exclusive member only posts. These posts contain one click downloads of the patterns. Simply click the Download & Print button. The PDF will automatically download to your computer or smart device. You can then read it on your device or print it at your leisure. You can download as many patterns as you like for the same $3 each month. You can go to this page to learn more, become a member and support my work… Exclusive Member Area Become a Member Become a Patron on Patreon If you enjoy this pattern and my other free online knitting patterns, please consider making a small donation or helping me out by visiting my Help Support My Work page. If that’s not possible, that’s totally fine too! Even sharing this page on your social media helps me out immensely. You can use those buttons below to do so easily. Things You Need Worsted weight yarn – 1 standard ball of yarn (215 yards/197 m) will make the gloves in one colour. Any colour combinations of your choosing will work. Knitting needles: Small – Size 3 US (3.25 mm) knitting needles Medium – Size 6 US (4 mm) knitting needles Large – Size 8 US (5 mm) knitting needles Tapestry needle – to sew the seam and work in the ends. 4 – 8 mm flat back cabochons or small buttons. You can also embroider eyes on if you prefer. Gauge In stockinette stitch Small size 3.5 mm (US size 4) knitting needles 11 stitches every 2 inches (5 cm) 16 rows every 2 inches (5 cm) Medium size 4 mm (US size 6) knitting needles 10 stitches every 2 inches (5 cm) 14 rows every 2 inches (5 cm) Large size 5 mm (US size 8) knitting needles 9 stitches every 2 inches (5 cm) 12 rows every 2 inches (5 cm) Sizing Like my other fingerless mitt patterns, I’ve made this as one pattern and adjusted the needle size to change the sizes. This makes it a heck of a lot easier to design and keeps the proportion of the owl the same on all sizes. Frankly, the overall look is better. To help with the hand sizing, I’ve included a handy infographic (pun intended). Keep in mind, The gloves will stretch a bit as the stitches relax. Right Hand Cast on 34 sts ◊ Row 1: K across Row 2: *K1 P2* Repeat from * to * to the last st. K1 ◊ Repeat from ◊ to ◊ for a total of 6 rows. (Change colour at the START of row 7 if desired.) To save yourself time if you’re changing colours, I suggest that you Work in the Ends While Knitting. https://youtu.be/1_zF6HAzsfY Row 7 – 11: K across (Change colour at the START of row 11 if desired.) Row 12: P5 K1 P8 K1 P19 Row 13: K14 Cast on 13 sts K6 C4B C4F K6 If you are uncertain how to make the C4B or C4F, you can either click the link or watch the videos below: https://youtu.be/Tj-x_cf_fEc https://youtu.be/XcyQfDmwGZs Row 14: P5 K1 P2 K4 P2 K1 P32 Row 15: K35 P4 K8 Row 16: P5 K1 P2 K4 P2 K1 P5 P2tog (Slip the next st onto your working needle. Pick up the next st, twist and place back on your non-working needle. Pass the slipped st back onto Read more
Read more


Love the grey cabled fingerless glove design. The cable resembles a basket weave pattern I once used to knit a sweater for my my husband. The doble layer knit will be nice and warn for my hands that ache with the cold weather. Thank you!!