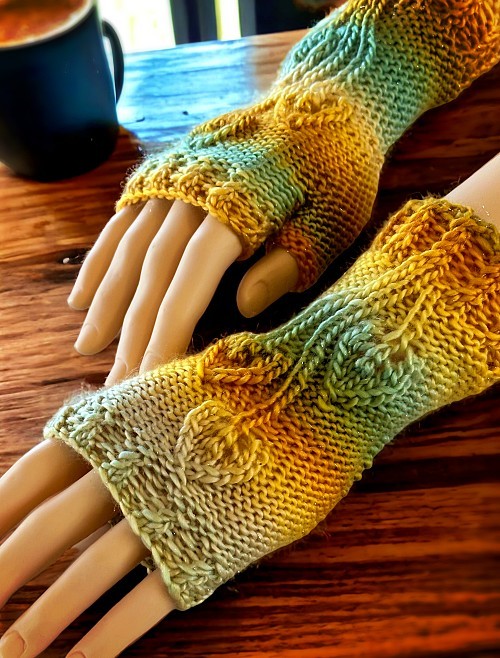
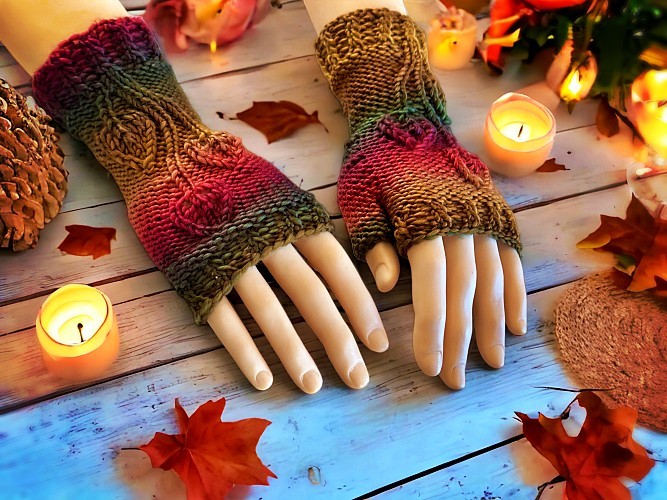
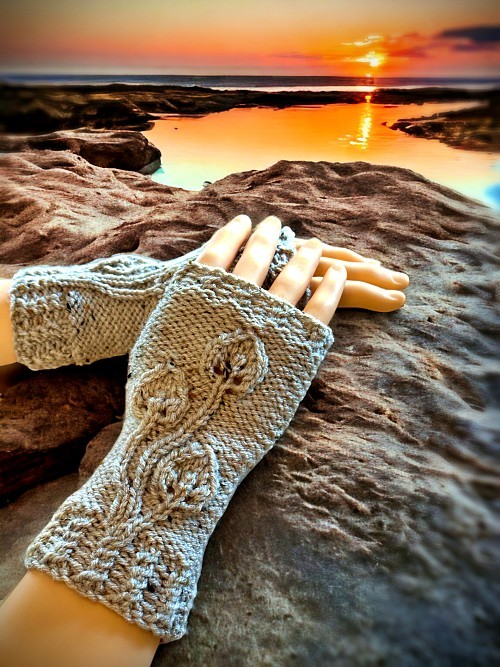
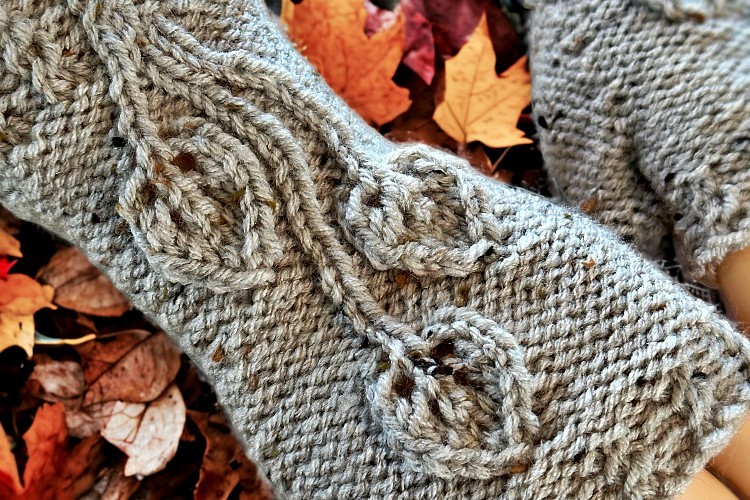
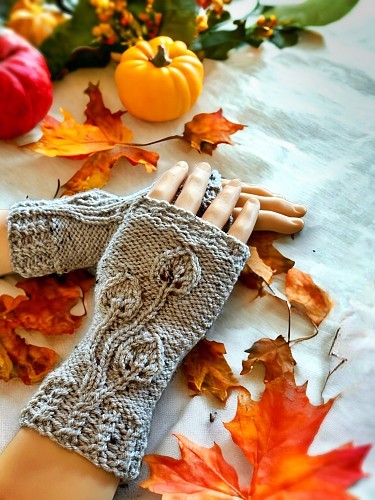
The inspiration of this pattern came from my previous Spider Fingerless Gloves pattern. I really like incorporating the design into the final wearable piece. I’ve always liked the leaf pattern and this seemed to be a great way to use it.

There isn’t a full-on how to for this pattern, by I have included helpful videos to show you how to do certain parts of the pattern. These will certainly help with any of the tricker parts like knitting the wrong side of the YO K1 YO and drawing the edges of the leaves together to a point. Click the link and it will open and automatically play the YouTube video.
If you would like to purchase a copy of this pattern that you can download and print, I have a number of options for you. You can buy the pattern on this website – Autumn Leaf Half Gloves – with How-to VIDEOS, Ravelry, Etsy, LoveCrafts, Creative Fabrica, Google Books and Amazon. Amazon has the book in both paperback and Kindle formats.
Use these 👇🏼 to share on social media 🥰
If you are loving this and all my other free patterns, please help out financially by visiting my Help Support My Work Page. If you can’t give cash, and I get that not everyone can, please do your part and share this where you can. Every share on social media helps promote my work and expose it to even more people. I’ve made it super easy for everyone to do that. By clicking those links up there 👆🏼 you can share it nearly everywhere.
Another way to avoid ads and pop-ups, get instant, PRINTABLE downloads of this pattern and others, is by becoming a Member. When you become a Website Supporter at $4/month, you’ll gain access to exclusive member only posts on Buy Me A Coffee. You can download as many patterns as you like for the same $4 each month. You can go to this page to learn more, become a member and support my work… Exclusive Member Area
Gauge
This is important to follow for correct sizing. This is when using the US size 6 (4 mm) knitting needles in stockinette.
2” (5 cm) – 10 sts
2” (5 cm) – 15 rows
Things You Need
Knitting needles:
- Small – Size 3 US (3.25 mm) knitting needles
- Medium – Size 6 US (4 mm) knitting needles
- Large – Size 8 US (5 mm) knitting needles
Worsted weight yarn – any standard size ball will do
Cable Needle – There are a number a styles but I prefer the hook version
Stitch holder – It looks like a big safety pin
Tapestry needle
Sizing
Like my other fingerless mitt patterns, I’ve made this as one pattern and adjusted the needle size to change the sizes. This makes it a heck of a lot easier to design and keeps the proportion of the leaves the same on all sizes. Frankly, the overall look is better.
If you are making the small or large size glove, check the gauge for the size 6 US (4 mm). Adjust to the size of the needles to obtain the correct gauge. If you are making the large size, increase your needle size by a size US (mm). For example, you need to use a size 7 US (4.5 mm) to get the correct gauge, use size 9 US (5.5 mm) knitting needles for the large. If you are making a small, use size 5 US (3.75 mm).
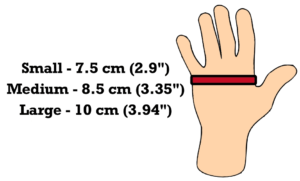
To know what size you should make, you can use the infographic below on how to measure your hand, or the hand of whomever you are making them for.
Abbreviations are at the END of the Pattern
Left Hand
Cast on 34
Row 1: (P1 K2) Repeat to last st. P1
Row 2: (K1 P2) Repeat to last st. K1
♥ Row 3: (P1 TB) Repeat to last st. P1
Row 4: As row 2 ♥ Repeat from ♥ to ♥ 3 times more. (Counts as rows 5-10).
Row 11: P1 P2tog P21 K3 P7 (33 sts)
Row 12: K7 P3 K23
Row 13: P23 K2 C1F P6
Row 14: K6 P1 K1 P2 K23
Row 15: P23 K2 P1 C1F P5
Row 16: K5 P1 K2 P2 K23
Row 17: P22 C1B K1 P2 YO K1 YO P5 (35 sts)
Row 18: K5 P3 K2 P1 K1 P1 K22 (35 sts)
Row 19: P21 C1B P1 K1 P2 (K1 YO) twice K1 P5 (37 sts)
Row 20: K5 P5 K2 P1 K2 P1 K21 (37 sts)
Row 21: P21 K1 P2 K1 P2 K2 YO K1 YO K2 P5 (39 sts)
Row 22: K5 P7 K2 P1 K2 P1 K21 (39 sts)
Please share this page!
More FREE patterns
Click the pic to read online!!


FREE Knitting Graph Paper for Colorwork Knitting


![]()
![]()


Row 23: P21 K1 P2 K1 P2 K2tog (When making this stitch, pick up a stitch as if to knit. Twist the stitch and place it back on your non-working needle. Knit the 2 stitches together from right to left.) K3 K2tog (knit the stitches together from left to right.) P5 (37 sts)
Row 24: K5 P5 K2 P1 K2 P1 K21 (37 sts)
Row 25: P21 K1 P2 K1 P2 K2tog (like you did before: pick up, twist, knit right to left) K1 K2tog (knit left to right) P5 (35 sts)
Row 26: K5 P3 K2 P1 K2 P1 K21 (35 sts)
Row 27: P14 PM1 P1 PM1 P6 YO K1 YO P2 K1 P2 Sl St (as if to knit) K2tog (knit left to right) PSSO P5 ( 37 sts)
Row 28: K8 P1 K2 P3 K23 (37 sts)
Row 29: P23 (K1 YO) twice. K1 P2 K1 P8 (39 sts)
Row 30: K8 P1 K2 P5 K6 M1 K3 M1 K14 (41 sts)
Row 31: P25 K2 YO K1 YO K2 P2 K1 P8 (43 sts)
Row 32: K8 P1 K2 P7 K25 (43 sts)
Row 33: P14 PM1 P5 PM1 P6 K2tog (pick up, twist, knit right to left) K3 K2tog (knit left to right ) P2 C1F P7 (43 sts)
Row 34: K7 P1 K3 P5 K27 (43 sts)
Row 35: P27 K2tog (pick up, twist, knit right to left ) K1 K2tog (knit left to right) P3 K1 P7 (41 sts)
Row 36: K7 P1 K3 P3 K6 M1 K7 M1 K14 (43 sts)
Row 37: P29 Sl St (as if to knit) K2tog (knit left to right) PSSO P3 YO K1 YO P7 (43 sts)
Row 38: K7 P3 K33 (43 sts)
Row 39: P14 PM1 P9 PM1 P10 (K1 YO) twice K1 P7 (47 sts)
Row 40: K7 P5 K35 (47 sts)
Row 41: P35 K2 YO K1 YO K2 P7 (49 sts)
Row 42: K7 P7 K10 M1 K11 M1 K14 (51 sts)
Row 43: P37 K2tog (pick up, twist, knit right to left) K3 K2tog (knit left to right) P7 (49 sts)
Row 44: K7 P5 K37 (49 sts)
Row 45: P14 Pass the next 13 sts of the thumb gusset onto a stitch holder. P10 K2tog (pick up, twist, knit right to left) K1 K2tog (knit left to right) P7 (34 sts)
Row 46: K7 P3 K24 (34 sts)
Row 47: P24 Sl St (as if to knit) K2tog (knit left to right) PSSO P7 (32 sts)
Row 48: K across
Row 49: P across
Row 50: K across
Row 51: P2tog (K2 P1) to the end of the row
☺Row 52: (K1 P2) Repeat to the last st. K1
Row 53: (P1 TB) Repeat to the last st. P1 ☺ Repeat from ☺ to ☺ once.
Cast off loosely on the WRONG side.
Thumb
Pick up the 13 stitches on the stitch holder with the WRONG side facing you. (See hints and tips for more info).
Row 1: Knit across
Row 2: Purl across
Row 3: Knit across
Cast off on the RIGHT side.
Sew seam along the side of the glove and the inside of the thumb. Work in ends.
More of my stuff on Etsy:
You can make a widget like this for your blog or website, too.
Instructions are on my website here: How to Display Etsy Items on Your Website
Right Hand
Cast on 34
Row 1: (P1 K2) Repeat to last st. P1
Row 2: (K1 P2) Repeat to last st. K1
♥ Row 3: (P1 TB) Repeat to last st. P1
Row 4: As row 2 ♥ Repeat form ♥ to ♥ 3 times more. (Counts as rows 5-10).
Row 11: P7 K3 P21 P2tog P1 (33 sts)
Row 12: K23 P3 K7
Row 13: P6 C1B K2 P23
Row 14: K23 P2 K1 P1 K6
Row 15: P5 C1B P1 K2 P23
Row 16: K23 P2 K2 P1 K5
Row 17: P5 YO K1 YO P2 K1 C1F P22 (35 sts)
Row 18: K22 P1 K1 P1 K2 P3 K5 (35 sts)
Row 19: P5 (K1 YO) twice K1 P2 K1 P1 C1F P21 (37 sts)
Row 20: K21 P1 K2 P1 K2 P5 K5 (37 sts)
Row 21: P5 K2 YO K1 YO K2 P2 K1 P2 K1 P21 (39 sts)
Row 22: K21 P1 K2 P1 K2 P7 K5 (39 sts)
Row 23: P5 K2tog (When making this stitch, pick up a stitch as if to knit. Twist the stitch and place it back on your non-working needle. Knit the 2 stitches together from right to left). K3 K2tog (knit the stitches together from left to right.) P2 K1 P2 K1 P21 (37 sts)
Row 24: K21 P1 K2 P1 K2 P5 K5 (37 sts)
Row 25: P5 K2tog (pick up, twist, knit right to left) K1 K2tog (knit left to right) P2 K1 P2 K1 P21 (35 sts)
Row 26: K21 P1 K2 P1 K2 P3 K5 (35 sts)
Row 27: P5 Sl St (as if to knit) K2tog (knit left to right) PSSO P2 K1 P2 YO K1 YO P6 PM1 P1 PM1 P14 ( 37 sts)
Row 28: K23 P3 K2 P1 K8 (37 sts)
Row 29: P8 K1 P2 (K1 YO) twice. K1 P23 (39 sts)
Row 30: K14 M1 K3 M1 K6 P5 K2 P1 K8 (41 sts)
Row 31: P8 K1 P2 K2 YO K1 YO K2 P25 (43 sts)
Row 32: K25 P7 K2 P1 K8 (43 sts)
Row 33: P7 C1B P2 K2tog (pick up, twist, knit right to left) K3 K2tog (knit left to right) P6 PM1 P5 PM1 P14 (43 sts)
Row 34: K27 P5 K3 P1 K7 (43 sts)
Row 35: P7 K1 P3 K2tog (pick up, twist, knit right to left) K1 K2tog (knit left to right) P27 (41 sts)
Row 36: K14 M1 K7 M1 K6 P3 K3 P1 K7 (43 sts)
Row 37: P7 YO K1 YO P3 Sl St (as if to knit) K2tog (knit left to right) PSSO P29 (43 sts)
Row 38: K33 P3 K7 (43 sts)
Row 39: P7 (K1 YO) twice K1 P10 PM1 P9 PM1 P14 (47 sts)
Row 40: K35 P5 K7 (47 sts)
Row 41: P7 K2 YO K1 YO K2 P35 (49 sts)
Row 42: K14 M1 K11 M1 K10 P7 K7 (51 sts)
Row 43: P7 K2tog (pick up, twist, knit right to left) K3 K2tog (knit left to right) P37 (49 sts)
Row 44: K37 P5 K7 (49 sts)
Row 45: P7 K2tog (pick up, twist, knit right to left) K1 K2tog (knit left to right) P10 Pass the next 13 sts of the thumb gusset onto a stitch holder. P14 (34 sts)
Row 46: K24 P3 K7 (34 sts)
Row 47: P7 Sl St (as if to knit) K2tog (knit left to right) PSSO P24 (32 sts)
Row 48: K across
Row 49: P across
Row 50: K across
Row 51: P2tog (K2 P1) to the end of the row
☺Row 52: (K1 P2) Repeat to the last st. K1
Row 53: (P1 TB) Repeat to the last st. P1 ☺ Repeat from ☺ to ☺ once.
Cast off loosely on the WRONG side.
Thumb
Pick up the 13 stitches on the stitch holder with the WRONG side facing you. (See hints and tips for more info).
Row 1: Knit across
Row 2: Purl across
Row 3: Knit across
Cast off on the RIGHT side.
Sew seam along the side of the glove and the inside of the thumb. Work in ends.
Hints and Tips
Make your seams as narrow as possible when sewing them. The bulkier the seam the more noticeable and possibly uncomfortable for the wearer.
Everything between and including the PM1 and M1 stitches form the thumb gusset.
When you are making the thumb, you MUST pick up the stitches from the wrong side. Pass the stitches from the stitch holder to the knitting needle then onto the other knitting needle so the wrong side facing you. If you don’t do the second pass, you’ll get a weird line.
Leave the cast off end of the finger cuff and the thumb longer so you can use it to sew up the seam along the side of the gloves and seam of the thumb, respectively.
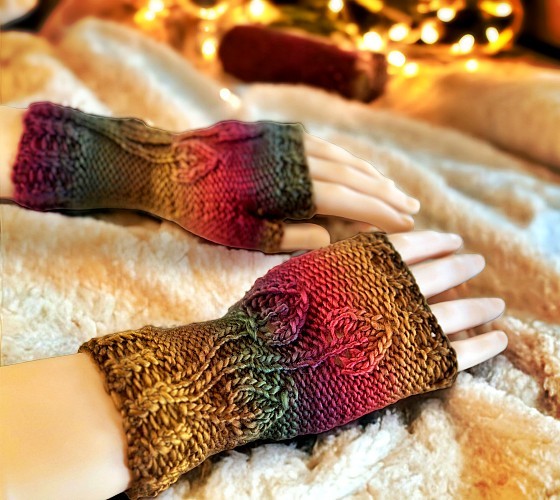
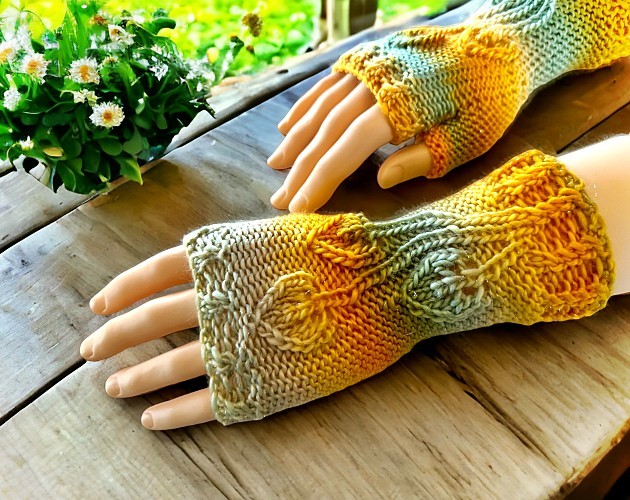
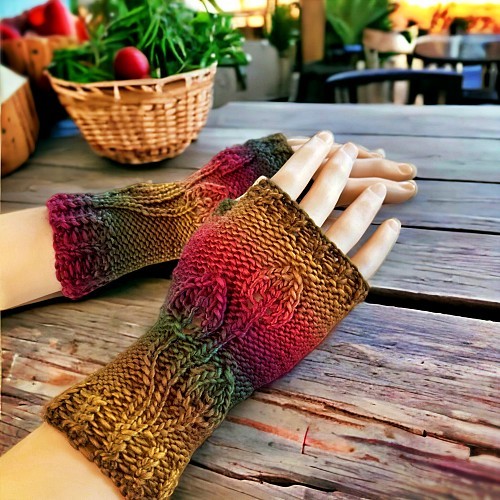
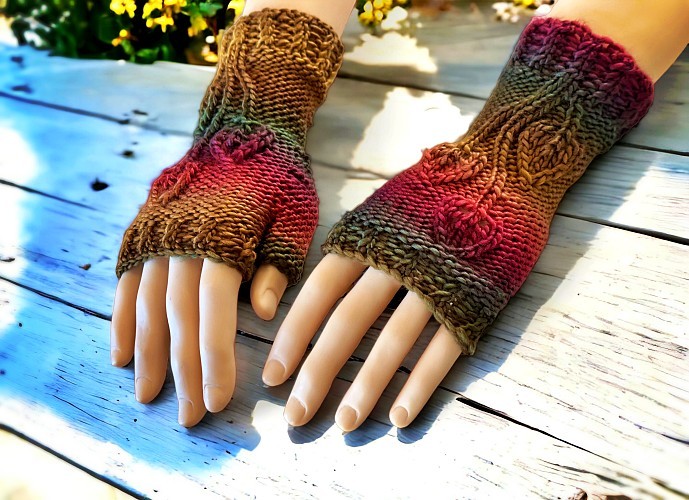
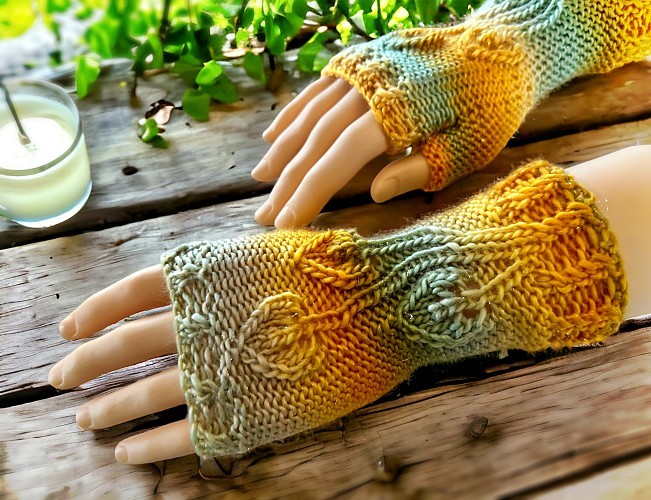
The striped ombre versions of the gloves are done with Loops & Threads “Facets” yarn you can find at Michaels (as of the printing of this pattern). It’s thin for a worsted weight yarn and I needed to use a 4.5 mm set of dpn’s to get the sizing correct. Make sure to check your gauge and adjust accordingly!
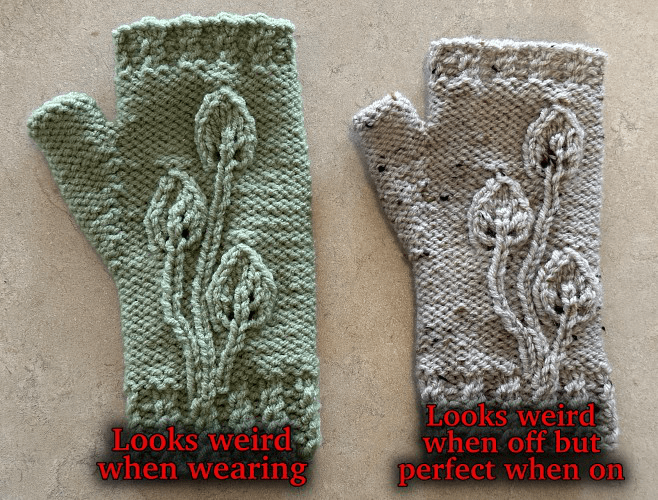
Please be aware that these gloves look like the leaves are off center when they’re not being worn. I actually redesigned them so the motif would be 2 stitches over because when they were on, they looked too close to the thumb. Sometimes designs are weird and the center of the design visually isn’t the middle of the design mathematically or functionally. Ahhh! The joys of art…
Abbreviations
K – knit
P – purl
YO – yarn over
TB – Pick up the stitch with your stitch holder. Hold the stitch at the back of your work. Knit the next stitch. Knit the stitch from the stitch holder.
C1B – Cable 1 back. Pick up next stitch on a cable needle. Pull this stitch to the BACK of your work. Knit the next stitch. Purl the stitch on the cable needle. This was for the Spider gloves but is the same for this pattern.
C1F – Cable 1 forward. Pick up the next stitch on a cable needle. Pull this stitch to the FRONT of your work. Purl the next stitch. Knit the stitch on the cable needle. This was for the Spider gloves but is the same for this pattern.
M1 – Make one (knit wise). Increase one stitch between the stitches. Pick up the yarn between the stitches. Twist slightly. Place it on your non-working needle. Knit the stitch. Watch this video to see how.
PM1 – Make one (purl wise). Increase one stitch between the purl stitches. Pick up the yarn between the stitches. Place it on your non-working needle. Purl the stitch as you regularly would. Watch this video to see how.
K2tog – How you do this depends where you are in the pattern. If you are making the right side of the leaf, knit right to left. If you are making the left side of the leaf, knit left to right. If you do it this way you eliminate the twisting of the stitch and the edge of the leaf flows evenly.
The k2tog are given for RIGHT handed knitters. If you are knitting left to right as a LEFT handed knitter, reverse the order that you knit the stitches together. K2tog from left to right then pick up, twist, knit from right to left.
Sl St – slip the stitch
PSSO – pass the slipped stitch over.
Like all of my patterns you have my permission to sell and/or give away the physical items that you make using this pattern. You are NOT permitted to reprint or duplicate this pattern in any form unless you have obtained my written permission to do so.


OK I became a member so how do I download patterns?
There’s a video on the member page that tells you how. I suggest that you watch it. I’ll also give a brief run down here.
Click on the “printable member patterns” button at the top of every page. Scroll down. All the patterns are organized by section knitted slippers, dishcloths, fingerless gloves and random stuff. Click on the “click to view” button. As long as you’re logged in, the page will open and you’ll see all the patterns just like how they appear in the video.