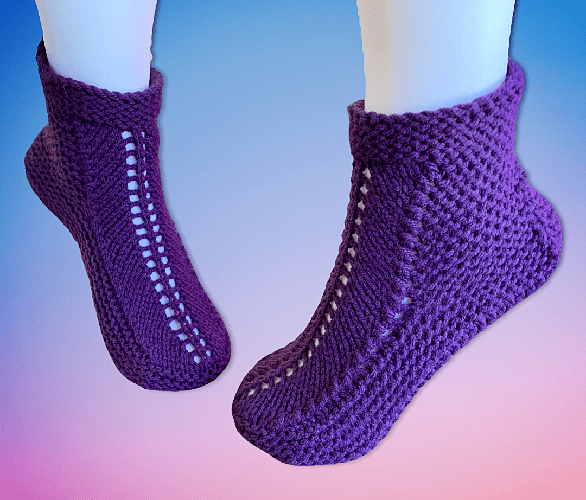
This knit flat slipper pattern is another version of my very popular Adult Moccasin Slippers. I thought I’d jazz these slippers up a bit by adding detail to the top of the toe using a striped eyelet and chevron combination. The cuff is made a little longer to create a cozy, bootie-style fit. This free knitting pattern PDF includes step-by-step video tutorials to help with the trickier sections, with clickable links and QR codes included in both the printable PDF and the web version. I really like how the final project turned out. The slippers are comfortable, practical, and very gender neutral, making them a great everyday knit.

Because of the request by many saying that they would prefer a PDF download, it’s DONE! You can download this pattern for FREE! Because I’m getting more people making donations through Buy Me a Coffee (thank you ♥️ to those who support me) I can bear the cost of offering a few free downloads on the site now. If the support continues, I’d like to make this the standard for all my patterns. Everything free has always been my ultimate goal.
A clean, printable PDF is available as a free download on Buy Me A Coffee. There’s no obligation to donate, but support is always appreciated. Thank you to everyone who helps make these free patterns possible. 😊 CLICK THIS BUTTON to go to BMAC.
👇🏼👇🏼👇🏼👇🏼👇🏼
👆🏼👆🏼👆🏼👆🏼👆🏼
This isn’t a pattern for beginners, but if you know how to knit a stitch, pick up stitches, knit two stitches together, yarn over and pass a slipped stitch over, you should be okay. I used a very different technique involving multiple sets of needles. I included videos to demonstrate how I’m using the extra set and it totally works! Trust me.
There is a lot of breaking and reconnecting the yarn to create the different portions of the slipper: the cuff, toe, sides and sole. I’ve created a very succinct video tutorial showing how to work in the ends as you go so there are fewer to sew in at the end. If you do it right, you’ll only have one, and that’s the length you leave at the end to sew up the heel seam. Here’s the link to see how – Working in the Ends While Knitting. This also a handy skill to have when knitting just about anything, tbh.
Things You Need
If you are uncertain or having trouble finding what you need to make these slippers, clicking any of the links below will show you exactly what you need. And if you decide to order through Amazon, it will be delivered right to your door and help support my pattern writing (I do get a small commission from sales through Amazon).
I have a weakness for variegated/shaded yarns. Don’t ask me why… My grandma did too. It must be genetic. I tried using some for one of the test knits for this slipper. It didn’t work. The holes and the angled striping virtually disappeared among the splotches. Also, I find the self-striping looks terrible and give it a 1/10. Would not recommend. Besides, it’s also hard to match the striping up and you waste a lot of yarn.
So here is the stuff you need…
1 ball of worsted weight yarn (average 260 yard, 5 oz or 141 gram ball will be more than enough). I used Red Heart worsted weight yarn when designing the pattern but any worsted weight yarn will suffice.
2 sets of size 4 mm (US size 6) single point knitting needles.
Stitch holder
Tapestry needle to sew in ends. You can also use this handy tutorial to show you how to work in the ends while knitting these slippers.
Gauge
With size 4 mm (US size 6) needles or whatever size you need to obtain the correct number of stitches and rows. Be sure to check your gauge otherwise the sizing won’t be correct.
In garter stitch
4” = 16 sts
4” = 34 rows
Sizes (are written as such)
Women’s 6-7 (8-9, 10-11, 12-13)
Men’s 5-6 (7-8, 9-10, 11-12, 13-14)
To Begin – Cuff
Cast on 35 (37, 39, 41, 43)
Knit across for 9 (9, 9, 11, 11) rows.
Next Row: With the WRONG side facing, K11 (12, 13, 14, 15), P13, K11 (12, 13, 14, 15).
♦ Next Row: K11 (12, 13, 14, 15), K1 Pass the stitch you just knit back onto your non-working needle. Pass the next unworked stitch OVER the stitch you passed back. Pass this stitch back to your working needle. K4 YO K1 YO K4. Pass the next stitch over to your working needle, as if to knit, taking care not to twist. Knit the next stitch PSSO. K11 (12, 13, 14, 15).
Next Row: K11 (12, 13, 14, 15), P13, K11 (12, 13, 14, 15).♦
Repeat from ♦ to ♦ 9 (10, 11, 12, 13) more. You’ll have 10 (11, 12, 13, 14) holes of the pattern made.
Break yarn when completed last row.
Toe Flap
Next Row: With RIGHT side facing, transfer the first 10 (11, 12, 13, 14) stitches to a stitch holder. Reattach the yarn.
♠ The following stitch combination is worked over the next 15 stitches (the start of the toe flap with the eyelet and chevron stripe motif). K2 (Yes, 2) Pass the stitch you just knit back onto your non-working needle. Pass the next unworked stitch OVER the stitch you passed back. Pass the stitch back to your working needle. K4 YO K1 YO K4. Pass the next stitch over to your working needle. Knit the next stitch PSSO. K1 Leave the remaining 10 (11, 12, 13, 14) stitches on the needle unworked. You will have a line of garter (knit) stitches running along side the chevron stripes.
Next Row: K1 P13 K1. ♠
The repeating rows are worked back and forth on the 15 stitch toe flap stitches only!
Repeat from ♠ to ♠ for 9 (10, 11, 12, 13) more times for a total of 10 (11, 12, 13, 14) repeats. You’ll have 20 (22, 24, 26, 28) holes of the pattern made when counted from the beginning.
Break yarn. You’ll have the 15 stitches of the toe flap on your needle and the 10 (11, 12, 13, 14) stitches you left on the needle when you started making the toe flap.
Making the Sides of the Slipper
This is where you’re going to need the extra set of knitting needles. You’ll be knitting back and forth in rows but the turn around the toe is too tight to use circular needles. For this, you’ll put the 15 toe flap stitches on one of your extra needles. It’s a little unconventional, but it works.
Please share this page!
More FREE patterns
Click the pic to read online!!


FREE Knitting Graph Paper for Colorwork Knitting


![]()
![]()


Next Row: With the RIGHT side facing, transfer the 10 (11, 12, 13, 14) stitches from the stitch holder onto one of your needles. Attach your yarn and knit the 10 (11, 12, 13, 14) stitches. Pick up 20 (22, 24, 26, 28) stitches evenly along the edge of the toe flap. (All of these stitches are on ONE needle. There are (30, 33, 36, 39, 42) stitches on this needle).
With another needle, knit the 15 stitches of the toe flap. (15 stitches on this needle)
With another needle, pick up 20 (22, 24, 26, 28) stitches evenly along the side of the toe flap. Knit the remaining 10 (11,12, 13, 14) stitches on the next needle. (30, 33, 36, 39, 42) stitches on this needle)
You should now have 3 needles holding stitches with all the points pointing as shown below when laid flat. You also have one spare needle to knit with. You are now going to knit in rows, back and forth with these three needles. Once you finish knitting all the stitches on one needle, move on to the next needle (the point of the needle is right there) until you complete the row.
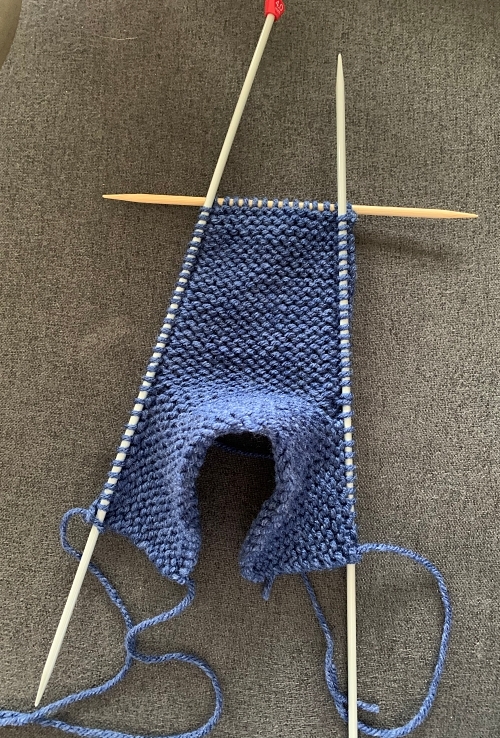
Another way to say it for the following rows, knit all the stitches forming the side of the slipper, knit the 15 stitches holding the toe flap stitches, then knit the other side of the slipper (counts as one row). Turn. Repeat.
Knit the next 8 (10, 12, 14, 16) rows
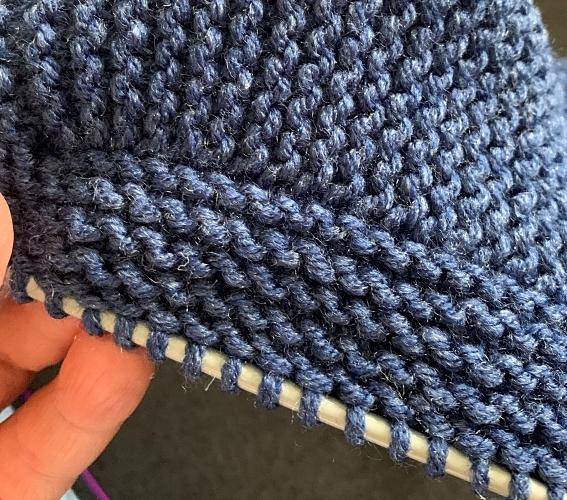
There are 4 (5, 6, 7, 8) ridges on the tip of the toe.
The photo below shows the 5 ridges for the women’s size 8-9 or the men’s 7-8.
Making the Sole
If you need help making the sole, I made a video showing how to do it. The video shows how to make the sole for a different style of slipper, but the technique is exactly the same.
Next Row: With WRONG side facing. Cast off all the stitches from the first needle loosely. You’ll need to pass the last stitch from the first needle over the first stitch of the toe flap stitches (second needle).
Using the same needle that now has one stitch, knit the remaining 14 stitches of the toe flap. Cast off all the stitches from the third needle loosely. Break yarn.
Next Row: With the RIGHT side facing, attach yarn and pick up the first cast off stitch by the toe flap (cast off stitch on the right by the point of the needle).
K2tog. Knit to the last 2 stitches K2tog. Pick up the cast off stitch by the point of your needle. (15 stitches).
Quick tip – wrap the yarn counterclockwise around your needle and turn it down to pull the yarn through the cast off stitch on the right. If you have a hard time doing this, you can also use a crochet hook to pull the loop through and place that loop on your working needle.
You now are working back and forth along the bottom of the foot picking up one cast off stitch on each side as you go.
Next Row: Knit across.
ʤ Next Row: Pick up the next stitch of the cast off stitches. K2tog. Knit to the last 2 stitches K2tog. Pick up the cast off stitch on the other side of the slipper by the point of your needle. (15 stitches).
Next Row: Knit across ʤ
Repeat from ʤ to ʤ down the entire length of the foot. There are equal number of cast off stitches along each side. How many rows varies depending on the size of slipper you’re making. Be sure to end with a completed knit across row.
More of My Stuff on Etsy
Making the Heel
I made a video showing how to do this. It’s how I make a lot of my slipper heels including this pattern. You can watch the video below to help you.
Next Row: With the RIGHT side facing, pick up a stitch in the row closest to the sole of the slipper. Count how many ridges it is for the size you are making. K2tog. Knit to the last 2 stitches. K2tog. Count down the same number of ridges on the other side and pick up a stitch in the space beneath it. (15 stitches).
Next Row: Knit across.
Ҩ Next Row: With the RIGHT side facing, count down one ridge less than the previous row and pick up a stitch in the space beneath it. K2tog twice. Knit to the last 4 stitches. K2tog twice. Count down the same number of ridges on the other side and pick up a stitch in the space beneath it. (You’ll have 13 stitches the first time you do this.)
Next Row: Knit across.
Next Row: Count down one ridge less than the previous row and pick up a stitch in the space beneath it. K2tog. Knit until the last 2 stitches. K2tog. Count down the same number of ridges and pick up a stitch in the space beneath it on the other side.
Next Row: Knit across. Ҩ Repeat from Ҩ to Ҩ until 7 stitches remain.
Next Row: Pick up a stitch beneath the next ridge. K2tog K3tog K2tog. Pick up a stitch in the space beneath the next ridge on the other side.
Next Row: Knit across.
Next Row: Pick up a stitch beneath the next ridge. K2tog K1 K2tog. Pick up a stitch in the space beneath the next ridge on the other side.
Next Row: K2tog K1 K2tog.
Next Row: K3tog.
Break yarn leaving a length of yarn long enough (8ish inches) to sew up the remaining seam.
Make another slipper.
Yes, they do look a little boxy when they’re done and not on a foot. The stretch of the garter stitch allows these slippers to stretch around the contours of any foot easily. I’ve had a number of positive reviews on Etsy from my well-slippered customers.
Hints and Tips
When picking up stitches from the cast off row, be sure you’re really moving on to the next cast off stitch! It’s an easy mistake to pick up a stitch in a stitch you already picked up. If in doubt, give the needle holding the stitches a bit of a tug. You’ll see the yarn move slightly at the very back, closest to the needle. Pick up a stitch at the NEXT cast off stitch.
If you don’t have the same number of stitches on both sides when you are forming the sole, you may have picked up a stitch twice in one stitch or missed one. Don’t worry! This is fixable. You can skip one cast off stitch if you need to make it even, or pick up a cast off stitch twice on the other side. There’s enough stretch in the slipper that any puckering this causes won’t be overly visible if you’re off by a stitch or two.
Picking up the stitches evenly along the toe flap is about 1 stitch every ridge.
To speed up finishing the slippers and not have so many ends to sew in, hold the yarn ends to the back of your work as you knit.
Abbreviations
k – knit
k2tog – knit 2 together
st – stitch
sts – stitches
PSSO – pass slipped stitch over
YO – yarn over
Like all of my patterns you have my permission to sell and/or give away the slippers that you make using this pattern. You are NOT permitted to reprint this pattern in any form unless you have obtained my written permission to do so.


