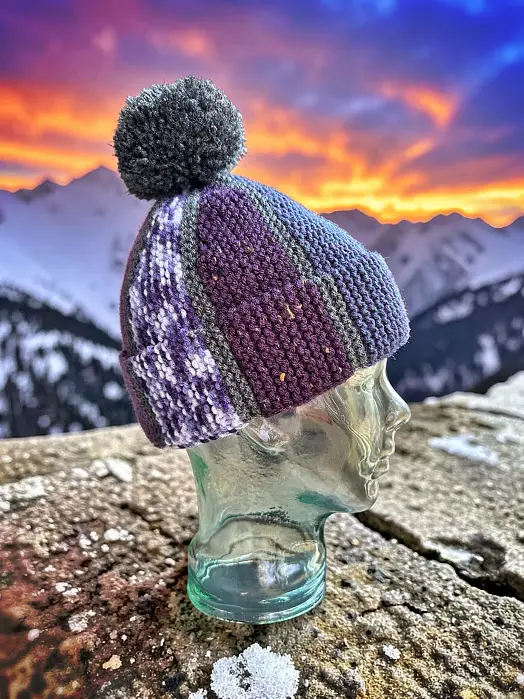
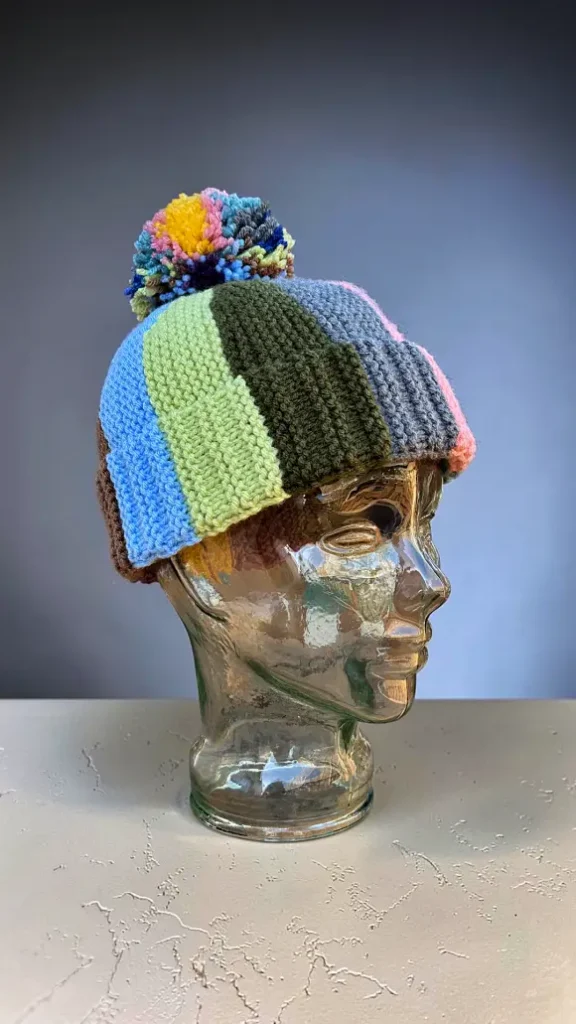
Posted on Leave a comment

Easy To Knit Fingerless Gloves – Knit Flat On Straight Needles

Knit fingerless gloves - knit flat on straight needles

For this version of my fingerless gloves, I’m doing something different. Instead of starting at the cuff, I’m starting at the fingers and working to the cuff. Why? Because I’m starting to design gloves with 3D animals, characters, figures, designs, etc. Sometimes these figures can only be made from the bottom up and to do this, I needed to design a basic fingerless glove pattern. Because most of the figures are done with stockinette stitches, I wanted the figures to stand out even more. So, I designed the glove to be done with a garter stitch to contrast with the stockinette.

Whew! That was a lot of extra info you probably didn’t want. But now that you know the plan, you can check out my website to see when I start publishing the new gloves. It could be right away. It could be 6 months. We’ll see how it goes… (FYI I already did 😊 You can check out the hippo fingerless gloves by clicking the link – Super Cute Hippo Fingerless Gloves or Mitts – FREE Knitting Pattern.

If you would prefer a PDF printable version of the pattern, you can download it for a small fee/donation from a number of places. In particular, my site here – Basic Fingerless Gloves. You can also get it at a number of other online book retailers such as RavelryLoveCrafts, and Etsy 👈🏼 (40% off on Etsy until the end of March). The Kindle and Paperback version is also on Amazon. If a link isn’t working I either haven’t formatted and published it on that retailer, I am waiting for approval, or I forgot to come back and add the link.

Another way to avoid ads and pop-ups, get instant, PRINTABLE downloads of this pattern and others, is by becoming a Member on this website. When you become a Website Supporter for $3/month, you’ll gain access to exclusive member only posts. These posts contain one click downloads of the patterns. Simply click the Download & Print button. The PDF will automatically download to your computer or smart device. You can then read it on your device or print it at your leisure. You can download as many patterns as you like for the same $3 each month. You can go to this page to learn more, become a member and support my work… Exclusive Member Area

If you enjoy this pattern and my other free online knitting patterns, please consider making a small donation or helping me out by visiting my Help Support My Work page. If that’s not possible, that’s totally fine too! Even sharing this page on your social media helps me out immensely. You can use those buttons below to do so easily.

Anyways, the pattern is written separately for both the right and left hand. The seam runs along the outside of the hand and along the pinky finger. The thumb is knitted once the hand is completed with picked up stitches. 

Things You Need

And because this pattern is so basic with no pattern of any sort, it’s a great knitting pattern to highlight the colour of your yarn. I have a weakness for variegated/shaded yarns. Don’t ask me why… My grandma did too. It must be genetic. I find the self-striping looks terrible and give it a 1/10. Would not recommend.

Worsted weight yarn – 1 standard ball of yarn (215 yards/197 m). Any colours of your choosing.

Size 4 mm (size 6 US) knitting needles (or whatever you require to get the correct gauge).

Tapestry needle – to sew the seam and work in the ends.

Gauge

In garter stitch

20 rows = 5 cm or 2.5 inches

9 sts = 5 cm or 2.5 inches

To help with the hand sizing, I’ve included a handy infographic (pun intended). I don’t usually design extra large gloves, but you’re smart. You can extrapolate from the sizes I’ve given. Keep in mind, the garter stitch is very forgiving and will stretch and contract as needed to fit.

hand sizing for knitting

RIGHT Hand 

Cast on 31 (34, 37, 40)

Row 1: (P1 K2). Repeat to the last st. P1.

Row 2: (K1 P2) Repeat to the last st. K1. 

Repeat these 2 rows for a total of 6 rows.

If you want to switch colours, do so now.

Row 7 – 12: Knit across

Row 13: K12 (14, 16, 18) Cast on 13 (13, 15, 15) sts. K19 (20, 21, 22). Total of 44 (47, 52, 55) sts. Click this link if you need help with casting on.

Row 14 – 16: Knit across

Row 17: K12 (14, 16, 18) K2tog K9 (9, 11, 11,) K2tog K19 (20, 21, 22). Total of 42 (45, 50, 53) sts

Row 18 – 20: Knit across

Row 21: K12 (14, 16, 18) K2tog K7 (7, 9, 9,) K2tog K19 (20, 21, 22). Total of 40 (43, 48, 51) sts

Row 22 – 24: Knit across

Row 25: K12 (14, 16, 18) K2tog K5 (5, 7, 7,) K2tog K19 (20, 21, 22). Total of 38 (41, 46, 49) sts

Row 26 – 28: Knit across

Row 29: K12 (14, 16, 18) K2tog K3 (3, 5, 5,) K2tog K19 (20, 21, 22). Total of 36 (39, 44, 47) sts 

Row 30 – 32: Knit across

Row 33: K12 (14, 16, 18) K2tog K1 (1, 3, 3,) K2tog K19 (20, 21, 22). Total of 34 (37, 42, 45) sts  

Stop here for SMALL and MEDIUM sizes. Skip ahead to the row marked with ♥

Row 34 – 36: Knit across

For the LARGE and X-LARGE 

Next row: K0 (0, 16, 18) K2tog K0 (0, 1, 1,) K2tog K0 (0, 21, 22). Total of 34 (37, 40, 43) sts  ) 

♥ Next 13 rows: K across

If you want to switch colours, do so now.

With the RIGHT side facing

Next row: (P1 K2). Repeat to the last st. P1.

Next row: (K1 P2) Repeat to the last st. K1.

Repeat for a total of 10 rows.

Cast off. Be sure to follow the P1 K2 pattern to create a nice, finished edge.

Make the Thumb

With the RIGHT side facing, Pick up 13 (13, 16, 16) sts from the additional sts you cast on in Row 13. Pick up the st in the twist formed from casting on. If you need help you can watch the video below or click this link – Pick up Thumb Stitches.

With the WRONG side facing

Row 1: (K1 P2) Repeat to the last st. K1.

Row 2: (P1 K2) Repeat to the last st. P1.

Row 3: Repeat row 1

Cast off following maintaining the P1 K2 pattern.

Sew the seams on the thumb and side of the glove.

More of my stuff on Etsy:

ALL patterns on Etsy are
40% off
until March 31


You can make a widget like this for your blog or website, too.
Instructions are on my website here: How to Display Etsy Items on Your Website

LEFT Hand 

Cast on 31 (34, 37, 40)

Row 1: (P1 K2). Repeat to the last st. P1.

Row 2: (K1 P2) Repeat to the last st. K1.

Repeat these 2 rows for a total of 6 rows.

If you want to switch colours, do so now.

Row 7 – 12: Knit across

Row 13: K19 (20, 21, 22) Cast on 13 (13, 15, 15) sts. K12 (14, 16, 18). Total of 44 (47, 52, 55) sts Click this link if you need help with casting on.

Row 14 – 16: Knit across

Row 17: K19 (20, 21, 22) K2tog K9 (9, 11, 11,) K2tog K12 (14, 16, 18). Total of 42 (45, 50, 53) sts

Row 18 – 20: Knit across

Row 21: K19 (20, 21, 22) K2tog K7 (7, 9, 9,) K2tog K12 (14, 16, 18). Total of 40 (43, 48, 51) sts

Row 22 – 24: Knit across

Row 25: K19 (20, 21, 22) K2tog K5 (5, 7, 7,) K2tog K12 (14, 16, 18). Total of 38 (41, 46, 49) sts

Row 26 – 28: Knit across

Row 29: K19 (20, 21, 22) K2tog K3 (3, 5, 5,) K2tog K12 (14, 16, 18). Total of 36 (39, 44, 47) sts 

Row 30 – 32: Knit across

Row 33: K19 (20, 21, 22) K2tog K1 (1, 3, 3,) K2tog K12 (14, 16, 18). Total of 34 (37, 42, 45) sts  

Stop here for SMALL and MEDIUM sizes. Skip ahead to the row marked with ♥

Row 34 – 36: Knit across

For the LARGE and X-LARGE 

Next row: K0 (0, 21, 22) K2tog K0 (0, 1, 1,) K2tog K0 (0, 16, 18). Total of 34 (37, 40, 43) sts  ) 

♥ Next 13 rows: K across

If you want to switch colours, do so now.

With the RIGHT side facing 

Next row: (P1 K2). Repeat to the last st. P1.

Next row: (K1 P2) Repeat to the last st. K1.

Repeat for a total of 10 rows.

Cast off. Be sure to follow the P1 K2 pattern to create a nice, finished edge.

Make the Thumb

With the RIGHT side facing, Pick up 13 (13, 16, 16) sts from the additional sts you cast on in Row 13. Pick up the st in the twist formed from casting on. If you need help you can click this link – Pick up Thumb Stitches.

With the WRONG side facing

Row 1: (K1 P2) Repeat to the last st. K1.

Row 2: (P1 K2) Repeat to the last st. P1.

Row 3: Repeat row 1

Cast off following maintaining the P1 K2 pattern.

Sew the seams on the thumb and side of the glove.

Hints and Tips

If you would like a longer glove, make more rows than indicated with the row marked with the ♥  If you are making a longer glove, cast the stitches off loosely to allow for more stretch.

If you want the cuff to be a different colour than the rest of the glove, I’ve indicated when to switch colours. The cuff on the fingers, wrist and thumb are don with the  K1 P2 ribbing sections.

You don’t need to add the extra ribbing for the thumb. It is a finished edge so it won’t come undone. You may want to do a quick single crochet around to give it a bit of a fancy edging.

Watch the Helpful Video

If you need help with casting on the thumb or picking up the stitches to finish the thumb, you can watch the quick how-to video on Youtube here – Basic Fingerless Gloves – How to Make the Thumb

Abbreviations

k – knit

p – purl

k2tog – knit 2 together

st – stitch

sts – stitches

Like all of my patterns you have my permission to sell and/or give away the slippers that you make using this pattern. You are NOT permitted to reprint this pattern in any form unless you have obtained my written permission to do so.  

Posted on Leave a comment

How To Knit A Beanie Hat – With OWLS! – FREE Knitting Pattern

Knit Owl Beanie Hat - FREE Knitting Pattern

I really do like how well the owl motif worked on this hat! And surprisingly didn’t take much figuring or math once I wrote out the Basic Knit Flat BeanieI did have to play around with how many rows tall to make the body and head. I didn’t figure it would stretch as much as it does but I’m happy with the final proportions.

And in case you haven’t found it on the website yet, I have a pair of fingerless gloves that have the same owl motif. There is the knit flat owl gloves and the owl gloves that are knit in the round. The cuffs aren’t a perfect match. I may redesign another pair so it will match the hat better.

This owl hat knit pattern is a fairly easy project to make if you have some knitting experience. I designed it to be flat, knit on 2 straight needles so more people would be comfortable in making it. Though the cabling can look intimidating, it really isn’t. I have videos on YouTube that will show you how if you’ve never done it before. I embedded videos in the pattern to help you along.

The choice of colour is yours as always. I included where to change colours if you would like to make one with 3 colours like I did for the brown and beige version I made. If you’re making a solid colour toque, you can ignore the notifications in the pattern.

As far as the use of a pom pom on the top… Some love it, some hate it. I know for myself, if I have to put my hood up, I hate them, but aesthetically, they do have their charms NGL. I have more information in the Hints and Tips section about the pom pom on the white and blue beanie.

Things You Need

Worsted weight yarn (either complimentary colours or single colour)

5 mm (Size 8 US) single pointed knitting needles

Cable needle

Tapestry needle to sew seams and work in ends

14 or 16 buttons or jewels for eyes (see Hints and Tips)

Pom pom – you can make or buy these, or not use one at all.

Gauge

In stockinette

9 sts = 2 inches (5 cm)

12 rows = 2 inches (5 cm)

Sizes are written as such:

S-M (L-XL)

Small and medium = 21 inches (53 cm) around

Large and Extra large = 24.5 inches (62 cm) around

Uses about 160 meters or 180 yards. Does NOT include pom-pom.

This pattern makes either 7 or 8 owls around. Each owl motif is about 3.5 inches (8.9 cm) wide if you follow the gauge given. You can adjust your stitches accordingly to make larger or smaller sizes than what I’ve given. Each owl motif uses 12 stitches. So, if you wanted it smaller by one owl cast on 74 sts (86 – 12 = 74)

If you would prefer a PDF printable version of the pattern, you can download it for a small fee/donation from a number of places. In particular, my site here – Knit Owl Beanie Hat. You can also get it at a number of other online book retailers such as RavelryLoveCrafts, and Etsy 👈🏼 (40% off on Etsy until the end of March). The Kindle and Paperback version is also on Amazon. If a link isn’t working I either haven’t formatted and published it on that retailer, I am waiting for approval, or I forgot to come back and add the link.

Another way to avoid ads and pop-ups, get instant, PRINTABLE downloads of this pattern and others, is by becoming a Member on this website. When you become a Website Supporter for $3/month, you’ll gain access to exclusive member only posts. These posts contain one click downloads of the patterns. Simply click the Download & Print button. The PDF will automatically download to your computer or smart device. You can then read it on your device or print it at your leisure. You can download as many patterns as you like for the same $3 each month. You can go to this page to learn more, become a member and support my work… Exclusive Member Area

If you enjoy this pattern and my other free online knitting patterns, please consider making a small donation or helping me out by visiting my Help Support My Work page. If that’s not possible, that’s totally fine too! Even sharing this page on your social media helps me out immensely. You can use those buttons below to do so easily.

The Pattern

Cast on 86 (98) sts

♠ Row 1: Knit

Row 2: Purl ♠ Repeat from ♠ to ♠ for a total of 10 rows. (Change colour at the START of row 11 if desired.) 

To save yourself time if you’re changing colours, I suggest that you Work in the Ends While Knitting. You can click that link or watch the video here.

Row 11-15: Knit (Change colour at the START of row 15 if desired.)

Row 16: ♦ P2 K1 P8 K1 ♦ Repeat from ♦ to ♦ until there are 2 sts. P2

Row 17: ♣ K3 C4B C4F K1 ♣ Repeat from ♣ to ♣ to the last 2 sts. K2

If you don’t know how to cable you can watch these videos to show you how.

Row 18: ♥ P2 K1 P2 K4 P2 K1 ♥ Repeat from ♥ to ♥ to the last 2 sts. P2

Row 19: K5 ☺ P4 K8 ☺ Repeat from ☺ to☺ 5 (6) times more. P4 K5

Row 20: As row 18

Row 21: As row 19

Row 22: As row 18

Row 23: As row 19

Row 24: As row 18

Row 25: As row 19

Row 26: As row 18

Row 27: ♣ K3 C4B C4F K1 ♣ Repeat from ♣ to ♣ to the last 2 sts. K2

Row 28: ♦ P2 K1 P8 K1 ♦ Repeat from ♦ to ♦ until there are 2 sts. P2.

Row 29: Knit

Row 30: As row 28

Row 31: Knit

Row 32: As row 28

Row 33: Knit

Row 34: As row 28

Row 35: ♣ K3 C4B C4F K1 ♣ Repeat from ♣ to ♣ to the last 2 sts. K2

Row 36: as row 28 (Change colour at the START of row 37 if desired.)

Row 37 – 40: Knit (Change colour at the START of row 41 if desired.)

▲ Row 41: Knit

Row 42: ◘ P2 K1 ◘ Repeat from ◘ to ◘ tot he last 2 sts. P2 ▲ Repeat from ▲ to ▲ for a total 

of 22 (26) rows.

Next row: ♣ K2tog K1 ♣ Repeat from ♣ to ♣ to the last 2 sts. K2tog

Next row: ◘ P1 K1 ◘ Repeat from ◘ to ◘ to the last st. P1

Next row: K2tog to the end of the row.

Next row: P across

Next row: K2tog to the last st. K1

Next row: P across

Break yarn and draw through. Sew the seam using the blanket stitch. Add a pom-pom to the top if you like.

More of my stuff on Etsy:

ALL patterns on Etsy are
40% off
until March 31


You can make a widget like this for your blog or website, too.
Instructions are on my website here: How to Display Etsy Items on Your Website

Hints and Tips

I used repurposed yarn for the pom pom on the white toque with the blue banding. Unraveling the slippers I had originally made, it left the wool in the crinkly state that occurs. I haven’t washed it so I don’t know if the fluffy/fuzzy look will stay, but I certainly do like the effect it gave to the final pom pom.

If you are using multiple colours for your toque, I suggest you Work in the Ends While You Knit. It saves you time in the long run. You can either click the link or take a photo of the QR code below to learn how.

Sew the seam using a blanket stitch to make it as invisible as possible. I added enough stitches along the sides so you can do this.

You can make the beanie fit closer to the crown of the head by not doing as many repeats of rows 41 and 42. You can also make it longer (taller and floppy) by doing more. 

You can use whatever you like for eyes. Buttons will work. I used 8 mm flat back cabochons. They come in a variety of colours and sizes. I looked for more realistic owl eyes but all I could find were ones for taxidermy and they were too big, and expensive. I also recommend gluing them on as sewing will take a bit of time.

Abbreviations

k – knit

p – purl

k2tog – knit 2 sts together

st – stitch

sts – stitches

Side note: I use both versions of the terminology when it comes to cable stitches. I’ve been corrected that I’m using the wrong one for both occasions so it’s a no win for me. What I mean is that C4F is the same technique as C2F. Just like how C2B is the same as C4B. Do you think of it as the just the stitches you’re pulling or the number of stitches you’re using in total when you do it? It’s a personal choice, I guess.

C4F – Pick up the next 2 stitches with your cable needle. Pull the stitches to the FRONT of your work. Knit the next 2 stitches on your non-working needle. Knit the 2 stitches from the cable needle. Watch this video to see how. How to C4F or Cable 4 Forward

C4B – Pick up the next 2 stitches with your cable needle. Pull the stitches to the BACK of your work. Knit the next 2 stitches on your non-working needle. Knit the 2 stitches from the cable needle. Watch this video to see how. How to C4B or Cable 4 Back

Posted on Leave a comment

Basic Knit Flat Beanie or Toque – FREE Hat Knitting Pattern for Straight Needles

easy knitting pattern beanie - knit on straight needles

I have wandered into the vastness of toque and/or beanie design once before. I designed the previous rendition a bit differently than the standard touque and used short rows. If you’re so inclined you can click this link to see the pattern – Winter Beanie Toque or Touque or Tuque with Vertical Stripes

The reason for this very basic, knit flat on 2 needles design is because I want to add my spider, hippo and owl motifs to a toque. But to do that, I needed to create the base design to get the fit and style right. FYI I’m already working on the owls now that this knitting design is complete. It’s coming along swimmingly btw .

I’ve added some notes to the end of the pattern to help you along if you want to do some basic modifications to the beanie like make it longer, bigger, smaller. Head size and taste varies from person to person and this may need a bit of tweaking to fit want you need or want.

I added links to how-to videos to help you along if you are a new knitter or just need a bit of extra help. (Click the link in the pattern to open a new window and watch. You won’t lose this page.) This pattern uses very basic stitches and has an easy seam to sew at the end making it a great pattern for newbies and super quick for those with more experience. 

If you would prefer a PDF printable version of the pattern, you can download it for a small fee/donation from a number of places. In particular, my site here – Basic Knit Flat Beanie. You can also get it at a number of other online book retailers such as Ravelry, LoveCrafts, Creative Fabrica and Etsy. The Kindle version is also on Amazon.

Another way to avoid ads and pop-ups, get instant, PRINTABLE downloads of this pattern and others, is by becoming a Member on this website. When you become a Website Supporter for $3/month, you’ll gain access to exclusive member only posts. These posts contain one click downloads of the patterns. Simply click the Download & Print button. The PDF will automatically download to your computer or smart device. You can then read it on your device or print it at your leisure. You can download as many patterns as you like for the same $3 each month. You can go to this page to learn more, become a member and support my work… Exclusive Member Area

If you enjoy this pattern and my other free online knitting patterns, please consider making a small donation or helping me out by visiting my Help Support My Work page. If that’s not possible, that’s totally fine too! Even sharing this page on your social media helps me out immensely. You can use those buttons below to do so easily.

Things You Need

Worsted weight yarn – 1 standard ball of yarn (215 yards/197 m)

US Size 8 (5 mm) knitting needles (or whatever you require to get the correct gauge).

Tapestry needle to sew up seams

Pom-pom is optional (I found mine on Amazon but you can make yarn ones too).

Gauge

In stockinette stitch

9 sts – 5 cm (2″) 

13 rows – 5 cm (2”) 

Sizes are written as such:

S-M (L-XL)

Small and medium = 21.5 inches (55 cm) around

Large and Extra large = 23.5 inches (60 cm) around

The Pattern

Cast on 86 (92)

♠ Row 1: K across

Row 2: P across ♠ Repeat from ♠ to ♠ for a total of 10 rows.

♥ Row 11: K across

Row 12: ♦ P2 K1 ♦ Repeat from ♦ to ♦ to the last 2 sts. P2 ♥ Repeat from ♥ to ♥ for a total of 44 (48) rows.

Next row: ♣ K2tog K1 ♣ Repeat from ♣ to ♣ to the last 2 sts. K2tog

Next row: ◘ P1 K1 ◘ Repeat from ◘ to ◘ to the last st. P1

Next row: ☺ K1 K2tog ☺ Repeat from ☺ to ☺ to the end of the row.

Next row: P across

Next row: K2tog to the last st. K1

Next row: P across

Break yarn and draw through and gather stitches. Sew the seam using the blanket stitch. Add a pom-pom to the top if you like.

Hints and Tips

If you want a longer touque, add more rows than what is mentioned in the pattern. Make more rows than the total of rows 11 and 12.

If you want a beanie that’s more slouchy with a looser weave, you can try using a larger size knitting needle (US size 10 or 6 mm for example). This changes the gauge making it bigger around the head. You’ll have to play with it a bit to figure out how many stitches you’ll need to cast on so it still fits the person’s head.

In saying that, if the hat is too small or too big, any combo of stitches 3x+2 will work. For example, if you need less stitches cast on because you want a looser weave, you may only need 74 sts. You get that with the following equation 3(24)+2=74. Twenty four repeats of the ribbing P2 K1 pattern (on the WRONG side) plus 2 extra P sts. Compare this to the large size that is 30 repeats of the P2 K1 ribbing pattern plus 2 stitches (total of 92 sts).

If you want to make this in child sizes, that’s also possible. As a quick reference, each rib section is about one inch or 2.5 cm if you match the gauge given for this pattern.

I’ve added the 2 stockinette stitches along the side so you can sew the seam easily using the blanket stitch and make it blend in to almost disappear.

Abbreviations

K – knit

P – purl

K2tog – knit 2 sts together

st – stitch

sts – stitches

Like all of my patterns, you have my permission to sell and/or give away the physical items that you make using this pattern. You are NOT permitted to reprint this pattern in any form unless you have obtained my written permission to do so. 

Posted on 1 Comment

Ribbed Moccasin Bootie Slippers for Adults – FREE Knitting Pattern

Ribbed moccasin bootie slippers for adults - green

Shocker. Another slipper design 😂 I really do like this style of slipper but after designing the basic moccasin slipper, I was thinking of ways that I can gussy it up a bit if you will. I liked the idea of doing ribbing around it, simply for the additional visual appeal. When I started I didn’t realize how complicated it would be to make the ribbing line up regardless of the sizing. But I gave it some thought, did the math and tahdah! The ribbed moccasins slippers have arrived.

Like the original design, this style of slipper is knit flat on straight needles. The only catch is that it use 2 sets of needles. Don’t worry though. I’ve added a number of photos to help you along. There’s even a few videos for specific stitches and techniques on YouTube if you need extra help.

If you would prefer a printable, ad-avoiding version, you can download the PDF version of this pattern for a small fee/donation. You can download it from a number of places. In particular, my site here – Ribbed Moccasin Bootie Slippers for Adults. You can also get it at a number of other online retailers such as RavelryCreativeFabrica, DeviantArt and Etsy. There is also the Kindle and Paperback versions available on Amazon.

Another way to avoid ads and pop-ups, get instant, PRINTABLE downloads of this pattern and others, is by becoming a Member on this website. When you become a Website Supporter for $3/month, you’ll gain access to exclusive member only posts. These posts contain one click downloads of the patterns. Simply click the Download & Print button. The PDF will automatically download to your computer or smart device. You can then read it on your device or print it at your leisure. You can download as many patterns as you like for the same $3 each month. You can go to this page to learn more, become a member and support my work… Exclusive Member Area

If you enjoy this pattern and my other free online knitting patterns, please consider making a small donation or helping me out by visiting my Help Support My Work page. If that’s not possible, that’s totally fine too! Even sharing this page on your social media helps me out immensely. You can use the buttons below to do so easily.

Things You Need

1 ball of worsted weight yarn (average 260 yard, 5 oz or 141 gram ball will be more than enough).

2 sets of size 4 mm (US size 6) single point knitting needles.

Stitch holder

Tapestry needle to sew in ends. You can also use this handy tutorial to show you how to work in the ends while knitting these slippers. (You can watch the embedded video in the Hints and Tips section too).

Gauge

With size 4 mm (US size 6) needles or whatever size you need to obtain the correct number of stitches and rows. Be sure to check your gauge otherwise the sizing won’t be correct.

In garter stitch

4” = 16 sts

4” = 40 rows

Sizes (are written as such)

Women’s 6-7 (8-9, 10-11, 12-13)

Men’s 5-6 (7-8, 9-10, 11-12)

The Pattern

Cast on 42 (46, 46, 50)

♠ Row 1: P across

Row 2: K across ♠ Repeat from ♠ to ♠ for a total of 8 rows

♫ Row 9: K2 (0, 0, 2) ♦ P2, K2 ♦ Repeat from ♦ to ♦ 9 (10, 10, 11) times more. P0 (2, 2, 0).

Row 10: K across ♫ Repeat from ♫ to ♫ for a total of 10 (10, 12, 12) rows.

Next Row: Repeat row 9.

Toe Flap

Next Row: Pass the next 14 (16, 16, 18) sts on to a stitch holder. K1 M1 K12 M1 K1. Leave the remaining sts unworked on your non-working needle. Turn

♣ ☺ Next Row: P3 ◘ K2 P2 ◘ Repeat from ◘ to ◘ two times more. P1

Next Row: K across. ♣ Repeat from ♣ to ♣ 12 (12, 14, 14) times more.

Repeat the row marked with ☺. 28 (28, 36, 36) rows for the toe flap.

Making the Sides

Next Row: Put the sts on the stitch holder back on a knitting needle. With the RIGHT side facing and with your first needle, K14 (16, 16, 18). Pick up 16 (16, 20, 20) sts evenly along the toe flap. Be sure to pick up a st in the first st of the stockinette stripe and in the M1.

Right side of slipper

With your second needle along the sts of the toe flap, K2tog (To make it blend more into the slipper, pick up the first st as if to knit, twist this st and place it back on your non-working needle. Knit this and the next st together going from RIGHT to LEFT. You can also knit the 2 sts together as you normally would if you want.) K12 K2tog (as you normally would).

With your third needle, pick up 16 (16, 20, 20) sts evenly along the toe flap. Be sure to pick up a st in the M1 and the first st of the stockinette stripe. K14 (16, 16, 20).

Left side of the slipper. (I accidentally dropped the next 2 sts when taking the photo)

Your 3 needles will look like this

♥ Next Row: K2 (0, 0, 2) ♦ P2, K2 ♦ Repeat from ♦ to ♦ 17 (18, 20, 21) times more. P0 (2, 2, 0).

Next Row: K across ♥ Repeat from ♥ to ♥ 2 (3, 4, 5).

With the WRONG side facing you, cast off 30 (32, 36, 38) sts. (Maintain the P2 K2 pattern while casting off) P1 ◘ K2 P2 ◘ Repeat from ◘ to ◘ two times more. Cast off the remaining sts maintaining the P2 K2 pattern. Bind off 

More of My Stuff on Etsy

ALL patterns on Etsy are
40% off
until March 31


You can make a widget like this for your blog or website, too.
Instructions are on my website here: How to Display Etsy Items on Your Website

Making the Sole

If you need more help than the photos provide below, you can watch the how-to video embedded here. The video starts in the correct section. No need to find the spot. I already have it cued up for you. The video is for a different style of slipper, but it is made EXACTLY the same way.

Next Row: With the RIGHT side facing, attach yarn and knit the first stitch of the cast off stitches by the toe flap (cast off stitch on the right by the point of the needle).

Your slipper will look like the slipper above. (I’m using a similar design to more clearly show the cast off stitches.) 

Knitted Moccasin Bootie Slippers for Children - picking up stitches
How to knit slippers

Pick up this stitch at the start of the row.

K2tog. Knit to the last 2 stitches K2tog. Pick up the cast off stitch by the point of your needle. (14 stitches).

Knitted Moccasin Bootie Slippers for Children - Picking up stitches

Pick up this stitch at the end of the row.

Quick tip – wrap the yarn counterclockwise around your needle and turn it down to pull the yarn through the cast off stitch on the right. If you have a hard time doing this, you can also use a crochet hook to pull the loop through and place that loop on your working needle.

You now are working back and forth along the bottom of the foot picking up one cast off stitch on each side as you go.

Next Row: Knit across.

ʤ Next Row: Pick up the next stitch of the cast off stitches. K2tog. Knit to the last 2 stitches K2tog. Pick up the cast off stitch on the other side of the slipper by the point of your needle. (14 stitches).

Working your way down the sides
Keep working your way down the slipper to make the sole.

Next Row: Knit across ʤ

Repeat from ʤ to ʤ down the entire length of the foot. There are equal number of cast off stitches along each side. How many rows varies depending on the size of slipper you’re making. Be sure to end with a completed knit across row.

Making the Heel

You’re now going to make a small triangle to fit in the back of the heel. You’re going to fill this space in the slipper by working on the 14 sole sts already on your needle, and picking up a st on each side of the needle.

I’ve made a specific video showing how to make the heel. It’s for a number of different styles, but it works the same for all. 

Please note: the video decreases every other row. This pattern calls for decreasing EVERY row after the first one or two rows (depending on size). I’ve included photos but if you are still confused, please watch the video embedded below.

Child moccasin slippers - Picking up stitches to make the heel.

♠ Next Row: With the RIGHT side facing, pick up a stitch along the side closest to the sole of the slipper. K2tog. Knit to the last 2 stitches. K2tog. Pick up a stitch on the other side.

Next Row: Knit across. ♠ Repeat from ♠ to ♠ 0 (0, 1, 1) time.

◘ Next row: With the RIGHT side facing, pick up a stitch along the side closest to the sole of the slipper. K2tog twice. Knit to the last 4 stitches. K2tog twice. Pick up a stitch on the other side.

Next row: Knit across. ◘ Repeat from ◘ to ◘ until 6 stitches remain.

Next Row: Pick up a stitch along the side. K2tog 3 times. Pick up a stitch on the other side.

Next Row: Knit across.

Next Row: K2tog, K1, K2tog. Pass the middle stitch on your working needle over the stitch on the left. Pass the stitch on the right over the stitch on the left. (Or you can turn your work and knit the 3 sts together).

Break yarn leaving a length of yarn long enough (8ish inches) to sew up the remaining seam.

Make another slipper.

Hints and Tips

I make my K2tog a little differently at the top of the toe only because how the t looks when you knit the two together can look off. I’m very picky though. It doesn’t really matter.

When picking up the first 2 and last 2 sts along the toe, you don’t have to go through the M1. Once again, I’m just overly particular about what it looks like. What works for you will be fine.

There is a lot of breaking and rejoining of yarn with this pattern. I have made a complete tutorial showing How to Work in the Ends While Knitting. You can watch the video right here.

Abbreviations

k – knit

p – purl

k2tog – knit 2 sts together

st – stitch

sts – stitches

M1 – Make one (knit wise). Increase one stitch between the stitches. Pick up the yarn between the stitches. Twist slightly. Place it on your non-working needle. Knit the stitch. Watch this video to see how. 

Like all of my patterns, you have my permission to sell and/or give away the physical items that you make using this pattern. You are NOT permitted to reprint this pattern in any form unless you have obtained my written permission to do so. 

If you have any questions, please feel free to leave a comment or send me your questions at [email protected].

Posted on Leave a comment

Super Cute Hippo Fingerless Gloves or Mitts – FREE Knitting Pattern

Hippo fingerless mittens - free knitting pattern

I originally started this 3D animal adventure with my very popular owl gloves (both knit flat and knit in the round. Those are clickable links btw ☺) It then progressed on to my Spider Gloves and Autumn Leaf Gloves. I wanted to make a cat sitting down on a pair of fingerless mitts. Well, that didn’t turn out as expected but it is how these hippo gloves came to be. I’m still working on the cat gloves…

When making these, I realized that I couldn’t make it in the traditional way by starting at the cuff and working my way to the fingers. I had to go the opposite way to be able to make the arms, legs, body, head and ears. No problem. I rewrote the basic glove pattern. That’s over on Amazon as an exclusive. It will be put on my website eventually so check out this website to see if it’s here at KweenBee.com.

If you are not a fan of ads or following a patten online, I also have printable PDF version for sale for a small fee. You can purchase and download the pattern from this website – Hippo Fingerless Gloves or Mittens, from my Etsy shop, Ravelry, LoveCrafts, Google Books, CreativeFabrica and the Kindle and paperback version are both available on Amazon. This is linked to the USA version. If you’re from anther country make sure you switch over to where you live.

Anyways, the pattern is written separately for both the right and left hand. Because it is knit flat there is a seam that runs along the outside of the hand and along the pinky finger. The thumb is knitted once the hand is completed with picked up stitches. And also, the hippo will never fall off. It’s made as you make the glove by going back and forth and making formed bobbles. Other than the thumb, this is made in one piece. 

Another way to avoid ads and pop-ups, get instant, PRINTABLE downloads of this pattern and others, is by becoming a Member on this website. When you become a Website Supporter for $3/month, you’ll gain access to exclusive member only posts. These posts contain one click downloads of the patterns. Simply click the Download & Print button. The PDF will automatically download to your computer or smart device. You can then read it on your device or print it at your leisure. You can download as many patterns as you like for the same $3 each month. You can go to this page to learn more, become a member and support my work… Exclusive Member Area

If you enjoy this pattern and my other free online knitting patterns, please consider making a small donation or helping me out by visiting my Help Support My Work page. If that’s not possible, that’s totally fine too! Even sharing this page on your social media helps me out immensely. You can use the buttons below to do so easily.

Things You Need

Worsted weight yarn – 1 standard ball of yarn (215 yards/197 m). Any colours of your choosing.

Knitting needles:

Small – Size 3 US (3.25 mm) knitting needles

Medium – Size 6 US (4 mm) knitting needles

Large – Size 8 US (5 mm) knitting needles

Tapestry needle – to sew the seam and work in the ends.

0.27 inch (7mm) wiggle eyes or small buttons. You can also embroider eyes on if you prefer.

Gauge

In stockinette stitch

Small

size 3.5 mm (US size 4) knitting needles

11 stitches every 2 inches (5 cm)

16 rows every 2 inches (5 cm)

Medium

size 4 mm (US size 6) knitting needles

10 stitches every 2 inches (5 cm)

14 rows every 2 inches (5 cm)

Large

size 5 mm (US size 8) knitting needles

9 stitches every 2 inches (5 cm)

12 rows every 2 inches (5 cm)

Sizing

Like my other fingerless mitt patterns, I’ve made this as one pattern and adjusted the needle size to change the sizes. This makes it a heck of a lot easier to design and keeps the proportion of the hippo the same on all sizes. Frankly, the overall look is better.

To help with the hand sizing, I’ve included a handy infographic (pun intended). Keep in mind, the garter stitch is very forgiving and will stretch and contract as needed to fit.

hand sizing for knitting

PLEASE Note!

I’ve added photos in the rows of the pattern that have trickier parts like making the bobbles, belly and decreases. If you are a seasoned knitter and don’t need the photos, I’ve written out the rows again without the photos. Regardless…you only need to knit each row once!

RIGHT Hand

Cast on 34

Row 1: (P1 K2). Repeat to the last st. P1.

Row 2: (K1 P2) Repeat to the last st. K1.

Repeat these 2 rows for a total of 6 rows. (If you want to change colours, do so now.)

Row 7 – 12: Knit across

Row 13: K14 Cast on 13 sts. K20. (47 sts) If you need help with casting on you can watch this video.

Row 14: Knit across

Row 15 (Feet): K35 Bobble 3 (K3 into one stitch. by alternating knitting into the front, the back and the front of the stitch, turn. Working the following rows into the 3 stitches in the one stitch, P3, turn, K3, turn, P3, turn, K3tog (do NOT turn).

3 sts in one st
Turn and purl


Done working the rows
Knit 3 sts together from  RIGHT to LEFT
Stitch completed

K2,

Next 2 sts knitted and going to make another bobble.

Bobble 3 (as before),

Knit the 2 sts together in this bobble from LEFT to RIGHT
2nd bobble done

K8.

***Row 15 repeated without the photos***

Row 15 (Feet): K35 Bobble 3 (K3 into one stitch. by alternating knitting into the front, the back and the front of the stitch, turn. Working the following rows into the 3 stitches in the one stitch, P3, turn, K3, turn, P3, turn, K3tog (do NOTturn). K2, Bobble 3 (as before), K8.

Row 16: K8 P4 K35

Row 17 (Belly): K14, K2tog K9, K2tog, K9. (K3 into one stitch) twice. Turn. Working the following rows into the 6 stitches in the two stitches,

6 sts in 2 sts

P6, turn, K1, M1 K4 M1, K1 turn, 

Increased to 8 sts

P8, turn, K8, turn, P8, turn, K8 (do NOT turn. 

Repeated rows for bottom of the belly done. 

Continue to work the remaining stitches of the row) K9. (51 sts)

Row 17 completed (for left hand)

***Row 17 repeated without the photos***

Row 17 (Belly): K14, K2tog K9, K2tog, K9. (K3 into one stitch) twice. Turn. Working the following rows into the 6 stitches in the two stitches, P6, turn, K1, M1 K4 M1, K1 turn, P8, turn, K8, turn, P8, turn, K8 (do NOT turn. Continue to work the remaining stitches of the row) K9. (51 sts)

Row 18: K9 P8 K34

Row 19: K across

Row 20: K9 P8 K34

Row 21: K14, K2tog K7 K2tog, K9, K2tog (When making this stitch, pick up a stitch as if to knit. Twist the stitch and place it back on your non-working needle. Knit the 2 stitches together from right to left.)

Insert your needle as if to knit
Place the loop on your working needle and twist
Place the st back on your non-working needle
Knit the 2 sts together from RIGHT to LEFT.

There is a video I made for another pattern that shows how to twist the stitch to get the nice edge. 

K4 K2tog (knit the stitches together from left to right as you normally would.), K9. (47 sts)

***Row 21 repeated without the photos***

Row 21: K14, K2tog K7 K2tog, K9, K2tog (When making this stitch, pick up a stitch as if to knit. Twist the stitch and place it back on your non-working needle. Knit the 2 stitches together from right to left.) K4 K2tog (knit the stitches together from left to right as you normally would.), K9. (47 sts)

Row 22: K9 P6 K32

Row 23 (Arms): K31 Bobble 3, K2tog (like you did before: pick up, twist, knit right to left) K2, K2tog (knit the stitches together from left to right.), Bobble 3, K8. (45 sts)

Row 24: K9, P4 K32

Row 25 (Neck): K14, K2tog K5 K2tog, K9, K2tog (like you did before: pick up, twist, knit right to left), K2tog (knit the stitches together from left to right.) K9. (41 sts)

Row 26: K9 P2 K30

Row 27 (Head): K30 (K3 into one stitch) twice. Turn. Working the following rows into the 6 stitches in the two stitches, P6, turn, K1, M1 K4 M1, K1 turn, P8, turn, K8, turn, P8, turn, K8, turn, P8, turn, K8 (do NOT turn. Continue to work the remaining stitches of the row), K9. (47 sts)

Row 28: K9 P8 K30

Row 29: K14, K2tog K3 K2tog, K9, K2tog (like you did before: pick up, twist, knit right to left) K4 K2tog (knit the stitches together from left to right.), K9. (43 sts)

Row 30: K9 P6 K28

Row 31 (Ears): K28  K2tog (as you did before) AND make a Bobble 3 (pick up 3 sts by knitting into the front, back and front of the 2 sts you’re knitting together). 

Flip the st and K2tog from RIGHT to LEFT…
…and make 3 sts in the K2tog. 
Continue to make a Bobble 3 like before.

K2, K2tog AND make Bobble 3, 

Knit the 2 sts together from LEFT to RIGHT…
…and start the bobble 3 (3 sts in K2tog)

K9. (41 sts)

***Row 31 repeated without the photos***

Row 31 (Ears): K28  K2tog (as you did before) AND make a Bobble 3 (pick up 3 sts by knitting into the front, back and front of the 2 sts you’re knitting together). K2, K2tog AND make Bobble 3, K9. (41 sts)

Row 32: K across

Row 33: K14, K2tog K1 K2tog, K8, K2tog, K2 K2tog, K8 (37 sts)

 Row 34 – 38: Knit across

With the RIGHT side facing (If you want to change colours, do so now.)

*Row 39: (P1 K2). Repeat to the last st. P1.

Row 40: (K1 P2) Repeat to the last st. K1.*

Repeat from * to * for a total of 12 rows.

Cast off. Be sure to follow the P1 K2 pattern to create a nice, finished edge.

Make the Thumb

With the RIGHT side facing, Pick up 13 sts from the additional sts you cast on in Row 13. Pick up the st in the twist formed from casting on. If you need help you can watch this video.

With the WRONG side facing

Row 1: (K1 P2) Repeat to the last st. K1.

Row 2: (P1 K2) Repeat to the last st. P1.

Row 3: Repeat row 1

Cast off following maintaining the P1 K2 pattern.

Sew the seams on the thumb and side of the glove.

More of My Stuff on Etsy

ALL patterns on Etsy are
40% off
until March 31


You can make a widget like this for your blog or website, too.
Instructions are on my website here: How to Display Etsy Items on Your Website

LEFT Hand 

Cast on 34

Row 1: (P1 K2). Repeat to the last st. P1.

Row 2: (K1 P2) Repeat to the last st. K1. 

Repeat these 2 rows for a total of 6 rows. (If you want to change colours, do so now.)

Row 7 – 12: Knit across

Row 13: K20 Cast on 13 sts. K14. (47 sts)

Row 14: Knit across

Row 15 (Feet): K8 Bobble 3 (K3 into one stitch. by alternating knitting into the front, the back and the front of the stitch, turn. Working the following rows into the 3 stitches in the one stitch, P3, turn, K3, turn, P3, turn, K3tog (do NOT turn). K2, Bobble 3 (as before), K35.

Row 16: K35 P4 K8

Row 17 (Belly): K9, (K3 into one stitch) twice. Turn. Working the following rows into the 6 stitches in the two stitches, P6, turn, K1, M1 K4 M1, K1 turn, P8, turn, K8, turn, P8, turn, K8 (do NOT turn. Continue to work the remaining stitches of the row) K9, K2tog K9, K2tog. K14. (51 sts)

Row 18: K34 P8 K9

Row 19: K across

Row 20: K34 P8 K9

Row 21: K9, K2tog (When making this stitch, pick up a stitch as if to knit. Twist the stitch and place it back on your non-working needle. Knit the 2 stitches together from right to left.) K4 K2tog (knit the stitches together from left to right.), K9 K2tog K7 K2tog, K14. (47 sts)

Row 22: K32 P6 K9

Row 23 (Arms): K8 Bobble 3, K2tog (like you did before: pick up, twist, knit right to left) K2, K2tog (knit the stitches together from left to right.), Bobble 3, K31. (45 sts)

Row 24: K32, P4 K9

Row 25 (Neck): K9, K2tog (like you did before: pick up, twist, knit right to left), K2tog (knit the stitches together from left to right.) K9, K2tog K5 K2tog, K14. (41 sts)

Row 26: K30 P2 K9

Row 27 (Head): K9 (K3 into one stitch) twice. Turn. Working the following rows into the 6 stitches in the two stitches, P6, turn, K1, M1 K4 M1, K1 turn, P8, turn, K8, turn, P8, turn, K8, turn, P8, turn, K8 (do NOT turn. Continue to work the remaining stitches of the row), K30. (47 sts)

Row 28: K30 P8 K9

Row 29: K9, K2tog (like you did before: pick up, twist, knit right to left) K4 K2tog (knit the stitches together from left to right.), K9, K2tog K3 K2tog, K14. (43 sts)

Row 30: K28 P6 K9

Row 31 (Ears): K9  K2tog AND make a Bobble 3 (pick up 3 sts by knitting into the front, back and front of the 2 sts you’re knitting together). K2, K2tog AND make Bobble 3, K28. (41 sts)

Row 32: K across

Row 33: K8, K2tog, K2 K2tog, K8, K2tog K1 K2tog K14. (37 sts)

 Row 34 – 38: Knit across

With the RIGHT side facing (If you want to change colours, do so now.)

*Row 39: (P1 K2). Repeat to the last st. P1.

Row 40: (K1 P2) Repeat to the last st. K1.*

Repeat from * to * for a total of 12 rows.

Cast off. Be sure to follow the P1 K2 pattern to create a nice, finished edge.

Make the Thumb

With the RIGHT side facing, Pick up 13 sts from the additional sts you cast on in Row 13. Pick up the st in the twist formed from casting on.

With the WRONG side facing

Row 1: (K1 P2) Repeat to the last st. K1.

Row 2: (P1 K2) Repeat to the last st. P1.

Row 3: Repeat row 1

Cast off following maintaining the P1 K2 pattern.

Sew the seams on the thumb and side of the glove.

Hints and Tips

While not necessary, I like to pull the arms closer together for a thinner neck and more noticeable belly. From the back, pass your needle to the front. Pass the yarn over the noticeable decrease stitch beside the arm and under the chest. Go up on the other side of the chest, catch the decrease stitch and pass through the hole next to the arm. Pull together as tight as you like. I leave a bit of slackness.

Catch the sts on the sides like this.
Use the same colour as your hippo.
I used a contrasting colour to showcase the sts.
Pull the yarn snug.
Tie off and work in the ends.

If you would like a longer glove, make more rows than indicated with the row marked with the ♥ If you are making a longer glove, cast the stitches off loosely to allow for more stretch.

If you want the cuff to be a different colour than the rest of the glove, I’ve indicated when to switch colours. The cuff on the fingers, wrist and thumb are done with the K1 P2 ribbing sections.

You don’t need to add the extra ribbing for the thumb. It is a finished edge so it won’t come undone. You may want to do a quick single crochet around to give it a bit of a fancy edging.

Abbreviations

k – knit

p – purl

k2tog – knit 2 sts together

K3tog – knit 3 sts together

st – stitch

sts – stitches

M1 – Make one (knit wise). Increase one stitch between the stitches. Pick up the yarn between the stitches. Twist slightly. 

Like all of my patterns, you have my permission to sell and/or give away the physical items that you make using this pattern. You are NOT permitted to reprint this pattern in any form unless you have obtained my written permission to do so. 

Posted on 3 Comments

How to Knit a Cable Scarf aka Netflix and Knit…This Scarf

Cable knit scarf knitting pattern

The perfect knitting project for binge watching the latest series on Netflix and incidentally, how I developed this pattern. To Breaking Bad, if you must know. I’m sure Walter White would be proud. FYI this pattern was written back in 2015 so that reference was a lot more timely back then. 

The pattern is easy to follow and repeats the same eight rows for the length of the scarf, which can be as long or as short as you like. If you have never knitted cables before, the pattern includes photos and instructions how to do it. By the time you’re finished this project, you’ll have mastered the art of the cable stitch, have a lovely scarf and hopefully have closure for all your favourite characters. Now in 2020, it’ll probably be something like Stranger Things. 

You can also download the PDF directly from my website if you’d prefer to have a permanent copy on your device or computer. Click this link to go to the download portion of this site. A new window will open so you won’t lose this page. 

If you need help with the pattern, you can view the complete how to from start to finish with my YouTube video: Knit a Cable Scarf (The video is embedded further along). If you know how to knit but need a little extra help with forming the cables, you can watch how to do the C2F, the C2B with my videos: C2F and C2B. Or if starting the cable pattern is giving you trouble, I have a video for that too: Starting the Cable Pattern. All the video links open to a new page so you won’t lose this one.

Cable Knit Scarf Knitting Pattern


If you’re looking for more scarf/dishcloth designs I have a bunch of others you may be interested in. You can click any of the following links to check some of them out.


Download and Print the Pattern

To get the pattern, click the button to open a new browser window. You can save this document to your device. It varies depending on what device (phone, tablet, computer) and what operating system you are using. 

If you are on your computer running Windows, holding down the “control” key while you tap the “s” key. This will trigger the “SAVE” function. Put it in whatever file you choose. 

You can also hold down the “control” key while you tap the “p” key. This will activate the “PRINT” function. Print as you normally would.

You can come back to the page as many times as you like. 

No log in or personal info is required to gain access to this pattern.

Things you need

If you are having a tough time finding what you need, click any of the links below to get everything you need to make this scarf.

200 gr of worsted weight yarn (This could be more of less depending on how long you want your scarf).

Size 5 (US size 8) single pointed knitting needles or whatever size to obtain correct gauge.

Cable knitting needle

Gauge

12 rows stockinette = 2″

9 stitches stockinette = 2″

If your gauge is off your scarf will be either narrower or wider, but it really isn’t overly important for this project.

Loving this free knitting pattern? Do you know someone who would love it as much as you? Please share it on your social media or email it to a friend.

And just so you know, this is one of the first videos I ever made. It is old. Try not to judge too harshly.

The Pattern


Cast on 40

Row 1: Knit across

Row 2-7: Sl st as if to knit. Knit across.

Row 8: Sl st as if to knit. K3 P32 K4.

Row 9: Sl st as if to knit. K2 P1 (K1 P1) 16 times. P1 K3.

Row 10: Sl st as if to knit. K3 (P1 K1) 16 times K4.

Repeat rows 9-10, 4 times more for an additional 8 rows.

🦊 Next row: Sl st as if to knit. K2 P1 (K1 P1) 3 times. K6 P1 (P1 K1) 3 times. P1 K6 P1 (P1 K1) 2 times. P2 K3.

🦋 Next row: Sl st as if to knit. K3 (P1 K1) 3 times. P6 K1 (K1 P1) 3 times. K1 P6 K1 (K1 P1) 2 times. K5.

🌸 Next row: Sl st as if to knit. K2 P1 (K1 P1) 3 times.C2F K2 P1 (P1 K1) 3 times. P1 C2F K2 P1 (P1 K1) 2 times. P2 K3.

Next row: Repeat row with 🦋

Next row: Repeat row with 🦊

Next row: Repeat row with 🦋

Next row: Sl st as if to knit. K2 P1 (K1 P1) 3 times. K2 C2B P1 (P1 K1) 3 times. P1 K2 C2B P1 (P1 K1) 2 times. P2 K3.

Next row: Repeat row with 🦋 (🐌 end with this row when scarf is the desired length.)

Next row: Repeat row with 🦊

Next row: Repeat row with  🦋  🌸

Repeat rows from 🌸 to 🌸. These 8 rows form the cable pattern. End the cable pattern with the row marked with 🐌.

Repeat until the scarf is the desired length, keeping in mind that the finished edge adds another 2 1/2 inches on to the length.

Next rows: Repeat rows 9-10 6 times for a total of 12 rows.

Next row: Sl st as if to knit. K2 P1 K32 P1 K3.

Next rows: Repeat rows 2-7.

Cast off.


How to Make the Cable

C2F – Cable 2 forward

With your cable needle, slip 2 stitches off the needle

Cable 2 forward knitting

Pull the stitches towards the front of your work.

Cable 2 forward knitting

Knit the next 2 stitches.

Cable 2 forward knitting


Cable 2 forward knitting

Knit the stitches from the cable needle.

Cable 2 forward knitting


Cable 2 forward knitting

Knit the last 2 stitches of the cable (accounted for in the pattern with the K2).

Cable 2 forward knitting

C2B – Cable 2 backward

Knit the first 2 stitches of the cable (accounted for in the pattern with the K2.)

Cable 2 back knitting

With your cable needle, slip 2 stitches off the needle.

Cable 2 back knitting

Pull the stitches towards the back of your work.

Cable 2 back knitting

Knit the next 2 stitches.

Knit the stitches from the cable needle.

Cable 2 back knitting


Cable 2 back knitting

C2F – Cable 2 forward. With your cable needle, slip 2 stitches off the needle and pull the stitches towards the front of your work. Knit the next 2 stitches. Knit the 2 stitches from the cable needle.

C2B – Cable 2 backward. With your cable needle, slip 2 stitches off the needle and pull the stitches towards the back of your work. Knit the next 2 stitches. Knit the 2 stitches from the cable needle.

Sl st – Slip 1 stitch off

Hints and Tips

Be very careful to get the stitches right at the beginning when forming the cable pattern. Once the pattern become more set, it becomes easy to see where you need to purl and knit and what stitches form the cable.

The back of the cables are ALWAYS purl stitches and the stitch on either side of them is ALWAYS a knit.

The stitch at the beginning of each row is slipped off and not knitted. This gives the edges of the scarf less stretch and lets the scarf hold its edge through wear and washings. If you don’t want to and would prefer to just knit, that’s ok. Just be consistent whether you knit it or not.

The easiest way to make any cable pattern is to see the pattern as panels versus individual rows. Unfortunately, there’s no other way to write a knitting pattern other than rows. If you see the scarfs pattern as the knitted edge, the moss stitch panel (the K1 P1 portions), the cable, moss stitch panel, another cable, moss stitch panel, knitted edge, it becomes very easy to do.

I did end up making a dishcloth version of this pattern. Do I love it? No. Do I hate it? No. Would I make it again? No. To be square there isn’t many repeats of the cable. I did four. It looks ok. If I was to redo it, I’d use a smaller gauge needle for sure. I would also cast on with a smaller needle than what I was going to knit the rest of the scarf/dishcloth.

Cable scarf into a dishcloth
It ain't so great...

Abbreviations

K – Knit

P – Purl

sts – stitches

C2F – Cable 2 forward. With your cable needle, slip 2 stitches off the needle and pull the stitches towards the front of your work. Knit the next 2 stitches. Knit the 2 stitches from the cable needle.

C2B – Cable 2 backward. With your cable needle, slip 2 stitches off the needle and pull the stitches towards the back of your work. Knit the next 2 stitches. Knit the 2 stitches from the cable needle.

Sl st – Slip 1 stitch off

Posted on 3 Comments

How to Knit Long Fingerless Gloves – FREE Knitting Pattern

How to Knit Long Fingerless Gloves - FREE Knitting Pattern

Made with large needles, these fingerless gloves are super fast to make if you know how to knit in the round. And really, knitting in the round isn’t difficult. But damn, it does look impressive when you’re knitting something using four needles. Not gonna lie. But with saying that, if you would prefer to knit this pattern flat on two needles like my Super Simple Fingerless Gloves or my Easy to Knit Owl Fingerless Gloves, please leave a comment at the end of this pattern.

But I digress. There are two styles you can make with this pattern. One has a plain cuff. The other has a double cuff. Both allow for your creativity to shine with yarn choice.

Because they are such a plain design, you can use any variety of colours to make these look awesome. Dare I say my favourite – variegated yarn – did wonders here… I really like how the splotching effect worked for the double cuff and how random the colours appeared when making the plain purl cuff with the beginning purl round.


These also are a great stash buster. You can use up the smaller quantities of yarn from other projects to make stripes. I used the self-striping yarn available at one of the big box craft stores to make my striped version. Be warned though. Not all self-striping yarn will work for this. It needs to be smaller sections of striping than most of the self striping yarn out there. If it makes for a great ombre shall or blanket, the striping is too wide.

As always, if you would prefer a printable paper version of this pattern, you can purchase and download the PDF from all of my usual sites. You can make a purchase from this website here – How to Knit Basic Long Fingerless Gloves. You can also purchase a download from my other online retailers which are LoveCrafts, Etsy and Ravelry. Depending on how long ago I published this, the printable pattern may appear below.

Another way to avoid ads and pop-ups, get instant, PRINTABLE downloads of this pattern and others, is by becoming a Member on this website. When you become a Website Supporter for $3/month, you’ll gain access to exclusive member only posts. These posts contain one click downloads of the patterns. Simply click the Download & Print button. The PDF will automatically download to your computer or smart device. You can then read it on your device or print it at your leisure. You can download as many patterns as you like for the same $3 each month. You can go to this page to learn more, become a member and support my work… Exclusive Member Area

If you want them longer, you can add more rows between the decrease rows. So instead of 6 rows, you could do 8 or more. If you want them to go further up the arm, cast on more when starting. Multiples of four stitches seem to work out quite nicely and let you maintain the ribbing at the fingers. I do recommend that you decrease stitches down to what’s written for the various sizes. It keeps it from getting sloppy, and dare I say annoying, when they don’t fit properly at the hand.

Knitting 2 together, or the decreases, do form a bit of a seam. To keep this out of view and make it run less noticeably down the inside of the arm, the pattern is designed so the thumb hole is on either side of this seam for the left and right hand.

What style would you like to make?

Gauge

This is important to follow for correct sizing.

2″ (5 cm) – 8 sts

2″ (5 cm) – 11 rows

in stockinette


Things You Need

You can click any link below to see what you need.

Set of 4 size 9 US (5.5 mm) double pointed knitting needles (DPN)

Worsted weight yarn

Tapestry needle


Left Hand (Plain Cuff)

Cast on 28 (32, 36)

Round 1 – 6: Purl around

Round 7 – 19: Knit around

Round 20: K2tog. Knit to the end of the round. You now have 27 (31, 35) sts.

Round 21 – 26: Knit around

Round 27: K2tog. Knit to the end of the round. You now have 26 (30, 34) sts.

Round 28 – 33: Knit around

Round 34: K2tog. Knit to the end of the round. You now have 25 (29, 33) sts.

Round 35 – 40: Knit around

Round 41: K2tog. Knit to the end of the round. You now have 24 (28, 32) sts.

Round 42 – 47: Knit around

Round 48: K2tog. Knit to the end of the round. You now have 23 (27, 31) sts.

Round 49 – 54: Knit around

Round 55: K2tog. Knit to the end of the round. You now have 22 (26, 30) sts.

Round 56 – 67: Knit around

Round 68: Knit 2 (4,6). Cast off 3 sts. Knit to the end of the round

Round 69: Knit 2 (4, 6). Cast on 3 sts. Knit to the end of the round. (Thumb hole made).

Round 70 – 74: P1 K1 around.

Cast off.

Right Hand (Plain Cuff)

Cast on 28 (32, 36)

Round 1 – 6: Purl around

Round 7 – 19: Knit around

Round 20: K2tog. Knit to the end of the round. You now have 27 (31, 35) sts.

Round 21 – 26: Knit around

Round 27: K2tog. Knit to the end of the round. You now have 26 (30, 34) sts.

Round 28 – 33: Knit around

Round 34: K2tog. Knit to the end of the round. You now have 25 (29, 33) sts.

Round 35 – 40: Knit around

Round 41: K2tog. Knit to the end of the round. You now have 24 (28, 32) sts.

Round 42 – 47: Knit around

Round 48: K2tog. Knit to the end of the round. You now have 23 (27, 31) sts.

Round 49 – 54: Knit around

Round 55: K2tog. Knit to the end of the round. You now have 22 (26, 30) sts.

Round 56 – 67: Knit around

Round 68: Knit 17 (19, 21). Cast off 3 sts. Knit to the end of the round

Round 69: Knit 17 (19, 21). Cast on 3 sts. Knit to the end of the round. (Thumb hole made).

Round 70 – 74: K1 P1 around.

Cast off.

Left Hand (Double Cuff)

Cast on 28 (32, 36)

Round 1 – 6: Purl around

Round 7 – 15: Knit around (If you are going to change the colour of the yarn for the purl rows, knit round 15 with the new colour).

Round 16 – 19: Purl around

Round 20: K2tog. Knit to the end of the round. You now have 27 (31, 35) sts.

Round 21 – 26: Knit around

Round 27: K2tog. Knit to the end of the round. You now have 26 (30, 34) sts.

Round 28 – 33: Knit around

Round 34: K2tog. Knit to the end of the round. You now have 25 (29, 33) sts.

Round 35 – 40: Knit around

Round 41: K2tog. Knit to the end of the round. You now have 24 (28, 32) sts.

Round 42 – 47: Knit around

Round 48: K2tog. Knit to the end of the round. You now have 23 (27, 31) sts.

Round 49 – 54: Knit around

Round 55: K2tog. Knit to the end of the round. You now have 22 (26, 30) sts.

Round 56 – 67: Knit around

Round 68: Knit 2 (4,6). Cast off 3 sts. Knit to the end of the round

Round 69: Knit 2 (4, 6). Cast on 3 sts. Knit to the end of the round. (Thumb hole made).

Round 70 – 74: P1 K1 around.

Cast off.

Right Hand (Double Cuff)

Cast on 28 (32, 36)

Round 1 – 6: Purl around

Round 7 – 15: Knit around (If you are going to change the colour of the yarn for the purl rows, knit round 15 with the new colour).

Round 16 – 19: Purl around

Round 20: K2tog. Knit to the end of the round. You now have 27 (31, 35) sts.

Round 21 – 26: Knit around

Round 27: K2tog. Knit to the end of the round. You now have 26 (30, 34) sts.

Round 28 – 33: Knit around

Round 34: K2tog. Knit to the end of the round. You now have 25 (29, 33) sts.

Round 35 – 40: Knit around

Round 41: K2tog. Knit to the end of the round. You now have 24 (28, 32) sts.

Round 42 – 47: Knit around

Round 48: K2tog. Knit to the end of the round. You now have 23 (27, 31) sts.

Round 49 – 54: Knit around

Round 55: K2tog. Knit to the end of the round. You now have 22 (26, 30) sts.

Round 56 – 67: Knit around

Round 68: Knit 17 (19, 21). Cast off 3 sts. Knit to the end of the round

Round 69: Knit 17 (19, 21). Cast on 3 sts. Knit to the end of the round. (Thumb hole made).

Round 70 – 74: K1 P1 around.

Cast off.

Love the free patterns? You can say thanks in a couple of ways. You can read more about how you can Support My Work by clicking that link or make a small donation and Buy Me a Coffee. ?? That is a website where you can make a one time donation as a thanks. If you don’t want to or are unable to make a financial donation, sharing this pattern through social media is a great way to help out too! The links below are a super easy way for you to do so.

Abbreviations

K – knit

P – purl

K2tog – Knit 2 together

Like all of my patterns you have my permission to sell and/or give away anything that you make using this pattern. You are NOT permitted to reprint this pattern in any form unless you have obtained my written permission to do so. 

If you have any questions, please feel free to leave a comment or send me your questions at [email protected].

Posted on Leave a comment

FREE Knitting Pattern – Ultra Thick Slip-On Bootie Slippers

Bulky yarn Slippers Knit on straight needles - dark green

The ultimate thick slipper knit with super bulky yarn on straight needles. These booties for adults (up to a man’s size 14) knit up quicker than the average slipper and are super cozy and long-lasting for the wearer. Who could ask for anything more? Ummmm, maybe a finished pair??? You can order a custom colour and size here – Double Thick Hand Knit Slippers

This pattern is the extra thick version of my Adult Moccasin Slippers pattern that has been so popular over the years. As a seller of slippers, many of my customers wanted extra thick versions. Who doesn’t want their slippers to last as long as possible, am I right? So I busted out my knitting needles and a pencil to redo the math. Now you can make the slippers with either 2 strands of worsted weight yarn, or one strand of super bulky yarn. Take your pick. But please note, you don’t need both. Choose one or the other.

And a note about the toe flap, this version uses a stockinette toe flap instead of a garter stitch. It was too thick and lumpy to be a garter stitch. But to make my life easier, I repurposed the photos from my original Moccasin Slipper pattern that has the toe flap as a garter stitch. I’m sorry if it causes any confusion. The technique to pick up stitches along he sides is exactly the same for both versions.

If you would prefer a PDF printable version of the pattern, you can download it for a small fee/donation from a number of places. In particular, my site here – Ultra Thick Slip-On Bootie Slippers. You can also get it at a number of other online book retailers such as Ravelry, LoveCrafts, Creative Fabrica and Etsy. The paperback and Kindle version are also on Amazon.

Another way to avoid ads and pop-ups, get instant, PRINTABLE downloads of this pattern and others, is by becoming a Member on this website. When you become a Website Supporter for $3/month, you’ll gain access to exclusive member only posts. These posts contain one click downloads of the patterns. Simply click the Download & Print button. The PDF will automatically download to your computer or smart device. You can then read it on your device or print it at your leisure. You can download as many patterns as you like for the same $3 each month. You can go to this page to learn more, become a member and support my work… Exclusive Member Area

If you enjoy this pattern and my other free online knitting patterns, please consider making a small donation or helping me out by visiting my Help Support My Work page. If that’s not possible, that’s totally fine too! Even sharing this page on your social media helps me out immensely. You can use those buttons below to do so easily.

This isn’t a pattern for beginners, but if you know how to knit a stitch, pick up stitches and knit two stitches together, you should be okay. I used a very different technique involving multiple sets of needles. I included photos and a how-to video to demonstrate how I’m using the extra set and it totally works! Trust me. You can use this link – How to Knit Moccasin Slippers. The only differences between this pattern and the demo video is the toe flap is done in stockinette and of course, double thick (or extra thick) yarn. The techniques are all the same.

There is a lot of breaking and reconnecting the yarn to create the different portions of the slipper: the cuff, toe, sides and sole. I’ve created a very succinct picture tutorial showing how to work in the ends as you go so there are fewer to sew in at the end. If you do it right, you’ll only have one, and that’s the length you leave at the end to sew up the heel seam. Here’s the link to see how – Working in the Ends While Knitting. This also a handy skill to have when knitting just about anything, tbh. 

Things You Need

And because this pattern is so basic with no pattern of any sort, it’s a great knitting pattern to highlight the colour of your yarn. I have a weakness for variegated/shaded yarns. Don’t ask me why… My grandma did too. It must be genetic. I find the self-striping looks terrible and give it a 1/10. Would not recommend.

Worsted weight yarn – 2 (two) standard balls of yarn (215 yards/197 m). Any colours of your choosing.

or 

Super Bulky yarn – 2 standard balls of ONE colour with matching lot numbers (90 yards/82 m). 

One ball makes one slipper. There will be yarn left over from each ball.

2 sets of size 5 mm (size 8 US) knitting needles (or whatever you require to get the correct gauge).

Tapestry needle – to sew the seam and work in the ends.

Stitch holder

Gauge

In stockinette stitch

13 sts – 10 cm (4″) 

22 rows – 10 cm (4”) 

Sizes are written as such:

Women 6-7 (8-9, 10-11, 12)

Men 6 (7-8, 9-10, 11-12, 13-14)

Abbreviations

k – knit

p – purl

k2tog – knit 2 together

st – stitch

sts – stitches

Like all of my patterns you have my permission to sell and/or give away the slippers that you make using this pattern. You are NOT permitted to reprint this pattern in any form unless you have obtained my written permission to do so. 

To Begin

Cast on 32 (34, 36, 38, 40)

ᴥ Row 1: Knit across 

Row 2: Purl across ᴥ Repeat from ᴥ to ᴥ for 6 times more for a total of 8 rows.

☺ Row 9: Knit across

Row 10: Knit 11 (12, 13, 14,15) P10 Knit 11 (12, 13, 14, 15) ☺ Repeat from ☺ to ☺ one more time for a total of 4 rows.

Toe Flap

Row 13: With RIGHT side facing, transfer the first 11 (12, 13, 14, 15) stitches to a stitch holder. Reattach the yarn and knit the next 10 stitches (the start of the toe flap). Leave the remaining 11 (12, 13, 14, 15) stitches on the needle unworked.

The following rows are worked back and forth on the 10 toe flap stitches only!

♠ Next row: Knit across 

Next row: Purl across ♠ Repeat from  to  10 (11, 12, 13, 14) times more for 22 (24, 26, 28, 30) rows total.

Break yarn. You’ll have the 10 stitches of the toe flap on your needle and the 11 (12, 13, 14, 15) stitches you left on the needle when you started making the toe flap.

Making the Sides of the Slipper

This is where you’re going to need the extra set of knitting needles. You’ll be knitting back and forth in rows but the turn around the toe is too tight to use circular needles. For this, you’ll put the 10 toe flap stitches on one of your extra needles. It’s a little unconventional, but it works.

Next Row: With the RIGHT side facing, transfer the 11 (12, 13, 14, 15) stitches from the stitch holder onto one of your needles. Attach your yarn and knit the 11 (12, 13, 14, 15) stitches. Pick up 11 (12, 13, 14, 15) stitches evenly along the edge of the toe flap. (All of these stitches are on  ONE needle. (22, 24, 26, 28, 30) stitches on this needle)

With another needle, knit the 10 stitches of the toe flap. (10 stitches on this needle)

With another needle, pick up 11 (12, 13, 14, 15) stitches evenly along the side of the toe flap. Knit the remaining 11 (12,13, 14, 15) stitches on the next needle. (22, 24, 26, 28, 30) stitches on this needle)

You should now have 3 needles holding stitches with all the points pointing as shown below when laid flat. As mentioned in the introduction, the photos have been repurposed from the original pattern. Your toe flap has less stitches across and is in stockinette. 

You also have one spare needle to knit with. You are now going to knit in rows, back and forth with these three needles. Once you finish knitting all the stitches on one needle, move on to the next needle (the point of the needle is right there) until you complete the row.

How to knit slippers
I used a double pointed needle to work my 10 stitches
for the toe only because it was handy. A regular needle works!

Another way to say it for the following rows, knit all the stitches forming the side of the slipper, knit the 10 stitches holding the toe flap stitches, then knit the other side of the slipper (counts as one row). Turn. Repeat.

Knit the next 8 (10, 1214, 16) rows

There are 4 (5, 6, 7, 8) ridges on the tip of the toe.

Knit 1 more row, if required, so the WRONG side is facing you.

The photo below shows the 5 ridges for the women’s size 8-9 or the men’s 7-8.

Using the same needle that now has one stitch, knit the remaining 9 stitches of the toe flap. Cast off all the stitches from the third needle loosely. Break yarn.

Making the Sole

If you need more help than the photos provide, you can watch the how-to video below

The video starts in the correct section. No need to find the spot. I already have it cued up for you. The video is for the original pattern, but is done EXACTLY the same way for this pattern.

Next Row: With the RIGHT side facing, attach yarn and knit the first stitch of the cast off stitches by the toe flap (cast off stitch on the right by the point of the needle).

Pick up this stitch at the start of the row.

K2tog. Knit to the last 2 stitches K2tog. Pick up the cast off stitch by the point of your needle. (10 stitches).

Pick up this stitch at the end of the row.

Quick tip – wrap the yarn counterclockwise around your needle and turn it down to pull the yarn through the cast off stitch on the right. If you have a hard time doing this, you can also use a crochet hook to pull the loop through and place that loop on your working needle. This is the hardest of all the stitches to pick up.

You now are working back and forth along the bottom of the foot picking up one cast off stitch on each side as you go.

Next Row: Knit across.

ʤ Next Row: Pick up the next stitch of the cast off stitches. K2tog. Knit to the last 2 stitches K2tog. Pick up the cast off stitch on the other side of the slipper by the point of your needle. (10 stitches).

Next Row: Knit across ʤ

Repeat from ʤ to ʤ down the entire length of the foot. There are equal number of cast off stitches along each side. How many rows varies depending on the size of slipper you’re making. Be sure to end with a completed knit across row.

Starting the sole. Right side
Still further down the sole. Note how the cast off edges are being picked up as you go. 
Keep working your way down the length of the sole until you’ve picked up all the cast off stitches.

Making the Heel

If you need more help than the photos provide, you can watch the how-to video by using this link – https://youtu.be/ZZ93FyF4qDIsi=FW0lLCLWZqOEIPSe&t=624

The video starts in the correct section. No need to find the spot. I already have it cued up for you. Once again, this is from the original pattern, but the technique is done EXACTLY the same way.

More of My Stuff on Etsy

ALL patterns on Etsy are
40% off
until March 31


You can make a widget like this for your blog or website, too.
Instructions are on my website here: How to Display Etsy Items on Your Website

You’re now going to make a small triangle to fit in the back of the heel. You’re going to fill this space in the slipper.

Ҩ Next Row: With the RIGHTside facing, pick up a stitch in the row closest to the sole of the slipper. Count how many ridges it is for the size you are making. K2tog twice. Knit to the last 4 stitches. K2tog twice. Count down the same number of ridges on the other side and pick up a stitch in the space beneath it. (8 stitches).

The photo above shows 9 rows of ridges.
These are rows you knit to form the edges of the slipper. 
Stitch picked up on the right edge in the 9th row shown above
After you K2tog across, you’ll pick up a stitch here.
Stitch picked up at the end of the row.

Next Row: Knit across.

Next Row: Count down one ridge less than the previous row and pick up a stitch in the space beneath it. K2tog. Knit until the last 2 stitches. K2tog. Count down the same number of ridges and pick up a stitch in the space beneath it on the other side.

Next Row: Knit across. Ҩ Repeat from Ҩ to Ҩ until 6 stitches remain.

Next Row: Pick up a stitch beneath the next ridge. K2tog 3 times. Pick up a stitch in the space beneath the next ridge on the other side.

Next Row: Knit across.

Next Row: K2tog, K1, K2tog. Pass the middle stitch on your working needle over the stitch on the left. Pass the stitch on the right over the stitch on the left. (Or you can turn your work and knit the 3 sts together).

Break yarn leaving a length of yarn long enough (8ish inches) to sew up the remaining seam.

Make another slipper.

Yes, they do look a little boxy when they’re done and not on a foot. The stretch of the garter stitch around the edge of the foot and sole, allows these slippers to stretch around the contours of any foot easily.

Hints and Tips

If you want a straight or longer cuff at the top like in the original pattern, knit across on the right and wrong side for a garter stitch at the beginning after you cast on. 

When picking up stitches from the cast off row, be sure you’re really moving on to the next cast off stitch! It’s an easy mistake to pick up a stitch in a stitch you already picked up. If in doubt, give the needle holding the stitches a bit of a tug. You’ll see the yarn move slightly at the very back, closest to the needle. Pick up a stitch at the NEXT cast off stitch.

If you don’t have the same number of stitches on both sides when you are forming the sole, you may have picked up a stitch twice in one stitch or missed one. Don’t worry! This is fixable. You can skip one cast off stitch if you need to make it even, or pick up a cast off stitch twice on the other side. There’s enough stretch in the slipper that any puckering this causes won’t be overly visible if you’re off by a stitch or two.

Picking up the stitches evenly along the toe flap is about 1 stitch every ridge. Theres a little knot nub along the edges that make it a bit easier to space evenly along.

To speed up finishing the slippers and not have so many ends to sew in, hold the yarn ends to the back of your work as you knit.

Posted on Leave a comment

Super Simple Fingerless Gloves – FREE Knitting Pattern

Simple Knit Fingerless Gloves

Are you just learning to knit? Tired of making dishcloths and scarves and want to make something awesome? Here is something that will make you look like a pro when it comes to knitting. A total brag-worthy design that any knitting newbie can make.

I’ve written a bunch of beginner patterns for slippers, but never for fingerless gloves. It was a common request, but for some reason, I never felt compelled to do so. After a bit of false starts and redesigns, I’ve finally come up with a fingerless glove pattern that I am happy with. I’ve kept the seams to a minimum and placed the seam along the outside of the hand and inside of the thumb. If you’re not a fan of seams my other fingerless gloves and mitts knitted on dpn can be found here – Fingerless Gloves – with OWLS, How to Knit Texting Mittens, How to Knit Fingerless Gloves and How to Knit Flip Mitts.

These mitts are knitted completely flat, on 2 needles and are perfect for the beginner. There is use of a stitch holder and picking up those stitches to complete the thumb, but it isn’t difficult. Slide them on to the holder, slide them back on the needle when instructed and knit them like any other set of stitches. If you need help with increasing stitches, there is a video showing how to increase when making the P1 and the M1.I also just made a video showing How to Use a Stitch Holder. You can click those links to watch the how-to videos. They are also embedded at the end of this page. Scroll to the bottom to watch.

I’ve also jazzed up this basic design a bit. If you want to knit owl gloves flat on 2 needles just like this pattern is, You can use this link – Easy to Knit Owl Fingerless Gloves to read the free knitting pattern online.

I’ve also written the pattern to fit different sizes – small, medium and large. Once again I’ll use the analogy of what fits my hand. I wear a medium rubber glove and the medium size fits my hand perfectly. I wash dishes and scrub my toilets. I wear gloves when I do. If you never wear rubber or latex gloves, this won’t make any sense to you, I guess. I’m only saying this because I have had complaints about my sizing references. I don’t live in a gloveless kind of world but I’m glad some people do. It always amazes me what some “Karens” feel the need to bitch about ? If you want to go to a specific size you can try these links. If I’ve done my code correctly, it should take you to the right point on the webpage:

Small

Medium

Large

I’ve made a PDF download for this pattern. I didn’t think it was going to be this long until I wrote it out. I made the decision to write each size and hand out separately to make it even easier for the new knitters out there who want to give this pattern a go. And btw, you can totally do it! To get the downloadable pattern for a small fee you can get it in my Etsy Shop, Ravelry, LoveCrafts and from this website – KweenBee.com.

If you would prefer to order a printed paperback version from Amazon, you can now do so! Shipping is free if you are an Amazon Prime member. Make sure you select the country you are in to take advantage of the free shipping. Click the following link for your country – United States, United Kingdom, Canada, and Australia. Available in English only.

Another way to avoid ads and pop-ups, get instant, PRINTABLE downloads of this pattern and others, is by becoming a Member on this website. When you become a Website Supporter for $3/month, you’ll gain access to exclusive member only posts. These posts contain one click downloads of the patterns. Simply click the Download & Print button. The PDF will automatically download to your computer or smart device. You can then read it on your device or print it at your leisure. You can download as many patterns as you like for the same $3 each month. You can go to this page to learn more, become a member and support my work… Exclusive Member Area

I also plan on making a how-to video for this. It will cover the medium size as that’s what most people order when I sell online. I always am hopeful I’ll get the videos done in a timely manner, but they’re always more work than I think they’re going to be. You can check out my other videos in the meantime with this handy link – KweenBee on YouTube – Janis Frank

Love the free patterns? You can say thanks in a couple of ways. You can read more about how you can Support My Work by clocking that link or make a small donation and Buy Me a Coffee. 👈🏼 That is a website where you can make a one time donation as a thanks. If you don’t want or are unable to make a financial donation, sharing this pattern through social media is a great way to help out too! The links below are a super easy way for you to do so.


Gauge

This is important to follow for correct sizing.

2″ (5 cm) = 10 sts

2″ (5 cm) – 16 rows

If You Need Help with the M1 or P1

Scroll down to the end of the page to watch quick how-to videos showing how to do these simple stitches. There’s a video showing how to use a stitch holder too!

Things You Need:

You can click any link below to see what you need.

Worsted weight yarn

Size 6 US (4 mm) knitting needles

Stitch holder – It looks like a big safety pin

Tapestry needle


Small

Right Hand

Cast on 31

Rows 1-14: Knit across

Row 15: Knit across

Row 16: Purl across

Row 17: Knit across

Row 18: Purl across

Row 19: Knit across

Row 20: Purl across

Row 21: Knit across

Row 22: Purl across

Row 23: K18 M1 K1 M1 K12

Row 24: Purl across

Row 25: Knit across

Row 26: P12 PM1 P3 PM1 P18

Row 27: Knit across

Row 28: Purl across

Row 29: K18 M1 K5 M1 K12

Row 30: Purl across

Row 31: Knit across

Row 32: P12 PM1 P7 PM1 P18

Row 33: Knit across

Row 34: Purl across

Row 35: K18 M1 K9 M1 K12

Row 36: Purl across

Row 37: K18. Slip the next 11 stitches onto a stitch holder. K12.

Row 38: Purl across

Row 39: Knit across

Row 40: Purl across

Row 41-48: Knit across

Cast off.

Making the Thumb

Pick up the 11 stitches on the stitch holder

Row 1: Knit across

Row 2: Purl across

Row 3: Knit across

Row 4: Purl across

Cast off.

Sew seam along the side of the glove and the inside of the thumb. Work in ends.

Left Hand

Cast on 31

Rows 1-14: Knit across

Row 15: Knit across

Row 16: Purl across

Row 17: Knit across

Row 18: Purl across

Row 19: Knit across

Row 20: Purl across

Row 21: Knit across

Row 22: Purl across

Row 23: K12 M1 K1 M1 K18

Row 24: Purl across

Row 25: Knit across

Row 26: P18 PM1 P3 PM1 P12

Row 27: Knit across

Row 28: Purl across

Row 29: K12 M1 K5 M1 K18

Row 30: Purl across

Row 31: Knit across

Row 32: P18 PM1 P7 PM1 P12

Row 33: Knit across

Row 34: Purl across

Row 35: K12 M1 K9 M1 K18

Row 36: Purl across

Row 37: K12. Slip the next 11 stitches onto a stitch holder. K18.

Row 38: Purl across

Row 39: Knit across

Row 40: Purl across

Row 41-48: Knit across

Cast off.

Making the Thumb

Pick up the 11 stitches on the stitch holder

Row 1: Knit across

Row 2: Purl across

Row 3: Knit across

Row 4: Purl across

Cast off.

Sew seam along the side of the glove and the inside of the thumb. Work in ends.

Medium

Right Hand

Cast on 33

Rows 1-14: Knit across

Row 15: Knit across

Row 16: Purl across

Row 17: Knit across

Row 18: Purl across

Row 19: Knit across

Row 20: Purl across

Row 21: Knit across

Row 22: Purl across

Row 23: K19 M1 K1 M1 K13

Row 24: Purl across

Row 25: Knit across

Row 26: P13 PM1 P3 PM1 P19

Row 27: Knit across

Row 28: Purl across

Row 29: K19 M1 K5 M1 K13

Row 30: Purl across

Row 31: Knit across

Row 32: P13 PM1 P7 PM1 P19

Row 33: Knit across

Row 34: Purl across

Row 35: K19 M1 K9 M1 K13

Row 36: Purl across

Row 37: Knit across

Row 38: P13 PM1 P11 PM1 P19

Row 39: Knit across

Row 40: Purl across

Row 41: K19. Slip the next 13 stitches onto a stitch holder. K13.

Row 42: Purl across

Row 43: Knit across

Row 44: Purl across

Row 45-52: Knit across

Cast off.

Making the Thumb

Pick up the 13 stitches on the stitch holder

Row 1: Knit across

Row 2: Purl across

Row 3: Knit across

Row 4: Purl across

Cast off.

Sew seam along the side of the glove and the inside of the thumb. Work in ends.

Left Hand

Cast on 33

Rows 1-14: Knit across

Row 15: Knit across

Row 16: Purl across

Row 17: Knit across

Row 18: Purl across

Row 19: Knit across

Row 20: Purl across

Row 21: Knit across

Row 22: Purl across

Row 23: K13 M1 K1 M1 K19

Row 24: Purl across

Row 25: Knit across

Row 26: P19 PM1 P3 PM1 P13

Row 27: Knit across

Row 28: Purl across

Row 29: K13 M1 K5 M1 K19

Row 30: Purl across

Row 31: Knit across

Row 32: P19 PM1 P7 PM1 P13

Row 33: Knit across

Row 34: Purl across

Row 35: K13 M1 K9 M1 K19

Row 36: Purl across

Row 37: Knit across

Row 38: P19 PM1 P11 PM1 P13

Row 39: Knit across

Row 40: Purl across

Row 41: K13. Slip the next 13 stitches onto a stitch holder. K19.

Row 42: Purl across

Row 43: Knit across

Row 44: Purl across

Row 45-52: Knit across

Cast off.

Making the Thumb

Pick up the 13 stitches on the stitch holder

Row 1: Knit across

Row 2: Purl across

Row 3: Knit across

Row 4: Purl across

Cast off.

Sew seam along the side of the glove and the inside of the thumb. Work in ends.

Large

Right Hand

Cast on 35

Rows 1-14: Knit across

Row 15: Knit across

Row 16: Purl across

Row 17: Knit across

Row 18: Purl across

Row 19: Knit across

Row 20: Purl across

Row 21: Knit across

Row 22: Purl across

Row 23: K20 M1 K1 M1 K14

Row 24: Purl across

Row 25: Knit across

Row 26: P14 PM1 P3 PM1 P20

Row 27: Knit across

Row 28: Purl across

Row 29: K20 M1 K5 M1 K14

Row 30: Purl across

Row 31: Knit across

Row 32: P14 PM1 P7 PM1 P20

Row 33: Knit across

Row 34: Purl across

Row 35: K20 M1 K9 M1 K14

Row 36: Purl across

Row 37: Knit across

Row 38: P14 PM1 P11 PM1 P20

Row 39: Knit across

Row 40: Purl across

Row 41: K20 M1 13 M1 K14

Row 42: Purl across

Row 43: K20. Slip the next 15 stitches onto a stitch holder. K14.

Row 44: Purl across

Row 45: Knit across

Row 46: Purl across

Row 47-54: Knit across

Cast off.

Making the Thumb

Pick up the 15 stitches on the stitch holder

Row 1: Knit across

Row 2: Purl across

Row 3: Knit across

Row 4: Purl across

Cast off.

Sew seam along the side of the glove and the inside of the thumb. Work in ends.

Left Hand

Cast on 35

Rows 1-14: Knit across

Row 15: Knit across

Row 16: Purl across

Row 17: Knit across

Row 18: Purl across

Row 19: Knit across

Row 20: Purl across

Row 21: Knit across

Row 22: Purl across

Row 23: K14 M1 K1 M1 K20

Row 24: Purl across

Row 25: Knit across

Row 26: P20 PM1 P3 PM1 P14

Row 27: Knit across

Row 28: Purl across

Row 29: K14 M1 K5 M1 K20

Row 30: Purl across

Row 31: Knit across

Row 32: P20 PM1 P7 PM1 P14

Row 33: Knit across

Row 34: Purl across

Row 35: K14 M1 K9 M1 K20

Row 36: Purl across

Row 37: Knit across

Row 38: P20 PM1 P11 PM1 P14

Row 39: Knit across

Row 40: Purl across

Row 41: K14 M1 13 M1 K20

Row 42: Purl across

Row 43: K14. Slip the next 15 stitches onto a stitch holder. K20.

Row 44: Purl across

Row 45: Knit across

Row 46: Purl across

Row 47-54: Knit across

Cast off.

Making the Thumb

Pick up the 15 stitches on the stitch holder

Row 1: Knit across

Row 2: Purl across

Row 3: Knit across

Row 4: Purl across

Cast off.

Sew seam along the side of the glove and the inside of the thumb. Work in ends.

Hints and Tips

Make your seams as narrow as possible when sewing them. The bulkier the seam the more noticeable and possibly uncomfortable for the wearer.

The purple fingerless mitts have 60 rows total between the garter stitch cuff and the start of the thumb gusset (Row 15 – 22). I don’t think I would increase much further than that. The glove itself isn’t very stretchy and won’t fit further up the forearm. Too much bunching may also make the glove push its way further down and off the fingers.

I used some self-striping yarn to make these. Not all striping yarn is created equal. Some of them are designed to stripe for larger projects and don’t really work for smaller projects like this. Though with saying that, you could always cut the yarn and start a new colour where you choose. You will have more ends to deal with, but I have a post that shows you How to Work in the Ends While Knitting. ?? This link will take you right there.

Abbreviations

K – knit

P – purl

M1 – Make one (knit wise). Increase one stitch between the stitches. Pick up the yarn between the stitches. Twist slightly. Place it on your non-working needle. Knit the stitch. Watch this video below to see how.

How to make one or M1 – Increase between stitches.

PM1- Make one (purl wise). Pick up the stitch as you did for M1, but purl the stitch as you regularly would. You can watch the video below.

And for those of you who are unsure of how to use a stitch holder, I made a quick little video that shows you how to do it without cutting the yarn. It’s a time saver for sure. No one likes working in ends if they can avoid it.

Posted on 1 Comment

How to Knit Slippers with a Cuff – FREE Printable Pattern!

Chevron Moccasin Slippers for adults - Free knitting pattern

This is another version of my very popular Adult Moccasin Slippers. I thought I’d jazz these slippers up a bit by adding some details to the top of the toe with a striped eyelet/chevron combo. I also made the cuff a little longer to fit even more like a bootie. I like how the final product turned out and is very gender neutral.

Because of the request by many saying that they would prefer a PDF download, it’s DONE! You can download this pattern for FREE! Because I’m getting more people making donations through Buy Me a Coffee and having more Website Members and patrons on Patreon, I can bear the cost of offering a few free downloads on the site now. If the support continues, I’d like to make this the standard for all my patterns.

In addition to the printable patterns you can get when you support my work, I’m also adding shoutouts to all who contribute. I’ll show your name in my longer videos to thank you. If you’d like to see what I mean, I do it at the end of the video above.

So thank you to all for all your support! I really do appreciate it 😊 And here is the free download that anyone can get.

If you like the way this pattern downloads, this is exactly how it works when you become a Website Member. It’s another way to avoid ads and pop-ups, get instant, PRINTABLE downloads of this pattern and others, is by becoming a Member on this website. When you become a Website Supporter for $3/month, you’ll gain access to exclusive member only posts. These posts contain one click downloads of the patterns. Simply click the Download & Print button. The PDF will automatically download to your computer or smart device. You can then read it on your device or print it at your leisure. You can download as many patterns as you like for the same $3 each month. You can go to this page to learn more, become a member and support my work… Exclusive Member Area

If you enjoy this pattern and my other free online knitting patterns, please consider making a small donation or helping me out by visiting my Help Support My Work page. If that’s not possible, that’s totally fine too! Even sharing this page on your social media helps me out immensely. You can use those buttons ?? to do so easily.


This isn’t a pattern for beginners, but if you know how to knit a stitch, pick up stitches, knit two stitches together, yarn over and pass a slipped stitch over, you should be okay. I used a very different technique involving multiple sets of needles. I included photos to demonstrate how I’m using the extra set and it totally works! Trust me.

There is a lot of breaking and reconnecting the yarn to create the different portions of the slipper: the cuff, toe, sides and sole. I’ve created a very succinct picture tutorial showing how to work in the ends as you go so there are fewer to sew in at the end. If you do it right, you’ll only have one, and that’s the length you leave at the end to sew up the heel seam. Here’s the link to see how – Working in the Ends While Knitting. This also a handy skill to have when knitting just about anything, tbh. 


Things You Need

If you are uncertain or having trouble finding what you need to make these slippers, clicking any of the links below will show you exactly what you need. And if you decide to order through Amazon, it will be delivered right to your door and help support my pattern writing (I do get a small commission from sales through Amazon).

I have a weakness for variegated/shaded yarns. Don’t ask me why… My grandma did too. It must be genetic. I tried using some for one of the test knits for this slipper. It didn’t work. The holes and the angled striping virtually disappeared among the splotches. Also, I find the self-striping looks terrible and give it a 1/10. Would not recommend. Besides, it’s also hard to match the striping up and you waste a lot of yarn.

So here is the stuff you need…

1 ball of worsted weight yarn (average 260 yard, 5 oz or 141 gram ball will be more than enough). I used Red Heart worsted weight yarn when designing the pattern but any worsted weight yarn will suffice.

2 sets of size 4 mm (US size 6) single point knitting needles.

Stitch holder

Tapestry needle to sew in ends. You can also use this handy tutorial to show you how to work in the ends while knitting these slippers.

Use this product to make knitted slippers less slippery.


You can also try this link if the product above are sold out – Sock Stop.

Gauge

With size 4 mm (US size 6) needles or whatever size you need to obtain the correct number of stitches and rows. Be sure to check your gauge otherwise the sizing won’t be correct.

In garter stitch

4” = 16 sts

4” = 40 rows

Sizes (are written as such)

Women’s 6-7 (8-9, 10-11, 12-13)

Men’s 5-6 (7-8, 9-10, 11-12, 13-14)

To Begin – Cuff

Cast on 35 (37, 39, 41, 43)

Knit across for 9 (9, 911, 11) rows. 

Next Row: With the WRONG side facing, K11 (12, 13, 14, 15), P13, K11 (12, 13, 14, 15).

? Next Row: K11 (12, 13, 14, 15), K1 Pass the stitch you just knit back onto your non-working needle. Pass the next unworked stitch OVER the stitch you passed back. Pass this stitch back to your working needle. K4 YO K1 YO K4. Pass the next stitch over to your working needle, as if to knit, taking care not to twist. Knit the next stitch PSSO. K11 (12, 13, 14, 15).

Next Row: K11 (12, 13, 14, 15), P13, K11 (12, 13, 14, 15).?

Repeat from ? to ? 9 (10, 11, 12, 13) more. You’ll have 10 (11, 12, 13, 14) holes of the pattern made.

Break yarn when completed last row.

Toe Flap

Next Row: With RIGHT side facing, transfer the first 10 (11, 12, 13, 14) stitches to a stitch holder. Reattach the yarn. 

The following stitch combination is worked over the next 15 stitches (the start of the toe flap with the eyelet and chevron stripe motif). K2 (Yes, 2) Pass the stitch you just knit back onto your non-working needle. Pass the next unworked stitch OVER the stitch you passed back. Pass the stitch back to your working needle. K4 YO K1 YO K4. Pass the next stitch over to your working needle. Knit the next stitch PSSO. K1 Leave the remaining 10 (11, 12, 13, 14) stitches on the needle unworked. You will have a line of garter (knit) stitches running along side the chevron stripes.

Next Row: K1 P13 K1. ?

The repeating rows are worked back and forth on the 15 stitch toe flap stitches only!

Repeat from ? to ? for 9 (10, 11, 12, 13more times for a total of 10 (11, 12, 13, 14) repeats. You’ll have 20 (22, 24, 26, 28) holes of the pattern made when counted from the beginning.

Break yarn. You’ll have the 15 stitches of the toe flap on your needle and the 10 (11, 12, 13, 14) stitches you left on the needle when you started making the toe flap.

Making the Sides of the Slipper

This is where you’re going to need the extra set of knitting needles. You’ll be knitting back and forth in rows but the turn around the toe is too tight to use circular needles. For this, you’ll put the 15 toe flap stitches on one of your extra needles. It’s a little unconventional, but it works.

Next Row: With the RIGHT side facing, transfer the 10 (11, 12, 13, 14) stitches from the stitch holder onto one of your needles. Attach your yarn and knit the 10 (11, 12, 13, 14) stitches. Pick up 20 (22, 24, 26, 28) stitches evenly along the edge of the toe flap. (All of these stitches are on  ONE needle. There are (30, 33, 36, 39, 42) stitches on this needle).

With another needle, knit the 15 stitches of the toe flap. (15 stitches on this needle)

With another needle, pick up 20 (22, 24, 26, 28) stitches evenly along the side of the toe flap. Knit the remaining 10 (11,12, 13, 14) stitches on the next needle. (30, 33, 36, 39, 42) stitches on this needle)

You should now have 3 needles holding stitches with all the points pointing as shown below when laid flat. You also have one spare needle to knit with. You are now going to knit in rows, back and forth with these three needles. Once you finish knitting all the stitches on one needle, move on to the next needle (the point of the needle is right there) until you complete the row.

How to knit slippers
I used a double pointed needle to work my 15 stitches for the toe only because it was handy. A regular needle works!

Another way to say it for the following rows, knit all the stitches forming the side of the slipper, knit the 15 stitches holding the toe flap stitches, then knit the other side of the slipper (counts as one row). Turn. Repeat.

Knit the next 8 (10, 12, 14, 16) rows

There are 4 (5, 6, 7, 8) ridges on the tip of the toe.

The photo below shows the 5 ridges for the women’s size 8-9 or the men’s 7-8.

How to knit slippers
These are the ridges picked up along the toe flap

Making the Sole

Next Row: With WRONG side facing. Cast off all the stitches from the first needle loosely. You’ll need to pass the last stitch from the first needle over the first stitch of the toe flap stitches (second needle).

Knitted Owl Slippers - Making the Sole

Using the same needle that now has one stitch, knit the remaining 14 stitches of the toe flap. Cast off all the stitches from the third needle loosely. Break yarn.

Next Row: With the RIGHT side facing, attach yarn and pick up the first cast off stitch by the toe flap (cast off stitch on the right by the point of the needle).

How to knit slippers
This photo is taken from the right side.

K2tog. Knit to the last 2 stitches K2tog. Pick up the cast off stitch by the point of your needle. (15 stitches).

Knitting Pattern - Owl Slippers
Left edge

Quick tip – wrap the yarn counterclockwise around your needle and turn it down to pull the yarn through the cast off stitch on the right. If you have a hard time doing this, you can also use a crochet hook to pull the loop through and place that loop on your working needle.

You now are working back and forth along the bottom of the foot picking up one cast off stitch on each side as you go.

Next Row: Knit across.

ʤ Next Row: Pick up the next stitch of the cast off stitches. K2tog. Knit to the last 2 stitches K2tog. Pick up the cast off stitch on the other side of the slipper by the point of your needle. (15 stitches).

Right edge

Next Row: Knit across ʤ

Repeat from ʤ to ʤ down the entire length of the foot. There are equal number of cast off stitches along each side. How many rows varies depending on the size of slipper you’re making. Be sure to end with a completed knit across row.

Adult Moccasin Slippers - Making the Sole
Starting the sole. Right side.
Adult Moccasin Slippers - Making the Sole
Working your way down while making the sole. Wrong side.
Adult Moccasin Slippers - Making the Sole
Continuing to work down the length of the sole.
Adult Moccasin Slippers - Making the Sole
Still further down the sole. Note how the cast off edges are being picked up as you go.
Keep going until you reach the end of the cast off stitches.
More of My Stuff on Etsy

Making the Heel

I recently made a video showing how to do this. It’s how I make a lot of my slipper heels including this pattern. You can watch the video below to help you if the photos aren’t enough.

Next Row: With the RIGHT side facing, pick up a stitch in the row closest to the sole of the slipper. Count how many ridges it is for the size you are making. K2tog. Knit to the last 2 stitches. K2tog. Count down the same number of ridges on the other side and pick up a stitch in the space beneath it. (15 stitches).

Next Row: Knit across.

Owl Slippers knitting pattern

The photo above shows 9 rows of ridges. You’ll have more than 9 ridges when making the adult size of this slipper. (I reused the photo from the owl slippers ☺)

Owl Slippers - Free Knitting Pattern
The photo above shows 9 rows of ridges.
Owl Slippers - Free Knitting Pattern

Ҩ Next Row: With the RIGHT side facing, count down one ridge less than the previous row and pick up a stitch in the space beneath it. K2tog twice. Knit to the last 4 stitches. K2tog twice. Count down the same number of ridges on the other side and pick up a stitch in the space beneath it. (You’ll have 13 stitches the first time you do this.)

Next Row: Knit across.

Next Row: Count down one ridge less than the previous row and pick up a stitch in the space beneath it. K2tog. Knit until the last 2 stitches. K2tog. Count down the same number of ridges and pick up a stitch in the space beneath it on the other side.

Next Row: Knit across. Ҩ Repeat from Ҩ to Ҩ until 7 stitches remain.

Next Row: Pick up a stitch beneath the next ridge. K2tog K3tog K2tog. Pick up a stitch in the space beneath the next ridge on the other side.

Next Row: Knit across.

Next Row: Pick up a stitch beneath the next ridge. K2tog K1 K2tog. Pick up a stitch in the space beneath the next ridge on the other side.

Next Row: K2tog K1 K2tog.

Next Row: K3tog.

Break yarn leaving a length of yarn long enough (8ish inches) to sew up the remaining seam.

Make another slipper.

Yes, they do look a little boxy when they’re done and not on a foot. The stretch of the garter stitch allows these slippers to stretch around the contours of any foot easily. I’ve had a number of positive reviews on Etsy from my well-slippered customers.

Hints and Tips

When picking up stitches from the cast off row, be sure you’re really moving on to the next cast off stitch! It’s an easy mistake to pick up a stitch in a stitch you already picked up. If in doubt, give the needle holding the stitches a bit of a tug. You’ll see the yarn move slightly at the very back, closest to the needle. Pick up a stitch at the NEXT cast off stitch.

If you don’t have the same number of stitches on both sides when you are forming the sole, you may have picked up a stitch twice in one stitch or missed one. Don’t worry! This is fixable. You can skip one cast off stitch if you need to make it even, or pick up a cast off stitch twice on the other side. There’s enough stretch in the slipper that any puckering this causes won’t be overly visible if you’re off by a stitch or two.

Picking up the stitches evenly along the toe flap is about 1 stitch every ridge.

To speed up finishing the slippers and not have so many ends to sew in, hold the yarn ends to the back of your work as you knit. There’s a pictorial on my website that shows you how. Here’s the link – Working in the Ends While Knitting.

Abbreviations

k – knit

k2tog – knit 2 together

st – stitch

sts – stitches

PSSO – pass slipped stitch over

YO – yarn over

Like all of my patterns you have my permission to sell and/or give away the slippers that you make using this pattern. You are NOT permitted to reprint this pattern in any form unless you have obtained my written permission to do so. 

If you have any questions, please feel free to leave a comment or send me your questions at [email protected].


Posted on 26 Comments

FREE Knitted Slipper Pattern – Moccasin Style – Now with a How-to VIDEO!

Hand knit slippers for men and women

This is the original version of my very popular Knitted Owl Slipper Pattern, Ultra Thick Slip On Bootie Slippers and Ribbed Moccasin Bootie Slippers for Adults. I realized that not everyone may want owls on their slippers. That a more plain slipper was something that any man, woman or child would wear as “knitted slippers” without fear of judgement (and if you’re so inclined to experience that lack of judgment, you can now buy a finished pair here – Adult Moccasin Slippers or in my Etsy shop). I’m not sure about someone who’d judge someone wearing owl slippers, but that’s really not the point. And oh yeah. The child sizes are finished! If you would like to knit up a quick pair of the child version, you can read that pattern here – FREE Knitted Slipper Pattern for Children.

Because of the request by many that they would prefer a PDF download, it’s DONE! You can download this pattern for a small fee/donation. You can get it from a number of places. You can download it from a number of places. In particular, my site here – Adult Moccasin Slippers with a Cuff. You can also get it at a number of other online book retailers such as Ravelry, LoveCrafts, and Etsy. I think that’s enough options to make nearly everyone happy 🥰.

This isn’t a pattern for beginners, but if you know how to knit a stitch, pick up stitches and knit two stitches together, you should be okay. I used a very different technique involving multiple sets of needles. I included photos and now a complete how-to video to demonstrate how I’m using the extra set and it totally works! Trust me.

Another way to avoid ads and pop-ups, get instant, PRINTABLE downloads of this pattern and others, is by becoming a Member on this website. When you become a Website Supporter for $3/month, you’ll gain access to exclusive member only posts. These posts contain one click downloads of the patterns. Simply click the Download & Print button. The PDF will automatically download to your computer or smart device. You can then read it on your device or print it at your leisure. You can download as many patterns as you like for the same $3 each month. You can go to this page to learn more, become a member and support my work… Exclusive Member Area

If you enjoy this pattern and my other free online knitting patterns, please consider making a small donation or helping me out by visiting my Help Support My Work page. If that’s not possible, that’s totally fine too! Even sharing this page on your social media helps me out immensely. You can use the buttons below to do so easily.


Things You Need

If you are uncertain or having trouble finding what you need to make these slippers, clicking any of the links below will show you exactly what you need. And if you decide to order through Amazon, it will be delivered right to your door and help support the hosting costs of the website (I do get a small commission from sales through Amazon).

And because this pattern is so basic with no pattern of any sort, it’s a great knitting pattern to highlight the colour of your yarn. I have a weakness for variegated/shaded yarns. Don’t ask me why… My grandma did too. It must be genetic. I find the self-striping looks terrible and give it a 1/10. Would not recommend.

1 ball of worsted weight yarn (average 260 yard, 5 oz or 141 gram ball will be more than enough). I used Red Heart worsted weight yarn when designing the pattern but any worsted weight yarn will suffice.

2 sets of size 4 mm (US size 6) single point knitting needles.

Stitch holder

Tapestry needle to sew in ends. You can also use this handy tutorial to show you how to work in the ends while knitting these slippers.

Gauge

With size 4 mm (US size 6) needles or whatever size you need to obtain the correct number of stitches and rows. Be sure to check your gauge otherwise the sizing won’t be correct.

In garter stitch

4” = 16 sts

4” = 40 rows


Sizes (are written as such)

Women’s 6-7 (8-9,10-11, 12-13)

Men’s 5-6 (7-8, 9-10, 11-12)

To Begin

Cast on 36 (38, 40, 42)

Knit across for 22 (24, 26, 28) rows. Break yarn when completed last row.

Toe Flap

Next row: With RIGHT side facing, transfer the first 11 (12, 13, 14) stitches to a stitch holder. Reattach the yarn and knit the next 14 stitches. Leave the remaining 11 (12, 13, 14) stitches on the needle unworked.

The following rows are worked back and forth on the 14 toe flap stitches only!

Knit across for 42 (44, 46, 48) rows.

Break yarn. You’ll have the 14 stitches of the toe flap on your needle and the 11 (12, 13, 14) stitches you left on the needle when you started making the toe flap.

Making the Sides of the Slipper

This is where you’re going to need the extra set of knitting needles. You’ll be knitting back and forth in rows but the turn around the toe is too tight to use circular needles. For this, you’ll put the 14 toe flap stitches on one of your extra needles. It’s a little unconventional, but it works.

Next Row: With the RIGHT side facing, transfer the 11 (12, 13, 14) stitches from the stitch holder onto one of your needles. Attach your yarn and knit the 11 (12, 13, 14) stitches. Pick up 21 (22, 23, 24) stitches evenly along the edge of the toe flap. (All of these stitches are on ONE needle. (32 34, 36, 38) stitches on this needle)

With another needle, knit the 14 stitches of the toe flap. Leave the remaining 11 (12, 13, 14) stitches on the other needle unworked for now. (14 stitches on this needle)

With another needle, pick up 21 (22, 23, 24) stitches evenly along the side of the toe flap. Knit the remaining 11 (12, 13, 14) stitches on the next needle. (32, 34, 36, 38) stitches on this needle)

You should now have 3 needles holding stitches with all the points pointing as shown below when laid flat. You also have one spare needle to knit with. You are now going to knit in rows, back and forth with these three needles. Once you finish knitting all the stitches on one needle, move on to the next needle (the point of the needle is right there) until you complete the row.

How to knit slippers
I used a double pointed needle to work my 14 stitches for the toe only because it was handy. A regular needle works!

Another way to say it for the following rows, knit all the stitches forming the side of the slipper, knit the 14 stitches holding the toe flap stitches, then knit the other side of the slipper (counts as one row). Turn. Repeat.

Knit the next 10 (12, 14, 16) rows

There are 5 (6, 7, 8) ridges on the tip of the toe.

The photo below shows the 5 ridges for the women’s size 6-7 or the men’s 5-6.

How to knit slippers
These are the ridges picked up along the toe flap

Next Row: With WRONG side facing. Cast off all the stitches from the first needle loosely. You’ll need to pass the last stitch from the first needle over the first stitch of the toe flap stitches (second needle).

Knitted Owl Slippers - Making the Sole

Using the same needle that now has one stitch, knit the remaining 13 stitches of the toe flap. Cast off all the stitches from the third needle loosely. Break yarn.

Making the Sole

If you need help with the sole, you can watch the video. It starts right where you need it to.

Next Row: With the RIGHT side facing, attach yarn and knit the first stitch of the cast off stitches by the toe flap (cast off stitch on the right by the point of the needle).

Knitted Moccasin Bootie Slippers for Children - picking up stitches
How to knit slippers
This photo is taken from the right side.

K2tog. Knit to the last 2 stitches K2tog. Pick up the cast off stitch by the point of your needle. (14 stitches).

Knitted Moccasin Bootie Slippers for Children - Picking up stitches
Pick up this stitch at the end of the row.

Quick tip – wrap the yarn counterclockwise around your needle and turn it down to pull the yarn through the cast off stitch on the right. If you have a hard time doing this, you can also use a crochet hook to pull the loop through and place that loop on your working needle.

You now are working back and forth along the bottom of the foot picking up one cast off stitch on each side as you go.

Next Row: Knit across.

♥︎ Next Row: Pick up the next stitch of the cast off stitches. K2tog. Knit to the last 2 stitches K2tog. Pick up the cast off stitch on the other side of the slipper by the point of your needle. (14 stitches).

Working your way down the sides
Keep working your way down the slipper to make the sole.

Next Row: Knit across ♥︎

Repeat from ♥︎ to ♥︎ down the entire length of the foot. There are equal number of cast off stitches along each side. How many rows varies depending on the size of slipper you’re making. Be sure to end with a completed knit across row.

Adult Moccasin Slippers - Making the Sole
Starting the sole. Right side
Adult Moccasin Slippers - Making the Sole
Working your way down while making the sole. Wrong side.
Adult Moccasin Slippers - Making the Sole
Continuing to work down the length of the sole.
Adult Moccasin Slippers - Making the Sole
Still further down the sole. Note how the cast off edges are being picked up as you go. Keep working your way down the length of the sole until you’ve picked up all the cast off stitches .
More of My Stuff on Etsy

ALL patterns on Etsy are
40% off
until March 31


You can make a widget like this for your blog or website, too.
Instructions are on my website here: How to Display Etsy Items on Your Website

Making the Heel

You’re now going to make a small triangle to fit in the back of the heel. You’re going to fill this space in the slipper. If you need extra help you can watch the video. It begins playing at the exact spot.

Child moccasin slippers - Picking up stitches to make the heel.

♀️ Next Row: With the RIGHT side facing, pick up a stitch in the row closest to the sole of the slipper. Count how many ridges it is for the size you are making. K2tog twice. Knit to the last 4 stitches. K2tog twice. Count downtime same number of ridges on the other side and pick up a stitch in the space beneath it. (12 stitches).

Owl Slippers knitting pattern
The photo above shows 9 rows of ridges.
These are rows you knit to form the edges of the slipper. 
Owl Slippers - Free Knitting Pattern
Stitch picked up on the right edge in the 9th row shown above
Owl Slippers - Free Knitting Pattern
After you K2tog across, you’ll pick up a stitch here.
Owl Slippers - Free Knitting Pattern
Stitch picked up at the end of the row.

Next Row: Knit across.

Next Row: Count down one ridge less than the previous row and pick up a stitch in the space beneath it. K2tog. Knit until the last 2 stitches. K2tog. Count down the same number of ridges and pick up a stitch in the space beneath it on the other side.

Next Row: Knit across. ♀️ Repeat from ♀️ to ♀️ until 6 stitches remain.

Next Row: Pick up a stitch beneath the next ridge. K2tog 3 times. Pick up a stitch in the space beneath the next ridge on the other side.

Next Row: Knit across.

Next Row: K2tog, K1, K2tog. Pass the middle stitch on your working needle over the stitch on the left. Pass the stitch on the right over the stitch on the left. (Or you can turn your work and knit the 3 sts together).

Break yarn leaving a length of yarn long enough (8ish inches) to sew up the remaining seam.

Make another slipper.

Yes, they do look a little boxy when they’re done and not on a foot. The stretch of the garter stitch allows these slippers to stretch around the contours of any foot easily.

Hints and Tips

If you want a longer cuff at the top, work more rows than stated at the beginning when you cast on.

When picking up stitches from the cast off row, be sure you’re really moving on to the next cast off stitch! It’s an easy mistake to pick up a stitch in a stitch you already picked up. If in doubt, give the needle holding the stitches a bit of a tug. You’ll see the yarn move slightly at the very back, closest to the needle. Pick up a stitch at the NEXT cast off stitch.

If you don’t have the same number of stitches on both sides when you are forming the sole, you may have picked up a stitch twice in one stitch or missed one. Don’t worry! This is fixable. You can skip one cast off stitch if you need to make it even, or pick up a cast off stitch twice on the other side. There’s enough stretch in the slipper that any puckering this causes won’t be overly visible if you’re off by a stitch or two.

Picking up the stitches evenly along the toe flap is about 1 stitch every ridge.

To speed up finishing the slippers and not have so many ends to sew in, hold the yarn ends to the back of your work as you knit.

Abbreviations

k – knit

k2tog – knit 2 together

st – stitch

sts – stitches

If you have any questions, please feel free to leave a comment below or send me your questions here. If there is a typo or stitch count that’s off, let me know in the comments! I type these out from notes I make when designing the slippers. It’s easy, and embarrassingly common for me to miss something.

To see how you can keep the free patterns coming, visiting this page – Help Support My Work!  A financial donation is always appreciated but a share, like and follow on social media also helps me immensely ?

Posted on Leave a comment

Knitted Cozy Cuff Slippers – FREE Knitting Pattern

knitted cozy cuff slippers - free knitting Pattern


I have a number of slippers that I’ve designed over the years and this basic design is one of my all time favourites. I’ve done a number of different styles including my Granny Slippers and Adult Bootie Slipeprs that are made the exact same way, but look slightly different because of the ribbing. 

This pattern is a great place to start if you are ok with your basic knitting stitches, but want to try something new. If you’ve been toying with the idea of trying to knitting in the round, this is a great place to start. If you would like to learn with this pattern, I’ve embedded how-to videos into the pattern that demonstrate how easy it actually is. If you are a seasoned knitter, then these slippers will be super quick for you to make as there is nothing complicated about them.

If you would like to purchase a copy of this pattern that you can download and print, I have a number of options for you. You can buy the pattern on this website – Knitted Cozy Cuff Slippers– with How-to VIDEOS, Ravelry, Etsy, LoveCrafts, Creative Fabrica, Google Books and Amazon. Amazon has the book in both paperback and Kindle formats.

Use these 👇🏼 to share on social media 🥰

If you are loving this and all my other free patterns, please help out financially by visiting my Help Support My Work Page. If you can’t give cash, and I get that not everyone can, please do your part and share this where you can. Every share on social media helps promote my work and expose it to even more people. I’ve made it super easy for everyone to do that. By clicking those links up there 👆🏼 you can share it nearly everywhere.

If you like my patterns and want to print more, you can download this pattern and more when you become a Website Member works. Becoming a member is like being a patron of the arts. By supporting me for a small fee every month, you help support me to create more patterns for you to use. You also get access to the patterns in the members area. You can see how many pattern there are currently available in my Current List of Member Patterns. For more information on how you can support me and become a member, click the button below.

Abbreviations

K – Knit

P – Purl

K2tog – knit 2 together

st – stitch

sts – stitches

If you need help with any of the basic stitches used to make these slippers, there is a playlist on YouTube that will show you how. You can also use this link – Knitting for Beginners – Easy Knitting Videos to Learn Basic Knitting Stitches. It will take you to another page on this website where you can watch them all. A new page will open so you won’t lose this one 😊

Things You Need

Worsted weight yarn — (215 yards/197 m). 

Size 5 mm (size 8 US) knitting needles (or whatever you require to get the correct gauge).

Set of 4 double point needles (DPN’s) – Size 5 mm (size 8 US)

Row markers (optional. Pieces of left over yarn will also work).

Tapestry needle to sew the seam and work in the ends .

Gauge

In stockinette stitch

9 sts – 5 cm (2″) 

13 rows – 5 cm (2”) 

Sizes are written as such:

Women 6-7 (8-9, 10-11, 12)

Men 6 (7-8, 9-10, 11-12, 13-14)

The Pattern

Cast on 38 (40, 42, 46, 48) sts

Row 1: K across

Row2: P14 (14, 14, 17, 17) K10 (12, 14, 12, 14) P14 (14, 14, 17, 17)☺ Repeat from ☺ to ☺ 

13 (14,16, 17, 18) times more for a total of 28 (30, 34, 36, 38) rows.

Add row markers on both sides of the slipper. This makes it easier when picking up stitches to make the cuff.

Start Toe

♥ Next Row: (K2 P1) Repeat 3 (3, 3, 4, 4) times more. K14 (16, 18, 16, 18) (P1 K2) Repeat 3 (3, 3, 4, 4) times more.

Next Row: (P2 K1) Repeat 3 (3, 3, 4, 4) times more. P2 K10 (12, 14, 12, 14) (P2 K1) Repeat 3 (3, 3, 4, 4) times more. P2♥

Repeat from ♥ to ♥ for 9 (10, 11, 12, 13) more times for a total of 20 (22, 24, 26, 28) rows for this section. You have a total of 48 (52, 58, 62, 66) rows from the cast on edge.

End Toe

Next Row: (K2tog P1) Repeat 3 (3, 3, 4, 4) times more. K2tog 7 (8, 9, 8, 9) times (P1 K2tog) 3 (3, 3, 4, 4) times more.

Next Row: (P1 K1) Repeat 3 (3, 3, 4, 4) times more. P1 K5 (6, 7, 6, 7) (P1 K1) Repeat 3 (3, 3, 4, 4) times more. P1.

Next Row: K1 K2tog 5 times. K0 (1, 0, 1, 0) K2tog to the end of the row.

Next Row: P5 (5, 5, 6, 6) K2 (3, 3, 3, 3) P to the end of the row.

Draw through to pull the stitches together.

Make the Heel

If you need a little extra help with this part, the video will show you how to do it. You can either click this link – How to Make the Heel or you can watch the video below.

With the RIGHT side facing, pick up 12 (14, 16, 14, 16) stitches along the cast on edge 

♦ Next 2 Rows: K across.

Next Row: K2tog. K to last 2 sts. K2tog. ♦ Repeat from ♦ to ♦ until there are 4 sts on your needle.

Next Row: K2tog twice.

End with the yarn on the left side of the row when the right side of the slipper is facing you. You may need to knit one more row.

Make the Cuff

If you want to make the cuff a different colour from the foot portion of the slippers, break your yarn and start with the new colour now.

There is also a video showing how to pick up the stitches to make the cuff if you are unfamiliar with knitting in the round. You can use this link – How to Make the Cuff or watch the video below.

With the RIGHT side facing and using your DPN’s, pick up 34 (37, 40, 43, 46) sts evenly around the edge of the slipper. You will now have 36 (39, 42, 45, 48) sts total. (As long as the final number of sts picked up is divisible by 3 your cuff will work. Pick up the same number of sts on both feet of course!)

Round 1-6: K2 P1 around 

Round 7-10: K around.

Hints and Tips

Be sure to cast your stitches off loosely when making the cuff. It needs to be able to stretch when going over the top of the foot and the heel. It’s the widest part the slipper has to pass over. The ribbing will snap it back to tighten up on its own.

Make the cuff as long as you like with the K2 P1 ribbing. I made it 6 rows but you may want it longer, especially for the larger sizes.

When casting off for the heel, if you need an extra row to end it so the yarn ending on the left with the right side facing (if right you are handed), that’s ok. When knitting this part, I often lose track of how many rows I’ve knitted between the row with the decreases. I’ve never had a complaint yet.

Don’t feel that the cuff needs to be the same colour as the slipper itself. A nice change is to make the cuff in a complimentary colour, especially if you have used variegated yarn. You can also use this pattern to use up some of your left over wool by making the toe (ribbed section) a different colour also.

This is also a great pattern to use if you have a variegated or any other colour changing yarn. Because there isn’t any specific stitch pattern other than some ribbing, it allows to show off the colours really well.

Posted on 2 Comments

Autumn Leaf Half Gloves – FREE Knitting Pattern for Fingerless Gloves Knit on Straight Needles

Autumn leaf half gloves - fingerless glove knitting pattern

The inspiration of this pattern came from my previous Spider Fingerless Gloves pattern. I really like incorporating the design into the final wearable piece. I’ve always liked the leaf pattern and this seemed to be a great way to use it.

There isn’t a full-on how to for this pattern, by I have included helpful videos to show you how to do certain parts of the pattern. These will certainly help with any of the tricker parts like knitting the wrong side of the YO K1 YO and drawing the edges of the leaves together to a point. Click the link and it will open and automatically play the YouTube video.

If you would like to purchase a copy of this pattern that you can download and print, I have a number of options for you. You can buy the pattern on this website – Autumn Leaf Half Gloves – with How-to VIDEOS, Ravelry, Etsy, LoveCrafts, Creative Fabrica, Google Books and Amazon. Amazon has the book in both paperback and Kindle formats.

Use these 👇🏼 to share on social media 🥰

If you are loving this and all my other free patterns, please help out financially by visiting my Help Support My Work Page. If you can’t give cash, and I get that not everyone can, please do your part and share this where you can. Every share on social media helps promote my work and expose it to even more people. I’ve made it super easy for everyone to do that. By clicking those links up there 👆🏼 you can share it nearly everywhere.

If you like my patterns and want to print more, you can download this pattern and more when you become a Website Member works. Becoming a member is like being a patron of the arts. By supporting me for a small fee every month, you help support me to create more patterns for you to use. You also get access to the patterns in the members area. You can see how many pattern there are currently available in my Current List of Member Patterns. For more information on how you can support me and become a member, click the button below.

Gauge

This is important to follow for correct sizing. This is when using the US size 6 (4 mm) knitting needles in stockinette.

2” (5 cm) – 10 sts

2” (5 cm) – 15 rows

Things You Need

Knitting needles:

  • Small – Size 3 US (3.25 mm) knitting needles
  • Medium – Size 6 US (4 mm) knitting needles
  • Large – Size 8 US (5 mm) knitting needles

Worsted weight yarn – any standard size ball will do

Cable Needle – There are a number a styles but I prefer the hook version

Stitch holder – It looks like a big safety pin

Tapestry needle

Sizing

Like my other fingerless mitt patterns, I’ve made this as one pattern and adjusted the needle size to change the sizes. This makes it a heck of a lot easier to design and keeps the proportion of the leaves the same on all sizes. Frankly, the overall look is better.

If you are making the small or large size glove, check the gauge for the size 6 US (4 mm). Adjust to the size of the needles to obtain the correct gauge. If you are making the large size, increase your needle size by a size US (mm). For example, you need to use a size 7 US (4.5 mm) to get the correct gauge, use size 9 US (5.5 mm) knitting needles for the large. If you are making a small, use size 5 US (3.75 mm).

To know what size you should make, you can use the infographic below on how to measure your hand, or the hand of whomever you are making them for.

Abbreviations are at the END of the Pattern

Left Hand

Cast on 34

Row 1: (P1 K2) Repeat to last st. P1

Row 2: (K1 P2) Repeat to last st. K1

♥ Row 3: (P1 TB) Repeat to last st. P1

Row 4: As row 2 ♥ Repeat from ♥ to ♥ 3 times more. (Counts as rows 5-10).

Row 11: P1 P2tog P21 K3 P7 (33 sts)

Row 12: K7 P3 K23

Row 13: P23 K2 C1F P6

Row 14: K6 P1 K1 P2 K23

Row 15: P23 K2 P1 C1F P5

Row 16: K5 P1 K2 P2 K23

Row 17: P22 C1B K1 P2 YO K1 YO P5 (35 sts)

Row 18: K5 P3 K2 P1 K1 P1 K22 (35 sts)

Row 19: P21 C1B P1 K1 P2 (K1 YO) twice K1 P5 (37 sts)

Row 20: K5 P5 K2 P1 K2 P1 K21 (37 sts)

Row 21: P21 K1 P2 K1 P2 K2 YO K1 YO K2 P5 (39 sts)

Row 22: K5 P7 K2 P1 K2 P1 K21 (39 sts)

Row 23: P21 K1 P2 K1 P2 K2tog (When making this stitch, pick up a stitch as if to knit. Twist the stitch and place it back on your non-working needle. Knit the 2 stitches together from right to left.) K3 K2tog (knit the stitches together from left to right.) P5 (37 sts)

Row 24: K5 P5 K2 P1 K2 P1 K21 (37 sts)

Row 25: P21 K1 P2 K1 P2 K2tog (like you did before: pick up, twist, knit right to left) K1 K2tog (knit left to right) P5 (35 sts)

Row 26: K5 P3 K2 P1 K2 P1 K21 (35 sts)

Row 27: P14 PM1 P1 PM1 P6 YO K1 YO P2 K1 P2 Sl St (as if to knit) K2tog (knit left to right) PSSO P5 ( 37 sts)

Row 28: K8 P1 K2 P3 K23 (37 sts)

Row 29: P23 (K1 YO) twice. K1 P2 K1 P8 (39 sts)

Row 30: K8 P1 K2 P5 K6 M1 K3 M1 K14 (41 sts)

Row 31: P25 K2 YO K1 YO K2 P2 K1 P8 (43 sts)

Row 32: K8 P1 K2 P7 K25 (43 sts)

Row 33: P14 PM1 P5 PM1 P6 K2tog (pick up, twist, knit right to left) K3 K2tog (knit left to right ) P2 C1F P7 (43 sts)

Row 34: K7 P1 K3 P5 K27 (43 sts)

Row 35: P27 K2tog (pick up, twist, knit right to left ) K1 K2tog (knit left to right) P3 K1 P7 (41 sts)

Row 36: K7 P1 K3 P3 K6 M1 K7 M1 K14 (43 sts)

Row 37: P29 Sl St (as if to knit) K2tog (knit left to right) PSSO P3 YO K1 YO P7 (43 sts)

Row 38: K7 P3 K33 (43 sts)

Row 39: P14 PM1 P9 PM1 P10 (K1 YO) twice K1 P7 (47 sts)

Row 40: K7 P5 K35 (47 sts)

Row 41: P35 K2 YO K1 YO K2 P7 (49 sts)

Row 42: K7 P7 K10 M1 K11 M1 K14 (51 sts)

Row 43: P37 K2tog (pick up, twist, knit right to left) K3 K2tog (knit left to right) P7 (49 sts)

Row 44: K7 P5 K37 (49 sts)

Row 45: P14 Pass the next 13 sts of the thumb gusset onto a stitch holder. P10 K2tog (pick up, twist, knit right to left) K1 K2tog (knit left to right) P7 (34 sts)

Row 46: K7 P3 K24 (34 sts)

Row 47: P24 Sl St (as if to knit) K2tog (knit left to right) PSSO P7 (32 sts)

Row 48: K across

Row 49: P across

Row 50: K across

Row 51: P2tog (K2 P1) to the end of the row

Row 52: (K1 P2) Repeat to the last st. K1

Row 53: (P1 TB) Repeat to the last st. P1 ☺ Repeat from ☺ to ☺ once.

Cast off loosely on the WRONG side.

Thumb

Pick up the 13 stitches on the stitch holder with the WRONG side facing you. (See hints and tips for more info).

Row 1: Knit across

Row 2: Purl across

Row 3: Knit across

Cast off on the RIGHT side.

Sew seam along the side of the glove and the inside of the thumb. Work in ends.

More of my stuff on Etsy:

ALL patterns on Etsy are
40% off
until March 31


You can make a widget like this for your blog or website, too.
Instructions are on my website here: How to Display Etsy Items on Your Website

Right Hand

Cast on 34

Row 1: (P1 K2) Repeat to last st. P1

Row 2: (K1 P2) Repeat to last st. K1

♥ Row 3: (P1 TB) Repeat to last st. P1

Row 4: As row 2 ♥ Repeat form ♥ to ♥ 3 times more. (Counts as rows 5-10).

Row 11: P7 K3 P21 P2tog P1 (33 sts)

Row 12: K23 P3 K7

Row 13: P6 C1B K2 P23

Row 14: K23 P2 K1 P1 K6

Row 15: P5 C1B P1 K2 P23

Row 16: K23 P2 K2 P1 K5 

Row 17: P5 YO K1 YO P2 K1 C1F P22 (35 sts)

Row 18: K22 P1 K1 P1 K2 P3 K5 (35 sts)

Row 19: P5 (K1 YO) twice K1 P2 K1 P1 C1F P21 (37 sts)

Row 20: K21 P1 K2 P1 K2 P5 K5 (37 sts)

Row 21: P5 K2 YO K1 YO K2 P2 K1 P2 K1 P21 (39 sts)

Row 22: K21 P1 K2 P1 K2 P7 K5 (39 sts)

Row 23: P5 K2tog (When making this stitch, pick up a stitch as if to knit. Twist the stitch and place it back on your non-working needle. Knit the 2 stitches together from right to left). K3 K2tog (knit the stitches together from left to right.) P2 K1 P2 K1 P21 (37 sts)

Row 24: K21 P1 K2 P1 K2 P5 K5 (37 sts)

Row 25: P5 K2tog (pick up, twist, knit right to left) K1 K2tog (knit left to right) P2 K1 P2 K1 P21 (35 sts)

Row 26: K21 P1 K2 P1 K2 P3 K5 (35 sts)

Row 27: P5 Sl St (as if to knit) K2tog (knit left to right) PSSO P2 K1 P2 YO K1 YO P6 PM1 P1 PM1 P14 ( 37 sts)

Row 28: K23 P3 K2 P1 K8 (37 sts)

Row 29: P8 K1 P2 (K1 YO) twice. K1 P23 (39 sts)

Row 30: K14 M1 K3 M1 K6 P5 K2 P1 K8 (41 sts)

Row 31: P8 K1 P2 K2 YO K1 YO K2 P25 (43 sts)

Row 32: K25 P7 K2 P1 K8 (43 sts)

Row 33: P7 C1B P2 K2tog (pick up, twist, knit right to left) K3 K2tog (knit left to right) P6 PM1 P5 PM1 P14 (43 sts)

Row 34: K27 P5 K3 P1 K7 (43 sts)

Row 35: P7 K1 P3 K2tog (pick up, twist, knit right to left) K1 K2tog (knit left to right) P27 (41 sts)

Row 36: K14 M1 K7 M1 K6 P3 K3 P1 K7 (43 sts)

Row 37: P7 YO K1 YO P3 Sl St (as if to knit) K2tog (knit left to right) PSSO P29 (43 sts)

Row 38: K33 P3 K7 (43 sts)

Row 39: P7 (K1 YO) twice K1 P10 PM1 P9 PM1 P14 (47 sts)

Row 40: K35 P5 K7 (47 sts)

Row 41: P7 K2 YO K1 YO K2 P35 (49 sts)

Row 42: K14 M1 K11 M1 K10 P7 K7 (51 sts)

Row 43: P7 K2tog (pick up, twist, knit right to left) K3 K2tog (knit left to right) P37 (49 sts)

Row 44: K37 P5 K7 (49 sts)

Row 45: P7 K2tog (pick up, twist, knit right to left) K1 K2tog (knit left to right) P10 Pass the next 13 sts of the thumb gusset onto a stitch holder. P14 (34 sts)

Row 46: K24 P3 K7 (34 sts)

Row 47: P7 Sl St (as if to knit) K2tog (knit left to right) PSSO P24 (32 sts)

Row 48: K across

Row 49: P across

Row 50: K across

Row 51: P2tog (K2 P1) to the end of the row

Row 52: (K1 P2) Repeat to the last st. K1

Row 53: (P1 TB) Repeat to the last st. P1 ☺ Repeat from ☺ to ☺ once.

Cast off loosely on the WRONG side.

Thumb

Pick up the 13 stitches on the stitch holder with the WRONG side facing you. (See hints and tips for more info).

Row 1: Knit across

Row 2: Purl across

Row 3: Knit across

Cast off on the RIGHT side.

Sew seam along the side of the glove and the inside of the thumb. Work in ends.

Hints and Tips

Make your seams as narrow as possible when sewing them. The bulkier the seam the more noticeable and possibly uncomfortable for the wearer.

Everything between and including the PM1 and M1 stitches form the thumb gusset.

When you are making the thumb, you MUST pick up the stitches from the wrong side. Pass the stitches from the stitch holder to the knitting needle then onto the other knitting needle so the wrong side facing you. If you don’t do the second pass, you’ll get a weird line.

Leave the cast off end of the finger cuff and the thumb longer so you can use it to sew up the seam along the side of the gloves and seam of the thumb, respectively.

The striped ombre versions of the gloves are done with Loops & Threads “Facets” yarn you can find at Michaels (as of the printing of this pattern). It’s thin for a worsted weight yarn and I needed to use a 4.5 mm set of dpn’s to get the sizing correct. Make sure to check your gauge and adjust accordingly!

Please be aware that these gloves look like the leaves are off center when they’re not being worn. I actually redesigned them so the motif would be 2 stitches over because when they were on, they looked too close to the thumb. Sometimes designs are weird and the center of the design visually isn’t the middle of the design mathematically or functionally. Ahhh! The joys of art…

Abbreviations

K – knit

P – purl

YO – yarn over

TB – Pick up the stitch with your stitch holder. Hold the stitch at the back of your work. Knit the next stitch. Knit the stitch from the stitch holder.

C1B – Cable 1 back. Pick up next stitch on a cable needle. Pull this stitch to the BACK of your work. Knit the next stitch. Purl the stitch on the cable needle. This was for the Spider gloves but is the same for this pattern.

C1F – Cable 1 forward. Pick up the next stitch on a cable needle. Pull this stitch to the FRONT of your work. Purl the next stitch. Knit the stitch on the cable needle. This was for the Spider gloves but is the same for this pattern.

M1 – Make one (knit wise). Increase one stitch between the stitches. Pick up the yarn between the stitches. Twist slightly. Place it on your non-working needle. Knit the stitch. Watch this video to see how. 

PM1 – Make one (purl wise). Increase one stitch between the purl stitches. Pick up the yarn between the stitches. Place it on your non-working needle. Purl the stitch as you regularly would. Watch this video to see how. 

K2tog – How you do this depends where you are in the pattern. If you are making the right side of the leaf, knit right to left. If you are making the left side of the leaf, knit left to right. If you do it this way you eliminate the twisting of the stitch and the edge of the leaf flows evenly.

The k2tog are given for RIGHT handed knitters. If you are knitting left to right as a LEFT handed knitter, reverse the order that you knit the stitches together. K2tog from left to right then pick up, twist, knit from right to left.

Sl St – slip the stitch

PSSO – pass the slipped stitch over.

Like all of my patterns you have my permission to sell and/or give away the physical items that you make using this pattern. You are NOT permitted to reprint or duplicate this pattern in any form unless you have obtained my written permission to do so. 

Posted on 2 Comments

How to Knit a Way Cool Monster Purse – FREE Printable Knitting Pattern with How-to Videos!

Way Cool Knitted Monster Purse - FREE Knitting Pattern

Make your own conversation piece when you knit this funky and original monster purse. Think a monster purse is a “bit much”? You can use the same design without the eyes and appendages and have a really cool fluffy purse. Still guaranteed to get you the occasional comment and looks of envy.

I’ve made this pattern as simple as possible with the least amount of sewing necessary (my least favourite thing to do).  It doesn’t even need a zipper, as I designed it to have a flap to fold over and hold in your valuables securely.

The pattern is fairly simple and easy to follow, but in case you have a hard time with the fluff stitch, I made a video which shows the technique. In case you don’t have access to wifi, I also provided pictures and descriptions on how to make the fluff stitch. The pictures are at the end of the pattern with the video just a scroll or two away..

If you like, you can download the pattern as a PDF from my website!


Like the free videos and patterns? Then please share my work! Those handy little icons below 👇🏼👇🏼👇🏼 let you do it easily. If you’d like more information on how you can keep things free learn, how you can Help Support My Work.

If you like how this pattern opens and how easy it is to download, this is exactly how the patterns available through my Member Area works. Becoming a member is like being a patron of the arts. By supporting me for a small fee every month, you help support me to create more patterns for you to use. You also get access to the patterns in the members area. You can see how many pattern there are currently available in my Current List of Member Patterns. For more information on how you can support me and become a member, click the button below.


Abbreviations:

K = Knit

P = Purl

FS = Fluff Stitch. This is the loop stitch and is described in detail after the tips and hints. You can also watch the video here:

Depending on how tight you knit you may need larger or smaller needles. If you’ve knitted before you probably have a good idea of what needles you need. The tension for this project is:

10 stitches = 2 inches

14 rows = 2 inches

Because there is no sizing to a purse, the tension isn’t overly important. A little tighter or loser won’t make much difference to the final product.

Things you need:

One ball of worsted weight yarn

Pair of size 4.5 knitting needles (single pointed)

2 – 1 inch google eyes

large eyed needle for sewing up seams


Optional:

Cloth to line the purse

Needle and thread to sew lining to purse

Body

Cast on 55 sts

Row 1: (and all odd rows): Knit

Row 2: P16 FS23 P16

Row 3 – 20: Repeat the rows 1 and 2. 

Row 21: Knit

With the WRONG side facing you…

Row 22: P16 FS6 P2 FS7 P2 FS6 P16.

Row 23: Knit

Row 24: Repeat row 22.

Row 25 – 32: Repeat rows 1 and 2. 

Row 33: Knit

Row 34: Purl

Row 35 – 64: repeat rows 33 and 34. 

With RIGHT side facing you, cast off.

Sew seams down the back and bottom of the purse. Work in the ends.

Arms and Legs (make four)

Cast on 6 sts. (Leave a long cast on end to use to attach the arm or leg)

Row 1: Knit

Row 2: Purl

Row 3 – 18: Repeat rows 1 and 2. 

Row 19: K K2tog twice K

Draw yarn through and pull tight.

Work in the draw through ends. Attach legs and arms to the body as you see fit. 

Strap

Cast on 6 sts. (Leave a long cast on and cast off ends to use to attach the strap)

Row 1: Knit

Row 2: Purl

Repeat rows 1 and 2 until the length you desire. With RIGHT side facing, cast off.

Hints and Tips

You don’t need to sew up the seams of the legs, arms or the strap. The way that it’s knit causes the swatches to roll up on their own. 

The top will automatically roll too! The casting off finishes the edge.

When making the strap, remember that the knitting will stretch. Make it shorter than you want the final length to be. Give the strap and the legs a good tug to make them roll up even more.

You can line the purse with any sort of material. A piece of material from an old t-shirt would do nicely.

The top flap can be as long or as short as you like. I wrote the pattern for it to be 30ish rows long but it doesn’t have to be. If you’re comfortable with making it shorter and adding a zipper, you can always do that too.

You don’t need to make a monster. You can skip making the arms and legs and instead of making the empty places for the eyes in rows 22 and 24, make the FS in all 23 stitches.


You can make a widget like this for your blog or website, too.
Instructions are on my website here: How to Display Etsy Items on Your Website

Make the Fluff or Loop Stitch

If you would prefer to see the video you can watch it here. Keep scrolling down to the bottom of the page or you can see it here – How to Knit the Fluff Stitch for the Monster Purse

To make the Fluff stitch (FS): Insert needle into to next stitch as if to KNIT. Wrap the yarn (up & over) CLOCKWISE around the needle and the index finger of your LEFT hand TWICE. Leave these loops on your finger until you are finished knitting the entire stitch!

Knitting the loop stitch

Wrap the yarn ONCE around the needle only.

Knitting the loop stitch

Pull all 3 loops of yarn through stitch as knitting a regular stitch.

Knitting the loop stitch

Insert the needle in your LEFT hand through these three loops and transfer these 3 loops onto the LEFT hand needle.

Knitting the loop stitch

Insert you RIGHT hand needle through these three loops as if to knit.

Knitting the loop stitch

Insert you RIGHT hand needle through these three loops as if to knit.

Knitting the loop stitch

The stitch is now completed.


Posted on Leave a comment

Tidy Treasures – Seven Knitted Dishcloth Designs

Tidy Treasures - Seven Knitted Dishcloth Designs

I went ahead and did it again! Combined all of my current genre of patterns into a single collection. I find that this is a really good way to get my work out there. People seem to be more inclined to buy a collection of multiple patterns, especially when buying a paperback book, than single patterns. It makes sense. You get more value for your buck.

So in this latest collection, I’m offering seven of my dishcloth patterns. When the virus time was running its course years ago, I went on a bit of a dishcloth design rampage. That’s when I came up with a bunch of these.

All the dishcloths included with this publication

This summer, I realized it was time to update some of my pattern photos. They were looking a bit dated and now that AI has made taking good photos easier than ever before, it seemed like a no brainer. Like always, a quick update turned into expansions. Some of the patterns were made into other things like scarves, and smaller things like coasters or scrubbies. A few even got updated videos embedded into them. I kinda just went with it.

Don’t forget to SHARE this page 👆🏼

To get the collection, you can go to a number of places. These are all the where you download the PDF of the patterns and print it yourself. The Amazon links are for both the Kindle (which you can’t print) and for the paperback version. Make sure you order the paperback from your country. You’ll save on shipping and duty fees this way.

Tidy Treasures - Seven Knitted Dishcloth Designs

Etsy

This Website

Google Books

Amazon

If you get it from Amazon make sure you select the correct country. Each country/region is linked to it’s selling zone:

United States, Canada, United Kingdom, Australia

Like always, the patterns are all still free to read online. All of them are also available for sale individually through all my retailers like Etsy, Ravelry, Amazon, and this website. The titles listed below are also clickable links that will take you to the FREE versions here online.

Learn to Knit a Dishcloth

Knit a Simple Dishcloth

Bars and Stripes Dishcloth

Textured Dishcloth, Scarf or Coasters

The One Piece Dishcloth and Coasters

Cute AF Bows Dishcloth

Diamonds Dishcloth and Coasters

I hope you enjoy this collection and happy knitting!

Posted on 1 Comment

YOuR PaTtERnS ArEn’t FreE – I dON’t LIkE tHE AdS

Pearl Clutching Karen.

There’s an ongoing issue that I want to address. I get emails (social media comments and reviews) similar to the ones I included below, on a weekly basis. I think it’s time I let everyone know how hurtful and demoralizing it is to receive these messages.

A direct email I received.
This was posted publicly by this person on my YouTube video. They knew it would be public. That’s why their username is visible.

For years, I have been designing and writing knitting (and a few crochet) patterns and publishing them through various distributors. One of these has been my website. It’s gone though many iterations over the course of my career but my patterns have ALWAYS been free to read online. I make my designs accessible to EVERYONE. They are the complete patterns with links to how-to videos, photos and more. I do this so anyone can access my work. No strings attached. No login required. 

Yes, they are ad supported. I also advertise what I make through other marketplaces like Amazon, Etsy, etc. It’s how I can make a living from doing this without charging users directly. I see it as a win-win for everyone. But here is where the problem lies. It’s the printing of my patterns…

I had to disable printing on my website because people would print off everything on my site, without so much as a thank you. My work that I had literally spent weeks designing and more weeks into formatting and publishing. Yes. It does take that long. 

To offset the loss of ad revenue from the “print users” not being on or returning to the website, I charge a small fee ($3 USD) to print my patterns. I chose this price keeping in mind that a standard ball of acrylic yarn available at a big box store is a little less than $4. This is the yarn users need to make my patterns. I didn’t think it was too much to ask for my work. Apparently, to some, it is. And somehow translates into accusations like those in the attached email and YouTube comment. Messages that illicit some strong emotions in me. But I digress. 

Tbh, these comments are completely inaccurate. Printing of the patterns isn’t necessary. You can pull up my website on your phone or tablet and scroll along with the pattern as you knit. Wanting a paper copy is a preference, not a requirement to read the pattern. 

The impetus of making this post is how I continually feel like I need to defend the choices I make in how I disseminate my patterns. I’m tired of defending my right to be financially compensated for my work. I shouldn’t be berated over a $3 purchase or membership subscription fee because someone doesn’t want to scroll down a webpage to read the pattern. Or even worse, being accused of lying that the patterns aren’t free. If you can read it in its entirety, how is that not free?

In short…Please stop sending me messages like this. 

For the sake of my mental health, I will selectively acknowledge or respond to the selfish, entitled haters. If you don’t like it, don’t use my work. It’s the simplest solution to the “problem”.

If you’re reading this, I probably sent you the link in response to your very unnecessary message. Keep that in mind when you feel the need to “reach out” to creators on the internet. We’re real people. What you said was hurtful. And untrue.

But if you stumble upon this inadvertently and are a supporter of my work, thank you soooo much! To those who have purchased my patterns and given me great reviews; you are why I keep going and I truly thank you!! 

TL;DR – Stop bitching about my patterns not being free or about the ads. You CAN read them for free on my website. I’m allowed to profit from my work. 

Posted on 1 Comment

Knit a Simple Dishcloth – GREAT Knitting Pattern for Beginners!

Beginner knitting pattern - make a dishcloth

This is a great project for anyone who is just learning how to knit. It’s not an overly complicated project and the yarn is easy to find and not too expensive. Best of all the final result gives you something you can use, even if it doesn’t turn out perfectly ?

If you are a new knitter, I’ve added links demonstrating how to do each of the stitches necessary for this project. I would recommend that getting the basics down first with a swatch or two, then getting into this project.

I am trying something new with this pattern. Years ago I tried to offer my patterns for free to download. I was taken advantage of at that time. People would download the patterns to never return. I can now embed scannable QR codes in my work and want to see if people come back to the website once they’ve downloaded the pattern and printed it off for themselves. We’ll see how it goes. If it turns out that people do come back and share this pattern with their followers on social media, I may do this with other patterns.

Use these 👇🏼 to share on social media 🥰

If you are loving this and all my other free patterns, please help out financially by visiting my Help Support My Work Page. If you can’t give cash, and I get that not everyone can, please do your part and share this where you can. Every share on social media helps promote my work and expose it to even more people. I’ve made it super easy for everyone to do that. By clicking those links up there 👆🏼 you can share it nearly everywhere.


The Pattern

If you would like to read the pattern online, keep scrolling down the page. Otherwise, you can download this FREE knitting pattern right here. 🥰

Easy to knit dishcloth - great for beginners

👆🏼👆🏼👆🏼👆🏼👆🏼👆🏼

If you like how this pattern opens and how easy it is to download, this is exactly how the patterns available through my Member Area works. Becoming a member is like being a patron of the arts. By supporting me for a small fee every month, you help support me to create more patterns for you to use. You also get access to the patterns in the members area. You can see how many pattern there are currently available in my Current List of Member Patterns. For more information on how you can support me and become a member, click the button below.

I use a size 5 mm (US size 8) knitting needles but this can be done with whatever size you like. The size of you needles will determine the final size of your dishcloth. You will also need one ball (42.5 g or 1.5 oz.) of crafter 100% cotton yarn. They are available in a variety of colours just about everywhere. Look for sales or buy a big ball if you plan on making a lot of dishcloths. And don’t forget about Amazon! There’s always a great selection of 100% cotton yarn there. 

More of my stuff on Etsy:

ALL patterns on Etsy are
40% off
until March 31


You can make a widget like this for your blog or website, too.
Instructions are on my website here: How to Display Etsy Items on Your Website

The dishcloth itself is knit along the diagonal, like how TVs are measured. You can make it as big as you want, but I find 45 to 50 stitches makes for a good sized cloth. If you would like it larger, you will need to buy more balls of yarn. Make sure that your lot numbers on the balls you select are the same or else the colours may be off.

Cast on 3

Row 1: Knit

Row 2: Knit

Row 3: K1, YO, Knit to end of row. Repeat this row until there are 48 stitches on your needle.

Next Row: K1, YO, K2tog, K to last 4 stitches, K2tog, K2. Repeat this row until there are 6 stitches remaining.

Next Row: K1, YO, (K2tog) twice. K1

Next Row: K1, K2tog twice. 

Cast off.

Work in ends.

You can make variations of this basic pattern by making wider edging: Instead of K1 before the YO you can K2 or K3. You could also make the center as a stocking knit stitch (purl one row then knit the next).

Feel free to use this pattern to make your own dishcloths to sell or give away. Just don’t reprint this pattern in any form without my permission, but linking to it and sharing is always appreciated!

If you are enjoying the free videos and patterns, then please share my work! Those handy little icons along the side or bottom of the page let you do it easily. If you’d like more information on how you can keep things free, learn how you can Help Support My Work.

Posted on 2 Comments

How to Work in the Ends While Knitting

How to work in ends while knitting

This simple technique is something that I’ve been meaning to share for quite sometime. And since I’ve received a number of comments regarding the number of ends for my Owl Slippers and Moccasin Slippers, I realized I needed to get on this ASAP.

I finally made the video! It shows how to work in the cast on end, work in the yarn at the start of the row if making stripes and how to join a new ball in the middle of a row and leave NO hole. I left the photo tutorial further down this page if you prefer that way of learning.

And I still don’t have instructions for left handed people. I’m so sorry about that. I’m right handed so it’s what I have to work with.

Step 1:

With the right side of your work facing you, put your needle through the stitch as if you were to knit. With the end at the back of your work, lay the end over your working needle. With your left hand, hold the end snug, not tight.

Step 2:

Place the working yarn over the needle as you normally would and knit the stitch. Do NOT catch or pull the end through while knitting the stitch.

Drop the stitch from the non-working needle as you normally would.

Please share this page!

Step 3:

Drop the end (or hold out of the way) and knit the next stitch.

Repeat steps 1-3 for roughly 10 stitches. With this technique you are alternating in order to catch the end between the stitches at the back of your work as shown below.

What it looks like from the wrong side.
View from the front. Can’t see the end at all!

When you are done, pull the end so it is snug. It’ll take up any slack that’s between the stitches you skipped. Before I trim it off, I always stretch the final piece to make sure there is just enough slack to ensure there’s no puckering.

If you need a little more security, you can always give an additional back weave with a tapestry needle to catch the end of the end a bit, but I don’t.

And yes, this does keep the yarn in place even with 100% acrylic yarn. I’ve made a number of slippers with the ends worked in this way and an afghan. I’ve washed the afghan a number of times with no issue whatsoever.

I hope this helps speed up your work. I hate sewing in ends just as much as the next person and anything that lessens the number of them is worth a huge ?? in my books.

And I also haven’t had much success doing this with purl stitches. If you have any ideas, by all means, let us know in the comment section.

The K1 P1 ribbing that I do for the cuffs of my Owl Fingerless Gloves works well using this method, too. Catch the end on your knit stitch and purl the purl stitch as you normally would. Because it is right on the cuff and needs to stretch and contract, I do catch the end a bit with a tapestry needle just to give it a little extra security.

Posted on Leave a comment

Seven Slipper Styles for Comfy Feet – A Knitting Pattern Collection

Seven Slipper Styles for Cozy Feet - Knitting Patterns

As the title suggests, this is my latest knitting pattern compilation. This is the 3rd one I’ve done! I sometimes can’t believe how many slipper patterns I’ve written. It’s a bit crazy. If you’re interested you can see both my Seven Slipper Patterns and Eight Slipper Patterns. Click either of those links if you would like to read more. Keep scrolling for where to get this knitting collection including AMAZON!

This collection is nearly all of my latest slipper patterns. I am always designing, so depending on when you read this there may be many more. In short, the following patterns are included here:

  1. Snug Slip-On Slippers
  2. Nearly Seamless Cuffed Booties – Extra Thick!
  3. Bulky Yarn Slippers – Extra Thick!
  4. Minimalist Round Toe Slippers
  5. Chevron Striped Moccasin Slippers
  6. Rolled Cuff Slippers
  7. Long Cuffed Slippers

All of the pattern listed above are free to read on my website. You can click any title and it will take you directly to the pattern.

And now for why I really made this post. You can now purchase this knitting compilation from a variety of sources! Of course you can always get the printable PDF version from the ever trusted Etsy – Seven Slipper Styles for Cozy Feet – Knitting Patterns Please be warned that when you print it yourself it’s 74 pages long. Not my longest but it is a bit.

You can also buy the pattern here from my website. It’s the same PDF as the one on Etsy but I understand that some people feel sketched out buying from websites. Anywho, you can find that here – Seven Slipper Styles for Comfy Feet – Knitting Patterns

If you would like to have the paperback version sent to you, I have it available to my readers on Amazon! If you have Amazon Prime your shipping is FREE as long as you make sure you order it from your correct country. Be sure that you click on the country closest to you from the list below:

United States

United Kingdom

Canada

Unfortunately, this isn’t available in Australia yet. It’s a new listing and sometimes it take a while for me to be able to sell my paperbacks there. I don’t get it either but it’s what I have to work with.

I do sell through another paperback distributor that helps to get my work onto other websites like Walmart and Target and into libraries and such. Once I have those links, I’ll post them here.

Posted on Leave a comment

How to Knit: Step-by-Step Beginners Video and Pattern to Knit Granny Slippers – FREE Knitting Pattern!

how to knit slippers - how to knit video free knitting pattern

This pattern is one of the first patterns that I ever wrote; over 10 years ago now! And though it wasn’t a bad pattern as it was written, over the years I saw some things that I wanted to change. The sizing was fairly general. I wanted to make it a little more tailored to the various sizes and simplify how it was written. 

I also wanted to increase the sizes. Though I don’t get many requests for sizes larger than a man’s size 12, I thought I’d make it larger in case there are those who wanted it. It’s simple math so figured I might as well add it.

I also wanted to make the sole thicker. It was originally done as a stockinette, and I always feel a garter stitch sole wears better. I’m hoping that with the rougher, garter stitch sole, the slippers will be a bit more grippy; on carpet anyway. 

And last but definitely not least, I’ve made a YouTube tutorial showing how to make these slippers from start to finish. It includes everything from cast on the stitches, to sewing up the seams at the end. And of course, the trickiest part, picking up the heel and making the cuff. This actually isn’t that hard once you see how to do it. Below, I’ve embedded the video so you can watch it right here!


If you are loving this and all my other free patterns, please help out financially by visiting my Help Support My Work Page. If you can’t give cash, and I get that not everyone can, please do your part and share this where you can. Every share on social media helps promote my work and expose it to even more people. I’ve made it super easy for everyone to do that. By clicking those links up there 👆🏼 you can share it nearly everywhere.

Not a fan of reading knitting patterns online or would prefer to print this off? I also have the PDF version of this pattern available as a free download from my site too. Click either of these links to get the ad free download for a small fee – How to Knit Slippers Just Like Granny Made, in my Etsy shop, Ravelry, LoveCrafts, CreativeFabrica and on Amazon.

Another way to avoid ads and pop-ups, get instant, PRINTABLE downloads of this pattern and others, is by becoming a Member on this website. When you become a Website Supporter for $3/month, you’ll gain access to exclusive member only posts. These posts contain one click downloads of the patterns. Simply click the Download & Print button. The PDF will automatically download to your computer or smart device. You can then read it on your device or print it at your leisure. You can download as many patterns as you like for the same $3 each month. You can go to this page to learn more, become a member and support my work… Exclusive Member Area


Abbreviations

K – knit

P – purl

K2tog – knit 2 stitches together

st — stitch

sts — stitches

Things you need:

Click on any of the links below to get everything you need to make these slippers sent right to your door.

200 grams of worsted weight yarn

Pair of size 5 mm ( US size 8) knitting needles or whatever size to obtain correct gauge.

Set of 4 size 5 mm (US size 8) double pointed needles or whatever size to obtain correct gauge.

Darning needle to sew seams and work in the ends.


Gauge

In stockinette stitch

9 sts – 5 cm (2″) 

13 rows – 5 cm (2”) 

Sizes are written as such:

Women 6-7 (8-9, 10-11, 12)

Men 6 (7-8, 9-10, 11-12, 13-14)

The Pattern

Cast on 38 (40, 44, 46, 46)

Row 1: P13 (13, 15, 15, 15) K12 (14, 14, 16, 16) P13 (13, 15, 15, 15)

Row 2: K13 (13, 15, 15, 15) P1, K10 (12, 12, 14, 14) P1, K13 (13, 15, 15, 15) ✬

Repeat from ✬ to ✬ 13 (14,16, 17, 18) times more for a total of 28 (30, 34, 36, 38) rows. 

Shape toe

❤︎ Next Row: With the RIGHT side facing, P1 ❂ K1 P1 ❂ Repeat from ❂ to ❂ 5 (5, 6, 6, 6) more times. K12 (14, 14, 16, 16) P1, ✿ K1 P1 ✿ Repeat from ✿ to ✿ 5 (5, 6, 6, 6) more times.

Next Row: ☻ K1 P1 ☻ Repeat from ☻ to ☻ 6 (6, 7, 7, 7) more times. K10 (12, 12, 14, 14) ☀︎ P1 K1 ☀︎ Repeat from ☀︎ to ☀︎ 6 (6, 7, 7, 7) more times.❤︎

Repeat from ❤︎ to ❤︎ 9 (10, 11, 12, 13) more times for a total of 20 (22, 24, 26, 28) rows for this section. You have a total of 48 (52, 58, 62, 66) rows from the cast on edge.

End Toe

Next Row: K2tog 10 times. K1 K2tog to the last st. P1.

Next Row: K1 P7 (7, 8, 8, 8). K 5(6, 6, 7, 7) P to the end of the row.

Next Row: K1 K2tog 5 times. K0 (1, 1, 0, 0) K2tog to the last st. P1.

Next Row: K1 P4 K2 (3, 4, 4, 4) P to the end of the row.

Draw through to pull the stitches together.

Heel and Cuff

If you need a little extra help with this part, the video will show you how to do it. You can either click this link – Making the Heel and Cuff. It starts at the correct spot in the video.

With the RIGHT side facing, pick up 12 (14, 14, 16, 16) stitches along the cast on edge 

  • Next 2 Rows: K across.

Next Row: K2tog. K to last 2 sts. K2tog. ✦ Repeat from ✦ to ✦ until there are 4 sts on your needle.

Next Row: K2tog twice.

End with the yarn on the left side of the row when the right side of the slipper is facing you. You may need to knit one more row.

My stuff on Etsy:


You can make a widget like this for your blog or website, too.
Instructions are on my website here: How to Display Etsy Items on Your Website

Create cuff:

With the RIGHT side facing and your DPN’s, pick up 36 (38, 42, 44, 48) sts evenly around the edge of the slipper. You will now have 38 (40, 44, 46, 50) sts total

Rounds 1-6: K1 P1 around.

Rounds 7-10: K around.

Cast off loosely.

Sew seams along the top of the foot and along the sides of the heel. Make another slipper to match.

Hints and Tips:

Be sure to cast your stitches off loosely when making the cuff. It needs to be able to stretch when going over the top of the foot and the heel. It’s the widest part the slipper has to pass over. The ribbing will snap it back to tighten up on its own.

When picking up stitches for the cuff, it doesn’t have to be the exact stitch count I give, but your final number of stitches on your needles MUST be an even number. Make sure your slippers have the same number of stitches around the cuff.

Make the cuff as long as you like with the K1 P1 ribbing. I made it 6 rows but you may want it longer, especially for the larger sizes.

When casting off for the heel, if you need an extra row to end it so the yarn ending on the left with the right side facing (if right you are handed), that’s ok. When knitting this part, I often lose track of how many rows I’ve knitted between the row with the decreases. I’ve never had a complaint yet.

Don’t feel that the cuff needs to be the same colour as the slipper itself. A nice change is to make the cuff in a complimentary colour, especially if you have used variegated yarn. You can also use this pattern to use up some of your left over wool by making the toe (ribbed section) a different colour also.

This is also a great pattern to use if you have a variegated or any other colour changing yarn. Because there isn’t any pattern created by the stitches, it allows to show off the colours really well.

Posted on Leave a comment

FREE Knitting Graph Paper – Knitting Colorwork Paper – Printable PDF

Free colorwork knitting paper for intarsia knitting design

Get your free knitting colorwork paper here! Perfect for all your intarsia motif design needs.

No need to sign in, sign up or give away any personal information. Simply use the download button to download and print as many copies of the knitting graph paper as you like.

It’s a PDF file meaning that you can easily open it on any device be it your computer, phone or tablet.

If you think someone else could use this free knitting color work paper, please let them know and share it on social media.

The knitting graph paper is to create patterns in the stockinette stitch. You can use it to either make stitch patterns, or use colours to create more intricate designs known as intarsia knitting. It’s fairly large so it will meet most of the requirements for your pattern. You can always tape sheets together if you need something larger.

I’ve also included arrows along the side to show which way you will be knitting based on the shape of the stitch. I also include a very faint pink colour so you can easily determine the number of stitches. I’ve marked them off in 5 stitch and row sections.

To help explain the process of designing your own intarsia motifs, there are photos and explanations on how to use the colorwork knitting paper included with the PDF you can download and print for free.

Posted on Leave a comment

Patreon Shop – KweenBee Knitting Patterns

Patreon Shop - KweenBee Knitting Patterns

I’m now selling my patterns on Patreon! So far I have listed 9 of my knitting patterns for a variety of knitted slippers and my fingerless gloves. More are coming soon. If there is anything you’d like to see now, let me know in the comments below.

Click the button below to view my shop now!

But wait! There’s more…

Become a patron on Patreon to get the patterns for FREE! All of the patterns for sale in my shop become available to you to download, ad free. I currently have a list of over 28 crochet, but mostly, knitting patterns you can download with a single click. These are listed as posts on my Patreon.

If you have any questions, please let me know. You can contact me through my online form here – Contact Me.

Posted on Leave a comment

Snug Slip-On Slippers – Easy Slippers to Knit on Straight Needles – FREE Knitting Pattern

Snug Slip-on Knit Slippers - FREE Knitting Pattern

A great pattern for someone just learning to knit. If you know how to purl, knit, K2tog, M1 and cast on, you will be able to make these slippers. And if you don’t, don’t worry. I’ve included links to the videos that show you exactly how to do the stitches.

These minimal cuff, snug fitting slippers for adults fit folks up to a men’s size 14. Big enough to fit nearly everyone. Knit flat on a pair of straight needles, you don’t need any extra supplies to get these done. If you are an experienced knitter, you’ll be able to whip these up in no time.

Like all my patterns, you have my permission to sell or give away any of the patterns that you make. All I ask that you respect the hard work that goes into designing and publishing a pattern and not violate my copyright.

If you would prefer a printable or ad free version of this pattern, you can get it in all the usual places including this website here – Snug Slip-On Slippers, through my Etsy shopLoveCrafts, Amazon, Google Books, Patreon,  Ravelry, or my newest place Creative Fabrica. If the links aren’t working, I’m in the process formatting and uploading to the retailer.

Another way to avoid ads and pop-ups, get instant, PRINTABLE downloads of this pattern and others, is by becoming a Member on this website. When you become a Website Supporter for $3/month, you’ll gain access to exclusive member only posts. These posts contain one click downloads of the patterns. Simply click the Download & Print button. The PDF will automatically download to your computer or smart device. You can then read it on your device or print it at your leisure. You can download as many patterns as you like for the same $3 each month. You can go to this page to learn more, become a member and support my work… Exclusive Member Area

Love the free patterns? You can say thanks in a couple of ways. You can read more about how you can Support My Work by clicking that link or make a small donation and Buy Me a Coffee. ?? That is a website where you can make a one time donation as a thanks. (FYI I have some great offers if you would like to buy me multiple coffees. You can see those by clicking on the Extras tab or you can click this link Janis Frank Extras).

If you don’t want to or are unable to make a financial donation, sharing this pattern through social media is a great way to help out too! The links below are a super easy way for you to do so.

Things You will Need

7oz (198 g) worsted weight yarn. Any standard ball of yarn you can get at craft or big box stores will be more than enough with yarn to spare.

Set of size 6 US (4 mm) single pointed knitting needles

Tapestry needle – to sew seams and work in ends.

Gauge

In garter stitch

2” (10 cm) – 9 stitches

2” (10 cm) – 18 rows

Sizes are written as such:

Women 6-7 (8-9, 10-11, 12)

Men 6 (7-8, 9-10, 11-12, 13-14)

Abbreviations

If you need help with any of the stitches, you can go to my how-to video page. Here’s the link – Learn to Knit With Videos. A new page will open so you’re sure to not lose this one.

K – knit

P – purl

K2tog – knit 2 together

M1 – Make 1. Increase one stitch between stitches.

st – stitch

sts – stitches

Heel Flap

Cast on 4

K across for 10 (10, 12, 12, 14) rows.

Next row: K1 M1. K across to last st. M1. K1.

Next 3 rows: K across * Repeat from * to * until there are 14 (14, 14, 16, 16) sts. Make sure to knit the 3 rows after the increase row. Cast on an additional 14 (15, 16, 17, 18) sts. 28 (29, 30, 33, 34) sts total.

Next row: K across. Cast on another 14 (15, 16, 17, 18) sts. 42 (44, 46, 50, 52) sts total.

Next row: K5 P9 (10, 11, 12, 13) K14 (14, 14, 16, 16) P9 (10, 11, 12, 13) K5. 

♠ Next row: K across.

Next row: K5 P9 (10, 11, 12, 13) K14 (14, 14, 16, 16) P9 (10, 11, 12, 13) K5 ♠

Repeat from ♠ to ♠ 12 (13, 14, 15, 16) times more for a total of 28 (30, 32, 34, 36) rows.

More of my stuff on Etsy:

ALL patterns on Etsy are
40% off
until March 31


You can make a widget like this for your blog or website, too.
Instructions are on my website here: How to Display Etsy Items on Your Website

Form Toe

♦ Next row: K2tog. K across to the last 2 sts. K2tog.

Next row: K4 P9 (10, 11, 12, 13) K14 (14, 14, 16, 16) P9 (10, 11, 12, 13) K4.

Next row: Repeat row marked with ♦.

Next row: K3 P9 (10, 11, 12, 13) K14 (14, 14, 16, 16) P9 (10, 11, 12, 13) K3.

Next row: Repeat row marked with ♦.

Next row: K2 P9 (10, 11, 12, 13) K14 (14, 14, 16, 16) P9 (10, 11, 12, 13) K2.

Next row: Repeat row marked with ♦.

Next row: K1 P9 (10, 11, 12, 13) K14 (14, 14, 16, 16) P9 (10, 11, 12, 13) K1.

♣ Next row: K across.

Next row: P10 (11, 12, 13, 14) K14 (14, 14, 16, 16) P10 (11, 12, 13, 14). ♣ Repeat from ♣ to ♣ 7 (7, 7, 8, 9) times morefor a total of 16 (16, 16, 18, 20) rows.

End Toe

Next row: K0 (1, 0, 1, 0) K2tog to last st (if there is one). K0 (1, 0, 1, 0)

Next row: P5 (6, 6, 7, 7) K7 (7, 6, 7, 8 ) P5 (6, 6, 7, 7).

Next row: K1 (0, 0, 1, 1) K2 tog 4 (5, 5, 5, 5) times, K1, K2tog to last st (if there is one). K1 (0, 0, 0, 0).

Next row: P3 (3, 3, 4, 3) K4 P3 (3, 3, 4, 4).

Break yarn and draw through.

Flip up the triangle-ish shaped flap in the back of the slipper to form the heel. Sew along the sides of the heel flap to form the back of the slipper. 

Make another slipper to match.

Hints and Tips

When ending the toe, due to the differing number of stitches for the various sizes, there may or may not be an extra stitch that needs working at the ends. I’ve marked the sizes accordingly.

The heel flap may not match up perfectly with the sides of the slipper but it will be close. Hold the garter edges at the top to make sure it lines up to form the cuff.

Leave a length of yarn when casting on and after you draw the yarn through when forming the toe. You can use it to sew the seams along one of the sides of the heel and along the top of the toe.

Posted on Leave a comment

Fox Takes On A Badger – Fox Attacks Badger Video with Highlight Shorts

Fox attacks badger - Fox v Badger video still

Watch the full documentary style video that tells the entire story of the fox and badger interaction. Click to watch ??

Watch the highlight from the videos with the shorts

Thanks for watching! I know that this set of videos doesn’t reflect the overall direction and niche of this website. This was such a unique thing to watch that I just wanted to share it with as many folks as I could. And for the record though I didn’t mention it anywhere else, everyone present was Team Fox. And somehow the badger was a “He” and the bad guy. I tried to present this as unbiased as possible but after watching the foxes all spring (my parents) and I hearing about them, it was hard not to feel attached to the foxes.

Posted on Leave a comment

Knitting Calculator – Decrease Stitches Evenly Across the Row

Knitter struggling with how to decrease stitches

The term, “decrease evenly across ? number of stitches” in any pattern can be an unpleasant sight to any knitter (me included). Whereas I try to do this calculation in the patterns I write, some don’t. Regardless, the stitch calculator below will help!

Using this calculator will give you evenly spaced decreases over the length of your work. All you need to enter is the number of stitches you have on your needle and the number of stitches you need to decrease. Everything is calculated for you.


Please note: If you have more or less stitches at the end of your work, go ahead and knit them. The number of decreases across the stitches is correct.

I want to be completely transparent in where this increase and decrease knitting calculators originated. I did not write the code myself. After much tweaking of this query to ChatGPT, I’ve developed a stitch calculator to determine how to decrease evenly across your work. I knew what I wanted, I just didn’t know how to write the code to make it happen. AI is useful after all!

Posted on 4 Comments

Knitting Calculator – How to Increase Evenly Across the Row

Knitter frustrated with how to increase stitches

It’s tough, and frustrating, to do the math to figure out how many stitches you need to knit to make your stitches even across the row. We’ve all been there and we all hate doing the math. Well, you’re in luck! I’ll do it for you ?. And if you don’t know how to M1 (make 1 or increase) scroll down the page or click this link to watch the video.

Using the calculator below will give you evenly spaced increases across the length of your work. All you need to enter is the number of stitches you have on your needle and the number of stitches you need to increase. Everything is calculated for you with a single click!


I know that sometimes the stitches are a little off on the ends. Adjust accordingly if it bothers you. I really was focused on the making the increases centered in the work with even spacing between the stitches.

I want to be completely transparent in where this knitting calculator and the decreasing calculator originated. I did not write the code myself. After much tweaking of this query to ChatGPT, I’ve developed a stitch calculator to determine how to increase evenly across your work. I knew what I wanted, I just didn’t know how to write the code to make it happen. AI is useful after all!

My notes I entered into ChatGPT to get the code to work.
Posted on 15 Comments

Diamonds Dishcloth and Coasters – FREE Knitting Pattern

Knit Diamonds Dishcloth and Coasters - FREE Knitting Pattern

The dishcloth obsession continues, though I am getting a bit weary of these. Time to get around to making more art pieces.

So I’m providing this in two sizes – roughly 7 inches square and 8 inches square. The smaller size seemed almost a smidgen too small but the larger one seemed a bit larger than I would like. I suppose it could have easily been fixed with changing needle sizes but I figured I’d let others deal with that. With that said, this knitting pattern is written accordingly. The larger size repeat counts are in brackets.


It’s important to note that for this specific knitting pattern, odd rows are NOT the right side of your work. The dropping and picking up stitches happens on what would be usually considered the WRONG side or all even rows. So in short, the right side of your work is all the EVEN rows.

Also, I’ve included a bunch of photos to help you along with YO, dropping stitches, slipping stitches and making the crossed over stitches. The YO, slipping and dropping stitches are standard stitches and if you’re an experienced knitter, you probably won’t need the photos. I’ve included the photos as you go along in the pattern, but if you already feel comfortable with these stitches, the pattern is also written without the photos further down the post here – the pattern without the photos.

If you would like to print this pattern or read it without the ads, there are a few options. You can buy it from my website here – Diamonds Dishcloth and Coaster Printable Knitting Pattern, or purchase it from my Etsy shop, Ravelry, LoveCrafts, for your Kindle and as a paperback from Amazon. I’m also trying a new retailer called CreativeFabrica. Let me know what you think!

If you would like to show your continued support of my work and this website, for only $3 you can become a Website Member. This is an easy way for you to support my work and get a bunch of other patterns you can easily print off. As of the writing there are 34 patterns I’ve added to this list. I also have a Patreon option available too, but there aren’t as many patterns over there. You can use either of the links below to check out supporting my work.

If you are loving the free patterns, please consider helping me out offsetting the hosting costs of the website. You can learn more by going to this page – Help Support My Work. If you can’t make a small donation, that’s OK ?. Instead, you can help others see my work by using the share buttons. It’s such an easy thing to do and helps me so much.


Things you will need

Click any of the links below to get everything you need to make this dishcloth.

Size 5 mm (size 8 US) single point knitting needles

1 ball of crochet cotton yarn (the 1.5 oz balls are more than enough)

Darning needle to work in the ends

Cable needle – VERY optional and only necessary if dropped stitch is unraveling.

Size 3.75 mm (size 5 US) crochet hook (for edging. You may need larger or smaller depending on your tension)

Pattern With the Photos

Cast on 34 (40 sts)

Row 1: Purl across (wrong side)

Row 2: Knit across (right side)

☺︎ Row 3: P2 YO ♠︎ P5 YO P1 YO ♠︎ Repeat from♠︎ to ♠︎ 3 (4) more times. P5 YO P3

Row 4: K2 SL1

Slipping a stitch
Arrow points to YO stitch. Stitch on the right is the one you slip onto the working needle.
Slipping the stitches
Slipping the stitch from your needle onto your working needle. Do NOT work this stitch!

Drop the YO

Drop this stitch
Let this stitch fall off your needle. Do NOT work it in any way!
YO dropped

K4 ☼ SL1, Drop the YO, SL1, Drop the YO, K4 ☼ Repeat from ☼ to ☼ 3 (4) more times. SL1, Drop the YO, K2

Row 5: P2 SL1 P4 ☆ SL2 P4 ☆ Repeat ☆ to ☆ 3 (4) more times. SL1 P2

Row 6: K2 ♣︎ Drop the next stitch

Drop this stitch
This is the stitch you’re going to drop.
Stitch dropped
Stitch dropped.

K2. Pick up the dropped stitch with the non-working needle.

Pick up dropped stitch

Knit this stitch.

Pick up the dropped stitch
Drop stitch knitted.

SL2.

Slip these two stitches onto your working needle.

Drop the next stitch.

Two stitches passed over and stitch dropped.

Pass the 2 slipped stitches back to the non-working needle.

Stitches passed back to non-working needle.

Pick up and knit the dropped stitch.

Picking up the stitch.
Working the stitch.
Stitch knitted. Cross over complete.

K2 ♣︎ Repeat from ♣︎ to ♣︎ 4 (5) more times. K2

Row 7: ✙ P4 YO P1 YO P1 ✙ Repeat from ✙ to ✙ 4 (5) more times. P4

Row 8: ♥︎ K4, SL1, Drop the YO, SL1, Drop the YO ♥︎ Repeat ♥︎ to ♥︎ 4 (5) more times. K4

Row 9: ♦︎ P4 SL2 ♦︎ Repeat from ♦︎ to ♦︎ 4 (5) more times. P4

Row 10: K2 ▲ SL2, Drop the next stitch. Pass the 2 slipped stitches back to the non-working needle. Pick up the dropped stitch with the non-working needle and knit this stitch. K2. Drop the next stitch. K2. Pick up and knit the dropped stitch. ▲ Repeat from ▲ to ▲ 4 (5) more times. K2. ☺︎

Repeat from ☺︎ to ☺︎ 4 (5) more times. (Rows 3 – 10 make up one repeat of the diamond motif).

Next row: Purl across

Next row: Cast off. Do NOT cut the yarn, unless you are making the edging a different colour.

Edging

To make things as easy as possible, I’ve embedded the (very) old video I made demonstrating how to do this technique. It’s basically a backwards single crochet (Bsc) that creates a more ropey kind of look.

You may have to play around a bit with the size of hook that’s going to work the best for you. For me, based on my tension for knitting the dishcloth and tension for how I crochet, a 3.75 mm crochet hook worked best.

Row 1: With right side facing, and in the first cast off stitch that you can easily insert your hook, Bsc (backwards single crochet) around edge. Bsc in every 2nd cast off stitch along the top and bottom edges

Skip every other stitch.
Insert your hook like this.
Hook the yarn and pull through.
Hook the yarn again and pull through the two loops. Stitch made.

Bsc in every other row along the sides.

Insert hook in this stitch when working along the rows.

Join to the start of the row. Work in ends.

I found there is enough slack that you don’t need multiple stitches in the corner.

Pattern Without the Photos

Cast on 34 (40 sts)

Row 1: Purl across (wrong side)

Row 2: Knit across (right side)

☺︎ Row 3: P2 YO ✿ P5 YO P1 YO ✿ Repeat from ✿ to ✿ 3 (4) more times. P5 YO P3

Row 4: K2 SL1, Drop the YO, K4 ◆ SL1, Drop the YO, SL1, Drop the YO, K4 ◆ Repeat from ◆ to ◆ 3 (4) more times. SL1, Drop the YO, K2

Row 5: P2 SL1 P4 ♠︎ SL2 P4 ♠︎ Repeat ♠︎ to ♠︎ 3 (4) more times. SL1 P2

Row 6: K2 ♣︎ Drop the next stitch, K2. Pick up the dropped stitch with the non-working needle. Knit this stitch. SL2 Drop the next stitch. Pass the 2 slipped stitches back to the non-working needle. Pick up and knit the dropped stitch. K2 ♣︎ Repeat from ♣︎ to ♣︎ 4 (5) more times. K2

Row 7: ♥︎ P4 YO P1 YO P1 ♥︎ Repeat from ♥︎ to ♥︎ 4 (5) more times. P4

Row 8: ♦︎ K4, SL1, Drop the YO, SL1, Drop the YO ♦︎ Repeat ♦︎ to ♦︎ 4 (5) more times. K4

Row 9: ✦ P4 SL2 ✦ Repeat from ✦ to ✦ 4 (5) more times. P4

Row 10: K2 ⚽︎ SL2, Drop the next stitch. Pass the 2 slipped stitches back to the non-working needle. Pick up the dropped stitch with the non-working needle and knit this stitch. K2. Drop the next stitch. K2. Pick up and knit the dropped stitch. ⚽︎ Repeat from ⚽︎ to ⚽︎ 4 (5) more times. K2. ☺︎.

Repeat from ☺︎ to ☺︎ 4 (5) more times. (Rows 3 – 10 make up one repeat of the diamond motif).

Next row: Purl across

Next row: Cast off

Edging

The edging is a backwards single crochet (Bsc) that creates a more ropey kind of look.

You may have to play around a bit with the size of hook that’s going to work the best for you. For me, based on my tension for knitting the dishcloth and tension for how I crochet, a 3.75 mm crochet hook worked best.

Row 1: With right side facing, and in the first cast off stitch that you can easily insert your hook, Bsc (backwards single crochet) around edge. Bsc in every 2nd cast off stitch along the top and bottom edges. Bsc in every other row along the sides.

Join to the start of the row. Work in ends.

I found there is enough slack that you don’t need multiple stitches in the corner.

Hints and Tips

You may have to play around a bit with the size of the crochet hook you use.

I haven’t had any problem with the dropped stitch unraveling while knitting other stitches. If you do, you can use a cable needle to hold it in place.

Try a variation in colours too! You could make each diamond repeat a different colour. What’s marked with ? to ?. And you can also make the edging a different colour like I did. It would be a great way to use up the extra bits of cotton yarn you have.

Abbreviations

Non-working needle – Left needle if you are right handed. Right needle if you are left handed)

YO – Yarn Over. When doing a YO for the purl stitch, pull your yarn to the back of your work (like you were going to knit) and purl the next stitch. The yarn will form an extra stitch on your needle.

How to YO when purling.
Starting the yarn over
How to YO when purling.
Pull the yarn to the back of your work
How to yarn over (YO) when purling.
Pull your yarn forward and work the stitch. Increase made.
The yarn over (increased stitched)

K – Knit

P – Purl

SL – Slip the next stitch, without working it, onto your working needle. (Right needle if you’re right handed. Left needle if you’re left handed).

Bsc – Backwards single crochet.

Posted on 10 Comments

Knitted Moccasin Bootie Slippers for Children – FREE Knitting Pattern and How-to Video!

Knitted Moccasin Bootie Slippers for Children - Knit on Straight Needles

After a bit of math and a little tweaking of the results, the child sizes of the FREE Knitted Slipper Pattern is finally available! (You can click that link if you need the adult sizes). Because these are made for little feet, they often don’t need much yarn. This makes them a great way to use up the smaller leftover bits from larger projects. Not to mention, these tend to sell like hotcakes at local farmers’ markets, craft fairs and consignment shops. The smaller pairs are “so cute” making for an easy sale and the return on the investment of your time is great! They’re quick to make and since the yarn has already been bought for a larger project, anything made from the leftovers, like these child shippers, is gravy, baby!

If you stumbled upon this post looking for a finished pair of slippers, I have them for sale in my Etsy shop. Prices vary depending on size. You can use this link – CUSTOM MADE Hand Knit Camo House Slippers – Slippers for Children – Kids Moccasin Booties – Slippers with a Cuff – Handcrafted House Shoes

If you enjoy this pattern and my other free online knitting patterns, please consider making a small donation or helping me out by visiting my Help Support My Work page. If you can’t help financially, I totally get it. Sharing on your social media is the next best thing.

And yes, you have my permission to sell or give away anything you make from my patterns. You’re just not allow to redistribute any of the patterns themselves in any form. Linking to and sharing is always welcome though! You can use those buttons ?? to do so easily.


Please note, this isn’t a pattern for beginners, but if you know how to knit a stitch, pick up stitches and knit two stitches together, you should be okay. I used a very different technique involving multiple sets of needles, but no worries! I included photos and now a how-to video demonstrating how I’m using the extra set and it totally works! Trust me.

And if you are concerned with the number of ends you’ll need to weave in when done, I’ve also created a tutorial to help you with that too! It’s so much easier to work the ends in as you go, though there will be a few you’ll have to do (i.e. when you sew up the seam for the heel), but if you are interested in easing your work load, here’s the link showing you How to Weave in the Ends While Knitting. A new window will open so you won’t lose this page ?. There’s also a clickable card in the scrolling free pattern pics running across the top of this website if you need to find the page again.

If you don’t want to read it online and want to print it, this knitting pattern is available in all the usual places including this website – Knitted Moccasin Bootie Slippers for Children, Ravelry, in my Etsy shop, LoveCrafts, a paperback on Amazon, and as an ePub that you can download on your Kindle. I’ll link to all of them as I get them completed and uploaded to the retailers. If a link isn’t working, it’s on its way. I need to reformat everything to get things on Amazon…

FYI I’m working at uploading my work to a distributor that also works with libraries. I’m publishing paperbacks of the patterns that you’ll be able to borrow! Some are available right now like the slipper and fingerless glove compilations I have. The single pattern paperbacks should be available as I get them uploaded and the distributor gets them out to the libraries. If they aren’t there now, you can always ask them to get it for you ?

The printable version of this pattern will also be in the member section and at Patreon also. Here are the links where you can get it.

Abbreviations

k – knit

k2tog – knit 2 together

st – stitch

sts – stitches

Things You Need

If you are uncertain or having trouble finding what you need to make these slippers, clicking any of the links below will show you exactly what you need. And if you decide to order through Amazon, it will be delivered right to your door and help support the hosting costs of the website (I do get a small commission from sales through Amazon).

And because this pattern is so basic with no pattern of any sort, it’s a great knitting pattern to highlight the colour of your yarn. I have a weakness for variegated/shaded yarns. I really enjoying watching how the colours pool on the finished project. Little weird, I know… And In case you were thinking of trying self-striping yarn. Don’t. It looks terrible.

1 ball of worsted weight yarn (average 260 yard, 5 oz or 141 gram ball will be more than enough). I used Red Heart and Bernat worsted weight yarn when designing the pattern but any worsted weight yarn will suffice.

2 sets of size 4 mm (US size 6) single point knitting needles.

Stitch holder

Cable needle

Tapestry needle to sew in ends. You can also use this handy tutorial to show you how to work in the ends while knitting these slippers.

Use this product to help prevent slippers from sliding on slick floors

Gauge

With size 4 mm (US size 6) needles or whatever size you need to obtain the correct number of stitches and rows. Be sure to check your gauge otherwise the sizing won’t be correct.

In garter stitch

4” = 16 sts

4” = 40 rows


Sizes (are written as such)

Child’s 1-2 (3-4, 5-6, 7-8, 9-10, 11-12, 13-1, 2-3, 4-5)

I’m using a colour code to denote the number of stitches for the various sizes. I hope this helps when making the sizes of slippers.

SizeLength
1-24 inches10 cm
3-44.5 inches11.4 cm
5-65 inches12.5 cm
7-85 3/4 inches14.5 cm
9-106 inches15 cm
11-126 3/4 inches17 cm
13-17 1/4 inches18.5 cm
2-38 1/4 inches21 cm
4-58 3/4 inches22 cm
All measurements are approximate. Knitted slippers are very forgiving for size and foot shape.

To Begin

Cast on 18 (20, 22, 24, 26, 28, 30, 32, 34)

Knit across for 10 (12, 12, 14, 14, 16, 18, 20, 20) rows. Break yarn when completed last row.

Toe Flap

Next Row: With RIGHT side facing, transfer the first 6 (7, 7, 8, 8, 9, 10, 10, 11) stitches to a stitch holder. Reattach the yarn and knit the next 6 (6, 8, 8, 10, 10, 10, 12, 12) to create the toe flap. Leave the remaining 6 (7, 7, 8, 8, 9, 10, 10, 11) stitches on the needle unworked.

The following rows are worked back and forth on the 6 (6, 8, 8,10, 10, 10, 12, 12) toe flap stitches only!

Knit across for 18 (20, 22, 24, 26, 30, 32, 36, 40) rows.

Break yarn. You’ll have the 6 (6, 8, 8, 10, 10, 10, 12, 12) stitches of the toe flap on your needle and the 6 (7, 7, 8, 8, 9, 10, 10, 11) stitches you left on the needle when you started making the toe flap.

Making the Sides of the Slipper

This is where you’re going to need the extra set of knitting needles. You’ll be knitting back and forth in rows but the turn around the toe is too tight to use circular needles. For this, you’ll put the toe flap stitches on one of your extra needles. It’s a little unconventional, but it works.

Next Row: With the RIGHT side facing, transfer the 6 (7, 7, 8, 8, 9, 10, 10, 11) stitches from the stitch holder onto one of your needles. Attach your yarn and knit these stitches. Pick up 9 (10, 11, 12, 13, 15, 16, 18, 20) stitches evenly along the edge of the toe flap. (All of these stitches are now on ONE needle – 15 (17, 18, 20, 21, 24, 26, 28, 31) stitches

With another needle, knit the 6 (6, 8, 8, 10, 10, 10, 12, 12) stitches of the toe flap. Leave the remaining 6 (7, 7, 8, 8, 9, 10, 10, 11) stitches on the other needle unworked for now.

With another needle, pick up 9 (10, 11, 12, 13, 15, 16, 18, 20) stitches evenly along the side of the toe flap. Knit the remaining 6 (7, 7, 8, 8, 9, 10, 10, 11) stitches on the next needle. There are now 15 (17, 18, 20, 21, 24, 26, 28, 31) stitches on this needle.

You should now have 3 needles holding stitches with all the points pointing as shown below when laid flat. You also have one spare needle to knit with. You are now going to knit in rows, back and forth with these three needles. Once you finish knitting all the stitches on one needle, move on to the next needle (the point of the needle is right there) until you complete the row.

Knitting on 4 Needles
I used double pointed needles because they were handy and I don’t like the longer needles flopping and waggling about while I knit. Regular knitting needles work perfectly fine, too!

Another way to say it for the following rows, knit all the stitches forming the side of the slipper, knit the stitches holding the toe flap stitches, then knit the other side of the slipper (counts as one row). Turn. Repeat.

Knit the next 4 (4, 6, 6, 8, 8, 8, 10, 10) rows.

There are 2 (2, 3, 3, 4, 4, 4, 5, 5) ridges on the tip of the toe.

The photo below shows the 5 ridges for the sizes 2-3 and 4-5.

How to knit slippers
These are the ridges picked up along the toe flap
Ridges for child slippers
The 2 ridges for small size 1-2 and 3-4.

Next Row: With WRONG side facing. Cast off all the stitches from the first needle loosely. You’ll need to pass the last stitch from the first needle over the first stitch of the toe flap stitches (second needle).

Knitted Owl Slippers - Making the Sole

Using the same needle that now has one stitch, knit the remaining 5 (5, 7, 7, 9, 9, 9, 11, 11) stitches of the toe flap.

Cast off all the stitches from the third needle loosely. Break yarn.

Making the Sole

If you need help with making the sole, picking up stitches along the side etc, you can watch this video. It starts exactly where you need it to.

Next Row: With the RIGHT side facing, attach yarn and knit the first stitch of the cast off stitches by the toe flap (cast off stitch on the right by the point of the needle).

Knitted Moccasin Bootie Slippers for Children - picking up stitches
How to knit slippers
Pick up this stitch at the start of the row.

K2tog. Knit to the last 2 stitches K2tog. Pick up the cast off stitch by the point of your needle. – 6 (6, 8, 8, 10, 10, 10, 12, 12) stitches

Knitted Moccasin Bootie Slippers for Children - Picking up stitches
Pick up this stitch at the end of the row.

Quick tip – wrap the yarn counterclockwise around your needle and turn it down to pull the yarn through the cast off stitch on the right. If you have a hard time doing this, you can also use a crochet hook to pull the loop through and place that loop on your working needle.

You now are working back and forth along the bottom of the foot picking up one cast off stitch on each side as you go.

Next Row: Knit across.

? Next Row: Pick up the next stitch of the cast off stitches. K2tog. Knit to the last 2 stitches K2tog. Pick up the cast off stitch on the other side of the slipper by the point of your needle. – 6 (6, 8, 8, 10, 10, 10, 12, 12) stitches 

Working your way down the sides
Keep working your way down the slipper to make the sole.

Next Row: Knit across ?

Repeat from ? to ? in every stitch down the entire length of the foot. There are equal number of cast off stitches along each side. How many rows varies depending on the size of slipper you’re making. Be sure to end with a completed knit across row.

Adult Moccasin Slippers - Making the Sole
Starting the sole. Right side. This is shows the adult size but will have less stitches for child sizes.
Adult Moccasin Slippers - Making the Sole
Working your way down while making the sole. Wrong side.
Adult Moccasin Slippers - Making the Sole
Continuing to work down the length of the sole.
Adult Moccasin Slippers - Making the Sole
Still further down the sole. Note how the cast off edges are being picked up as you go. Keep working your way down the length of the sole until you’ve picked up all the cast off stitches.

More of my stuff on Etsy

ALL patterns on Etsy are
40% off
until March 31


You can make a widget like this for your blog or website, too.
Instructions are on my website here: How to Display Etsy Items on Your Website

Making the Heel

If you need help with making the heel, you can watch the video. It starts where you need it to. As mentioned in the video, you’ll need to follow how to decrease with the pattern as written below.

If You Have 6 Stitches

Next Row: With the RIGHT side facing, pick up a stitch in the row closest to the sole of the slipper. Count how many ridges it is for the size you are making. K2tog 3 times. Count down the same number of ridges and pick up a stitch in the space beneath it on the other side.

Child moccasin slippers - Picking up stitches to make the heel.
Owl Slippers knitting pattern
The photo above shows 9 rows of ridges. These are rows you knit to form the edges of the slipper. 
Owl Slippers - Free Knitting Pattern
Stitch picked up on the right edge in the 9th row shown above
Owl Slippers - Free Knitting Pattern
After you K2tog at the end of the row, you’ll pick up a stitch here.
Owl Slippers - Free Knitting Pattern
Stitch picked up on the left or end of the row.

Next Row: Knit across.

Next Row: K2tog, K1, K2tog. Pass the middle stitch on your working needle over the stitch on the left. Pass the stitch on the right over the stitch on the left. (Or you can turn your work and knit the 3 sts together).

Break yarn leaving a length of yarn long enough (8ish inches) to sew up the remaining seam.

Make another slipper.

If You Have 8 Stitches

Next Row: With the RIGHT side facing, pick up a stitch in the row closest to the sole of the slipper. Count how many ridges it is for the size you are making. K2tog 4 times. Count down the same number of ridges and pick up a stitch in the space beneath it on the other side. (Scroll up to the “If you have 6 stitches” section to see the photos if you need help).

Next Row: Knit across.

Next Row: Pick up a stitch beneath the next ridge. K2tog 3 times. Pick up a stitch in the space beneath the next ridge on the other side.

Next Row: Knit across.

Next Row: K2tog, K1, K2tog. Pass the middle stitch on your working needle over the stitch on the left. Pass the stitch on the right over the stitch on the left. (Or you can turn your work and knit the 3 sts together).

Break yarn leaving a length of yarn long enough (8ish inches) to sew up the remaining seam.

Make another slipper.

If you have 10 or More Stitches

♀️ Next Row: With the RIGHT side facing, pick up a stitch in the row closest to the sole of the slipper. Count how many ridges it is for the size you are making. K2tog twice. Knit to the last 4 stitches. K2tog twice. Count down the same number of ridges on the other side and pick up a stitch in the space beneath it. (Scroll up to the “If you have 6 stitches” section to see the photos if you need help).

Next Row: Knit across.

Next Row: Count down one ridge less than the previous row and pick up a stitch in the space beneath it. K2tog. Knit until the last 2 stitches. K2tog. Count down the same number of ridges and pick up a stitch in the space beneath it on the other side.

Next Row: Knit across. ♀️ Repeat from ♀️ to ♀️ until 6 stitches remain.

Next Row: Pick up a stitch beneath the next ridge. K2tog 3 times. Pick up a stitch in the space beneath the next ridge on the other side.

Next Row: Knit across.

Next Row: K2tog, K1, K2tog. Pass the middle stitch on your working needle over the stitch on the left. Pass the stitch on the right over the stitch on the left. (Or you can turn your work and knit the 3 sts together).

Break yarn leaving a length of yarn long enough (8ish inches) to sew up the remaining seam.

Make another slipper.

Yes, they do look a little boxy when they’re done and not on a foot. The stretch of the garter stitch allows these slippers to stretch around the contours of any foot easily.

Hints and Tips

If you want a longer cuff at the top, work more rows than stated at the beginning when you cast on. Because smaller kid-lettes tend to have chunkier legs (aka – cankles ?), which is so gosh-darn cute btw, don’t go too crazy with the length.

When picking up stitches from the cast off row, be sure you’re really moving on to the next cast off stitch! It’s an easy mistake to pick up a stitch in a stitch you already picked up. If in doubt, give the needle holding the stitches a bit of a tug. You’ll see the yarn move slightly at the very back, closest to the needle. Pick up a stitch at the NEXT cast off stitch.

If you don’t have the same number of stitches on both sides when you are forming the sole, you may have picked up a stitch twice in one stitch or missed one. Don’t worry! This is fixable. You can skip one cast off stitch if you need to make it even, or pick up a cast off stitch twice on the other side. There’s enough stretch in the slipper that any puckering this causes won’t be overly visible if you’re off by a stitch or two.

Picking up the stitches evenly along the toe flap is roughly 1 stitch every ridge.

To speed up finishing the slippers and not have so many ends to sew in, hold the yarn ends to the back of your work as you knit. And yes, this is the third time I’m sharing it, but I made a photo tutorial showing how to do this. You can see it here – How to Work in the Ends as You Knit.

If you have any questions, please feel free to leave a comment below or send me your questions here. If there is a typo or stitch count that’s off, let me know in the comments! I type these out from notes I make when designing the slippers. It’s easy, and embarrassingly common for me to miss something. Especially on the smaller slippers that involve so many different stitch counts for the numerous sizes.

To see how you can keep the free patterns coming, visiting this page – Help Support My Work!  A financial donation is always appreciated but a share, like and follow on social media also helps me immensely ?


Posted on 2 Comments

Bulky Yarn Slippers on Straight Needles – FREE Knitting Pattern

Adult Cuffed Bootie - Knit on Straight Needles with bulky yarn

If you’ve run across any of my slipper patterns before this, one thing you’ll be very familiar with is my unreasonable dislike for sewing seams on projects. I equally dislike working in ends (go to How to Work in Ends While Knitting for more on this). I have a embarrassing amount of nearly finished projects that collect in a box with unsewn seams and dangling ends. Yes. I just admitted that to everyone. No shame in my game.

This is another attempt to make this happen. It’s quite difficult to make something seamless when the design calls for it to be knit flat on 2 needles. This automatically means there are going to be ends that need to meet at some point. The idea is to make them meet as you knit so they are permanently fixed together with no extra work.

Don’t forget to share this pattern with your family and friends! You can use these buttons??????

This pattern starts with the cast on stitches going around the foot (sans heel). You’ll then work your way up to the top cuff. I’ve pointed out where we’re starting in this photo. 

Cast on edge for Adult Bootie Slippers

I have a bunch of other slipper patterns you can read right here on my website. If you go to this page – FREE Slipper Patterns, you can see everything I have written to date. If you’re looking for other extra thick slippers like this, I’ve written another entitled Easy to Knit Beginner Slipper Pattern – Knit Flat with Bulky Yarn.

As always, if you would prefer a printable paper version of this pattern, you can purchase and download the PDF from all of my usual sites. You can make a purchase from this website here – Bulky Yarn Slippers for Adults – Knit on Straight Needles. You can also purchase a download from my other online retailers which are LoveCrafts, Etsy and Ravelry. If the link isn’t working I haven’t upload the pattern to the site yet.

Want to make a monthly contribution, avoid ads and pop-ups, and get instant, PRINTABLE downloads of my patterns? Become a Member on this website! When you become a Website Supporter for $3/month, you’ll gain access to exclusive member only posts. These posts contain one click downloads of the patterns. Simply click the Download & Print button. The PDF will automatically download to your computer or smart device. You can then read it on your device or print it at your leisure. You can download as many patterns as you like for the same $3 each month. You can go to this page to learn more, become a member and support my work… Exclusive Member Area

Now that we’re done all that, if you just need the pattern, you can click this button. Please note, if you click the button you’ll skip the other info like gauge, how much yarn, needle size, etc.

Abbreviations

st – stitch

sts – stitches

sl – slip the stitch

PSSO – pass slipped stitch over.

K – knit

P – purl 

PM1 – Make one (purl wise). Increase one stitch between the stitches. Pick up the yarn between the stitches. Twist it slightly and place it on your non-working needle. Purl the stitch. Watch this video on How to PM1 or Purl Make 1 to see how. 

M1 – Make one (knit wise). Increase one stitch between the stitches. Pick up the yarn between the stitches. Twist it slightly and place it on your non-working needle. Knit the stitch. Watch this video on How to M1 or Make 1 to see how. 

K2tog – knit 2 stitches together

K3tog – knit 3 stitches together

P2tog – purl 2 stitches together

P2tog TBL – purl 2 together through the back loop.

p2tog TBL - purl 2 together through back loop

Things You Need

Worsted weight yarn – 2 (two) standard balls of yarn (215 yards/197 m). Any colours of your choosing.

or 

Super Bulky yarn – 2 standard balls of ONE colour with matching lot numbers (90 yards/82 m). 

One ball makes one slipper. There will be some yarn left over from each ball.

Size 5 mm (size 8 US) knitting needles (or whatever you require to get the correct gauge).

Tapestry needle to sew the seam and work in the ends.

Gauge

In stockinette stitch

8 sts – 5 cm (2″) 

7 rows – 5 cm (2”) 

Sizes are written as such:

Women 6-7 (8-9, 10-11, 12)

Men 6 (7-8, 9-10, 11-12)

The Pattern

Cast on 56 (60, 64, 68)

Knit across for 6 (6, 8, 8) rows.

Next Row: K26 (28, 30, 32) K2tog. Sl 1 as if to knit. K1 PSSO. K26 (28, 30, 32).

Next Row: P25 (27, 29, 31) P2tog TBL. P2tog. P25 (27, 29, 31).

Next Row: K24 (26, 28, 30) K2tog. Sl 1 as if to knit. K1 PSSO. K24 (26, 28, 30).

Next Row: P23 (25, 27, 29) P2tog TBL. P2tog. P23 (25, 27, 29).

Next Row: K22 (24, 26, 28) K2tog. Sl 1 as if to knit. K1 PSSO. K22 (24, 26, 28).

Next Row: P21 (23, 25, 27) P2tog TBL. P2tog. P21 (23, 25, 27).

Next Row: K20 (22, 24, 26) K2tog. Sl 1 as if to knit. K1 PSSO. K20 (22, 24, 26).

Next Row: P19 (21, 23, 25) P2tog TBL. P2tog. P19 (21, 23, 25).

Next Row: K18 (20, 22, 24) K2tog. Sl 1 as if to knit. K1 PSSO. K18 (20, 22, 24).

Next Row: P17 (19, 21, 23) P2tog TBL. P2tog. P17 (19, 21, 23).

Next Row: K16 (18, 20, 22) K2tog. Sl 1 as if to knit. K1 PSSO. K16 (18, 20, 22).

Next Row: P15 (17, 19, 21) P2tog TBL. P2tog. P15 (17, 19, 21).

Next Row: K14 (16, 18, 20) K2tog. Sl 1 as if to knit. K1 PSSO. K14 (16, 18, 20).

Next Row: P13 (15, 17, 19) P2tog TBL. P2tog. P13 (15, 17, 19). If making women’s size 6-7 or men’s size 6, go to the row marked with ☺.

*Next Row: K4 M1. K0 (10, 12, 14). K2tog. Sl 1 as if to knit. K1 PSSO. K0 (10, 12, 14). M1 K4.

Next Row: P2 PM1. P0 (12, 14, 16). P2tog TBL. P2tog. P0 (12, 14, 16). PM1 P2.*

Repeat from * to * 0 (1, 2, 3) times more.

☺Knit across for 6 (6, 8, 8) rows.

Cast off loosely.

Making the Sole

This photo will help you in how and where to pick up the following stitches. Hold your work so it looks like this with the pointy end up. The RED arrow is for right handed knitters.

Picking up stitches for the sole

Pick up 6 sts at the toe in bottom loop of cast on stitches. (3 sts on either side of middle clearly marked with p2tog line.)

Next Row: Knit across.

Next Row: Pick up a stitch in the bottom loop of the cast on stitches. K6. Pick up a stitch in the bottom loop of the cast on stitches. 

Next Row: Knit across.

Next Row: Pick up a stitch in the bottom loop of the cast on stitches. K8. Pick up a stitch in the bottom loop of the cast on stitches. 

Next Row: Knit across.

If you are making women’s sizes 6-9 or men’s sizes 6-8, skip to row marked with ♥

For all other sizes continue as follows:

Next Row: Pick up a stitch in the bottom loop of the cast on stitches. K10. Pick up a stitch in the bottom loop of the cast on stitches. 

Next Row: Knit across.

♥ ☼ Next Row: Pick up a stitch in the bottom loop of the cast on stitches. K2tog. Knit to last 2 sts. K2tog. Pick up a stitch in the bottom loop of the cast on stitches.

Next Row: Knit across. ☼ 

Repeat rows marked with ☼ to ☼ down the length of the sole. You will ALWAYS have 10 (10, 12, 12) sts on your needle.

Forming the Heel

There are two ways to do this. The easiest way is to make a small triangle.

Using the 10 (10, 12, 12) sts on your needle.

♦ Next 2 Rows: Knit across.

Next Row: K2tog. Knit to last 2 sts. K2tog.

Next Row: Knit across. ♦

Repeat from ♦ to ♦ until 5 (5, 6, 6) sts

If making women’s sizes 6-9 or men’s sizes 6-8:

Next Row: K2tog K1 K2tog.

Next Row: K3tog. Cut yarn and draw yarn through last st. Leave a length of yarn long enough to sew the remaining seam. 

If making women’s sizes 10-12 or men’s sizes 9-12:

Next Row: K2tog 3 times.

Next Row: K3tog. Cut yarn and draw yarn through last st. Leave a length of yarn long enough to sew the remaining seam. 

For all sizes:

Flip up the triangle to fit into the back of the heel. Sew seams along sides of triangle and up the back of the slipper.

Or

Make the seams as you go:

I recently made a video showing how to do this. It’s how I make a lot of my slipper heels including this pattern. You can watch the video below to help you if the photos aren’t enough.

Using the 10 (10, 12, 12) sts on your needle,

♦ Next Row: Pick up a st along side of the slipper. K2tog twice. Knit to last 4 sts. K2tog twice. Pick up a st along side of the slipper and work in the ends. 

Picking up stitches to make the heel

Next Row: Knit across. ♦

Repeat from ♦ to ♦ until 6 (6, 8, 8) sts.

§ Next Row: Pick up a st along side of the slipper. K2tog across. Pick up a st along side of the slipper.

Next Row: Knit across. §

If making women’s sizes 10-12 or men’s sizes 9-12, repeat from § to § once.

Next Row: Pick up a st along side of the slipper. K2tog, K1, K2tog. Pick up a st along side of the slipper.

Next Row: K2tog, K1, K2tog.

Next Row: K3tog. Cut yarn and draw yarn through last st. Leave a length of yarn long enough to sew the remaining seam. Sew the seam up the back of the slipper and work in the ends.

Hints and Tips

You can make the slippers truly seamless when you are making the seamed triangle for the back of the heel. Continue picking up stitches on each side while working up the heel seam. Continue doing this using the 5 sts and repeating as follows: 

Next Row: Pick up a st along side of the slipper. K2tog, K1, K2tog. Pick up a st along side of the slipper.

Next Row: Knit across.

I didn’t include it in the instructions because… I didn’t. It was already complicated enough for the heel.

If you are up in arms about how many ends there are to sew in, you can work the ends in while you are knitting. I have a detailed photo tutorial on my website here that you can watch – How to Work In the Ends While Knitting.

Play around with the colours you choose if you’re using worsted weight yarn. You can get some neat effects by blending a solid colour with a variegated one, or by using colours that are the same colour but a different tone. I used both of these techniques for the red booties.

Like all of my patterns you have my permission to sell and/or give away the physical items that you make using this pattern. You are NOT permitted to reprint or duplicate this pattern in any form unless you have obtained my written permission to do so. 

If you have any questions, please feel free to leave a comment or send me your questions at [email protected].

Posted on 3 Comments

Textured Easy to Knit Scarf, Dishcloth and Coaster Pattern – 3 in 1 FREE Knitting Pattern

How to knit scarf, dishcloth and coasters

If you have ever made one of my dishcloths in the past, it really bothers me when one side of a dishcloth doesn’t look the same way on the reverse side. To me, a dishcloth should be reversible. I know, it’s weird and really isn’t that important, but we all have these random, arbitrary rules we like to follow. Well, this one hits that same-both-side requirement! Yay! My mildly OCD brain is happy.

There’s not a whole lot to say about this one. If you make it 50 stitches wide, you’ll end up making a dishcloth that is approximately 9 inches (23 cm) square. Here are links if you’re interested in making any of my other dishcloths. I have a number of them now… Diamonds Dishcloth, Cute AF Bows Dishcloth, Bars and Stripes Dishcloth, Knit a Simple Dishcloth, and Knitting for Beginners Dishcloth.


Want to make the scarf or the coasters instead? It’s easy peasy! Follow the pattern below shows which rows to repeat when making the scarf. And when making the coasters, only make it about 26 stitches wide instead of the 50 stitches for the dishcloth. Any even number will work for the width regardless if you’re making the scarf, dishcloth or the coasters.

As always, if you would prefer a printable paper version of this pattern, you can purchase and download the PDF from all of my usual sites. You can make a purchase from this website here – Textured Knitted Scarf, Dishcloth and Coasters Pattern. You can also purchase a download from my other online retailers which are LoveCraftsEtsy and Ravelry. If the link isn’t working I haven’t upload the pattern to the site yet.

Want to make a monthly contribution, avoid ads and pop-ups, and get instant, PRINTABLE downloads of my patterns? Become a Member on this website! When you become a Website Supporter for $3/month, you’ll gain access to exclusive member only posts. These posts contain one click downloads of the patterns. Simply click the Download & Print button. The PDF will automatically download to your computer or smart device. You can then read it on your device or print it at your leisure. You can download as many patterns as you like for the same $3 each month. You can go to this page to learn more, become a member and support my work… Exclusive Member Area

Abbreviations

K – knit

P – purl

Increase in the first stitch – knit in the front and back of the stitch.

K2tog – knit 2 together

Gauge

Gauge doesn’t really matter for this. It’s a dishcloth. The smaller the needle the tighter the knit. If it’s a bit looser of a knit, it’ll still work.

Things You Need

You can click any link below to see what you need.

Size 6 US (4 mm) knitting needles

Worsted weight yarn – I always use cotton yarn for dishcloths. You can use something else if you are going to make a scarf with this pattern. The amount of yarn you’ll need depends on how long and wide you want a scarf. If making dishcloths or coasters, one standard ball will be enough.

Tapestry needle – to work in the ends.

Making the Dishcloth

Cast on 5

Row 1: K across

Row 2: Increase in the first knit stitch. K across.

Row 3: Increase in the first knit stitch. K1 P1 K3

Row 4: Increase in the first knit stitch. K1 P1 K1 P1 K2

Row 5 – 6: Increase in the first knit stitch. K across.

★ Row 7: Increase in the first knit stitch. K1 *P1 K1* Repeat from * to * to the last 4 stitches P1 K3.

Row 8: Increase in the first knit stitch. K1 *P1 K1* Repeat from * to * to the last 3 stitches P1 K2.

Row 9 – 10: Increase in the first knit stitch. K across. ★ Repeat from ★ to ★ until you have 50 stitches total.

♥︎ Next row: K2 *P1 K1* Repeat from * to * to the last 4 stitches P1 K3.

Next row: K2 *P1 K1* Repeat from * to * to the last 4 stitches P1 K3.

Next 2 rows: K across. ♥︎

If you are making a scarf, repeat from ♥︎ to ♥︎ until it’s the length you want. If NOT making a scarf, continue with the pattern as follows…

♦︎ Next row: K2tog *P1 K1* Repeat from * to * to the last 4 stitches P1 K3.

Next row: K2tog *P1 K1* Repeat from * to * to the last 3 stitches P1 K2. 

Next 2 rows: K2tog. K across. ♦︎ Repeat from ♦︎ to ♦︎ until down to 8 stitches. You will have finished the first knit across row when there are 8 stitches on your needle.

Next row: K2tog. K the next stitch. Pass the K2tog loop on your working needle over the stitch you just knitted (AKA Cast off). Continue to cast off until there are 2 stitches on your non-working needle. K2tog these 2 stitches. You now have 2 stitches on your working needle. Pass the stitch over the the K2tog loop (the loop on the right over the loop on the left, if you are right handed). 

Work in the ends.

More of my stuff on Etsy:


You can make a widget like this for your blog or website, too.
Instructions are on my website here: How to Display Etsy Items on Your Website

Hints and Tips

This pattern can easily be made into a scarf of any width. I used fringe on the point for my scarf but you could attach tassels if you so desire. If you want to make this into a scarf, repeat the rows in the middle marked with the ?. It’s always 4 rows for one repeat of the pattern. The scarf in the photos is 26 stitches wide.

Not a fan of the scarf but could use some coasters? This pattern could easily be made smaller following the pattern exactly as written for the dishcloth but only making the coaster 26 stitches wide.

Make this as wide or as narrow as you like. If you feel 50 stitches are too wide, or not wide enough, do what you wish. Just always end on the second row of the knitting across rows to maintain the pattern texture.

If you want a more finished edge, you can easily do a single crochet around the edge of the dishcloth. The lighter beige dishcloth has the single crocheted edge if you’d like to see an example. I found that 2 stitches at each of the corners maintained a spaced out edging that lays flat.

Like all of my patterns you have my permission to sell and/or give away the slippers that you make using this pattern. You are NOT permitted to reprint this pattern in any form unless you have obtained my written permission to do so. 

If you have any questions, please feel free to leave a comment or send me your questions at [email protected].

Help Support My Work!

Follow me on TikTokInstagramTwitterFacebookPinterest and YouTube. Every follow, subscribe, thumbs up, like, heart and share help increase my popularity on the web and get more viewers to my work. It costs you nothing but helps me sooooo much! 

If you would like to help a little more, you can always support me on Patreon or you can make a single time donation at Buy Me a Coffee.

And just to see how many people read the entirety of a blog post…

For even more FREE knitting and crochet patterns, be sure to check out my newest website – KweenBee.ca I add new patterns regularly.

If you are a fibre artist and have a pattern you would like to share, I’d love to show case your work! Paid or free, on your own website, in your Etsy shop, on Ravelry or anywhere else, you can add your pattern. Go to – KweenBee.ca The service is free for anyone to use. I’m trying to generate a safe space for everyone to share their work that isn’t related to any of the social media sites.

Posted on 2 Comments

Easy to Knit Beginner Slipper Pattern – Knit Flat with Bulky Yarn on Straight Needles – FREE Knitting Pattern

Flat knit slippers on straight needles with bulky yarn

Knit fast and keep your feet toasty warm with this quick to knit pattern. Made with 2 strands of worsted weight yarn, or choose to use super bulky yarn, these extra thick, super quick slippers are sure to be a hit with you and anyone that wears the slippers.

I had a number of people over the years ask about faster to knit and thicker versions of my slippers using either 2 strands of worsted weight yarn or using the thicker yarns that are available. I decided to do the math and come up with something simple and quick for anyone to make. I decided on the thicker version of my Easy to Knit Rolled Cuff Slippers that I published a while back. It’s simple and made one piece. This lent itself well to a rewrite of the pattern taking into account the new gauge of the yarn.

A word on yarn. You can use super bulky yarn. This is equal to 14 ply or No. 6 yarn. How it’s referenced depends on where you live. This pattern also works well, and for our purposes, equals to a double strand of worsted weight yarn (10 ply or No. 4 yarn). As long as the gauge is the same, the sizing of the slippers should be consistent. I found that using size 5 mm (US 8) knitting needles worked for both the super bulky and the double strand of worsted weight giving the same stitches and rows per inch for both.

A note on super bulky yarn selections. Make sure what you are using is the one that is like regular worsted weight yarn but only thicker. Using any of the blanket yarns (the ones that are similar to a terry towel type texture) don’t stretch the way they should. 

It’s easier to use 2 separate balls of yarn when using two strands of worsted weight yarn for this project. It also lets you play with colour a bit. Using colours that are in the same colour family or have a slightly different shade can make for some interesting variations. Mixing a solid colour with a variegated yarn can also make for unique effects. It really is up to you how you want to blend the colours. Of course, you can use the same colour for both strands. The choice is yours.

Love the free patterns? You can say thanks in a couple of ways. You can read more about how you can Support My Work by clicking that link or make a small donation and Buy Me a Coffee. ?? That is a website where you can make a one time donation as a thanks. (FYI I have some great offers if you would like to buy me multiple coffees. You can see those by clicking on the Extras tab or you can click this link Janis Frank Extras).

If you don’t want to or are unable to make a financial donation, sharing this pattern through social media is a great way to help out too! The links below are a super easy way for you to do so.

If you would like to avoid the ads on this page or would like to print the pattern, you can purchase the PDF for a small fee from this website at Easy to Knit Beginner Slipper Pattern – Knit Flat with Bulky Yarn, through my Etsy shop, LoveCrafts or on Ravelry.

Another way to avoid ads and pop-ups, get instant, PRINTABLE downloads of this pattern and others, is by becoming a Member on this website. When you become a Website Supporter for $3/month, you’ll gain access to exclusive member only posts. These posts contain one click downloads of the patterns. Simply click the Download & Print button. The PDF will automatically download to your computer or smart device. You can then read it on your device or print it at your leisure. You can download as many patterns as you like for the same $3 each month. You can go to this page to learn more, become a member and support my work… Exclusive Member Area

Things You Need

Worsted weight yarn – 2 (two) standard balls of yarn (215 yards/197 m). Any colours of your choosing.

or 

Super Bulky yarn – 2 standard balls of ONE colour with matching lot numbers (90 yards/82 m). One ball makes one slipper. There will be some yarn left over from each ball.

Size 5 mm (size 8 US) knitting needles (or whatever you require to get the correct gauge).

Tapestry needle to sew the seam and work in the ends.

Gauge

In garter stitch

8 sts – 5 cm (2″) 

7 rows – 5 cm (2”) 

The sizing for this pattern is written as such:

Women 6-7 (8-9, 10-11, 12)

Men 6 (7-8, 9-10, 11-12)

Abbreviations

K – knit

P – purl 

K2tog – knit 2 stitches together

P2tog – purl 2 stitches together

st – stitch

sts – stitches

The Pattern

Cast on 2

Row 1-2: Knit across.

Row 3: Increase in both stitches. (4 sts)

Row 4-5: Knit across.

Row 6: Increase in the first st. K to the last st. Increase in the last st. (6 sts)

Row 7-8: Knit across.

Row 9: Increase in the first st. K to the last st. Increase in the last st. (8 sts)

Row 10-11: Knit across.

Row 12: Increase in the first st. K to the last st. Increase in the last st. (10 sts)

Row 13-14: Knit across. Go to the row marked with ◘ for women’s sizes 6-9 and for men’s sizes 6-8. Continue for all larger sizes as follows:

Next row: Increase in the first st. K to the last st. Increase in the last st. (12 sts) 

Next 2 rows: Knit across.

◘ Next row: Cast on 12 (12, 15, 15). 22 (22, 27, 27 sts)

Next row: P3 *K2 P1* Repeat from * to * 2 (2, 3, 3) times more. K 10 (10, 12, 12).

Next row: Cast on 12 (12, 15, 15) Knit across. 34 (34, 42, 42 sts)

♥ Next row: P3 *K2 P1* Repeat from * to * 2 (2, 3, 3) times more. K 10 (10, 12, 12). *P1 K2* Repeat from * to * 2 (2, 3, 3) times more. P3.

Next row: Knit across. ♥ Repeat from ♥ to ♥ 11 (12, 13, 14more times for a total of 24 (26, 28, 30) rows.

Next row: P2tog P1*K2 P1* Repeat from * to * 2 (2, 3, 3) times more. K 10 (10, 12, 12). *P1 K2* Repeat from * to * 2 (2, 3, 3) times more. P1 P2 tog. 32 (32, 40, 40 sts)

Next row: Knit across. 

Next row: P2 *K2 P1* Repeat from * to * 2 (2, 3, 3) times more. K 10 (10, 12, 12). *P1 K2* Repeat from * to * 2 (2,3, 3) times more. P2. Repeat from ☻ to ☻ 10 (11, 10, 11more times for a total of 22 (24, 22, 24) rows.

More of my stuff on Etsy:

ALL patterns on Etsy are
40% off
until March 31


You can make a widget like this for your blog or website, too.
Instructions are on my website here: How to Display Etsy Items on Your Website

Ending the Toe

Next row: *K2tog K1* Repeat from * to * 3 (3, 4, 4) times more. K2tog 5 (5, 6, 6) times. *K1 K2tog * Repeat from * to * 2 (2, 3, 3) times more. K1. 

Next row: P2 *K1 P1* Repeat from * to * 2 (2, 3, 3) times more. K5 (5, 6, 6). *P1 K1* Repeat from * to * 2 (2, 3, 3) times more. P1.

For women’s size 6-9 and men’s size 6-8

Next row: K1 K2tog 9 times. K1. 

Next row: P5 K2 P4.

Draw through and pull tight.

For women’s size 10-12 and men’s size 9-12

Next row: K1 K2tog 7 times. K1 K2tog 4 times. K1.

Next row: P6 K3 P5.

Draw through and pull tight.

Sew the seam on the top of the foot. Flip up the triangle of the heel and sew the seams on both sides. Sew the ends of the rolled cuff section together above the tip of the triangle.

Like all of my patterns you have my permission to sell and/or give away the physical items that you make using this pattern. You are NOT permitted to reprint or duplicate this pattern in any form unless you have obtained my written permission to do so. 

If you have any questions, please feel free to leave a comment below.

Posted on 2 Comments

How to Knit Fingerless Gloves – With SPIDERS!! – FREE Knitting Pattern

Knit Spider Gloves - Fre Knitting Pattern - Fingerless Gloves with Spiders

Creepy? No. Awesome? YES! Knit a pair of fingerless gloves with a spider motif on the back of the hand. Guaranteed to never fall off, the 3D spider is created as you make the mitten.

Did you stumble upon this pattern but wanted to buy a pair of spider gloves? Head over to my Etsy shop and you can buy a pair in nearly any colour – CUSTOM MADE Hand Knit Adult Spider Fingerless Granny Gloves

Don’t forget to share this post!

This isn’t a pattern for beginners. You’ll need to think out of the box a bit for this one; making bobbles and working selectively over given stitches to create the body and head. But the basic glove portion is the same as every other glove with a thumb increase you’ve made, just like my Super Simple Fingerless Gloves only done with a purl stitch to make the spider stand out even more.

This pattern has been in the works for a number of years now. It originally started as a knit in the round design, but because of the extensive purling, there were always lines left where the needles met. I couldn’t live with that. 

So, there was a change in plans from the initial design. First change; it’s knit flat on 2 needles. The second is that instead of including a bunch of how-to pictures, and there were going to be a lot, I decided it was time to utilize links to how-to videos. Everything that may be challenging, particularly rows 25 – 27 can be a little confusing. I made videos that show the trickier parts of these rows. To watch the video, click the link provided. The video opens a new page on the website and you can watch the embedded YouTube video here.

Too much blib blab for you? Want to just print the damn pattern already? You have some options available to you.

Because of the request by many that they would prefer a PDF download, it’s DONE! You can download this pattern for a small fee/donation. You can get it from a number of places. You can download it from a number of places. In particular, my site here – Knit a Pair of Spider Fingerless Gloves – now with VIDEOS! You can also get it at a number of other online book retailers such as Ravelry, LoveCrafts, and Etsy. And the paperback version is also available on Amazon! It’s available to order in most countries. Be sure to make your purchase in the country you love so you can get free shipping with your Amazon Prime membership.

Another way to avoid ads and pop-ups, get instant, PRINTABLE downloads of this pattern and others, is by becoming a Member on this website. When you become a Website Supporter for $3/month, you’ll gain access to exclusive member only posts. These posts contain one click downloads of the patterns. Simply click the Download & Print button. The PDF will automatically download to your computer or smart device. You can then read it on your device or print it at your leisure. You can download as many patterns as you like for the same $3 each month. You can go to this page to learn more, become a member and support my work… Exclusive Member Area

Wrong Stitch Counts

It is very easy to have the wrong number of stitches created around the spider. This can happen between the gusset for the thumb and the spider, or for the shorter side. If that happens you can take it apart. The other option is to just go with it. Being a stitch or two off won’t be noticable to the wearer. 

If you decide to “just go for it”, line up the stitches done to create the spider to previous spider stitches. In general, this is just the legs. They are very obvious. Keep in mind that you always knit the legs on the right side and purl the legs on the wrong side. Adjust the background of the mitt with your incorrect count of purl stitches on the right side and the knit stitches on the wrong side. 

For example, if you’re making Row 30, instead of K7 at the start of the row you made a mistake and now have K8. Knit the 8 stitches instead and start the rest of the pattern from there.

Example row:

Row 30: K7 *P1 K1* Repeat from * to * 2 more times. P1 K6 M1 K11 M1 K12

Abbreviations

If you need help with the less common stitches in the abbreviations list below, all are included in this playlist below. Specific videos for rows 25-27 are included in this list and also embedded below each row for the Left Hand glove.

K – Knit

P – Purl 

st – stitch

sts – stitches

PM1 – Make one (knit wise). Increase one stitch between the stitches. Pick up the yarn between the stitches. Twist it slightly and place it on your non-working needle. Knit the stitch. Watch this video on How to PM1 or Purl Make 1 to see how. 

M1 – Make one (knit wise). Increase one stitch between the stitches. Pick up the yarn between the stitches. Twist it slightly and place it on your non-working needle. Knit the stitch. Watch this video on How to M1 or Make 1 to see how. 

P3tog – Purl 3 stitches together

P2tog – Purl 2 stitches together

K2tog – Knit 2 stitches together

K3tog – Knit 3 stitches together

C1B – Cable 1 back. Pick up next stitch on a cable needle. Pull this stitch to the BACK of your work. Knit the next stitch. Purl the stitch on the cable needle. Watch this video on Cable 1 Back to see how. 

C1F – Cable 1 forward. Pick up the next stitch on a cable needle. Pull this stitch to the FRONT of your work. Purl the next stitch. Knit the stitch on the cable needle. Watch this video on Cable 1 Forward to see how.

FB2 – Knit in the front and back of the next stitch. This is also known as an increase one in the next stitch. I’m labeling it as this because it is very easy to make a mistake here and pick up an extra stitch. This way I know I have your attention and made you look ? No need to thank me..or complain. Both seem to be a likely response tbh.

Things You Need

Worsted weight yarn – a standard ball of yarn (215 yards/197 m)

Knitting needles – described below in sizing and gauge

Cable Needle

Stitch Holder

Tapestry needle to sew the seam and work in the ends

Sizing & Gauge

Like my other fingerless gloves I’ve designed such as my owl fingerless gloves, I use the size of the needles to change the size of the mitt. This keeps the proportion of the spider consistent to the size of the glove.

My standard for sizing was my hand and designed the knitting pattern according to what kind of rubber gloves fit me comfortably. I wear a medium sized rubber glove and the medium sized glove fits perfectly. You may need to use different sized needles to get the correct gauge, but this pattern is very forgiving if you’re a bit off. Most knitting is tbh.

Small

size 3.5 mm (US size 4) 

11 stitches every 2 inches (5 cm)

16 rows every 2 inches (5 cm)

Medium

size 4 mm (US size 6)

10 stitches every 2 inches (5 cm)

14 rows every 2 inches (5 cm)

Large

size 5 mm (US size 8)

9 stitches every 2 inches (5 cm)

12 rows every 2 inches (5 cm)

Left Hand

Cast on 33, loosely

Row 1: K1 P1 across. K last st.

Row 2: P1 K1 across. P last st.

Repeat rows 1 and 2 for a total of 10 rows.

Row 11: P across

Row 12: K across

Row 13: P across

Row 14: K across

Row 15: P12 PM1 P1 PM1 P7 K1 P3 K1 P8 (35 sts)

Row 16: K8 P1 K3 P1 K22 (35 sts)

Row 17: P20 K1 P1 K1 P3 K1 P1 K1 P6 (35 sts)

Row 18: K6 P1 K1 P1 K3 P1 K1 P1 K5 M1 K3 M1 K12 (37 sts)

Row 19: P22 K1 P1 K1 P3 K1 P1 K1 P6 (37 sts)

Row 20: K6 P1 K1 P1 K3 P1 K1 P1 K22 (37 sts)

Row 21: P12 PM1 P5 PM1 P5 C1F twice, P1, C1B twice, P6 (39 sts)

Row 22: K6 *K1 P1* Repeat from *to * 3 more times, K25 (39 sts)

Row 23: P25 C1F K1 P1 K1 C1B P7 (39 sts) 

Row 24: K8 P2 K1 P2 K7 M1 K7 M1 K12 (41 sts)

Row 25: P28 K2tog, Bobble 6 (K6 into one stitch by alternating knitting into the front and back of the stitch, turn. Working the following rows into the 6 stitches in the one stitch, P6, turn, K6, turn, P6, turn, K6, turn, P6, turn, K6, turn, P6, turn, K2tog 3 times (do NOT turn). Pass the middle stitch over the stitch closest to the tip of the needle. Two bobble stitches remain. Pass the second bobble stitch over the stitch closest to the tip of the needle. (The bobble is now 1 stitch again on your needle.) K2tog. P8  (39 sts) Click here for the video how-to link – Row 26 Video Tutorial

Row 26: K8 PM1 P3tog PM1 K28 (39 sts) Click here for the video how-to link: Row 26 – Video Tutorial

Row 27: P12 PM1 P9 PM1 P7 FB2 (This is a simple increase knit-wise in the next stitch. These are the start of the front legs). Bobble 5 (K5 into one stitch by alternating knitting into the front and back of the stitch, turn. Working the following rows into the 5 stitches in the one stitch, P5, turn, K5, turn, P2tog P1 P2tog, turn, K3 (do NOT turn). Pass the middle stitch over the stitch closest to the tip of the needle. Two bobble stitches remain. Pass the second bobble stitch over the stitch closest to the tip of the needle. (The bobble is now 1 stitch again on your needle) FB2 (AKA Increase in the next stitch. Makes the other front legs). P8. (43 sts) Click here for the video how-to link: Row 27 – Video Tutorial

Row 28: K8 P2 K1 P2 K30 (43 sts) 

Row 29: P29 C1B K1 P1 K1 C1F P7 (43 sts)

Row 30: K7 *P1 K1* Repeat from * to * 2 more times. P1 K6 M1 K11 M1 K12  (45 sts)

Row 31: P30 C1B twice P1 C1F twice P6 (45 sts)

Row 32: K6 P1 K1 P1 K3 P1 K1 P1 K30 (45 sts)

Row 33: P12. Pass the next 13 stitches to a stitch holder. P7 K1 P3 K1 P8 (32 sts)

Row 34: K8 P1 K3 P1 K19 (32 sts)

Row 35: P across

Row 36: K across

Row 37: P across

Row 38: K across

Row 39 – 42: K1 P1 across

Cast off loosely.

Making the Thumb

Pick up the 13 stitches on the stitch holder. Transfer them onto the other needle so you start knitting with the WRONGside facing you. If you don’t transfer them onto the other needle you’ll get a line.

Row 1: K across

Row 2: P across

Row 3: K across

Cast off loosely.

More of my stuff on Etsy

ALL patterns on Etsy are
40% off
until March 31


You can make a widget like this for your blog or website, too.
Instructions are on my website here: How to Display Etsy Items on Your Website

Right Hand

Cast on 33, loosely

Row 1: K1 P1 across. K last st.

Row 2: P1 K1 across. P last st.

Repeat rows 1 and 2 for a total of 10 rows.

Row 11: P across

Row 12: K across

Row 13: P across

Row 14: K across

Row 15: P8 K1 P3 K1 P7 PM1 P1 PM1 P12 (35 sts)

Row 16: K22 P1 K3 P1 K8 (35 sts)

Row 17: P6 K1 P1 K1 P3 K1 P1 K1 P20 (35 sts)

Row 18: K12 M1 K3 M1 K5 P1 K1 P1 K3 P1 K1 P1 K6 (37 sts)

Row 19: P6 K1 P1 K1 P3 K1 P1 K1 P22 (37 sts)

Row 20: K22 P1 K1 P1 K3 P1 K1 P1 K6 (37 sts)

Row 21: P6 C1F twice, P1, C1B twice, P5 PM1 P5 PM1 P12 (39 sts)

Row 22: K24 *K1 P1* Repeat from *to * 3 more times, K7 (39 sts)

Row 23: P7 C1F K1 P1 K1 C1B P25 (39 sts)

Row 24: K12 M1 K7 M1 K7 P2 K1 P2 K8 (41 sts)

Row 25: P8 K2tog, Bobble 6 (K6 into one stitch by alternating knitting into the front and back of the stitch, turn. Working the following rows into the 6 stitches in the one stitch, P6, turn, K6, turn, P6, turn, K6, turn, P6, turn, K6, turn, P6, turn, K2tog 3 times (do NOT turn). Pass the middle stitch over the stitch closest to the tip of the needle. Two bobble stitches remain. Pass the second bobble stitch over the stitch closest to the tip of the needle. (The bobble is now 1 stitch again on your needle.) K2tog. P28 (39 sts)

Row 26: K28 PM1 P3tog PM1 K8 (39 sts)

Row 27: P8 FB2 (This is a simple increase knit-wise in the next stitch. These are the start of the front legs). Bobble 5 (K5 into one stitch by alternating knitting into the front and back of the stitch, turn. Working the following rows into the 5 stitches in the one stitch, P5, turn, K5, turn, P2tog P1 P2tog, turn, K3 (do NOT turn). Pass the middle stitch over the stitch closest to the tip of the needle. Two bobble stitches remain. Pass the second bobble stitch over the stitch closest to the tip of the needle. (There is now 1 stitch on your needle.) FB2 (AKA Increase in the next stitch. Makes the other front legs). P7 PM1 P9 PM1 P12. (43 sts)

Row 28: K30 P2 K1 P2 K8 (43 sts)

Row 29: P7 C1B K1 P1 K1 C1F P29 (43 sts)

Row 30: K12 M1 K11 M1 K6 P1 *K1 P1* Repeat from * to * 2 more times. K7 (45 sts)

Row 31: P6 C1B twice P1 C1F twice P30 (45 sts)

Row 32: K30 P1 K1 P1 K3 P1 K1 P1 K6 (45 sts)

Row 33: P8 K1 P3 K1 P7 Pass the next 13 stitches to a stitch holder P12 (32 sts)

Row 34: K19 P1 K3 P1 K8 (32 sts)

Row 35: P across

Row 36: K across

Row 37: P across

Row 38: K across

Row 39 – 42: K1 P1 across

Cast off loosely.

Making the Thumb

Pick up the 13 stitches on the stitch holder. Transfer them onto the other needle so you start knitting with the WRONGside facing you. If you don’t transfer them onto the other needle you’ll get a line.

Row 1: K across

Row 2: P across

Row 3: K across

Cast off loosely.

Finishing

I recommend that you finish the body of the spider before sewing the seams along the edge. It’s easier to work it when flat. I like to make a figure 8 around the body, to the head, around the head and back to the start.

To give the spider body and head a more rounded feel, cut a length of yarn about 12” long. Insert your tapestry needle from the wrong side through the front between the head and the body. Pick up stitches around the edge of the body, back to the head. Pull snug until you are happy with the body shape

Pick up stitches around the head back to the body. Pull snug until you’re happy with the shape.

Pull the yarn to the back of your work. Tie off.

I like to tack the body at it’s base to the glove so it won’t flop around and stay in line with the head. Tie off.

No need to work in the ends when finishing the spider body and head. Simply pull the yarn through the body of the spider. Press the body down and cut the yarn. When the body pops back up, the end will be hidden in the body.

Once the spider finishing is complete, sew the seams along the edge and the thumb, working in the ends when finished to avoid lumps from knots.

Like all my patterns, you are welcome to you this pattern to sell, give away or keep any physical items that you make. All I ask is that you respect my work and don’t make copies of my work in any form.

If you feel the need to complain about not being able to print this pattern from this website page, may I suggest you read this post – Your Patterns Aren’t Free! If you still feel a need to vent in the comments, wtf is the matter with you? It’s bad enough I had to take the time to write the blog post because of your fellow entitled users, don’t be like that too. And reassess your life. Seriously.


Posted on 8 Comments

Super Simple Easy to Knit Slippers – Free Knitting Pattern – Now with a Complete How-to Video!

easy to knit slipper pattern

These slippers are perfect for a beginner! If you know how to cast on, knit, purl, K2tog, M1, and draw through (or gather) stitches you will be able to make these slippers. Don’t know how? I have a full online video tutorial to show you how to do it!.

If you’re looking for the pattern, keep scrolling down the page. It’s written out in full below.

Happy days! Because I was asked by a number of people to make a printable version this pattern, I made up the PDF! You can get it in all my usual places. The first is right from this site. Click this link to download and print this pattern – Super Simple Easy to Knit Slippers – Great Knitting Pattern for Beginners. You can also find it in my Etsy shop, Love Crafts and on Ravelry. If you like Amazon, you can also get the Kindle version there.

Loving the free patterns on this site? You can always help me out by sharing this with people you think may like it. A share on social media is always appreciated. You can use the links below??????. Financial donations are always welcome, too! I recently started a profile on Buy Me a Coffee. It’s a one time donation that is a simple thanks for all the hard work I put into my patterns and this website.


Another way to avoid ads and pop-ups, get instant, PRINTABLE downloads of this pattern and others, is by becoming a Member on this website. When you become a Website Supporter for $3/month, you’ll gain access to exclusive member only posts. These posts contain one click downloads of the patterns. Simply click the Download & Print button. The PDF will automatically download to your computer or smart device. You can then read it on your device or print it at your leisure. You can download as many patterns as you like for the same $3 each month. You can go to this page to learn more, become a member and support my work… Exclusive Member Area


Things You Will Need:

Worsted weight yarn (aka 4 or Aran weight or 10 ply) I like acrylic. It washes and wears well. It’s also easy to find and rather inexpensive.

Size 4 mm (US size 6) knitting needles

Tapestry needle (to sew seams and work in the ends)

Knitted socks can be slippery on wood floors but I find that this can help:


Abbreviations

If you’re unsure how to do any of the following, click the link to watch the video demo.

Cast on – cast on

K – knit

P – purl

K2tog – knit 2 stitches together

M1 – Make one (Makes one stitch increase)

draw through (or gather) stitches

Gauge

With size 4 mm (US size 6) needles or whatever size needles you need to create the number of stitches and rows. Be sure to check your gauge or the sizing could be off. But even in saying that, this is a very forgiving pattern. If you’re off a bit, it’ll be okay.

4″ = 16 stitches

4″ = 40 rows

Sizes are written as follows:

Women 6-7 (8-9, 10-11,12-13)

Men’s 5-6 (7-8, 9-10, 11-12)

It’s only the numbers of rows that are going to change with the sizing.

To Begin – Making the Heel Flap

Cast on 3 stitches

(I’m counting this as row 1 only because I mis-numbered the rows when I originally posted this knitting pattern. It was easier to change it at the beginning than renumbering the entire pattern.)

Rows 2 – 3: Knit across

Row 4: K1 M1 K2. (4 sts)

Rows 5 – 6: Knit across

Row 7: K1 M1 K2 M1 K1 (6 sts)

Rows 8 – 9: Knit across

Row 10: K1 M1 K4 M1 K1 (8 sts)

Rows 11 – 12: Knit across

Row 13: K1 M1 K6 M1 K1 (10 sts)

Rows 14 – 15: Knit across

Row 16: K1 M1 K8 M1 K1 (12 sts)

Rows 17 – 18: Knit across

Row 19: K1 M1 K10 M1 K1 (14 sts)

Rows 20 – 21: Knit across

Row 22: K1 M1 K12 M1 K1 (16 sts)

Row 23 – 24: Knit across

If you are having difficulties with casting on the stitches, the video above ???? starts exactly at that spot. If you know how to do that, keep on going with the pattern.

Row 25: Cast on 14 sts. (Yes, you already have 16 stitches on your needle. Don’t break your yarn. Simply cast on. The next stitches are knit into the stitches you cast on and the original 16 that were there). * P1 K1 * Repeat from * to * 6 more times. P1 K14 P1. (30 sts)

Row 26: Cast on 14 sts. (Yes again.) ⟡ K1 P1 ⟡ Repeat from ⟡ to ⟡ 6 more times. K16 ⦷ P1 K1 ⦷ Repeat for ⦷ to ⦷ 6 more times. (44 sts)

Row 27: ⧱ P1 K1 ⧱ Repeat from ⧱ to ⧱ 6 more times. P1 K14 P1. ⨳ K1 P1 ⨳ Repeat from ⨳ to ⨳ 6 more times (44 sts)

Row 28: ⋚ K1 P1 ⋚ Repeat from ⋚ to ⋚ 6 more times. K16 ⨈ P1 K1 ⨈ Repeat from ⨈ to ⨈ 6 more times.⧭

Repeat ⧭ to ⧭ 28 (31, 34, 37) times.

Another way to think of it, you will have knit 56 (62, 68, 74) rows TOTAL.

***END WITH ROW 27***. This maintains the pattern.

More of my stuff on Etsy:

ALL patterns on Etsy are
40% off
until March 31


You can make a widget like this for your blog or website, too.
Instructions are on my website here: How to Display Etsy Items on Your Website

Ending the Toe

Like with the casting on, some people have difficulties with forming the toe. The video below starts exactly at that point.

Next row: K1 K2tog 12 times. K1 K2tog to the end of the row.

Next row: P8 K7 P8

Next row: K2tog across. Knit the last stitch.

Next row: P5 K3 P4.

Pull the yarn through or draw stitches together. Cut the yarn leaving 12″ or so.

Finishing

Sew up the seam from where you gathered the toe stitches to roughly 2/3 up the foot.

Flip up the heel flap and sew up the seams on the back of the heel.

Work in your ends.

Hints and Tips

It’s important to sew the toe seam close to 2/3 of the way from the toe to the ankle. Any less and it will feel a bit sloppy on the wearer’s foot. Any further and it will be too tight for the wearer to get over their heel. You can lay it out and measure it or simply eyeball it. It’s not rocket science.

If you want to pick up stitches to add the heel flap after instead of how I did it in one piece, cast on 44 sts to start and then start at row 27.

This is a good pattern to use variegated yarn. The pattern is very simple so the yarn texture and print can really show off. You can use the self striping yarn, but getting the stripes to match will be difficult.

Like all my patterns, you can sell whatever slippers you make with this pattern. You are NOT permitted to print or copy this pattern in any way. You are not permitted to copy or redistribute this pattern in any form including, but not limited to, any physical or digital versions. To do so will violated copyright law. And give you bad karma.

Posted on 2 Comments

FREE Knitting Pattern – Winter Beanie Toque or Touque or Tuque with Vertical Stripes

Free Knitting Pattern - Toque, Touque, Beanie with vertical stripes

It wasn’t until this very moment in my life that I realized that naming a knitting pattern for winter headgear was going to be complicated. For those that don’t know about the internet and how information is found, writers have to write around keywords so web crawlers can find the information. I won’t bore you any further with that, but it does cause some, indecision, shall we say, when it comes to naming this knitting pattern. As it so happens, there are at least 3 ways to spell what I know as a touque. I’m Canadian. That’s what we call it and how I have always spelled it. My autocorrect on the other hand, is calling me a doofus and insists that it’s toque. In a state of mild rage I went to the internet to see what’s what in regard to this winter hat dilemma. Turns out there is a third option: tuque. What the actual “f”?! 

I do realize that a lot of people generally refer to winter headwear as beanies. TBH that to me is a more tight fitting winter hat that conforms to the shape of your head and NEVER has a pom pom. These are the manly toques worn under hooded things like hoodies and winter jackets, especially when it gets really cold outside.

This pattern is different from most touque patterns I’ve seen and knit up over the years. I’m a little obsessed with short rows this last couple of months. So far I’ve made dishcloths and coasters and slippers using this technique. Instead of casting on all the stitches you’ll need to go around the head, this touque is knit from the forehead to the crown or top of the head. It’s still knit flat, with the shaping of the head being worked as you go. It also gives a neat vertical striping effect if you’re using self striping yarn. And just so you know, the smaller the stripes the narrower the stripes on the toque. 

If you would prefer a printed copy of this pattern, there are a couple options for you. No, you don’t need to message me how you’re up in arms that you can’t print this webpage. You can keep scrolling down this page and read the pattern row by row on your phone or tablet in the comfort of your chair as you knit. A printed copy is a preference but not necessary to read and use this pattern.

If you would like a formatted, printable copy, you can purchase it from this website – Easy Knitting Pattern – Winter Beanie Toque/Touque/Tuque with Vertical Stripes, my Etsy shop, Ravelry, Google Books, Love Crafts and from Amazon for Kindle and as a paperback. Be sure you pick the correct country so shipping for your paperback is free if you are an Amazon Prime member.

Another way to avoid ads and pop-ups, get instant, PRINTABLE downloads of this pattern and others, is by becoming a Member on this website. When you become a Website Supporter for $3/month, you’ll gain access to exclusive member only posts. These posts contain one click downloads of the patterns. Simply click the Download & Print button. The PDF will automatically download to your computer or smart device. You can then read it on your device or print it at your leisure. You can download as many patterns as you like for the same $3 each month. You can go to this page to learn more, become a member and support my work… Exclusive Member Area

If you like the vertical stripes but have no self striping yarn, I’ve marked in the pattern where to change the colours. This makes this touque a great project to use up all those left over bits of yarn from other projects. I keep them too. I just can’t bring myself to throw out those bits. I always feel I’ll find a use for them.

But enough. You’re here to knit…

Things You Need:

Worsted weight yarn – a standard ball of yarn (215 yards/197 m). It may need to be more if you want a big, dense and fluffy pom pom.

Size 5 mm (size 8 US) knitting needles or whatever you need to acquire the correct gauge.

Tapestry needle to sew the seam and work in the ends

Pom pom maker – or you can use the two pieces of cardboard method. I’m sure there’s a video on YouTube showing how to do this.

Gauge

In stockinette 

9 sts – 5 cm (2″) 

12 rows – 5 cm (2”) 

Sizes are for small, medium and large and are written as such sm (med, lg).

Small – 21 inches

Medium – 22.5 inches

Large – 24 inches

Sizing is always general for knitting as it has a fair amount of stretch to it and tends to contract and expand as needed.

Abbreviations

K – knit

P – purl 

st – stitch

sts – stitches

Starting the Toque, Touque, Tuque, Beanie….*Sigh* I give up SMH

Cast on 39 (45, 48)

Row 1: P9 (12, 12) K30 (33, 36)

Row 2: P30 (33, 36) K9 (12, 12)

♥ Row 3: K37 (43, 46) (leave last 2 sts unworked. Turn).

leave 2 stitches unworked
Leave last 2 stitches unworked
Flip and knit

Row 4: P28 (31, 34) K9 (12, 12)

Row 5: P9 (12, 12) K27 (30, 33) (leave last 3 sts unworked. Turn).

Row 6: P27 (30, 33) K9 (12, 12)

Row 7: K35 (41, 44) (leave last 4 sts unworked. Turn).

Row 8: P26 (29, 32) K9 (12, 12)

Row 9: P9 (12, 12) K25 (28, 31) (leave last 5 sts unworked. Turn). ** Break yarn and change colour here if desired.

Row 10: P25 (28, 31) K9 (12, 12)

Row 11: K35 (41, 44) (leave last 4 sts unworked. Turn).

Row 12: P26 (29, 32) K9 (12, 12)

Row 13: P9 (12, 12) K27 (30, 33) (leave last 3 sts unworked. Turn).

Row 14: P27 (30, 33) K9 (12, 12)

Row 15: K37 (43, 46) (leave last 2 sts unworked. Turn).

Row 16: P28 (31, 34) K9 (12, 12)

Row 17: P9 (12, 12) K30 (33, 36) **Break yarn and change colour here if desired. 

(No need to colour change if this is the last of your repeats. Stop here and cast off on the wrong side if all repeats are complete.)

Row 18: P30 (33, 36) K9 (12, 12) ♥ Repeat from ♥ to ♥ 6 times more for a total of 7 times.

You’ll have 7 lines dividing the sections when you look at the toque from the top.

The seven sections. Stitches around the top hole are NOT drawn together.

Sew up the seams, draw the top center stitches together. You don’t need to add a pom pom, but I think it looks a lot better with one.

More of my stuff on Etsy

ALL patterns on Etsy are
40% off
until March 31


You can make a widget like this for your blog or website, too.
Instructions are on my website here: How to Display Etsy Items on Your Website

Hints and Tips

Any type of yarn will work for this project. It doesn’t have to be striped just because that’s how I did it. A solid colour would look just as good. Another option it to use the ombre yarns that gently shift from one colour to another. It’s nice to be able to make a beanie that has the colour transition go up and down instead of the usual horizontal way.

Colour changes have to be done in groups of 2 or 7 colours if you want to maintain the proper sequence. For example: black, white, black white, black white, etc. for 2 colours. If you want 7 different colours it would have to be something like: red, orange, yellow, green, blue, purple, black and then repeat those colours again in that order. Of course, it you’re using up leftover yarn and aren’t repeating colours, it doesn’t matter. 

Another way to think of it…there are 14 possible colour sections to this winter hat. Any number that fits equally into 14 can be repeated in sequence around the hat. 

When making colour changes, you can work in the ends as you go for the first colour change. I show how to do that here – How to Work in the Ends While Knitting. You can also work them in with the tapestry needle when done.

The second colour change occurs at the top of the hat. I tie and knot the ends of the yarn together as I change colour. When done, I thread them up and through the pom pom and cut off the dangly bits so they blend in with it. The knots are above the crown of the head and don’t actually touch the scalp. It’s an easy, time saving short cut. 

Like all my patterns, you have my permission to sell, give away or keep any of the physical items you make. You are NOT permitted to reproduced this pattern in any way, including but not limited to, all digital or physical copies.

Posted on 16 Comments

Cable Knit Slippers for Children and Adults – FREE Knitting Pattern

Cable Knit slippers - free knitting pattern

Learn to knit comfy, cozy cabled slippers. This pattern shows you how to make slippers for children from a small size 3 to large 3, and a woman’s and man’s size 4 to 12. This makes it a great project for a knitter with some experience but wanting to make something that is a little more challenging.

Even if you have never knit a cable before, have no fear! This pattern includes detailed instructions and numerous photos on how to create the cable. And if you need to brush up on some of the more basic stitches, you can learn how to knit with my YouTube videos.

Not wanting to be online all the time? You can also download the ad free version of this pattern, for a small fee, here – How to Knit Cable Slippers and in my Etsy shop.

Another way to avoid ads and pop-ups, get instant, PRINTABLE downloads of this pattern and others, is by becoming a Member on this website. When you become a Website Supporter for $3/month, you’ll gain access to exclusive member only posts. These posts contain one click downloads of the patterns. Simply click the Download & Print button. The PDF will automatically download to your computer or smart device. You can then read it on your device or print it at your leisure. You can download as many patterns as you like for the same $3 each month. You can go to this page to learn more, become a member and support my work… Exclusive Member Area

If you are enjoying the free knitting patterns, don’t forget to learn more about how you can Help Support My Work. Using those share buttons down there?? is a great way to start! Letting others know about this pattern is good for everyone.

Things you will need:

If you are having a difficult time locating the supplies you need to make these slippers, click any link below to have it mail right to your door.

200 gr of worsted weight yarn (usually this is less but better to have too much).

Size 4.5 (US size 7) single pointed knitting needles or whatever size to obtain correct gauge.

Cable knitting needle

Darning needle to sew the seams and work in the ends.

Gauge: 

14 rows stockinette = 2″

9 stitches stockinette = 2″

Be sure to check your gauge to obtain correct sizing!

Children’s Sizes 3 – 3

Cable Knit Slippers

Numbers in parenthesis are written for sizes as such 3-4 (5-6, 7-8, 9-10, 11-12, 13-1, 2-3)

Cast on 29 (29, 31, 32, 34, 35, 37)

Row 1: K3 (3, 3, 3, 4, 4, 4) P1 K3 P1 K13 (13, 15, 16, 16, 17, 19) P1 K3 P1 K3 (3, 3, 3, 4, 4, 4)

Row 2: K4 (4, 4, 4, 5, 5, 5) P3 K3 (3, 4, 4, 4, 4, 5) P1 K7 (7, 7, 8, 8, 9, 9) P1 K3 (3, 4, 4, 4, 4, 5) P3 K4 (4, 4, 4, 5, 5, 5)

Row 3: K3 (3, 3, 3, 4, 4, 4) P1 C1F K1 P1 K13 (13, 15, 16, 16, 17, 19) P1 C1F K1 P1 K3 (3, 3, 3, 4, 4, 4)

Row 4: Repeat row 2.

Row 5: K3 (3, 3, 3, 4, 4, 4) P1 K1 C1B P1 K13 (13, 15, 16, 16, 17, 19) P1 K1 C1B P1 K3 (3, 3, 3, 4, 4, 4)

Repeat rows 2–5 3 (4, 5, 6, 6, 7, 8) times more.

Next row: Repeat row 2.

Shape Toe

Next row: K2tog once (once, once, once, twice, twice, twice) K 1 (1, 1, 1, 0, 0, 0) P1 C1F K1 P1 K13 (13, 15, 16, 16, 17,19) P1 C1F K1 P1 K 1 (1, 1, 1, 0, 0, 0) K2tog once (once, once, once, twice, twice, twice)  Click here for an explanation.

? Next row (and all remaining even rows): K3 P3 K3 (3, 4, 4, 4, 4, 5) P1 K7 (7, 7, 8, 8, 9, 9) P1 K3 (3, 4, 4, 4, 4, 5) P3 K3 

Next row: K2 P1 K1 C1B P1 K13 (13, 15, 16, 16, 17, 19) P1 K1 C1B P1 K2

Next row: Repeat row marked with ? (All rows when wrong side of the work is facing you.)

? Next row: K2 P1 C1F K1 P1 K13 (13, 15, 16, 16, 17, 19) P1 C1F K1 P1 K2

Next row: Repeat row marked with ?

Next row: K2 P1 K1 C1B P1 K13 (13, 15, 16, 16, 17, 19) P1 K1 C1B P1 K2

Next row: Repeat row marked with ? ?

Repeat from ? to ? 3 (3,3,3,4,4,4) times more.

End Toe

Next row: K2tog P1 SL1 K2tog PSSO P1 K1 (1, 1, 0, 0, 1, 0) K2tog 6 (6, 7, 8, 8, 8, 9) times P1 SL1 K2tog PSSO P1 K2tog.

Next row: Knit

Next row:  K2tog to the end of the row. If you have an extra stitch at the end of the row, knit it.

Next row: Knit

Pull yarn through.


Form Heel:

With the right side of the slipper facing you, pick up 10 sts along the back of the sole between the purl stitches.

Row 1 – 3 : Knit across.

Row 4: K2tog K6 K2tog. (8 sts)

Row 5 – 7: Knit across.

Row 8: K2tog K4 K2tog. (6 sts)

Row 9 – 11: Knit across.

Row 12: K2tog K2 K2tog. (4 sts)

Row 13 – 15 : Knit across.

Row 16: K1 K2tog K1. (3 sts)

Row 17 – 19: Knit across.

Bind off.

When shaping the toe, once completed the row, you should have 2 knit stitches before the purl of the cable at the beginning of the row and 2 stitches after the last purl after the cable at the end of the row regardless of the size. Depending on the size you either knit 2 stitches together twice or knit two stitches together once and knit the one remaining stitch. Regardless of size this gives the two stitches.

More of my stuff on Etsy:

ALL patterns on Etsy are
40% off
until March 31


You can make a widget like this for your blog or website, too.
Instructions are on my website here: How to Display Etsy Items on Your Website

Adult Sizes: 

Cable Knit Slippers

Numbers in parenthesis are written for sizes as such:

Women’s 4-5 (6-7, 8-9, 10-11, 12) 

Men’s 4 (5-6, 7-8, 9-10, 11-12)

A woman’s size 6-7 is the same as a man’s size 5-6. A woman’s size 8-9 is the same as a man’s size 7-8. etc.

Cast on 40 (44, 46, 48, 50)

Row 1: K3 (4, 4, 5, 5) P1 K6 P1 K18 (20, 22, 22, 24) P1 K6 P1 K3 (4, 4, 5, 5)

Row 2: K4 (5, 5, 6, 6) P6 K4 (5, 5, 5, 6) P1 K10 (10, 12, 12, 12) P1 K4 (5, 5, 5, 6) P6 K4 (5, 5, 6, 6) 

? Row 3: K3 (4, 4, 5, 5) P1 C2F K2 P1 K18 (20, 22, 22, 24) P1 C2F K2 P1 K3 (4, 4, 5, 5)

Row 4: Repeat row 2. 

Row 5: Repeat row 1.

Row 6: Repeat row 2.

Row 7: K3 (4, 4, 5, 5) P1 K2 C2B P1 K18 (20, 22, 22, 24) P1 K2 C2B P1 K3 (4, 4, 5, 5)

Row 8: Repeat row 2.

Row 9: Repeat row 1.

Row 10: Repeat row 2. ?

Repeat from ? to ? 3 (3, 4, 4, 4) times more.

Shape Toe:

Next row: K2tog 1 (1, 1, 2, 2) times K1 (2, 2, 1, 1) P1 C2F K2 P1 K18 (20, 22, 22, 24) P1 C2F K2 P1 K1 (2, 2, 1, 1) K2tog 1 (1, 1, 2, 2) times. 38 (42, 44, 44, 46) sts.

Next row: K3 (4, 4, 4, 4) P6 K4 (5, 5, 5, 6) P1 K10 (10, 12, 12, 12) P1 K4 (5, 5, 5, 6) P6 K3 (4, 4, 4, 4) 

Next row: K2tog K 0 (1, 1, 1, 1) P1 K6 P1 K18 (20, 22, 22, 24) P1 K6 P1 K 0 (1, 1, 1, 1) K2tog. 36 (40, 42, 42, 44) sts. 

? Next row: K2 (3, 3, 3, 3) P6 K4 (5, 5, 5, 6) P1 K10 (10, 12, 12, 12) P1 K4 (5, 5, 5, 6) P6 K2 (3, 3, 3, 3) 

? Next row: K1 (2, 2, 2, 2) P1 K2 C2B P1 K18 (20, 22, 22, 24) P1 K2 C2B P1 K1 (2, 2, 2, 2)

Next row: Repeat row marked with ?

⭐️ Next row: K1 (2, 2, 2, 2) P1 K6 P1 K18 (20, 22, 22, 24) P1 K6 P1 K1 (2, 2, 2, 2)

Next row: Repeat row marked with ?

? Next row: K1 (2, 2, 2, 2) P1 C2F K2 P1 K18 (20, 22, 22, 24) P1 C2F K2 P1 K1 (2, 2, 2, 2)

Next row: Repeat row marked with ?

Next row: Repeat row marked with ⭐️

Next row: Repeat row marked with ?

Next row: Repeat row marked with ?

Next row: Repeat row marked with ?

Next row: Repeat row marked with ⭐️

Next row: Repeat row marked with ? ?

Repeat from ? to ? 0(1, 1, 2, 3) times more.

End Toe:

Next row: K1 (2, 2, 2, 2) P1 C2F K2 P1 K18 (20, 22, 22, 24) P1 C2F K2 P1 K1 (2, 2, 2, 2)

Next row: Repeat row marked with ?

Next row: Repeat row marked with ⭐️

Next row: Repeat row marked with ?

Next row: K2tog across.

Next row: Knit across.

Next row: K2tog 9 (10, 10, 10, 11) times.

Knit the last stitch for women’s sizes 8-9 and 10-11 and the men’s sizes 7-8 and 9-10 only.

Next row: Knit across.

Pull yarn through.

Form Heel:

With the right side of the slipper facing you, pick up 14 sts along the back of the sole between the purl stitches.

Row 1 – 3 : Knit across.

Row 4: K2tog K10 K2tog. (12 sts)

Row 5 – 7: Knit across.

Row 8: K2tog K8 K2tog. (10 sts)

Row 9 – 11: Knit across.

Row 12: K2tog K6 K2tog. (8 sts)

Row 13 – 15 : Knit across.

Row 16: K2tog K4 K2tog. (6 sts)

Row 17 – 19 : Knit across.

Row 20: K2tog K2 K2tog. (4 sts)

Row 21 – 23 : Knit across.

Row 24: K1 K2tog K1. (3 sts)

Row 25 – 27: Knit across.

Bind off.

Hints and tips:

This pattern doesn’t contain a child’s size 4-5. Based on the foot measurements I used to develop the pattern there isn’t a need. A woman’s size 5 measures 8 11/16 inches long, while a girl’s size 3 measures 8 9/16 inches long. Knitting is very forgiving with small differences in measurements such as this. But when in doubt, I recommend making the larger size.

The children’s slipper is made with a smaller cable than the adult sizes. It uses C1F and C1B to allow for the smaller foot size.

C1F (Cable 1 forward) is done the same way as the C2F, but instead of knitting and pulling forward 2 stitches, only knit and pull one stitch forward.

C1B – (Cable 1 backward) is done the same way as the C2B, but instead of knitting and pulling of 2 stitches to the back of your work, only knit and pull one stitch back.


How to Make the Cable:

C2F – Cable 2 Forward. 

You can also watch this helpful video on YouTube: https://youtu.be/PrCjIC3fhxk


With your cable needle, slip 2 stitches off the needle

Cable 2 forward knitting

Pull the stitches towards the front of your work.

Cable 2 forward knitting

Knit the next 2 stitches.

Cable 2 forward knitting

Cable 2 forward knitting

Knit the stitches from the cable needle.

Cable 2 forward knitting

Cable 2 forward knitting

Knit the last 2 stitches of the cable (accounted for in the pattern with the K2).

Cable 2 forward knitting

C2B – Cable 2 backward. 

You can also watch how to do this with my helpful video on YouTube: https://youtu.be/u8GrJIJseKQ

Knit the first 2 stitches of the cable (accounted for in the pattern with the K2.)

Cable 2 back knitting

With your cable needle, slip 2 stitches off the needle.

Cable 2 back knitting

Pull the stitches towards the back of your work.

Cable 2 back knitting

Knit the next 2 stitches.

Knit the stitches from the cable needle.

Cable 2 back knitting

Cable 2 back knitting

Cabling described without photos:

C2F – Cable 2 forward

With your cable needle, slip 2 stitches off the needle and pull the stitches towards the front of your work. Knit the next 2 stitches. Knit the 2 stitches from the cable needle.

C2B – Cable 2 backward

With your cable needle, slip 2 stitches off the needle and pull the stitches towards the back of your work. Knit the next 2 stitches. Knit the 2 stitches from the cable needle.

If you have any questions, please feel free to leave a comment or send me your questions here.

Abbreviations:

K – Knit

P – Purl

K2tog – knit 2 together

sts – stitches

C1F – Cable 1 forward (this is done the same way as the C2F, but instead of knitting and pulling forward 2 stitches, only knit and pull one stitch forward). With your cable needle, slip 1 stitch off the needle and pull the stitch towards the front of your work. Knit the next stitch. Knit the stitch from the cable needle. 

C1B – Cable 1 backward (this is done the same way as the C2B, but instead of knitting and pulling of 2 stitches to the back of your work, only knit and pull one stitch back). With your cable needle, slip 1 stitch off the needle and pull the stitch towards the back of your work. Knit the next stitch. Knit the stitch from the cable needle.

C2F – Cable 2 forward. With your cable needle, slip 2 stitches off the needle and pull the stitches towards the front of your work. Knit the next 2 stitches. Knit the 2 stitches from the cable needle. 

C2B – Cable 2 backward. With your cable needle, slip 2 stitches off the needle and pull the stitches towards the back of your work. Knit the next 2 stitches. Knit the 2 stitches from the cable needle.

SL 1 – Slip 1 stitch off knit ways

PSSO – Pass the slipped stitch over

If you have any questions, please feel free to leave a comment or send me your questions at [email protected] or through my contact form.

Copyright 2020

Janis Frank

This pattern gives you permission to sell or give away anything that you make with this pattern. It does NOT give you permission to give away, reproduce in any form or sell this pattern.


Posted on Leave a comment

FREE Knitting Pattern – Minimalist Round Toe Slippers

Free Knitting Pattern - Round Toe Slippers

I’ve been looking to simplify my Adult Moccasin Slippers for some time now. I wanted to design a minimalist style slippers that were knit on a single set of knitting needles, without the sewing of seams (which I try to avoid at all costs, btw). I also wanted to keep any tricky techniques to a minimum. With this pattern, there are no additional sets of needles required, and no knitting in the round on double pointed needles (DPN) to make the edging.

And because there is a bit of starting and stopping when making the sections, this leaves a number of ends to sew in. I strongly recommend working in your ends while you knit. If you don’t know how to do that, you can check out How to Work in the Ends While Knitting on my website. For a quick how to: hold the yarn on the back of your work (the wrong side) and catch the yarn every other stitch. It totally works and in all the slippers I’ve made over the years, I’ve never had a single complaint about it coming undone.

Please note that in some of the photos showing parts of the slipper, I used double pointed needles. These needles are NOT necessary. I just prefer to use shorter needles when knitting narrow pieces. Regular single pointed needles work just as well.

If you would prefer to print the pattern or have it available offline, you can purchase the PDF for a small fee. You can buy it from this website here – Minimalist Round Toe Knitted Slippers Pattern, Ravelry, LoveCrafts, and Etsy. I also have the ebook available on Google Books and both Kindle and the paperback version on Amazon. Make sure you go to your country if ordering from Amazon.

Another way to avoid ads and pop-ups, get instant, PRINTABLE downloads of this pattern and others, is by becoming a Member on this website. When you become a Website Supporter for $3/month, you’ll gain access to exclusive member only posts. These posts contain one click downloads of the patterns. Simply click the Download & Print button. The PDF will automatically download to your computer or smart device. You can then read it on your device or print it at your leisure. You can download as many patterns as you like for the same $3 each month. You can go to this page to learn more, become a member and support my work… Exclusive Member Area

If you enjoy this pattern and my other free online knitting patterns, please consider making a small donation or helping me out by visiting my Help Support My Work page. If that’s not possible, that’s totally fine too! Even sharing this page on your social media helps me out immensely. You can use those buttons ?? to do so easily.

Things You Need

Size 6 US (4 mm) knitting needles

Worsted weight yarn – any standard ball of yarn will suffice. (I’m a fan of Red Heart and Bernat worsted weight as it is easy to find and economical.)

Tapestry needle – to work in the ends.

Abbreviations

K – knit

K2tog – knit 2 together

st – stitch

sts – stitches

Gauge

Make sure you match the gauge or sizing will be off.

18 stitches = 4 inches 

24 rows = 4 inches 

in stockinette

Sizes are written as such:

Women’s 6-7 (8-9, 10-11, 12)

Men’s  5-6 (7-8, 9-10, 11-12)

Starting the Quarter Circle and Side

Cast on 12 (13, 14, 15)

☺ Row 1 – 2: Knit across.

Row 3: K11 (12, 13, 14) Turn work. Leave last stitch unworked.

Row 4: K11 (12, 13, 14)

Row 5: K10 (11, 12, 13) Turn work. Leave last 2 stitches unworked.

Row 6:  K10 (11, 12, 13)

Row 7: K9 (10, 11, 12) Turn work. Leave last 3 stitches unworked.

Row 8: K9 (10, 11, 12)

Row 9: K8 (9, 10, 11) Turn work. Leave last 4 stitches unworked.

Row 10: K8 (9, 10, 11)

Row 11: K7 (8, 9, 10) Turn work. Leave last 5 stitches unworked.

Row 12:  K7 (8, 9, 10)

Row 13: K6 (7, 8, 9) Turn work. Leave last 6 stitches unworked.

Row 14: K6 (7, 8, 9)

Row 15: K5 (6, 7, 8) Turn work. Leave last 7 stitches unworked.

Row 16: K5 (6, 7, 8)

Row 17: K4 (5, 6, 7) Turn work. Leave last 8 stitches unworked.

Row 18: K4 (5, 6, 7)

Stop here for women’s size 6-7 and men’s size 5-6. Eighth of a circle completed. Go to instructions marked with ۞

Row 19: K0 (4, 5, 6) Turn work. Leave last 9 stitches unworked.

Row 20: K0 (4, 5, 6)

Stop here for women’s size 8-9 and men’s size 7-8. Eighth of a circle completed. Go to instructions marked with ۞

Row 21: K0 (0, 4, 5) Turn work. Leave last 10 stitches unworked. 

Row 22: K0 (0, 4, 5)

Stop here for women’s size 10-11 and men’s size 9-10. Eighth of a circle completed. Go to instructions marked with ۞

Row 23: K0 (0, 0, 4) Turn work. Leave last 10 stitches unworked.

Row 24: K0 (0, 0, 4) ☺

Stop here for men’s size 11-12. Eighth of a circle completed.

۞ Come here when indicated to stop for the size you are making. 

Repeat from ☺ to ☺ once to make another eighth of a circle.

First 1/8th of a circle looks like this.
The second 1/8th looks like this. You now have 1/4th of a circle.

When you have made a quarter circle (1/8 + 1/8 = 1/4), start knitting rows as follows:

Next row: Knit across for 40 (42, 46, 50) rows total.

Starting the back and forth rows. What it looks like finished is below.

Cast off.

With the RIGHT side of your work facing you, pick up  12 (13, 14, 15) sts along the original cast on row.

Side finished (but not cast off. Make sure yours is!!)
Picking up the stitch.
Stitch picked up.
Two stitches picked up.
Stitches picked up along the edge.

Repeat from ☺ to ☺ twice.

First repeat.
Second repeat.

Knit across for 40 (42, 46, 50) rows total.

Starting the back and forth rows.
Done the toe and sides.

Cast off.

Edging (Done before sole)

I know it’s a little unconventional to add an edging at this point. This is usually something you do as a last step. But, to keep this slipper pattern as simple as possible, and to not need any other knitting needles or need to know how to knit in the round, we’ll make the edging now. You can use a complimentary colour or the same colour that you are already using. The choice is yours. 

With the RIGHT side of your work facing you, pick up 20 (21, 23, 25) sts along the edge, 7 sts over the curve of the toe and 20 (21, 23, 25) sts along the other edge. 

If you spread the rows apart a bit you can see where to pick up the stitch.
First 2 stitches picked up..
Stitches picked up along edge
It doesn’t have to be perfect. As long as the 7 stitches are picked up evenly in this space it’s ok.
Seven stitches picked up.
All stitches picked up.

Knit (4, 4, 4) rows over the picked up stitches. Cast off loosely on the WRONG side.

More of My Stuff on Etsy:

ALL patterns on Etsy are
40% off
until March 31


You can make a widget like this for your blog or website, too.
Instructions are on my website here: How to Display Etsy Items on Your Website

Making the Sole

With the RIGHT side of your work facing you, find the middle seam of the toe. This is the line where you picked up the stitches the first time after making the first quarter section and side strip. Count over 5 (6, 6, 6) ridges. Pick up 11 (13, 13, 13) sts to start the sole. The middle stitch (the 6th (7th, 7th, 7th stitch) should be picked up in the middle seam. 

Stitches picked up. This is the smallest size so there are only 11 stitches.

Next row: Knit across.

♥ Next row: With the RIGHT side facing, attach yarn and pick up a stitch in the ridges by the toe flap. K2tog. Knit to the last 2 stitches K2tog. Pick up a stitch in the ridges by the point of your needle. You now have 11 (13, 13, 13) stitches.

Keep picking up a stitch on each side down the entire length to form the sole.

Next row: Knit across. ♥ Repeat from ♥ to ♥ down the length of the slipper until there are no ridges left.

As you pick up stitches along the side, the sole will automatically curve around the toe like this.
Keep working your way down the length of the slipper.

Forming the Heel

I recently made a video showing how to do this. It’s how I make a lot of my slipper heels including this pattern. You can watch the video below to help you if the photos aren’t enough.

◘ Next row: With the RIGHT side facing, pick up a stitch in the cast off stitch closest to the sole of the slipper. K2tog twice. Knit to the last 4 stitches. K2tog twice. Pick up the cast off stitch on the other side.

Next row: Knit across.

Next Row: Pick up a stitch in the next cast off stitch. K2tog. Knit until the last 2 stitches. K2tog. Pick up the cast off stitch on the other side.

Next row: Knit across. ◘ Repeat from ◘ to ◘ until 7 stitches remain.

Working up the back of the heel.

Next row: K2tog, Knit 3 stitches together, K2tog.

Next row: Knit the 3 stitches together.

Break yarn leaving a length of yarn long enough (8ish inches) to sew up the remaining seam.

Make another slipper.

The back of the heel completed.
heels complete
Heels sewn and complete.

Yes, the toe does look a little boxy when they’re not on a foot. The stretch of the garter stitch allows these slippers to stretch around the contours of any foot easily. 

Hints and Tips

If you are up in arms about sewing in the ends when you are done, there is away to avoid it. You can work in the ends on the back side of your work as you are knitting. Not sure how to do that? I have a photo tutorial on my website that will show you how – How to Work in the Ends While Knitting

You can add rows to the edging to make more of a cuff if you like. Or you could also do a K1 P1 ribbing over the stitches. I didn’t like how the slipper fit or looked when it was longer. That’s why I didn’t add any photos of it.

If you have picked up a different number of stitches on each side when making the sole, it’s not a big deal as long as it’s only a row or two. I suggest picking up 2 stitches in one row, rather than skipping a row. It’s less noticeable. 

I designed this pattern to have a very minimalist feel to it. Of course, not everyone is into function only wearables. If you want to add pompoms, fancy large buttons or some other decorations, have at it! Be creative and add your personal touch to the design.

Like all of my patterns you have my permission to sell and/or give away the slippers that you make using this pattern. You are NOT permitted to reprint this pattern in any form unless you have obtained my written permission to do so. 

If you have any questions, please feel free to leave a comment or send me your questions at [email protected].

Posted on Leave a comment

Members Only Demo – Easy Downloads and Printing

Not sure if you want to become a member of this site? Use this sample page to see how easy it is to read, download and print the patterns in the paid member areas. All ad and pop-up free.

If you would like to access the other patterns on this site, please click the button below to help support this website and future patterns by becoming a member. Downloads are unlimited and you always have access to the exclusive Members Only pattern pages as long as your subscription is up to date. Cancel your subscription at any time.

Netflix & Knit (this scarf)

Hipster Wine Cozy

Fun and Easy Monster Purse

Click the button above ????if you wish to access the patterns in the member only areas.

Posted on 1 Comment

One Piece Knitted Dishcloth and Coasters – FREE Knitting Pattern for Beginners

Easy knitting pattern for beginners - coaster dishcloth

This knitting pattern is very versatile and can be made to be any size of square. For myself, I like it as a dishcloth. But when I started to knit up samples for the photos I realized that this design could transfer into any thing that can be square. Regardless of the size, because of the method of making it, it will always be square regardless of how many, or few, stitches are cast on at the outset. 

And no need to worry about picking up stitches or any other difficult techniques. If you can knit and cast on and cast off, you can make this. It’s not complicated at all.

For myself, I found that 32 stitches made for the perfect size dishcloth and used a little less than one of the smaller balls of cotton yarn. I like mine to be bigger but not unmanageably so. I also found that making a coaster or mini face scrubber, took about 18 stitches. These are just approximate cast on stitch counts. I found that there is some variation in the worsted weight (medium 4) yarn thickness. You may need to add 2 or 3 more cast on stitches if it’s on the thinner side.

I’ve written the pattern to make a dishcloth so started with 32 stitches cast on. A quick tip, if you use a size smaller needle (4 mm or US 6) to cast on, then switch back to the 5 mm (US 8) the starting edge looks a bit more finished and tight.

Another plus about this pattern, I finally designed something that really highlights variegated yarn. I have a great appreciation for the colour changing yarns that are available (I do not have similar feelings towards self striping yarn, but that’s a rant for another time). I found that the variegated yarn did really well with smaller size squares, though I like the pooling of colours when making the larger sized dishcloths as well.

And to sooth my quest for sameness, these washcloths are the same on both sides!! Both sides look pretty much the same. I know in the scheme of things this matters very little, but it somehow screams “correct” to me. I’m weird. I know. 

If you’re looking for an ad free pattern you can download to your computer, tablet or phone you can get that here – this website at One Piece Knitted Dishcloth and Coasters – Great Knitting Pattern for Beginners, LoveCrafts, my Etsy shop or Ravelry for a small fee. It is also available on Amazon Kindle and as a paperback.

Another way to avoid ads and pop-ups, get instant, PRINTABLE downloads of this pattern and others, is by becoming a Member on this website. When you become a Website Supporter for $3/month, you’ll gain access to exclusive member only posts. These posts contain one click downloads of the patterns. Simply click the Download & Print button. The PDF will automatically download to your computer or smart device. You can then read it on your device or print it at your leisure. You can download as many patterns as you like for the same $3 each month. You can go to this page to learn more, become a member and support my work… Exclusive Member Area

And, yes. I know this pattern becomes very obvious in how to make it once you start knitting. I wrote it out in full regardless, as some people (the few but very vocal) have a tendency to contact me if even the most obvious thing is not mentioned in my patterns. I’m trying to avoid these critical emails, just so you know.

It’s so obvious that you may be able to knit this without the pattern at all. That’s why I made the video. I’m sure some of the more experienced knitters out there will watch the first couple minutes of the video below and be like, “Ya. I got this.”

Things You Need


Size 8 US (5 mm) knitting needles

1 3/4 oz (42g) ball of 100% cotton worsted weight yarn

Large sewing needle (for working in the ends)

Gauge isn’t really important for this project as sizing is approximate.

Abbreviations

K – Knit

st – stitch

That’s it! This is a VERY simple pattern.

The Pattern

Cast on 32 (You will always have 32 stitches on your needle when the right side is facing you)

Row 1 – 2: Knit across

Row 3: K31. Leave the last stitch unworked. Turn.

Leave a stitch
Flip and knit
Back side of work always looks like normal knitting when the row is completed

Row 4: K31.

Row 5: K30. Leave the last 2 stitches unworked. Turn.

leave 2 stitches unworked

Row 6: K30.

Row 7: K29. Leave the last 3 stitches unworked. Turn.

Row 8: K29.

Row 9: K28. Leave the last 4 stitches unworked. Turn.

Row 10: K28.

Row 11: K27. Leave the last 5 stitches unworked. Turn.

Row 12: K27.

Row 13: K26. Leave the last 6 stitches unworked. Turn.

Row 14: K26.

Row 15: K25. Leave the last 7 stitches unworked. Turn.

Row 16: K25.

Row 17: K24. Leave the last 8 stitches unworked. Turn.

Row 18: K24.

Row 19: K23. Leave the last 9 stitches unworked. Turn.

Row 20: K23.

Row 21: K22. Leave the last 10 stitches unworked. Turn.

Row 22: K22.

Row 23: K21. Leave the last 11 stitches unworked. Turn.

Row 24: K21.

Row 25: K20. Leave the last 12 stitches unworked. Turn.

Row 26: K20.

Row 27: K19. Leave the last 13 stitches unworked. Turn.

Row 28: K19.

Row 29: K18. Leave the last 14 stitches unworked. Turn.

Row 30: K18.

Row 31: K17. Leave the last 15 stitches unworked. Turn.

Row 32: K17.

Row 33: K16. Leave the last 16 stitches unworked. Turn.

Row 34: K16.

Row 35: K15. Leave the last 17 stitches unworked. Turn.

More of my stuff on Etsy:


You can make a widget like this for your blog or website, too.
Instructions are on my website here: How to Display Etsy Items on Your Website

Row 36: K15.

Row 37: K14. Leave the last 18 stitches unworked. Turn.

Row 38: K14.

Row 39: K13. Leave the last 19 stitches unworked. Turn.

Row 40: K13.

Row 41: K12. Leave the last 20 stitches unworked. Turn.

Row 42: K12.

Row 43: K11. Leave the last 21 stitches unworked. Turn.

Row 44: K11.

Row 45: K10. Leave the last 22 stitches unworked. Turn.

Row 46: K10.

Row 47: K9. Leave the last 23 stitches unworked. Turn.

Row 53: K6. Leave the last 26 stitches unworked. Turn.

Row 48: K9.

Row 49: K8. Leave the last 24 stitches unworked. Turn.

Row 50: K8.

Row 51: K7. Leave the last 25 stitches unworked. Turn.

Row 52: K7.

Row 54: K6.

Row 55: K5. Leave the last 27 stitches unworked. Turn.

Row 56: K5.

Row 57: K4. Leave the last 28 stitches unworked. Turn.

Row 58: K4.

Row 59: K3. Leave the last 29 stitches unworked. Turn.

Row 60: K3.

Row 61: K2. Leave the last 30 stitches unworked. Turn.

Row 62: K2.

Row 63: K1. Leave the last 31 stitches unworked. Turn.

Two colour knitted square

Halfway Point

If you would like the other half of your square to use a different colour like shown above, attach it now.

Row 64: K1.

Row 65: K2. Leave the last 30 stitches unworked. Turn.

Row 66: K2.

Row 67: K3. Leave the last 29 stitches unworked. Turn.

Row 68: K3.

Row 69: K4. Leave the last 28 stitches unworked. Turn.

Row 70: K4.

Row 71: K5. Leave the last 27 stitches unworked. Turn.

Row 72: K5.

Row 73: K6. Leave the last 26 stitches unworked. Turn.

Row 74: K6.

Row 75: K7. Leave the last 25 stitches unworked. Turn.

Row 76: K7.

Row 77: K8. Leave the last 24 stitches unworked. Turn.

Row 78: K8.

Row 79: K9. Leave the last 23 stitches unworked. Turn.

Row 80: K9.

Row 81: K10. Leave the last 22 stitches unworked. Turn.

Row 82: K10.

Row 83: K11. Leave the last 21 stitches unworked. Turn.

Row 84: K11.

Row 85: K12. Leave the last 20 stitches unworked. Turn.

Row 86: K12.

Row 87: K13. Leave the last 19 stitches unworked. Turn.

Row 88: K13.

Row 89: K14. Leave the last 18 stitches unworked. Turn.

Row 90: K14.

Row 91: K15. Leave the last 17 stitches unworked. Turn.

Row 92: K15.

Row 93: K16. Leave the last 16 stitches unworked. Turn.

Row 94: K16.

Row 95: K17. Leave the last 15 stitches unworked. Turn.

Row 96: K17.

Row 97: K18. Leave the last 14 stitches unworked. Turn.

Row 98: K18.

Row 99: K19. Leave the last 13 stitches unworked. Turn.

Row 100: K19.

Row 101: K20. Leave the last 12 stitches unworked. Turn.

Row 102: K20.

Row 103: K21. Leave the last 11 stitches unworked. Turn.

Row 104: K21.

Row 105: K22. Leave the last 10 stitches unworked. Turn.

Row 106: K22.

Row 107: K23. Leave the last 9 stitches unworked. Turn.

Row 108: K23.

Row 109: K24. Leave the last 8 stitches unworked. Turn.

Row 110: K24.

Row 111: K25. Leave the last 7 stitches unworked. Turn.

Row 112: K25.

Row 113: K26. Leave the last 6 stitches unworked. Turn.

Row 114: K26.

Row 115: K27. Leave the last 5 stitches unworked. Turn.

Row 116: K27.

Row 117: K28. Leave the last 4 stitches unworked. Turn.

Row 118: K28.

Row 119: K29. Leave the last 3 stitches unworked. Turn.

Row 120: K29.

Row 121: K30. Leave the last 2 stitches unworked. Turn.

Row 122: K30.

Row 123: K31. Leave the last stitch unworked. Turn.

Row 124: K31.

Row 125: K32. 

Cast off on the WRONG side.

Hints and Tips

If you would like to make smaller squares for coasters or pot scrubbers, cast on fewer stitches. The basic idea for the pattern is to always leave one less stitch done every other row. Once you’re down to one stitch, knit one extra stitch every other row.

I know I mentioned this in the intro but it deserves repeating. If you use a size smaller needle (4 mm or US 6) to cast on, then switch back to the 5 mm (US 8) the starting edge looks a bit more finished and tight.

You don’t have to use cotton yarn if you’re going to make coasters. An acrylic or wool blend would also work well. And you can also use up some of your yarn stash this way too. Great little things to sell at a garage sale, or craft fair and recoup a little of the money already spent on the yarn.

Use these squares for anything! As long as your yarn is the same thickness and type, all acrylic let’s say, you could easily use up your last little yarn bits to make an afghan or throw blanket. I don’t quilt but I know that triangles and squares make up a good portion of quilt designs. Knitting squares that are two colours along the diagonal put together the solid coloured squares could make some very interesting patterns.

These also make good trivets or pot holders for taking things out of the oven, but only if… they are NOT wet and are made of 100% cotton. Any acrylic or polyester blend will melt to the pot and possible fingers, counter tops or tables. And ain’t nobody got time for that!!

Like all my work, you are permitted to sell, give away or keep whatever physical items you make using this pattern. You do NOT have permission to copy or redistribute this pattern (or any of my patterns) in any form either digitally or physically. That includes printed copies of the pattern either as photos or any file format.

Posted on 5 Comments

Knitting for Beginners – How to Knit a Dishcloth

Lacey Dishcloth

If you wanted to learn how to knit, this is the perfect project! Using only 3 basic stitches and including a complete step-by-step video embedded on the bottom of this page, you can make a beautiful lace like dishcloth. If you’d prefer to download the pattern so you can take it wherever you go, the download is available on this website – Dishcloth Pattern, Etsy, Ravelry and LoveCrafts. If the links aren’t working, I haven’t uploaded it to that retailer yet.

And here’s a bit more info for you. Not only can you use the pattern create a dishcloth, but if you add more rows, you can easily use the same pattern to make a scarf!

This is exactly what a newbie knitter needs to get his or her knit on! For more the seasoned knitter, this pattern doesn’t require a gauge as it’s a dishcloth and sizing isn’t important. Also, if you want to make a larger dishcloth, increase the number of initial stitches cast on and increase the number of repeated rows to make it square.

free Knitting Pattern - Lacey Dishcloth

Want to make a monthly contribution, avoid ads and pop-ups, and get instant, PRINTABLE downloads of my patterns? Become a Member on this website! When you become a Website Supporter for $3/month, you’ll gain access to exclusive member only posts. These posts contain one click downloads of the patterns. Simply click the Download & Print button. The PDF will automatically download to your computer or smart device. You can then read it on your device or print it at your leisure. You can download as many patterns as you like for the same $3 each month. You can go to this page to learn more, become a member and support my work… Exclusive Member Area

Things you need:

Size 3 US (3 or 3.25 mm) knitting needles

1 3/4 oz (50g) ball of 100% cotton worsted weight yarn

Size 8 US (5 mm) crochet hook – this is optional

Large sewing needle


Cast on 35 sts

Row 1 – 5: Knit across

* Row 6: Lace knit stitch across.

To make this stitch, simply wrap the yarn twice around the knitting needle and work as any knit stitch. (Watch the how-to for this stitch at the bottom of this post.)

Row 7 – 11: Knit across.* Repeat from * to * more times. There will be 9 lace rows.

Cast off

If you want to make a scarf simply repeat from * to * as many times as you like until you knit the length you want.

More of my stuff on Etsy


You can stop here if you choose to not crochet the edge. If you prefer a more finished edge for your dishcloth, single crochet evenly around the edge. Make 2 sc in each set of 5 rows, 1 sc in the lace knit row, 3 sc in each corner, and 1 sc in each knitted stitch along the cast on edge and the cast off edge.


That’s it! Like I said before, this is a very repetitive pattern that enables the newbie knitter to master a few basic stitches while still making something they can be proud of. A more experienced knitter can make these in a few hours or less and great to whip up if you want to give them as a gift, sell them online or at a local market, or even if you need a dishcloth for yourself. An let’s be honest, can you ever have too many dishcloths? Or is that just me…


Posted on 2 Comments

Current List of Member Patterns

Hippo fingerless mittens - free knitting pattern

This is the current list of patterns available to download and print. Once you become a member, you can print ALL of the patterns listed below for ONE monthly fee. You can become a member of the website for as long or as short a time period as you like.

The links below connect to the FREE ad-supported versions that are NOT printable. You do NOT need to be a member if you stay online to read the pattern. Membership supports my work and is like an extra tip you give. As a thank you for the tip, you get to print ALL of the patterns listed below through the membership portal.

See here for membership levels.

Watch how easy it is to use!

Click the red play button ▶️ in the middle of the embedded video below. You can watch the how-to right here on the website.

All the patterns below are available at every membership level. New patterns are added to this list continually.

All titles below are also clickable links.

Knitting Patterns

  1. Easy To Knit Fingerless Gloves – Knit Flat On Straight Needles
  2. Knit A Beanie Hat – With OWLS!
  3. Basic Knit Flat Beanie
  4. Ribbed Moccasin Bootie Slippers for Adults
  5. Super Cute Hippo Fingerless Gloves or Mitts – FREE Knitting Pattern
  6. Ultra Thick Slip-On Bootie Slippers
  7. Knitted Cozy Cuff Slippers
  8. Autumn Leaf Half Gloves – Fingerless Gloves Knit on Straight Needles
  9. How to Knit a Way Cool Monster Purse
  10. Knit a Simple Dishcloth
  11. How to Knit: Step-by-Step Beginners Video and Pattern to Knit Granny Slippers
  12. Snug Slip-On Slippers – Easy Slippers to Knit on Straight Needles
  13. Diamonds Dishcloth and Coasters
  14. Knitted Moccasin Bootie Slippers for Children – FREE Knitting Pattern
  15. Bulky Yarn Slippers on Straight Needles – FREE Knitting Pattern
  16. Easy to Knit Beginner Slipper Pattern – Knit Flat with Bulky Yarn on Straight Needles
  17. How to Knit Children’s Slippers – Free Knitting Pattern
  18. How to Knit Spider Fingerless Gloves – Knit Flat on Two Needles
  19. Chevron Striped Moccasin Slippers
  20. Cable Knit Slippers
  21. Minimalist Round Toe Slippers
  22. Easy to Knit Rolled Cuff Slippers
  23. Super Simple Easy to Knit Slippers
  24. Moccasin Style Slippers
  25. How to Knit Adult Slippers
  26. Easy to Knit Slippers
  27. Easy to Knit Long Cuffed Slippers
  28. How to Knit Adult Bootie Slippers 
  29. Adult Ribbed Booties
  30. Easy to Knit Bow Slippers
  31. Easy to Knit Owl Fingerless Gloves
  32. How to Knit Fingerless Gloves – with OWLS!
  33. How to Knit Fingerless Gloves
  34. Super Simple Fingerless Gloves
  35. Basic Long Fingerless Gloves
  36. Cable Fingerless Gloves or Mitts
  37. Fingerless Gloves or Arm Warmers with BOWS!
  38. One Piece Knitted Dishcloth and Coasters
  39. Easy to Knit Textured Scarf, Dishcloth and Coasters
  40. Bars and Stripes Knitted Dishcloth
  41. Cute AF Bows Dishcloth Pattern
  42. The Beginner Knitter – Learn to Knit a Dishcloth
  43. Vertical Striped Beanie Toque

Crochet Patterns

  1. Crocheted Sun Hat and Bucket Hat
  2. Quick to Make Bracelet
  3. Flower and Friendship Bracelet


Glad to see you here and considering becoming a member to support my work. I’m currently adding my patterns to this list, starting with my most popular. Please be patient. It will all be here soon, ??I also am writing new stuff all the time so be sure to check back often.

The pattern sections listed in the exclusive member areas don’t have ads, and you can easily download and print everything with a single click. To gain access to these areas, you’ll need to become a member for only $3 USD per month. Click here to see how easy to use the member areas.

You still have access to all previously purchased patterns, and can still buy individual patterns to print if a subscription isn’t something you’re interested in. I have a number of printable pattern purchase options including this website, my Etsy Shop, Ravelry, LoveCrafts and both digital and paperback versions on Amazon. Of course, you can read the ad supported versions on the website for free. There will always be a free version of this site for anyone who wants it. I believe in making my work as accessible as possible while still being able to pay my mortgage and feed my family each month ? You can use the buttons below to read ALL my patterns online at no cost to you.

Member patterns are available in English only. Only the ad supported, online versions of my patterns are translated into other languages.

Posted on 3 Comments

Easy to Knit Long Cuffed Slippers – FREE Knitting Pattern

FREE Knitting Pattern -Long Cuffed slippers - Green

This easy to knit slipper pattern is a variation of my Rolled Cuff Slipper pattern. This pattern has the same foot design, but I know that some people prefer a longer cuff to help keep their ankles warm.

Like my previous slipper pattern, this was written to avoid any difficult techniques, specifically, picking up stitches. That is why this pattern is done in one piece; starting at the heel flap and working towards the toe. 

Also, the extended cuff is worked in one piece as you knit the slipper. I’ve given instructions and included photos to show how you’ll need to flip the slipper so the seam for the folded down section is on the right side. When folded, the seam disappears. You can read more about that when you go to the Hints and Tips section at the end of this post.

Love the free patterns? You can say thanks in a couple of ways. You can read more about how you can Support My Work by clicking that link or make a small donation and Buy Me a Coffee. ?? That is a website where you can make a one time donation as a thanks. (FYI I have some great offers if you would like to buy me multiple coffees. You can see those by clicking on the Extras tab or you can click this link Janis Frank Extras).

If you don’t want to or are unable to make a financial donation, sharing this pattern through social media is a great way to help out too! The links below are a super easy way for you to do so.

If you would like to avoid the ads on this page or would like to print the pattern, you can purchase the PDF for a small fee from this website at Easy to Knit Long Cuffed Slippers , through my Etsy shop or on Ravelry.

Another way to avoid ads and pop-ups, get instant, PRINTABLE downloads of this pattern and others, is by becoming a Member on this website. When you become a Website Supporter for $3/month, you’ll gain access to exclusive member only posts. These posts contain one click downloads of the patterns. Simply click the Download & Print button. The PDF will automatically download to your computer or smart device. You can then read it on your device or print it at your leisure. You can download as many patterns as you like for the same $3 each month. You can go to this page to learn more, become a member and support my work… Exclusive Member Area

Things You Need

Yarn (a standard ball of worsted weight yarn such as this will be more than enough)

Size 5 mm (US 8 ) single pointed needles

Tapestry needle to sew seams and work in ends

Gauge

18 stitches = 4 inches 

24 rows = 4 inches 

in stockinette

Sizes are written as such:

Women’s 6-7 (8-9, 10-11, 12)

Men’s 6 (7-8, 9-10, 11-12, 13)

Heel Flap

Cast on 2

Row 1: Knit across.

Row 2: Increase in each stitch. (4 sts)

Row 3 – 4 : Knit across.

Row 5: Increase in the first stitch. K until one stitch remains. Increase in this stitch. (6 sts)

Row 6 – 7: Knit across.

Row 8: Increase in the first stitch. K until one stitch remains. Increase in this stitch. (8 sts)

Row 9 – 10: Knit across.

Row 11: Increase in the first stitch. K until one stitch remains. Increase in this stitch. (10 sts)

Row 12 – 13: Knit across.

Row 14: Increase in the first stitch. K until one stitch remains. Increase in this stitch. (12 sts)

Row 15 – 16: Knit across.

PLEASE NOTE:

The following rows are for sizes Women’s size 12 and Men’s sizes 11, 12 and 13 ONLY:

Next row: Increase in the first stitch. K until one stitch remains. Increase in this stitch (14 sts)

Next 2 rows: Knit across.

Continue the pattern for all sizes.

Next row: Cast on 29 stitches. (Yes, you already have 12 (12, 12, 14, 14) stitches on your needle. After casting on, you’ll have 41 (41, 41, 43, 43) sts on your needle). The following is worked over the stitches you just cast on and the stitches from the heel. K8 P1 Knit to the end of the row.  As you worked those stitches, your work was transferred onto the other needle. Cast on another 29 sts onto this needle. (You now have 70 (70, 70, 72, 72 sts) on your needle)

Next row: K16 P1 *K3 P1* Repeat from * to * 2 more times. K12 (K12, K12, K14, K14) *P1 K3* Repeat from * to * 2 more times. P1 K16.

♥ ☺ Next row: P9 K52 (K52, K52, K54, K54) P9

Next row: K16 P1 *K3 P1* Repeat from * to * 2 more times. K12 (K12, K12, K14, K14) *P1 K3* Repeat from * to * 2 more times. P1 K16.

Next row: K8 P1 K52 (K52, K52, K54, K54) P1 K8.

Next row: K16 P1 *K3 P1* Repeat from * to * 2 more times. K12 (K12, K12, K14, K14) *P1 K3* Repeat from * to * 2 more times. P1 K16. ♥ Repeat from ♥ to ♥ 6 (6, 7, 7, 8) times more for 30, (30, 34, 34, 38) rows total.

Please note – Repeat the row marked with ☺ once to maintain the pattern.

Shaping Toe

Next row: Cast off 15 sts. P1 *K3 P1* Repeat from * to * 2 more times. K12 (K12, K12, K14, K14) *P1 K3* Repeat from * to * 2 more times. P1 K16.

Next row: Cast of 15 sts. Knit across.

◊ ♫ Next row: P2 *K3 P1* Repeat from * to * 2 times more. K12 (12, 12, 14, 14). ◘ P1 K3 ◘ Repeat from ◘ to ◘ 2 times more. P2.

Next row: Knit across. ◊ Repeat from ◊ to ◊ 9 (10, 10, 11, 11) times more for 22 (24, 24, 26, 26) rows total.

Please note – Repeat the row marked with  once to maintain the pattern.

End Toe

Next row: K2tog 10 (10, 10, 11, 11) times. K1 K2tog to last 3 sts. K1 K2tog. 

Next row: P1 K2 *P1 K1* Repeat from * to * once P1 K6 (6, 6, 7, 7) *P1 K1* Repeat from * to * 2 time more. P1.

Next row: K1 K2tog 4 (4, 4, 5, 5) times. K1 (1, 1, 0, 0). K2tog until last st. K1

Next row: P1 K1 P3 K3 P4.

Break yarn and pull through. Pull tight to draw loops together.

Hints and Tips

Leave a longer length of yarn when you first start the slipper. You can use this piece to sew one of the seams along the heel flap. When you end the slipper, leave that yarn length longer too. You can use the length to sew the toe seam.

When sewing the seams to form the cuff, when you get to the part that folds over, be sure to turn the slipper inside out so the seam is on the RIGHT side.

The sizing of these slippers is very forgiving. The garter stitch used throughout helps the slipper to stretch both width and length wise. If your gauge is off by a row or a stitch, you should be able to get the size of slipper you want.

Abbreviations

K – Knit

P – Purl

K2tog – knit 2 together

sts – stitches

st – stitch

The use of this pattern allows you to make and sell the slippers you make, but you may not redistribute or resell this pattern.

Posted on 10 Comments

Easy to Knit Rolled Cuff Slippers – FREE Knitting Pattern

Easy to Knit One Piece Rolled Cuff Slippers - free knitting pattern

I’ve written a number of slipper patterns over the years with a couple of goals in mind, two goals to be specific. The first is to never have any seams to sew. This pattern didn’t meet this requirement. I offer a heartfelt apology for this. 

The other goal is to make them as easy as possible so new knitters or those with not as much experience, can knit something that gives a great final product. This pattern was written specifically to avoid any difficult techniques, specifically, picking up stitches. That is why this pattern is done in one piece; starting at the heel and working towards the toe. 

The cuff is made as you knit the piece. Because of the stitches used, it automatically rolls back up on itself giving a nice finished edge without adding any additional stitches or work.

I also made a longer cuffed version of this pattern. It fits more like a bootie. You can use this link to check out that slipper design – Easy to Knit – Long Cuffed Slippers. There is also a thicker version of this slipper using 2 strands of yarn. It’s quicker to make and extra thick – Easy to Knit Beginner Slipper Pattern – Knit Flat with Bulky Yarn on Straight Needles – FREE Knitting Pattern

Love the free patterns? You can say thanks in a couple of ways. You can read more about how you can Support My Work by clicking that link or make a small donation and Buy Me a Coffee. ?? That is a website where you can make a one time donation as a thanks. (FYI I have some great offers if you would like to buy me multiple coffees. You can see those by clicking on the Extras tab or you can click this link Janis Frank Extras).

If you don’t want to or are unable to make a financial donation, sharing this pattern through social media is a great way to help out too! The links below are a super easy way for you to do so.

If you would like to avoid the ads on this page or would like to print the pattern, you can purchase the PDF for a small fee from this website at Easy to Knit Rolled Cuff Slippers , through my Etsy shop or on Ravelry.

Another way to avoid ads and pop-ups, get instant, PRINTABLE downloads of this pattern and others, is by becoming a Member on this website. When you become a Website Supporter for $3/month, you’ll gain access to exclusive member only posts. These posts contain one click downloads of the patterns. Simply click the Download & Print button. The PDF will automatically download to your computer or smart device. You can then read it on your device or print it at your leisure. You can download as many patterns as you like for the same $3 each month. You can go to this page to learn more, become a member and support my work… Exclusive Member Area

Things You Need

Yarn (a standard ball of worsted weight yarn will be more than enough)

Size 5 mm (US 8 ) single pointed needles

Tapestry needle to sew seams and work in ends

Gauge(in stockinette)

18 stitches = 4 inches 

24 rows = 4 inches 

Sizes are written as such:

  • Women’s 6-7 (8-9, 10-11, 12)
  • Men’s 6 (7-8, 9-10, 11-12, 13)

Heel Flap

Cast on 2

Row 1: Knit across.

Row 2: Increase in each stitch. (4 sts)

Row 3 – 4 : Knit across.

Row 5: Increase in the first stitch. K until one stitch remains. Increase in this stitch. (6 sts)

Row 6 – 7: Knit across.

Row 8: Increase in the first stitch. K until one stitch remains. Increase in this stitch. (8 sts)

Row 9 – 10: Knit across.

Row 11: Increase in the first stitch. K until one stitch remains. Increase in this stitch. (10 sts)

Row 12 – 13: Knit across.

Row 14: Increase in the first stitch. K until one stitch remains. Increase in this stitch. (12 sts)

Row 15 – 16: Knit across.

PLEASE NOTE:

The following rows are for sizes Women’s 10, 11 and 12 and Men’s sizes 9, 10, 11, 12 and 13 ONLY:

Next row: Increase in the first stitch. K until one stitch remains. Increase in this stitch (14 sts)

Next 2 rows: Knit across.

Continue the pattern for all sizes.

Next row: Cast on 16 stitches. (Yes, you already have 12 (12, 14, 14, 14) stitches on your needle. After casting on, you’ll have 28 (28, 30, 30, 30) sts on your needle). The following is worked over the stitches you just cast on and the stitches from the heel. P4 *K3 P1* Repeat from * to * 2 times more. K12 (12, 14, 14, 14). As you worked those stitches, your work was transferred onto the other needle. Cast on another 16 sts onto this needle. (You now have 44 (44, 46, 46, 46 sts) on your needle)

♥ Next row: Knit across.

Next row: P4 *K3 P1* Repeat from * to * 2 times more. K12 (12, 14, 14, 14). ◘ P1 K3 ◘ Repeat from ◘ to ◘ 2 times more. P4. ♥ Repeat from ♥ to ♥ 11 (12, 13, 14, 15) times more for 24, (26, 28, 30, 32) rows total.

Shaping Toe

Next row: K2tog K to the last 2 sts K2tog. (42 (42, 44, 44, 44) sts)

Next row: P3 *K3 P1* Repeat from * to * 2 times more. K12 (12, 14, 14, 14). ◘ P1 K3 ◘ Repeat from ◘ to ◘ 2 timesmore. P3.

Next row: K2tog K to the last 2 sts K2tog. (40 (40, 42, 42, 42) sts)

Next row: P2 *K3 P1* Repeat from * to * 2 times more. K12 (12, 14, 14, 14). ◘ P1 K3 ◘ Repeat from ◘ to ◘ 2 timesmore. P2.

Next row: Knit across.

Next row: P2 *K3 P1* Repeat from * to * 2 times more. K12 (12, 14, 14, 14). ◘ P1 K3 ◘ Repeat from ◘ to ◘ 2 timesmore. P2. ☺ Repeat from ☺ to ☺ 12 (13, 14, 15, 16) times more for 26 (28, 30, 32, 34) rows total.

End Toe

Next row: K2tog 10 (10, 11, 11, 11) times. K1 K2tog to last 3 sts. K1 K2tog. 

Next row: P1 K2 *P1 K1* Repeat from * to * once P1 K6 (6, 7, 7, 7) *P1 K1* Repeat from * to * 2 time more. P1.

Next row: K1 K2tog 4 (4, 5, 5, 5) times. K1 (1, 0, 0, 0) times. K2tog until last st. K1

Next row: P1 K1 P3 K3 P4.

Break yarn and pull through. Pull tight to draw loops together.

Sew seam on top of toe and the heel flap to the sides of the slipper (the 16 stitches you cast on earlier) and join the edges of the cuff together in the back above the flap.

Hints and Tips

Sew the seam on the top of the toe up to where you K2tog when shaping the toe. If you don’t like what the join looks like, you can always make a pom pom to cover it.

Leave a longer length of yarn when you first start the slipper. You can use this piece to sew one of the seams along the heel flap. When you end the slipper, leave that yarn length longer too. You can use the length to sew the toe seam.

The sizing of these slippers is very forgiving. The garter stitch used throughout helps the slipper to stretch both width and length wise. If your gauge is off by a row or a stitch, you should be able to get the size of slipper you want.

Abbreviations

K – Knit

P – Purl

K2tog – knit 2 together

sts – stitches

st – stitch

The pattern allows you to make, sell or give away any of the slippers that you make. You are NOT permitted to redistribute this pattern in any way. The purchase the PDF is for your PERSONAL USE ONLY! Sharing copies of my patterns robs me of what I financially gain from my hard work and creativity that goes into designing my patterns. Please respect my copyright.

Posted on Leave a comment

Two Styles of Knitted Slippers with One FREE Knitting Pattern

Two slipper styles with one Knitting pattern

These two slipper styles are actually the same knitting pattern but showcase one side of the work or the other. They are easily made with the same basic knitting stitches and if you can make one style, you can make the other! The pattern is for slippers from a men’s size 6 to 13 and for a women’s 6 to 13. I’ve also provided direct links in the pattern to my YouTube videos demonstrating the knitting stitches required if you need a little help.

If you have never picked up stitches or knitted in the round, this is a great pattern to learn. I made a YouTube video showing how to do this for another pattern (you can read that pattern here – How to Knit Adult Booties), but the technique is similar. You can watch the video snippet right here – Picking up Stitches to Make the Heel the Cuff. The stitch pattern used this video is different, but would still look ok when done the final project.

If you’re loving the free patterns on this site, please consider a small donation to help with the hosting costs of the site. You can learn more about how you can help by going to my page Help Support My Work. If you’re not in the position to help financially, which is totally ok btw, please share this pattern with anyone you think may like it. You can use these handy links ?????? to share on social media or send it as an email to your friends and family.


And if you’re wanting to get off the internet and would prefer to have this on your phone, tablet or computer, you can download this pattern from my website here – Two Slipper Styles with One Pattern. You can also purchase this pattern through my Etsy shop or through Ravelry. The download is a PDF that you can read on any device or even print if you so desire.


Things you will need:

Click any of the links below to have everything you need to make these slippers sent right to your door.

200 grams of worsted weight yarn

Set of 2 size 5 mm ( US size 8) knitting needles or whatever size needed to obtain correct gauge.

Set of 4 size 5 (US size 8) double pointed knitting needles or whatever size needed to obtain the correct gauge.

Darning needle to sew up seams and work in ends.

Two Slippers with one pattern
Two Styles with One Knitting Pattern

Gauge:

12 rows stockinette = 2″
9 stitches stockinette = 2″
Be sure to check your gauge to obtain correct sizing!

The Pattern:

Cast on 42 sts.

Row 1: P3 K1 P3 K1 P3 K1 P3 K12 P3 K1 P3 K1 P3 K1 P3

Row 2: K3 P1 K3 P1 K3 P1 K3 K12 K3 P1 K3 P1 K3 P1 K3

Repeat these two rows until slippers measures as shown in the chart below. End with row 2.

Shoe Size (North America)Length
Men’s 6 – 78″ (20 cm)
Men’s 8 – 98 ½” (21 cm)
Men’s 10 – 119″ (22.5 cm)
Men’s 12 – 139 ½” (24 cm)
Women’s 6 – 77 ½” (18 cm)
Women’s 8 – 98″ (20 cm)
Women’s 10 – 118 ½” (21 cm)
Women’s 12 – 139″ (22.5 cm)
two slippers with one pattern
Slipper A


End Toe – Slipper “A”

Row 1: *(P2tog K2tog) repeat from * 3 times more.  K2tog twice K1 K2tog 3 times *(P2tog K2tog) repeat from * 2 times more P2tog P1

Row 2: K2 *(P1 K1) repeat from * two more times. K7 *(K1 P1) repeat from * two more times. K1

Row 3: K2tog 11 times

Row 4: P11

Draw yarn through loops and pull tight.

Two Slippers with one pattern - Slipper B
Slipper B


End Toe – Slipper “B”

Row 1: K1 (K2tog) 10 times K1 (K2tog) 10 times.

Row 2: P8 K6 P8

Row 3: (K2tog) 5 times K1 (K2tog) 5 times K1

Row 4: P4 K3 P4

Draw yarn through loops and pull tight.

Two Slippers with one pattern - Slipper a
Slipper A

Heel and Cuff – Slipper “A”

With right side facing pick up 14 stitches

Row 1: Knit across

Row 2: Knit across

Repeat the two rows one more time

Row 5: K2tog K10 K2 tog

Row 6: K12

Row 7: K12

Row 8: K2tog K8 K2tog

Row 9: K10

Row10: K10

Row 11: K2tog K6 K2 tog

Row 12: K8

Row 13: K8

Row 14: K2tog K4 K2tog

Row 15: K6

Row 16: K6

Row 17: K2tog K2 K2tog

Row 18: K4

Start Cuff:

With double pointed needles, pick up 18 sts over half of one side, 18 sts on the other, and transfer the 4 stitches created when making the heel. Pick up the stitches over the first half of the slipper and leave the rest for the toe. Fold the sides of the slipper together to give an approximate of where to start picking up stitches on the other side of the slipper. You can also count back 18 stitches along the edge for a starting point.

Row 1- 6: P3 K1 repeat 9 more times for total of 40 sts.

Rows 7 – 10: K around

Bind off loosely.

Sew seams and work in ends of the yarn.

Two Slippers with one pattern - Slipper B
Slipper B

Heel and Cuff – Slipper “B”

With right side facing pick up 14 stitches. 

Row 1: Knit across

Row 2: Knit across

Repeat the two rows one more time

Row 5: K2tog K10 K2 tog

Row 6: K12

Row7: K12

Row 8: K2tog K8 K2tog

Row 9: K10

Row10: K10

Row 11: K2tog K6 K2 tog

Row 12: K8

Row 13: K8

Row 14: K2tog K4 K2tog

Row 15: K6

Row 16: K6

Row 17: K2tog K2 K2tog

Row 18: K4

Start Cuff:

With double pointed needles, pick up 18 sts over half of one side, 18 sts on the other, and transfer the 4 stitches created when making the heel. Pick up the stitches over the first half of the slipper and leave the rest for the toe. Fold the sides of the slipper together to give an approximate of where to start picking up stitches on the other side of the slipper. You can also count back 18 stitches along the edge for a starting point.

Row 1- 6: K3 P1 repeat 9 more times for total of 40 sts.

Rows 7 – 10: K around

Bind off loosely.

Sew seams and work in ends of the yarn.

Extra hints and tips:

When selecting your yarn, I recommend that you choose a lighter shade of a solid colour. A lighter colour with flecks also works quite well. You can use darker or variegated yarn, but the texture of the pattern won’t be as visible.

The “right side” of the slipper is the side you’ve chosen to be on the outside. For Slipper “A” it is the side that has a more striped appearance. Slipper “B” looks more ribbed. No one said that the heel and cuff had to match anyways, so you may want to switch them up!

Abbreviations:

K – Knit

P – Purl

K2tog – knit 2 together

P2tog – purl 2 together

sts – stitches

If you have any questions or comments you’d rather keep private, you can send me an email through my contact page.

Posted on Leave a comment

Eight Slipper Styles to Knit

Eight Slipper Styles to Knit - Knitting Pattern Book

Well, I’m back at it again. Updating my old patterns with new photos and the occasional typo fix. I’m also very pleased to say that I have had enough of rehashing the old and am nearly done. Just a couple more to go.

So like always I’ve made this compilation of my original slipper patterns available as a PDF, Kindle and physical book. The book is available only through Amazon at this point. Like my other compilations, please pick the country you’re from so if you are an Amazon Prime member, you’ll get the shipping for free.

United States

United Kingdom

Canada

Australia

The patterns themselves are still all free to read on the website (the links are listed further down this post). You won’t be able to print them from the site. I lose ad revenue if you do… Betchya didn’t even think of that before ?. I’ve kept the cost for a printable PDF very low so it’s definitely within everyone’s budget. It’s less than a ball of yarn! You can purchase the PDF through this website here – Eight Slipper Styles to Knit or you can get it through my Etsy shop here – Eight Slipper Styles to Knit – Updated and Revised.

For those comfortable with reading patterns online, clicking any of the links below will take you right to it.

Easy to Knit Bow Slippers

Easy to Knit Slippers

Two Slippers with One Pattern

How to Knit Children’s Slippers

How to Knit Adult Slippers

How to Knit Slippers Just Like Granny Made

Adult Booties

How to Knit Sheep Slippers

And to beat any Karen’s to the punch…if you’re scrolling past everything here to leave a nasty comment that I’m lying about free patterns. Or maybe you feel you need some passive/aggressive, poor you bullish!t that it’s too hard to close an ad to follow a link, please move on and don’t use my patterns. I don’t want my good in the world tarnished by someone as entitled as yourself. And also, learn how to use the internet before you start your self absorbed, unfounded complaints.

Posted on 2 Comments

Nine Fingerless Gloves and Mitten Patterns to Knit

Nine Fingerless Gloves and Mitten Patterns to Knit cover art

I’ve been busy as of late! I’ve updated photos and rewritten a few of my fingerless glove and mitt patterns over the last few weeks to bring you yet another compilation of all my mitt and glove patterns! To date, there are a total of 9 patterns all together. All the favourites, and a couple that were so old you may not have even known they existed. For some reason, people don’t seem to like to do searches of this site or follow links. It’s weird TBH.

Currently, it is only available through retailers online. You can order a physical copy through Amazon with free shipping if you are an Amazon Prime member. As I write this I am making a selection of my publications to physical book stores. It’s a bit of a process to make this happen but hopefully ?? I’ll get the formatting down and accepted. Marketing is pricey so I need to be selective on how I’m going to approach this. Wish me luck!

Patterns to make all of the mitts and gloves in the photos below are included with this pattern collection.

But on to my latest publication. This collection contains patterns for fingerless gloves knit flat on 2 needles and seamless gloves and mittens knit in the round on double pointed needles (DPN). This compilation also includes mitts that are specifically designed for texting. And lastly, another design to free your fingers when you need them but cover your fingers when required. In short, this collection meets all your fashion and functionality requirements.

You can purchase and print the PDF yourself if you like. It is cheaper that way, of course. You can purchase it from my website here – Nine Fingerless Gloves and Mitten Patterns to Knit or from my Etsy shop here – Nine Knitting Patterns! – Fingerless Gloves and Mitten Collection. Either way I would like you to know it’s 106 pages. It’s a lot to print, but if you are comfortable reading PDF’s on your table or phone, this a very economical option. You can also just print the pattern you want by selecting the pages and printing on two sides of the page, but you’ll have to know how to do this. I can’t help you because every printer has a different way of doing it.

If you want to purchase the printed book, delivered to your door for free if you’re an Amazon Prime member, please click the country you are in:

United States

United Kingdom

Canada

Australia

This publication is available in English only.

Like always, all of the patterns are free to read on this website. They are ad supported and unprintable. Sorry, but too many people were just printing the pages leaving me with nothing but a bill for web hosting costs. You may not realize this, but with each illegal print, you cost me advertising revenue. I am writing patterns to help support me and my family, not charity. I can only give so much folks!

Another option to purchase the paperback if you are in the United States is through Walmart. I can’t find it on Target, but hopefully it will be there soon. Click the button below:

The list of the patterns in this collection include the following (all titles are clickable links to the pattern btw):

Super Simple Fingerless Gloves
Easy to Knit Owl Fingerless Gloves
How to Knit Fingerless Gloves
How to Knit Fingerless Gloves – with OWLS!
Basic Long Fingerless Gloves
Cable Fingerless Gloves or Mitts
Knit a Pair of Flip Mittens or Fingerless Gloves
Knit a Pair of Texting Mitts
Arm Warmers or Gloves – with BOWS!

I’ve also organized it so there is a specific page with all of the glove and mitten patterns in one place. You can see that here: Fingerless Gloves and Flip Mitts – FREE Knitting Patterns

I hope to keep you all informed of my progress with getting my patterns in real stores. The potential is there and I’m really excited where this next stage of my pattern writing journey takes me.

Happy knitting everyone!!!

Posted on 6 Comments

How to Knit a Pair of Flip Mittens or Fingerless Gloves

Free knitting pattern - flip mitts

Make yourself a nifty pair of flip mitts. They’re hip, trendy and handier than a pocket on a shirt! Not only can you make these super awesome mitts for just about anyone from teen to adult, but you can forgo the finger portion and make some cool fingerless gloves. Technically, they’re fingerless mittens but that just sounds weird.

They’re knitted on double point needles, also known as DPN. Though this sounds intimidating, it really is very simple. You’ll need to know how to knit to make this project, but knitting in the round is the same as knitting flat. Only difference is you don’t flip your work back in forth; it’s done a continuous circle.

The sizing for mittens, like socks or slippers, is somewhat general. The small size will fit someone with a smaller hand, medium is an average lady’s hand, large is for an average man’s hand, and extra large will fit a very large man’s hand. Each size is written out in full as the row and stitch counts differ for each. Keep scrolling to read how to make the finger flap. Sorry, this pattern is a bit of a mammoth


If you would prefer, you can also download this pattern to any device such as a smartphone, computer or tablet. The PDF of this pattern is available on my website here: Knitted Flip Mitts and Fingerless Gloves. It will be available in all my retailers such as Ravelry, Etsy and Lovecraft’s. I’m also working on a compilation of all my glove and mitten patterns that will be a book on Amazon.

Enjoying the free patterns and would like to Help Support My Work, GREAT! Please give what you can and like, share and follow me on social media.

Another way to get instant, PRINTABLE downloads of this pattern and more, is by becoming a patron and supporting me on Patreon. When you support my work at the $4/month level or higher, the locked posts become visible and you can immediately access the download link. No waiting for an email. Simply click the PDF link at the bottom of the Patreon post and the download is now on your computer, smart phone, tablet or whatever device you’re using. You can then read it on your device or print it at your leisure. You can download as many patterns as you like for the same $4 each month. You can go to this website to become a patron and support my work…https://www.patreon.com/JanisFrank

Support my work on patreon
Click this ????

Things you need

Yarn (a standard ball of worsted weight yarn will be more than enough)

Size 5 mm (US size 8) double pointed needles (or whatever size needles you need to get the correct gauge).

Stitch holder

Hook and loop fastener (AKA – Velcro*)

Permanent glue

Gauge

18 stitches = 4 inches

24 rows = 4 inches

Small

The Mitt

Cast on 28 sts (loosely). Divide these evenly as possible on three of the double pointed needles.

Round 1 – 12: K2, P2 (Creates knit 2 purl 2 ribbing).

Round 13 – 17: Knit

Round 18: K1, pick up a st, k1, pick up a stitch. K26.

Round 19 – 20: Knit

Round 21: K1, pick up a st, k3, pick up a stitch. K26.

Round 22 – 23: Knit

Round 24: K1, pick up a st, k5, pick up a stitch. K26.

Round 25 – 26: Knit

Round 27: K1, pick up a st, k7, pick up a stitch. K26.

Round 28 – 29: Knit

Round 30: K1, pick up a st, k9, pick up a stitch. K26.

Round 31 – 32: Knit

Round 33: K1, place next 11 sts onto the stitch holder. K26.

Round 34: K1, pick up a st, K26.

Round 35 – 37: Knit

Round 38 – 42: K2, P2

Bind off loosely.

The Thumb

Worked over the 11 sts on the stitch holder.

Pick up and divided the 11 sts on the stitch holder between the 3 double pointed needles. One of the needles will have more sts than the others.

Round 1 – 12: Knit

Round 13: K2tog around. (You may have to pass the last stitch from one dpn the next dpn to do this).

Round 14: Knit

Pull yarn through.

More of my stuff on Etsy:

ALL patterns on Etsy are
40% off
until March 31


You can make a widget like this for your blog or website, too.
Instructions are on my website here: How to Display Etsy Items on Your Website

Medium

The Mitt

Cast on 32 sts (loosely). Divide these evenly as possible on three of the double pointed needles.

Round 1 – 12: K2, P2 (Creates knit 2 purl 2 ribbing).

Round 13 – 17: Knit

Round 18: K1, pick up a st, k1, pick up a stitch. K30.

Round 19 – 20: Knit

Round 21: K1, pick up a st, k3, pick up a stitch. K30.

Round 22 – 23: Knit

Round 24: K1, pick up a st, k5, pick up a stitch. K30.

Round 25 – 26: Knit

Round 27: K1, pick up a st, k7, pick up a stitch. K30.

Round 28 – 29: Knit

Round 30: K1, pick up a st, k9, pick up a stitch. K30.

Round 31 – 32: Knit

Round 33: K1, pick up a st, k11, pick up a stitch. K30.

Round 34 – 35: Knit

Round 36: K1, place next 13 sts onto the stitch holder. K30.

Round 37: K1, pick up a st, K30.

Round 38 – 40: Knit

Round 41 – 45: K2, P2

Bind off loosely.

The Thumb

Worked over the 13 sts on the stitch holder.

Pick up and divided the 13 sts on the stitch holder between the 3 double pointed needles. One of the needles will have more sts than the others.

Round 1 – 13: Knit

Round 14: K2tog around. (You may have to pass the last stitch from one dpn the next dpn to do this).

Round 15: Knit

Pull yarn through.

Large

The Mitt

Cast on 36 sts (loosely). Divide these evenly as possible on three of the double pointed needles.

Round 1 – 12: K2, P2 (Creates knit 2 purl 2 ribbing).

Round 13 – 17: Knit

Round 18: K1, pick up a st, k1, pick up a stitch. K34.

Round 19 – 20: Knit

Round 21: K1, pick up a st, k3, pick up a stitch. K34.

Round 22 – 23: Knit

Round 24: K1, pick up a st, k5, pick up a stitch. K34.

Round 25 – 26: Knit

Round 27: K1, pick up a st, k7, pick up a stitch. K34.

Round 28 – 29: Knit

Round 30: K1, pick up a st, k9, pick up a stitch. K34.

Round 31 – 32: Knit

Round 33: K1, pick up a st, k11, pick up a stitch. K34.

Round 34 – 35: Knit

Round 36: K1, pick up a st, k13, pick up a stitch. K34.

Round 37 – 38: Knit

Round 39: K1, place next 15 sts onto the stitch holder. K34.

Round 40: K1, pick up a st, K34.

Round 41 – 43: Knit

Round 44 – 49: K2, P2

Bind off loosely.

The Thumb

Worked over the 15 sts on the stitch holder.

Pick up and divided the 15 sts on the stitch holder between the 3 double pointed needles. One of the needles will have more sts than the others.

Round 1 – 18: Knit

Round 19: K2tog around. (You may have to pass the last stitch from one dpn the next dpn to do this).

Round 20: Knit

Pull yarn through.

Extra Large

The Mitt

Cast on 40 sts (loosely). Divide these evenly as possible on three of the double pointed needles.

Round 1 – 12: K2, P2 (Creates knit 2 purl 2 ribbing).

Round 13 – 17: Knit

Round 18: K1, pick up a st, k1, pick up a stitch. K38.

Round 19 – 20: Knit

Round 21: K1, pick up a st, k3, pick up a stitch. K38.

Round 22 – 23: Knit

Round 24: K1, pick up a st, k5, pick up a stitch. K38.

Round 25 – 26: Knit

Round 27: K1, pick up a st, k7, pick up a stitch. K38.

Round 28 – 29: Knit

Round 30: K1, pick up a st, k9, pick up a stitch. K38.

Round 31 – 32: Knit

Round 33: K1, pick up a st, k11, pick up a stitch. K38.

Round 34 – 35: Knit

Round 36: K1, pick up a st, k13, pick up a stitch. K38.

Round 37-38: Knit

Round 39: K1, pick up a st, k15, pick up a stitch. K38.

Round 40 – 41: Knit

Round 42: K1, place next 17 sts onto the stitch holder. K38.

Round 43: K1, pick up a st, K38.

Round 44 – 46: Knit

Round 47 – 52: K2, P2

Bind off loosely.

The Thumb

Worked over the 17 sts on the stitch holder.

Pick up and divided the 17 sts on the stitch holder between the 3 double pointed needles. One of the needles will have more sts than the others.

Round 1 – 20: Knit

Round 21: K2tog around. (You may have to pass the last stitch from one dpn the next dpn to do this).

Round 22: Knit

Pull yarn through.

More of my stuff on Etsy

ALL patterns on Etsy are
40% off
until March 31


You can make a widget like this for your blog or website, too.
Instructions are on my website here: How to Display Etsy Items on Your Website

Finger Flap

Instructions are written for small (medium, large, extra large)

Cast on 32 (36, 40, 44) loosely.

Round 1 – 6: K2 P2

Round 7 and on: Knit around until work measures 3 (3.5, 4, 4.5) inches from the cast on edge.

Next round: K1 K2tog K10 (12, 14, 16) K2 tog K2 K2tog K10 (12, 14, 16) K2tog K1.

Next 2 rounds: Knit

Next round: K1 K2tog K8 (10, 12, 14) K2 tog K2 K2tog K8 (10, 12, 14) K2tog K1.

Next 2 rounds: Knit

Next round: K1 K2tog K6 (8, 10, 12) K2 tog K2 K2tog K6 (8, 10, 12) K2tog K1.

Next 2 rounds: Knit

Next round: K1 K2tog K4 (6, 8, 10) K2 tog K2 K2tog K4 (6, 8, 10) K2tog K1.

Next 2 rounds: Knit

Transfer the stitches onto two needles being sure that the thumb is along the edge of fold.

Break yarn leaving enough to graft the fingertips and sew in ends. 12 inches is plenty.

Graft Fingertips

The divided stitches will look something like this:

How to graft stitches knitting

With a darning needle, insert the needle through the front loop of the first needle as if to PURL.

How to graft stitches knitting

Insert needle through the stitch on the back needle as shown.

How to graft stitches knitting

Insert the needle through the back loop of the first stitch AND through the stitch of the next stitch as if to PURL. Drop the first stitch.

Insert the needle through the stitch on the back needle as if to PURL. Drop this stitch.

? Insert the needle through the back loop of the next stitch on the front needle and the front loop of the next stitch as if to PURL. Drop the first stitch.

Insert the needle through the stitch on the back needle as if to PURL. Drop this stitch. ?

Repeat from ? to ? until there are no stitches left on either needle.

 Pull the yarn tight.

Make another mitten to match.

Attaching the Velcro

Cut a small piece of Velcro. Keeping both halves of the Velcro together, attach it to the back of the mitten first. Glue it in place.

Keeping the Velcro pieces together, place some glue on the other half of the Velcro. Pull the finger flap back (off the fingers). Press firmly. DO NOT pull the Velcro apart until ALL the glue has dried completely.

How to Pick Up a Stitch

I use this method to increase a stitch or pick up a stitch because it doesn’t leave a hole in your work. It takes a little longer to do but worth the effort in the final piece.

Make the stitch in the yarn stretched between two stitches.

how to pick up a stitch knitting

Pick the yarn up with the needle.

how to pick up a stitch knitting

Transfer the stitch onto the opposite needle.

how to pick up a stitch knitting

Knit this newly formed stitch. You may have to pull the yarn forward a bit to get your needle beneath the yarn.

how to pick up a stitch knitting

It automatically twists the stitch eliminating the hole.

Abbreviations

K – Knit

P – Purl

K2tog – knit 2 together

sts – stitches

st – stitch

Helpful Hints

You don’t need a stitch holder. Even a piece of yarn will work.

Instead of glue, you can also sew the Velcro on. I find glue is simpler and quicker.

Customise this pattern as you see fit. If you want the cuff longer, do so. If you need a longer thumb or finger flap, add more rows. As long as your stitch counts stay the same, it should work out fine.

Some folks like to felt their mittens as it can help stop the wind from blowing through the stitches. Be careful though because felting shrinks your work! It’s hard to guess how much shrinkage will happen as there are so many variables involved, from temperature of the water to how much agitation occurs during the felting process. You can give it a try but make sure you use PURE wool! Anything that is a blend won’t felt properly. My last attempt at felting a pair of mittens for myself resulted in my young son getting a new pair of mitts. At least they didn’t go to waste :-/

If you have any questions or comments you can reach me here.

Like always, you can sell or give away whatever you make from my patterns. Don’t be a douche and try to pass this pattern off as your own in any way or form (physical or digital). See how handy fingerless gloves can be ?

Posted on 1 Comment

FREE Knitting Pattern – How to Knit Texting Mittens

How to Knit Texting Mitts - Knitting Pattern

Improve your texting in cold climates with these thumbless mittens. More than just a pair of fingerless gloves, these keep your hands warm and only expose your thumbs when needed. The thumb pocket is sewn on and the flap is secured at the base of the palm with Velcro* for easy access. The flap hangs in the back out of the way to enable your texting abilities. Plan on using your thumbs for a while? Then simply tuck the flap into the thumb pocket.

The sizes are each written separately as each size is a bit different in row and stitch counts. Scroll down this post to the size you would like to make. Medium fits the average lady’s hand, large for men, and small for pre-teens.

Don’t forget to share this post!

Don’t want to come back here to read the pattern? You can download the pattern to your tablet, phone or computer from my website at Knit a Pair of Texting Mitts. You can also get it from other ebook retailers such as Ravelry, Etsy, and LoveCrafts. If the link isn’t working, I haven’t uploaded it to the site yet. It will be ASAP.

If you enjoy this and my other free knitting and crochet patterns, please Help Support My Work. It doesn’t have to be financial, though that’s always appreciated. Every like, share and follow also helps me keep this website running.

Another way to get instant, PRINTABLE downloads of this pattern and more, is by becoming a patron and supporting me on Patreon. When you support my work at the $4/month level or higher, the locked posts become visible and you can immediately access the download link. No waiting for an email. Simply click the PDF link at the bottom of the Patreon post and the download is now on your computer, smart phone, tablet or whatever device you’re using. You can then read it on your device or print it at your leisure. You can download as many patterns as you like for the same $4 each month. You can go to this website to become a patron and support my

Things you need

Yarn (a standard ball of worsted weight yarn will be more than enough)

Size 4.5 mm double pointed needles

Stitch holder

Hook and loop fastener (AKA – Velcro)

Glue

Gauge

10 stitches = 2 inches

13 rows = 2 inches

Small

The Mitt

Cast on 32 sts (loosely). Divide these evenly as possible on three of the double pointed needles.

Round 1 – 15: K2, P2 (Creates knit 2 purl 2 ribbing).

Round 16 – 18: Knit

Round 19: K1, pick up a st (scroll down to the bottom of the page if you want to see photos of how I do this), k1, pick up a stitch. Knit remaining sts.

Round 20 – 21: Knit

Round 22: K1, pick up a st, k3, pick up a stitch. Knit remaining sts.

Round 23 – 24: Knit

Round 25: K1, pick up a st, k5, pick up a stitch. Knit remaining sts.

Round 26 – 27: Knit

Round 28: K1, pick up a st, k7, pick up a stitch. Knit remaining sts.

Round 29 – 30: Knit

Round 31: K1, pick up a st, k9, pick up a stitch. Knit remaining sts.

Round 32 – 33: Knit

Round 34: K1, place next 11 sts onto the stitch holder. Knit the remaining sts.. There should be 31 sts divided on the three needles.

Round 35 and on: Knit in the round on these remaining 31 sts until work measures approximately 3.5 inches from the stitches held back to form the thumb.

Form Fingertips

Next round: K1, k2tog, K10 K2tog, K2, K2tog, K9, K2tog, K1.

Next two rounds: Knit

Next round: K1, K2tog, K8, K2 tog, K2, K2tog, K7, K2tog, K1.

Next two rounds: Knit

Next round: K1, K2tog, K6, K2 tog, K2, K2tog, K5, K2tog, K1.

Next two rounds: Knit

Transfer the stitches onto two needles being sure that the stitches held back for the thumb are along the fold.

Break yarn leaving enough to graft the fingertips (if you scroll to the end of the post there are photos showing you how to do this) and sew in ends. 12 inches is plenty.

Finishing the Thumb

Worked over the 11 sts on the stitch holder. Leave the end you attach to complete the thumb longer than you normally would. You can use this to sew the thumb flap onto the mitten.

Pick up and divided the 11 sts on the stitch holder between the 3 double pointed needles. One of the needles will have more sts than the others.

Round 1 – 5: Knit

Bind off loosely.

Thumb Flap

Using 2 of your double pointed needles and working back and forth.

Cast on 3 sts.

Row 1: Knit

Row 2: Purl

Row 3: K1, pick up a st, K1 pick up a st, K1. (5 sts)

Row 4: Purl

Row 5: Knit

Row 6: Purl

Row 7: Knit

Row 8: Purl

Row 9: K1, pick up a st, K3, pick up a st, K1. (7 sts)

Row 10: Purl

Row 11: Knit

Row 12: Purl

Row 13: Knit

Row 14: Purl

Row 15: With the right side of your work facing you, cast on 3 sts. Working over the 3 sts you just cast on, K3. Leave these 3 sts on the needle you used to knit them. With another double pointed needle, knit the 7 sts from the previous row. With the wrong side of you work facing you, cast on 3 sts. Transfer these 3 sts onto another double pointed needle. You will now start knitting in the round.

With the right side of your work facing you:

Round 16 – 25: Knit

Round 28: K2tog, K1, K2 tog 3 times, K1, K2tog, K1 .

Round 29: Knit

Round 30: K2tog four times

Draw loops together and sew in the ends.

More of my stuff on Etsy

ALL patterns on Etsy are
40% off
until March 31


You can make a widget like this for your blog or website, too.
Instructions are on my website here: How to Display Etsy Items on Your Website

Medium

The Mitt

Cast on 36 sts (loosely). Divide these evenly on three of the double pointed needles.

Round 1 – 15: K2, P2 (Creates knit 2 purl 2 ribbing).

Round 16 – 18: Knit

Round 19: K1, pick up a st (scroll down to the bottom of the page if you want to see photos of how I do this), k1, pick up a stitch. Knit remaining sts.

Round 20 – 21: Knit

Round 22: K1, pick up a st, k3, pick up a stitch. Knit remaining sts.

Round 23 – 24: Knit

Round 25: K1, pick up a st, k5, pick up a stitch. Knit remaining sts.

Round 26 – 27: Knit

Round 28: K1, pick up a st, k7, pick up a stitch. Knit remaining sts.

Round 29 – 30: Knit

Round 31: K1, pick up a st, k9, pick up a stitch. Knit remaining sts.

Round 32 – 33: Knit

Round 34: K1, pick up a st, k11, pick up a stitch. Knit remaining sts.

Round 35 – 36: Knit

Round 37: K1, place next 13 sts onto the stitch holder. Knit the remaining sts. There should be 35 sts divided on the three needles.

Round 38 and on: Knit in the round on these remaining 35 sts until work measures approximately 4 inches from the stitches held back to form the thumb.

Form Fingertips

Next round: K1, k2tog, K12 K2tog, K2, K2tog, K11, K2tog, K1.

Next two rounds: Knit

Next round: K1, K2tog, K10, K2 tog, K2, K2tog, K9, K2tog, K1.

Next two rounds: Knit

Next round: K1, K2tog, K8, K2 tog, K2, K2tog, K7, K2tog, K1.

Next two rounds: Knit

Transfer the stitches onto two needles being sure that the stitches held back for the thumb are along the fold.

Break yarn leaving enough to graft the fingertips (scroll to the bottom of the post where there are photos showing you how to do this) and sew in ends. 12 inches is plenty.

Finishing the Thumb

Worked over the 13 sts on the stitch holder. Leave the end you attach to complete the thumb longer than you normally would. You can use this to sew the thumb flap onto the mitten.

Pick up and divided the 13 sts on the stitch holder between the 3 double pointed needles. One of the needles will have more sts than the others.

Round 1 – 5: Knit

Bind off loosely.

Thumb Flap

Using 2 of your double pointed needles and working back and forth.

Cast on 3 sts.

Row 1: Knit

Row 2: Purl

Row 3: K1, pick up a st, K1 pick up a st, K1. (5 sts)

Row 4: Purl

Row 5: Knit

Row 6: Purl

Row 7: Knit

Row 8: Purl

Row 9: K1, pick up a st, K3, pick up a st, K1. (7 sts)

Row 10: Purl

Row 11: Knit

Row 12: Purl

Row 13: Knit

Row 14: Purl

Row 15: With the right side of your work facing you, cast on 5 sts. Working over the 5 sts you just cast on, K5. Leave these 5 sts on the needle you used to knit them. With another double pointed needle, knit the 7 sts from the previous row. With the wrong side of you work facing you, cast on 5 sts. Transfer these 5 sts onto another double pointed needle. You will now start knitting in the round.

With the right side of your work facing you:

Round 16 – 27: Knit

Round 28: K2tog twice, K1, K2 tog 3 times, K1, K2 tog twice, K1.

Round 29: Knit

Round 30: K2tog, K1, K2tog twice, K2tog, K1

Draw loops together and sew in the ends.

Large

The Mitt

Cast on 40 sts (loosely). Divide these evenly as possible on three of the double pointed needles.

Round 1 – 15: K2, P2 (Creates knit 2 purl 2 ribbing).

Round 16 – 18: Knit

Round 19: K1, pick up a st (scroll down to the bottom of the page if you want to see photos of how I do this), k1, pick up a stitch. Knit remaining sts.

Round 20 – 21: Knit

Round 22: K1, pick up a st, k3, pick up a stitch. Knit remaining sts.

Round 23 – 24: Knit

Round 25: K1, pick up a st, k5, pick up a stitch. Knit remaining sts.

Round 26 – 27: Knit

Round 28: K1, pick up a st, k7, pick up a stitch. Knit remaining sts.

Round 29 – 30: Knit

Round 31: K1, pick up a st, k9, pick up a stitch. Knit remaining sts.

Round 32 – 33: Knit

Round 34: K1, pick up a st, k11, pick up a stitch. Knit remaining sts.

Round 35 – 36: Knit

Round 37: K1, pick up a st, k13, pick up a stitch. Knit remaining sts.

Round 38 – 39: Knit

Round 40: K1, place next 15 sts onto the stitch holder. Knit the remaining sts. There should be 39 sts divided on the three needles.

Round 41 and on: Knit in the round on these remaining 39 sts until work measures approximately 5 inches from the stitches held back to form the thumb.

Form Fingertips

Next round: K1, k2tog, K14 K2tog, K2, K2tog, K13, K2tog, K1.

Next two rounds: Knit

Next round: K1, K2tog, K12, K2 tog, K2, K2tog, K11, K2tog, K1.

Next two rounds: Knit

Next round: K1, K2tog, K10, K2 tog, K2, K2tog, K9, K2tog, K1.

Next two rounds: Knit

Transfer the stitches onto two needles being sure that the stitches held back for the thumb are along the fold.

Break yarn leaving enough to graft the fingertips (scroll to the bottom of the post where there are photos showing you how to do this) and sew in ends. 12 inches is plenty.

Finishing the Thumb

Worked over the 15 sts on the stitch holder. Leave the end you attach to complete the thumb longer than you normally would. You can use this to sew the thumb flap onto the mitten.

Pick up and divided the 15 sts on the stitch holder between the 3 double pointed needles. One of the needles will have more sts than the others.

Round 1 – 8: Knit

Bind off loosely.

Thumb Flap

Using 2 of your double pointed needles and working back and forth.

Cast on 3 sts.

Row 1: Knit

Row 2: Purl

Row 3: K1, pick up a st, K1 pick up a st, K1. (5 sts)

Row 4: Purl

Row 5: Knit

Row 6: Purl

Row 7: Knit

Row 8: Purl

Row 9: K1, pick up a st, K3, pick up a st, K1. (7 sts)

Row 10: Purl

Row 11: Knit

Row 12: Purl

Row 13: Knit

Row 14: Purl

Row 15: K1, pick up a st, K5, pick up a st, K1. (9 sts)

Row 16: Purl

Row 17: Knit

Row 18: Purl

Row 19: Knit

Row 20: Purl

Row 21: With the right side of your work facing you, cast on 5 sts. Working over the 5 sts you just cast on, K5. Leave these 5 sts on the needle you used to knit them. With another double pointed needle, knit the 9 sts from the previous row. With the wrong side of you work facing you, cast on 5 sts. Transfer these 5 sts onto another double pointed needle. You will now start knitting in the round.

With the right side of your work facing you:

Round 22 – 38: Knit

Round 39: K2tog twice, K1, K2 tog 4 times, K1, K2 tog twice, K1.

Round 40: Knit

Round 41: K2tog, K1, K2tog twice, K1, K2tog, K1

Draw loops together and sew in the ends.If you are unfamiliar with how to end the fingertips on mittens (this works for socks as well), I’ve added a picture tutorial at the end of another pattern. Instead of me adding all the photos and instructions again, here’s the link to learn how – 
How to Graft Fingertips

Make another mitten to match.

Attaching the Thumb Flap

With the yarn left from where you continued the thumb, attach the thumb flap to the mitten. Make sure that you attach the thumb flap to the back side of the left and right mittens accordingly. Easiest way is to lay the mitts flat with the thumbs pointing in opposite directions.

Attaching the Velcro

Cut a small piece of Velcro that will fit on the base of the thumb flap. Keeping both halves of the Velcro together, attach it to the THUMB FLAP first. Glue it in place.

Keeping the Velcro pieces together, place some glue on the other half of the Velcro. Pull the thumb flap forward in the toasty warm thumb position. With the Velcro still together, place the Velcro where the bottom of the flap touches the palm of the mitten. Press firmly. DO NOT pull the Velcro apart until ALL the glue has dried completely.Like grafting the fingertips, I’ve also shown how to pick up a stitch without leaving a hole. If you’d like to see how it’s done, here’s the link to learn how – How to Pick up a Stitch

Abbreviations

K – Knit

P – Purl

K2tog – knit 2 together

sts – stitches

st – stitch

Helpful Hints

Make sure when attaching the Velcro to the thumb flap, that the fuzzy half of the Velcro is what you use for the flap. In other words, which ever side feels less rough. The other pokey side should go on the palm of the mitt. That way the Velcro won’t stick to the inside of the thumb flap when folded back into itself.

When picking up stitches to finish the thumb on the mitt, leave a long piece of yarn to sew on the thumb flap. This saves on the number of ends to sew in when you’re done.

You don’t need a stitch holder. Even a piece of yarn will work.

Instead of glue, you can also sew the Velcro on. I find glue is simpler and quicker.

*Velcro is a registered trademark.

Posted on Leave a comment

Seven Slipper Styles to Knit – A Knitting Pattern Collection

seven slipper styles to knit - a knitting pattern collection

I don’t usually do posts like this but I thought I’d make it easier for everyone to get this knitting pattern collection. There is both a physical book you can get, a downloadable PDF that you can print and of course, all the individual patterns are free to read on this website if purchasing isn’t an option for you.


A quick note on other places that you can get this collection from. Amazon does offer the Kindle version of the slipper pattern collection in all countries. I don’t think you can print the pattern off on a Kindle. That defeats the purpose of creating this post that helps you find where you can get a physical copy of the slipper patterns.

Seven Slipper Styles to Knit

Seven Slipper Styles to Knit – Paperback Version

If you would like to purchase the paperback version of the slipper pattern collection, it’s available on Amazon only. It is very reasonably priced at $12.99 USD and shipping is included if you’re a prime member. The price is automatically converted into your county’s currency equivalent. Be sure that you order it from YOUR COUNTRY. If not you’ll be charged shipping. I’ve included the links from each country. Unfortunately, the paperback version isn’t available in very county.

Canada

USA

United Kingdom

If the patten collection isn’t available in your country or you would prefer a less expensive option and print it yourself, you can purchase the PDF Version from two places. Ravelry and LoveCrafts don’t allow for collections like this.

Etsy – Seven Slipper Styles to Knit

This website – Seven Slipper Styles to Knit – A Knitting Pattern Collection

All of the included are FREE to read online. They are ad supported and can’t be printed. Clicking on the title will take you to the pattern page. I’ve listed the slipper patterns included in the publication below:

Adult Moccasin Slippers

Knitted Plaid Slippers

Ribbed Bootie Slippers

Owl Slippers

Cable Knit Slippers

Super Cozy Texture Bootie Slippers

Super Simple Easy to Knit Slippers


Eight Slipper Patterns to Knit

Eight Slipper Styles to Knit

And in case you were unaware, I did another collection of my slipper patterns years ago. I never made it into a paperback (though if anyone was interested, please let me know).

You can purchase the printable PDF from the following places:

Etsy – Eight Slipper Styles to Knit

This Website – Eight Slipper Styles to Knit


Posted on 20 Comments

How to Knit Ribbed Bootie Slippers for Adults

Knitted adult ribbed bootie slippers

I designed these knitted adult bootie slippers to be as easy to knit as possible. They are knit flat with no extra needles or special techniques required. If you know how to cast onpurlknit and cast off you will be more than capable of finishing these for yourself or someone else! If you’re not sure or need a little practice, clicking on any of the links below will show you how with a how-to knitting video demonstrating the technique ? And if you’re looking for an ad free pattern you can download to your computer, tablet or phone you can get that here – How to Knit Ribbed Adult Booties or my Etsy shop or Ravelry for a small fee.

Another way to avoid ads and pop-ups, get instant, PRINTABLE downloads of this pattern and others, is by becoming a Member on this website. When you become a Website Supporter for $3/month, you’ll gain access to exclusive member only posts. These posts contain one click downloads of the patterns. Simply click the Download & Print button. The PDF will automatically download to your computer or smart device. You can then read it on your device or print it at your leisure. You can download as many patterns as you like for the same $3 each month. You can go to this page to learn more, become a member and support my work… Exclusive Member Area

The pattern is written to fit feet from a ladies size 6 – 12 and a man’s 5 – 12. I’m still on the fence as whether to design these to fit children. The sizing involves a lot of math and knitting sample sizes and I’m really not too excited about taking on either of those tasks. Let me know if you want it for kids. If there’s enough of you out there, I’ll do it.

Knitted adult ribbed bootie slippers

If you are enjoying the free videos and patterns, then please share my work! Those handy little icons down there ?? let you do it easily and helps me immensely ?. If you’d like more information on how you can keep things free, learn how you can Help Support My Work.


Things You Need

Click any link below to get everything you need to make these slippers mailed right to your door.

Size 8 US (5 mm) knitting needles (or whatever size you need to get the correct gauge.)

Darning Needle to sew in ends

Yarn – any standard ball of 200+ yards (220 m) of worsted weight yarn will do.

Use this to stop slippers from sliding


Gauge is in stockinette (Be sure to check to obtain correct sizing!)

18 sts = 4 inches

26 rows = 4 inches

Sizes are written for women’s size 6-7 (8-9, 10-11, 12)

and for a men’s 5-6 (7-8, 9-10, 11-12)

Knitted Adult Ribbed Bootie Slippers Pattern

Heel Flap

Cast on 3

Row 1: Knit

Row 2: K, inc in next stitch, K (4 sts)

Row 3: Knit

Row 4: Inc in first stitch, K2, inc in last stitch (6 sts)

Row 5: Knit

Row 6: Inc in first stitch, K4, inc in last stitch (8 sts)

Row 7: Knit

Row 8: Inc in first stitch, K6, inc in last stitch (10 sts)

Row 9: Knit

Row 10: Inc in first stitch, K8, inc in last stitch (12 sts)


Starting the Ankle and Foot

Row 11: K12. Cast on 23 (26, 26, 29). You now have 35 (38, 38, 41 sts total)

Row 12: Knit across. Cast on 23 (26, 26, 29). You now have 58 (64, 64, 70 sts)

Row 13: K10 (12, 12, 14), P13 (14, 14, 15), K12, P13 (14, 14, 15), K10 (12, 12, 14)

Row 14: Knit

Row 15: K10 (12, 12, 14), P13 (14, 14, 15), K12, P13 (14, 14, 15), K10 (12, 12, 14)

Row 16: K10 (12, 12, 14), P13 (14, 14, 15), K12, P13 (14, 14, 15), K10 (12, 12, 14)

*Row 17: Knit

Row 18: K10 (12, 12, 14), P13 (14, 14, 15), K12, P13 (14, 14, 15), K10 (12, 12, 14)

Row 19: K10 (12, 12, 14), P13 (14, 14, 15), K12, P13 (14, 14, 15), K10 (12, 12, 14)

Row 20: Knit

Row 21: K10 (12, 12, 14), P13 (14, 14, 15), K12, P13 (14, 14, 15), K10 (12, 12, 14)

Row 22: K10 (12, 12, 14), P13 (14, 14, 15), K12, P13 (14, 14, 15), K10 (12, 12, 14)*

Repeat from * to * 2 (3, 4, 5more times.

Please note: Repeat rows 17 and 18 for every size.

Decreasing for the Foot

Next row: Cast off K10 (12, 12, 14), P12 (13, 13, 14), K12, P13 (14, 14, 15), K10 (12, 12, 14). You now have 48 (52, 52, 56 sts total).

Next row: Cast off K10 (12, 12, 14). Knit remaining stitches. You now have 38 (40, 40, 42 sts total).

Next row: P13 (14, 14, 15), K12, P13 (14, 14, 15).

Next row: P13 (14, 14, 15), K12, P13 (14, 14, 15).

✪ Next row: Knit

Next row: P13 (14, 14, 15), K12, P13 (14, 14, 15).

Next row: P13 (14, 14, 15), K12, P13 (14, 14, 15).

Next row: Knit

Next row: P13 (14, 14, 15), K12, P13 (14, 14, 15).

Next row: P13 (14, 14, 15), K12, P13 (14, 14, 15).✪

Repeat from ✪ to ✪ 3 more times for every size.

End of Toe

Next row: K2tog across. 19 (20, 20, 21 sts)

Next row: P7 (7, 7, 8) K6 P6 (7, 7, 7)

Next row: K2tog across. Knit the last stitch for ladies’ size 6-7 and 12 or men’s size 5-6 and 11-12.

Break yarn and pull through.

Make another slipper to match.

Sew seams and work in ends.

If you have any questions, please feel free to leave a comment or send me your questions at [email protected].

Hints and Tips

When starting the slipper, leave a long length of yarn when casting on. You can use this length to sew up the back seam of the slipper and will give less ends to sew in when done.

Work in the ends and don’t just knot them off. The knots will rub on the wearer’s foot and make them decidedly uncomfortable.

When sewing the seams, be sure to yank on them a bit before working in the ends. You want as much yarn securing the seams so that the seam will stretch the length of the foot and the ankle.

When casting off for the ankle, be sure to do so loosely. It will allow the seam to stretch.

In case you’re not sure what part of the slipper you are making and how it goes together, I’ve added some pictures that will help.

Knitted Ribbed Adult Booties Slipper Pattern

How it goes together. Fold it in half and sew the seams for the toe and ankle.

Knitted Ribbed Adult Booties Slipper Pattern

There has been a bit of confusion on how to sew the seams along the back of the slippers, so I knit another pair and took a few photos to show what the back of the slipper should look like. 

Below are two photos showing how to flip up the heel flap triangle and fit it into the back of the slipper. Sew the back seam down to where the top of the heel flap triangle reaches without stretching it. Sew each side of the triangle to the remaining rows along each side as shown.

How to sew the back seam of ribbed adult slippers.
Sew the seam of ribbed adult slippers.

Happy knitting!

Posted on 6 Comments

Easy to Knit Slippers – Great Beginner FREE Knitting Pattern

Easy to Knit Slippers Pattern

This is a great knitting pattern for beginners because it only uses basic stitches that are very easy master. I’ve included links in the pattern to videos on YouTube that show you how to preform each stitch, making this a great pattern to teach yourself how to knit.

This is also a great project for experienced knitters because these slippers are very quick and easy to make. The pattern enables you to make a variety of sizes, from a woman’s size 6 up to a man’s size 14. 

If you are loving the free patterns, please feel free to share this pattern with anyone and everyone you think may like it. You can use any of the buttons below to share it with whatever social media accounts you have.


If you’d like to do just more than share to keep this website up and running, you can also make a donation to help with hosting costs. Go to this page – Help Support My Work to learn how you can help.

If you’d rather have the ad free downloadable version of this pattern for a small fee, you can find it here – Easy to Knit Slippers or in my Etsy shop.

Another way to avoid ads and pop-ups, get instant, PRINTABLE downloads of this pattern and others, is by becoming a Member on this website. When you become a Website Supporter for $3/month, you’ll gain access to exclusive member only posts. These posts contain one click downloads of the patterns. Simply click the Download & Print button. The PDF will automatically download to your computer or smart device. You can then read it on your device or print it at your leisure. You can download as many patterns as you like for the same $3 each month. You can go to this page to learn more, become a member and support my work… Exclusive Member Area

Things you will need:

Having a hard time finding what you need? Click any of the links below to have exactly what you require to finish these slippers mailed right to your door.

200 grams of worsted weight yarn (I find Red Heart wears well and easy to maintain).

Set of size 5 ( US size 8) knitting needles or whatever size to obtain correct gauge.

Darning needle to sew up the seams and work in the ends.


Gauge:

12 rows stockinette = 2″

9 stitches stockinette = 2″

Be sure to check your gauge to obtain correct sizing!

Slippers are given for a woman’s size 6-7 (8-9, 10-11, 12-13, 14-15)
or man’s sizes 5-6 (7-8, 9-10, 11-12, 13-14). The foot lengths of a woman’s size 6-7 are about the same as that of a man’s size 5-6 and so on.

The Pattern:

Cast on 40 (48, 48, 48, 48)

Row 1: *K2 P2* Repeat from * to* 2 (3, 3, 3, 3) times more. K2 P12 Repeat from * to* 3 (4, 4, 4, 4) times K2.

Row 2: *P2 K2* Repeat from * to * 2 (3, 3, 3, 3) times more. P2 K12 Repeat from * to * 3 (4, 4, 4, 4) times P2.

Row 3: Repeat row 1.

Row 4: Knit across.

Repeat rows 1 through 4 10 (11, 12, 13, 14) times more.


Shape toe: 

Next row: Repeat row 1.

Next row: Repeat row 2.

Next row: *K2tog P2tog* Repeat from * to * 2 (3, 3, 3, 3) times more. K2tog. (P2tog) Repeat 5 times more. Repeat from * to * 3 (4, 4, 4, 4) times. K2tog. [20 (24, 24, 24, 24) sts remain.]

Next row: Knit across.

Next row: K1 *K2tog* Repeat from * to * 2 (3, 3, 3, 3) times more. (P2tog) Repeat 2 times more. Repeat from * to * 3 (4, 4, 4, 4) times. K1. [11 (13, 13, 13, 13) sts remain.]

Next row: P4 (P5, P5, P5, P5) K3 P4 (P5, P5, P5, P5).

Cut the yarn leaving approximately 12” to sew up toe seam.  Draw yarn through stitches and pull tight to form toe. Bring edges together and sew half of the stitches together to form toe taking care to match the stitches together to form an invisible seam. Make another slipper to match.

To Make Heel Flap:

***For woman’s size 6-7 and man’s size 5-6 ONLY!***

With right side of the slipper facing you, pick up 12 stitches along the sole edge.

Row 1: Knit

Row 2: Purl

Row 3: Knit

Row 4: Purl

Row 5: Knit

Row 6: P2tog P8 P2tog (10 sts)

Row 7: Knit

Row 8: Purl

Row 9: K2tog K6 K2tog (8 sts)

Row 10: Purl

Row11: Knit

Row 12: P2tog P4 P2tog (6 sts)

Row 13: Knit

Row 14: Purl

Row 15: K2tog K2 K2tog (4 sts)

Row 16: Purl

Row 17: Knit

Row 18: P1 P2tog P1 (3 sts)

Row 19: Knit

Row 20: Bind off.

For all remaining slipper sizes:

With right side of the slipper facing you, pick up 12 stitches along the sole edge.

Row 1: Knit

Row 2: Purl

Repeat rows 1 – 2 3 times more

Row 9: Knit

Row 10: P2tog P8 P2tog (10 sts)

Row 11: Knit

Row 12: Purl

Row 13: K2tog K6 K2tog (8 sts)

Row 14: Purl

Row 15: Knit

Row 16: P2tog P4 P2tog (6 sts)

Row 17: Knit

Row 18: Purl

Row 19: K2tog K2 K2tog (4 sts)

Row 20: Purl

Row 21: Knit

Row 22: P1 P2tog P1 (3 sts)

Row 23: Knit

Row 24: Bind off.

Make a heal flap for the other slipper. Sew up the seams of heal flap and work in all the yarn ends.

Extra Tips

The pattern is written as simply as possible, but here are a few extra tips that may help you.

Knit what is between the * * once. Then knit whatever is between the * * again however many times more the pattern instructs you to.

When the pattern say repeat between * * however many times, knit the portion as many times as it instructs. Simply put, the slippers always have an equal number of knitted “ridges” and purled “valleys” on each side of the sole. There are 4 “ridges” and 3 “valleys” on the smallest size and 5 “ridges” and 4 “valleys” on all the other sizes.

When selecting your yarn, I recommend that you choose a lighter shade of a solid colour. You can use darker or variegated yarn but the texture of the pattern won’t be as visible.

Happy knitting!

If you have any questions or comments you can reach me through my contact page.

This pattern enables you to sell or give away anything you may make with it. It does NOT allow you to redistribute, sell, give away or copy the pattern in any way without WRITTEN permission.