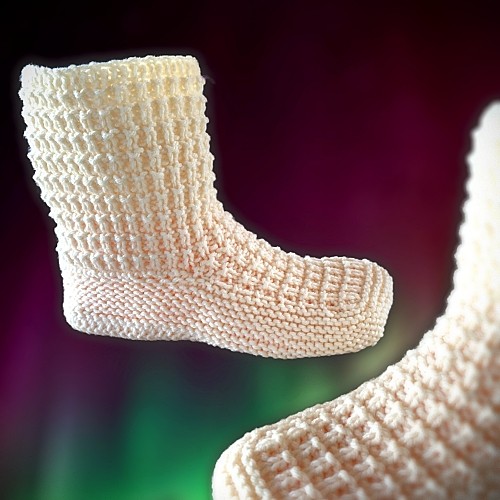
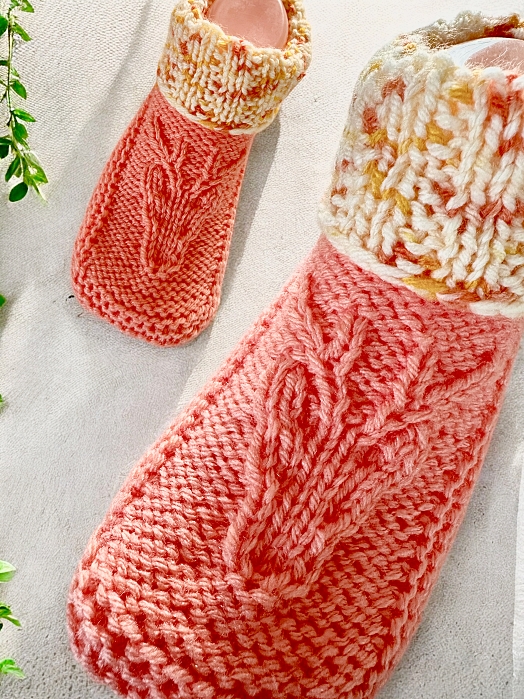
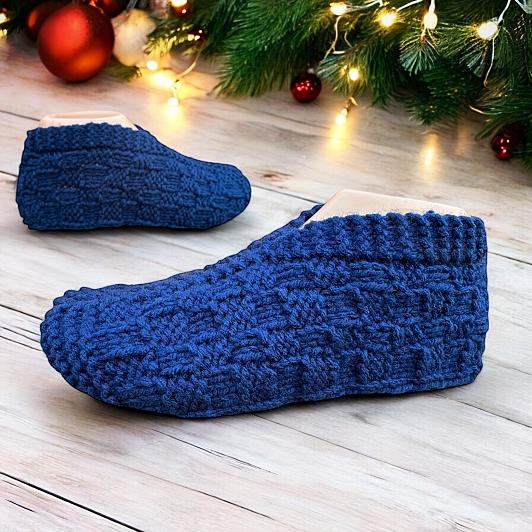
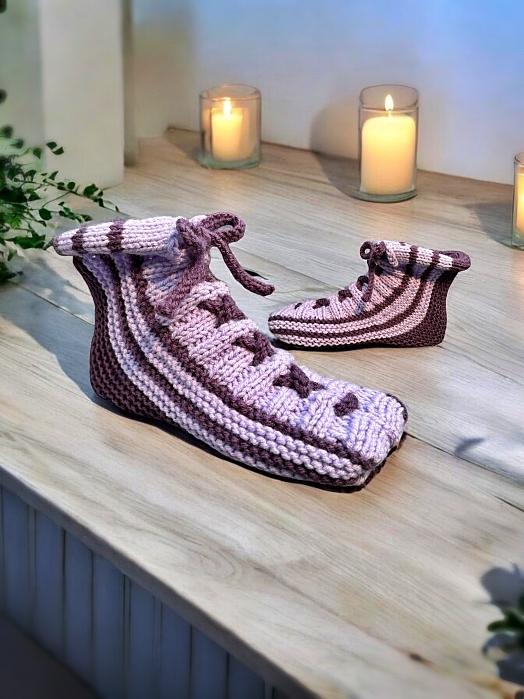
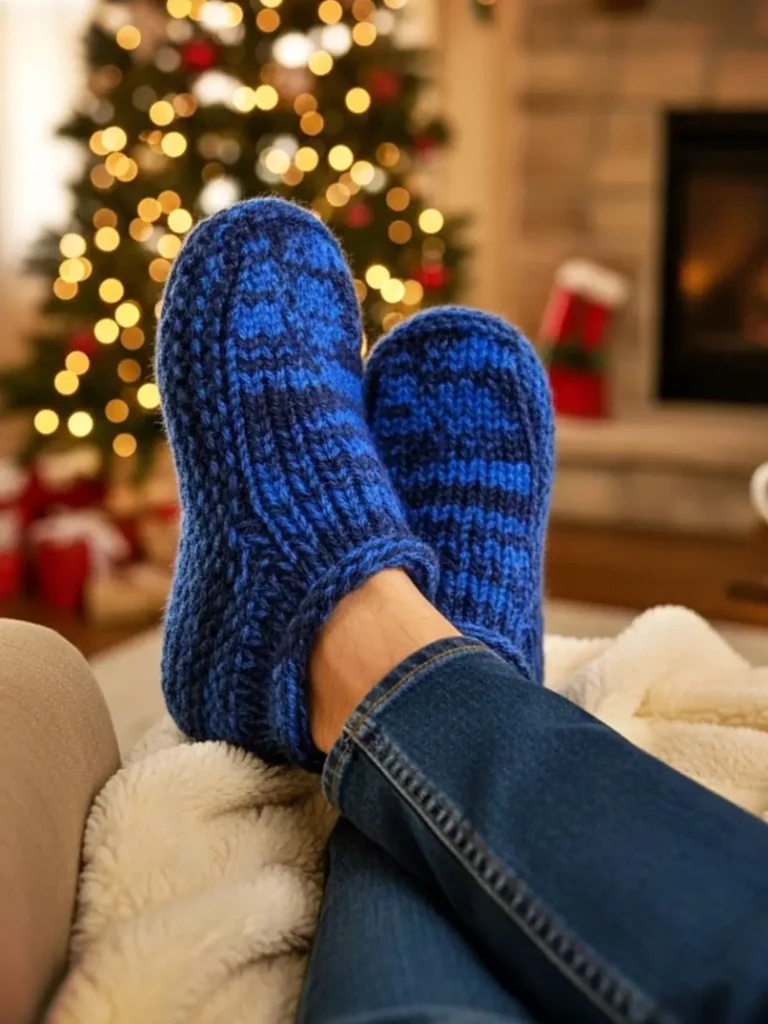
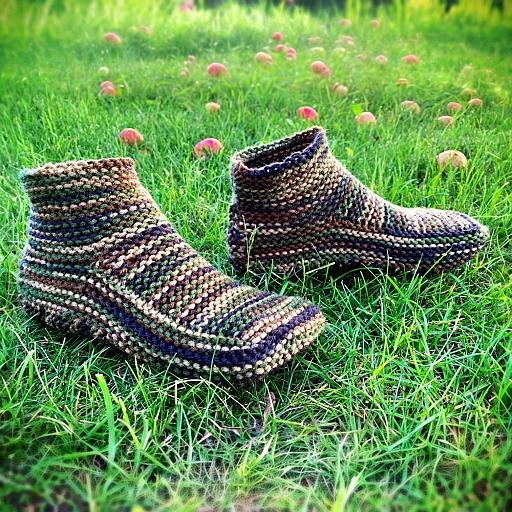
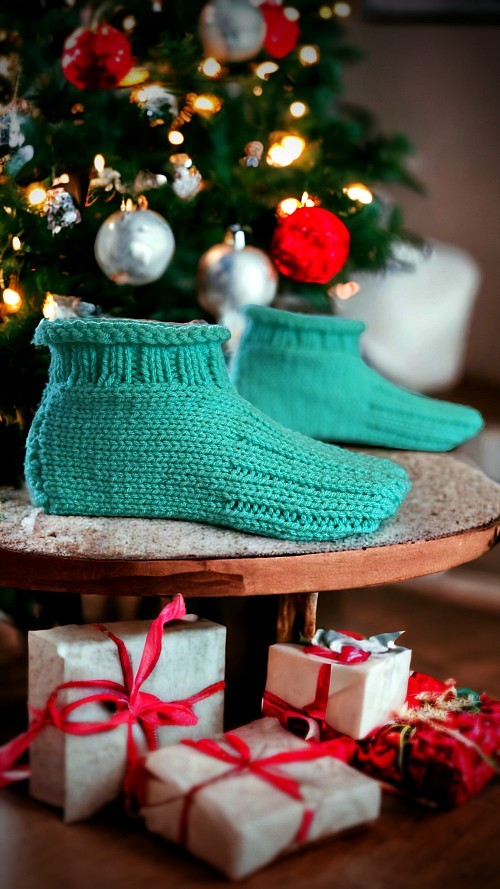
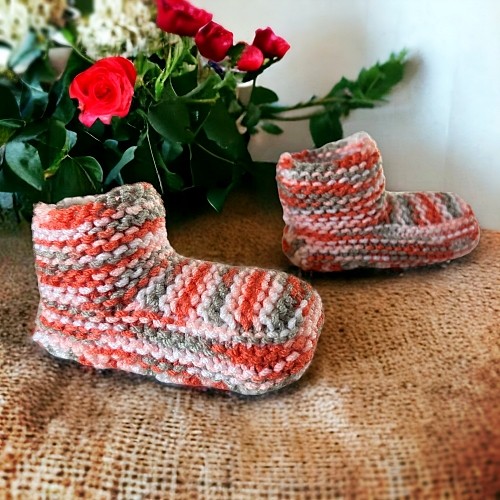
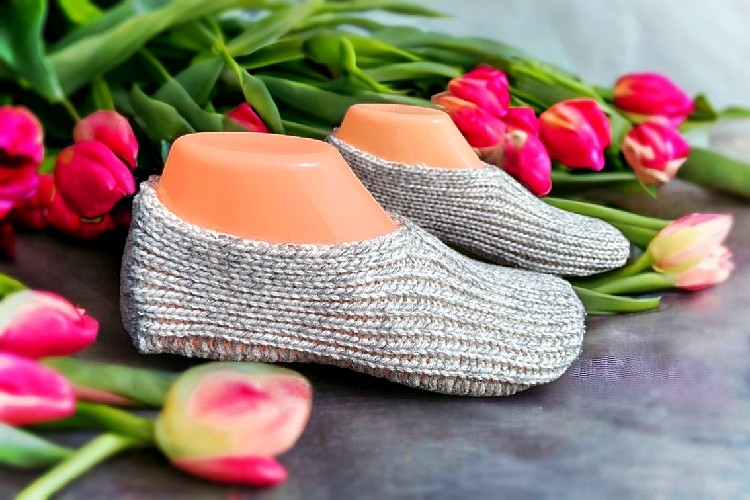
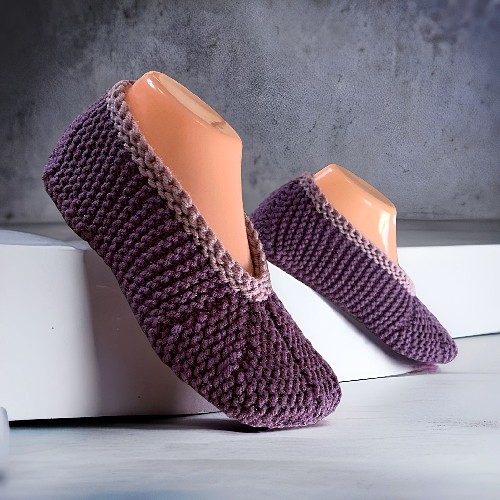
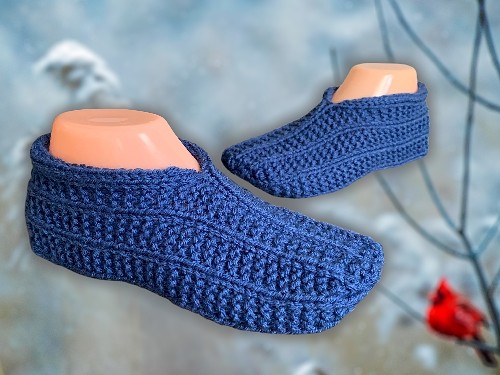
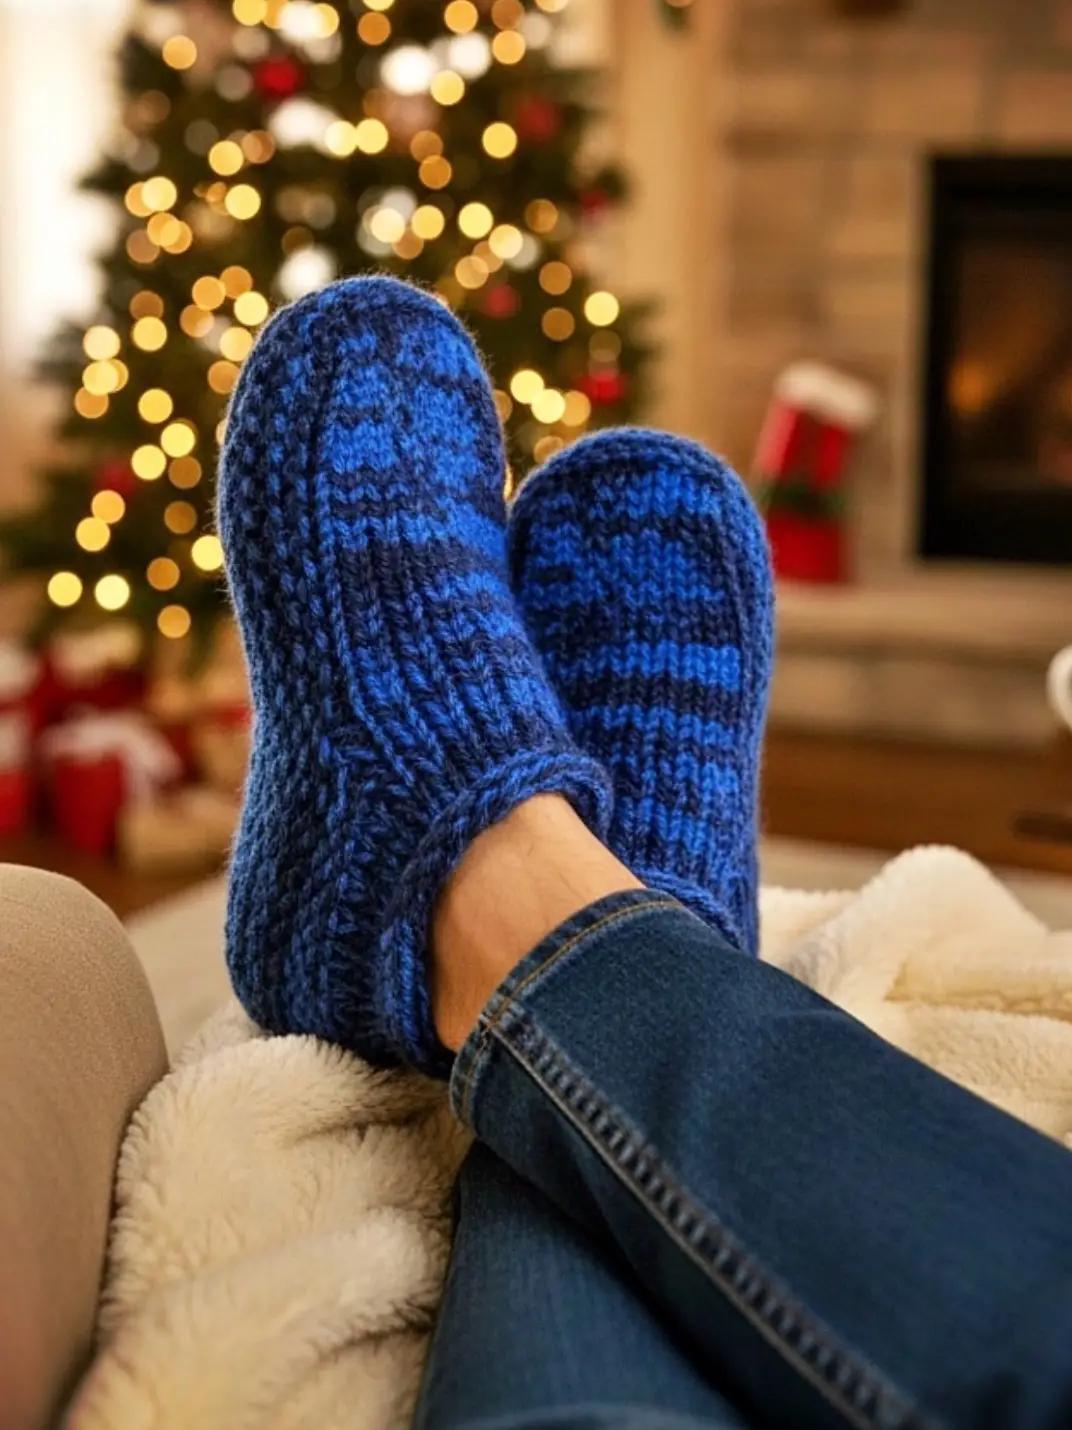
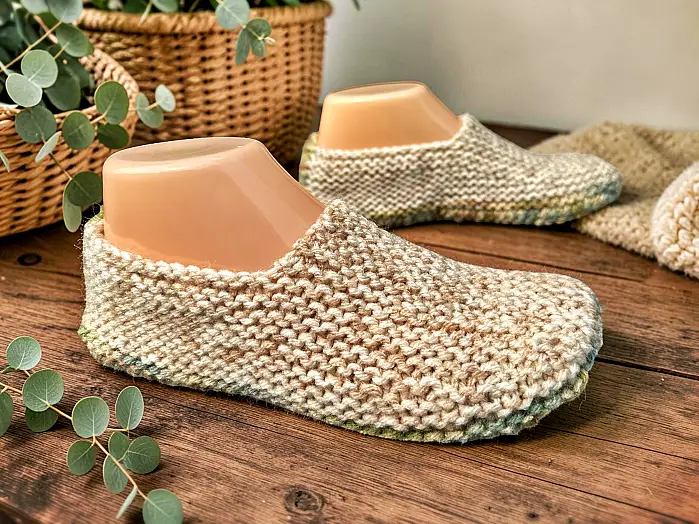
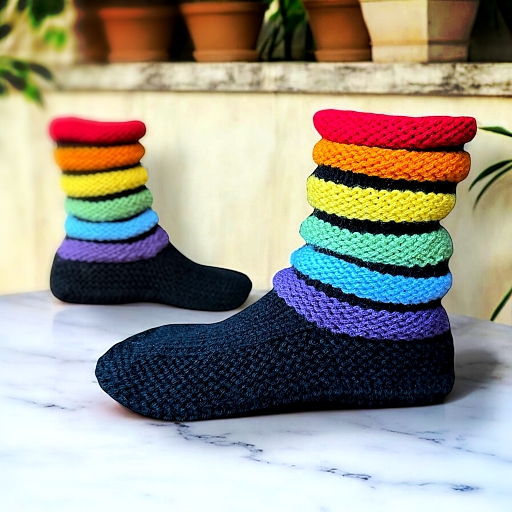
All my free knitting patterns in one convenient location. You can use any of these patterns as you see fit, including selling finished items. Please do NOT claim these patterns as your own. Links back to the original pattern on my website is always encouraged.
This simple technique is something that I’ve been meaning to share for quite sometime. And since I’ve received a number of comments regarding the number of ends for my Owl Slippers and Moccasin Slippers, I realized I needed to get on this ASAP.
I finally made the video! It shows how to work in the cast on end, work in the yarn at the start of the row if making stripes and how to join a new ball in the middle of a row and leave NO hole. I left the photo tutorial further down this page if you prefer that way of learning.
And I still don’t have instructions for left handed people. I’m so sorry about that. I’m right handed so it’s what I have to work with.
Step 1:
With the right side of your work facing you, put your needle through the stitch as if you were to knit. With the end at the back of your work, lay the end over your working needle. With your left hand, hold the end snug, not tight.
Step 2:
Place the working yarn over the needle as you normally would and knit the stitch. Do NOT catch or pull the end through while knitting the stitch.
Drop the stitch from the non-working needle as you normally would.
Please share this page!
Step 3:
Drop the end (or hold out of the way) and knit the next stitch.
Repeat steps 1-3 for roughly 10 stitches. With this technique you are alternating in order to catch the end between the stitches at the back of your work as shown below.
What it looks like from the wrong side.
View from the front. Can’t see the end at all!
When you are done, pull the end so it is snug. It’ll take up any slack that’s between the stitches you skipped. Before I trim it off, I always stretch the final piece to make sure there is just enough slack to ensure there’s no puckering.
If you need a little more security, you can always give an additional back weave with a tapestry needle to catch the end of the end a bit, but I don’t.
And yes, this does keep the yarn in place even with 100% acrylic yarn. I’ve made a number of slippers with the ends worked in this way and an afghan. I’ve washed the afghan a number of times with no issue whatsoever.
I hope this helps speed up your work. I hate sewing in ends just as much as the next person and anything that lessens the number of them is worth a huge ?? in my books.
And I also haven’t had much success doing this with purl stitches. If you have any ideas, by all means, let us know in the comment section.
The K1 P1 ribbing that I do for the cuffs of my Owl Fingerless Gloves works well using this method, too. Catch the end on your knit stitch and purl the purl stitch as you normally would. Because it is right on the cuff and needs to stretch and contract, I do catch the end a bit with a tapestry needle just to give it a little extra security.
As the title suggests, this is my latest knitting pattern compilation. This is the 3rd one I’ve done! I sometimes can’t believe how many slipper patterns I’ve written. It’s a bit crazy. If you’re interested you can see both my Seven Slipper Patterns and Eight Slipper Patterns. Click either of those links if you would like to read more. Keep scrolling for where to get this knitting collection including AMAZON!
This collection is nearly all of my latest slipper patterns. I am always designing, so depending on when you read this there may be many more. In short, the following patterns are included here:
All of the pattern listed above are free to read on my website. You can click any title and it will take you directly to the pattern.
And now for why I really made this post. You can now purchase this knitting compilation from a variety of sources! Of course you can always get the printable PDF version from the ever trusted Etsy – Seven Slipper Styles for Cozy Feet – Knitting Patterns Please be warned that when you print it yourself it’s 74 pages long. Not my longest but it is a bit.
You can also buy the pattern here from my website. It’s the same PDF as the one on Etsy but I understand that some people feel sketched out buying from websites. Anywho, you can find that here – Seven Slipper Styles for Comfy Feet – Knitting Patterns
If you would like to have the paperback version sent to you, I have it available to my readers on Amazon! If you have Amazon Prime your shipping is FREE as long as you make sure you order it from your correct country. Be sure that you click on the country closest to you from the list below:
Unfortunately, this isn’t available in Australia yet. It’s a new listing and sometimes it take a while for me to be able to sell my paperbacks there. I don’t get it either but it’s what I have to work with.
I do sell through another paperback distributor that helps to get my work onto other websites like Walmart and Target and into libraries and such. Once I have those links, I’ll post them here.
Get your free knitting colorwork paper here! Perfect for all your intarsia motif design needs.
No need to sign in, sign up or give away any personal information. Simply use the download button to download and print as many copies of the knitting graph paper as you like.
It’s a PDF file meaning that you can easily open it on any device be it your computer, phone or tablet.
If you think someone else could use this free knitting color work paper, please let them know and share it on social media.
The knitting graph paper is to create patterns in the stockinette stitch. You can use it to either make stitch patterns, or use colours to create more intricate designs known as intarsia knitting. It’s fairly large so it will meet most of the requirements for your pattern. You can always tape sheets together if you need something larger.
I’ve also included arrows along the side to show which way you will be knitting based on the shape of the stitch. I also include a very faint pink colour so you can easily determine the number of stitches. I’ve marked them off in 5 stitch and row sections.
To help explain the process of designing your own intarsia motifs, there are photos and explanations on how to use the colorwork knitting paper included with the PDF you can download and print for free.
A great pattern for someone just learning to knit. If you know how to purl, knit, K2tog, M1 and cast on, you will be able to make these slippers. And if you don’t, don’t worry. I’ve included links to the videos that show you exactly how to do the stitches.
These minimal cuff, snug fitting slippers for adults fit folks up to a men’s size 14. Big enough to fit nearly everyone. Knit flat on a pair of straight needles, you don’t need any extra supplies to get these done. If you are an experienced knitter, you’ll be able to whip these up in no time.
Like all my patterns, you have my permission to sell or give away any of the patterns that you make. All I ask that you respect the hard work that goes into designing and publishing a pattern and not violate my copyright.
If you would prefer a printable or ad free version of this pattern, you can get it in all the usual places including this website here – Snug Slip-On Slippers, through myEtsy shop, LoveCrafts, Amazon, Google Books, Patreon, Ravelry, or my newest place Creative Fabrica. If the links aren’t working, I’m in the process formatting and uploading to the retailer.
Another way to avoid ads and pop-ups, get instant, PRINTABLE downloads of this pattern and others, is by becoming a Member on this website. When you become a Website Supporter for $4/month, you’ll gain access to exclusive member only posts. These posts contain one click downloads of the patterns. Simply click the Download & Print button. The PDF will automatically download to your computer or smart device. You can then read it on your device or print it at your leisure. You can download as many patterns as you like for the same $4 each month. You can go to this page to learn more, become a member and support my work… Exclusive Member Area
Love the free patterns? You can say thanks in a couple of ways. You can read more about how you can Support My Work by clicking that link or make a small donation and Buy Me a Coffee. ?? That is a website where you can make a one time donation as a thanks. (FYI I have some great offers if you would like to buy me multiple coffees. You can see those by clicking on the Extras tab or you can click this link Janis Frank Extras).
If you don’t want to or are unable to make a financial donation, sharing this pattern through social media is a great way to help out too! The links below are a super easy way for you to do so.
Things You will Need
7oz (198 g) worsted weight yarn. Any standard ball of yarn you can get at craft or big box stores will be more than enough with yarn to spare.
Set of size 6 US (4 mm) single pointed knitting needles
Tapestry needle – to sew seams and work in ends.
Gauge
In garter stitch
2” (10 cm) – 9 stitches
2” (10 cm) – 18 rows
Sizes are written as such:
Women 6-7 (8-9, 10-11, 12)
Men 6 (7-8, 9-10, 11-12, 13-14)
Abbreviations
If you need help with any of the stitches, you can go to my how-to video page. Here’s the link –Learn to Knit With Videos. A new page will open so you’re sure to not lose this one.
K – knit
P – purl
K2tog – knit 2 together
M1 – Make 1. Increase one stitch between stitches.
st – stitch
sts – stitches
Heel Flap
Cast on 4
K across for 10 (10, 12, 12, 14) rows.
* Next row: K1 M1. K across to last st. M1. K1.
Next 3 rows: K across * Repeat from * to * until there are 14 (14, 14, 16, 16) sts. Make sure to knit the 3 rows after the increase row. Cast on an additional 14 (15, 16, 17, 18) sts. 28 (29, 30, 33, 34) sts total.
Next row: K across. Cast on another 14 (15, 16, 17, 18) sts. 42 (44, 46, 50, 52) sts total.
Next row: K1 (0, 0, 1, 1) K2 tog 4 (5, 5, 5, 5) times, K1, K2tog to last st (if there is one). K1 (0, 0, 0, 0).
Next row: P3 (3, 3, 4, 3) K4 P3 (3, 3, 4, 4).
Break yarn and draw through.
Flip up the triangle-ish shaped flap in the back of the slipper to form the heel. Sew along the sides of the heel flap to form the back of the slipper.
Make another slipper to match.
Hints and Tips
When ending the toe, due to the differing number of stitches for the various sizes, there may or may not be an extra stitch that needs working at the ends. I’ve marked the sizes accordingly.
The heel flap may not match up perfectly with the sides of the slipper but it will be close. Hold the garter edges at the top to make sure it lines up to form the cuff.
Leave a length of yarn when casting on and after you draw the yarn through when forming the toe. You can use it to sew the seams along one of the sides of the heel and along the top of the toe.
Watch the full documentary style video that tells the entire story of the fox and badger interaction. Click to watch ??
Watch the highlight from the videos with the shorts
Thanks for watching! I know that this set of videos doesn’t reflect the overall direction and niche of this website. This was such a unique thing to watch that I just wanted to share it with as many folks as I could. And for the record though I didn’t mention it anywhere else, everyone present was Team Fox. And somehow the badger was a “He” and the bad guy. I tried to present this as unbiased as possible but after watching the foxes all spring (my parents) and I hearing about them, it was hard not to feel attached to the foxes.
The term, “decrease evenly across ? number of stitches” in any pattern can be an unpleasant sight to any knitter (me included). Whereas I try to do this calculation in the patterns I write, some don’t. Regardless, the stitch calculator below will help!
Using this calculator will give you evenly spaced decreases over the length of your work. All you need to enter is the number of stitches you have on your needle and the number of stitches you need to decrease. Everything is calculated for you.
Please note: If you have more or less stitches at the end of your work, go ahead and knit them. The number of decreases across the stitches is correct.
I want to be completely transparent in where this increase and decrease knitting calculators originated. I did not write the code myself. After much tweaking of this query to ChatGPT, I’ve developed a stitch calculator to determine how to decrease evenly across your work. I knew what I wanted, I just didn’t know how to write the code to make it happen. AI is useful after all!
It’s tough, and frustrating, to do the math to figure out how many stitches you need to knit to make your stitches even across the row. We’ve all been there and we all hate doing the math. Well, you’re in luck! I’ll do it for you ?. And if you don’t know how to M1 (make 1 or increase) scroll down the page or click this link towatch the video.
Using the calculator below will give you evenly spaced increases across the length of your work. All you need to enter is the number of stitches you have on your needle and the number of stitches you need to increase. Everything is calculated for you with a single click!
I know that sometimes the stitches are a little off on the ends. Adjust accordingly if it bothers you. I really was focused on the making the increases centered in the work with even spacing between the stitches.
I want to be completely transparent in where this knitting calculator and the decreasing calculator originated. I did not write the code myself. After much tweaking of this query to ChatGPT, I’ve developed a stitch calculator to determine how to increase evenly across your work. I knew what I wanted, I just didn’t know how to write the code to make it happen. AI is useful after all!
My notes I entered into ChatGPT to get the code to work.
The dishcloth obsession continues, though I am getting a bit weary of these. Time to get around to making more art pieces.
So I’m providing this in two sizes – roughly 7 inches square and 8 inches square. The smaller size seemed almost a smidgen too small but the larger one seemed a bit larger than I would like. I suppose it could have easily been fixed with changing needle sizes but I figured I’d let others deal with that. With that said, this knitting pattern is written accordingly. The larger size repeat counts are in brackets.
It’s important to note that for this specific knitting pattern, odd rows are NOT the right side of your work. The dropping and picking up stitches happens on what would be usually considered the WRONG side or all even rows. So in short, the right side of your work is all the EVEN rows.
Also, I’ve included a bunch of photos to help you along with YO, dropping stitches, slipping stitches and making the crossed over stitches. The YO, slipping and dropping stitches are standard stitches and if you’re an experienced knitter, you probably won’t need the photos. I’ve included the photos as you go along in the pattern, but if you already feel comfortable with these stitches, the pattern is also written without the photos further down the post here – the pattern without the photos.
If you would like to show your continued support of my work and this website, for only $3 you can become a Website Member. This is an easy way for you to support my work and get a bunch of other patterns you can easily print off. As of the writing there are 34 patterns I’ve added to this list. I also have a Patreon option available too, but there aren’t as many patterns over there. You can use either of the links below to check out supporting my work.
If you are loving the free patterns, please consider helping me out offsetting the hosting costs of the website. You can learn more by going to this page – Help Support My Work. If you can’t make a small donation, that’s OK ?. Instead, you can help others see my work by using the share buttons. It’s such an easy thing to do and helps me so much.
Things you will need
Click any of the links below to get everything you need to make this dishcloth.
Pass the 2 slipped stitches back to the non-working needle.
Stitches passed back to non-working needle.
Pick up and knit the dropped stitch.
Picking up the stitch.
Working the stitch.
Stitch knitted. Cross over complete.
K2 ♣︎ Repeat from ♣︎ to ♣︎ 4 (5) more times. K2
Row 7: ✙ P4 YO P1 YO P1 ✙ Repeat from ✙ to ✙ 4 (5) more times. P4
Row 8: ♥︎ K4, SL1, Drop the YO, SL1, Drop the YO ♥︎ Repeat ♥︎ to ♥︎ 4 (5) more times. K4
Row 9: ♦︎ P4 SL2 ♦︎ Repeat from ♦︎ to ♦︎ 4 (5) more times. P4
Row 10: K2 ▲ SL2, Drop the next stitch. Pass the 2 slipped stitches back to the non-working needle. Pick up the dropped stitch with the non-working needle and knit this stitch. K2. Drop the next stitch. K2. Pick up and knit the dropped stitch. ▲ Repeat from ▲ to ▲ 4 (5) more times. K2. ☺︎
Repeat from ☺︎ to ☺︎ 4 (5) more times. (Rows 3 – 10 make up one repeat of the diamond motif).
Next row: Purl across
Next row: Cast off. Do NOT cut the yarn, unless you are making the edging a different colour.
Edging
To make things as easy as possible, I’ve embedded the (very) old video I made demonstrating how to do this technique. It’s basically a backwards single crochet (Bsc) that creates a more ropey kind of look.
You may have to play around a bit with the size of hook that’s going to work the best for you. For me, based on my tension for knitting the dishcloth and tension for how I crochet, a 3.75 mm crochet hook worked best.
Row 1: With right side facing, and in the first cast off stitch that you can easily insert your hook, Bsc (backwards single crochet) around edge. Bsc in every 2nd cast off stitch along the top and bottom edges
Skip every other stitch.
Insert your hook like this.
Hook the yarn and pull through.
Hook the yarn again and pull through the two loops. Stitch made.
Bsc in every other row along the sides.
Insert hook in this stitch when working along the rows.
Join to the start of the row. Work in ends.
I found there is enough slack that you don’t need multiple stitches in the corner.
Pattern Without the Photos
Cast on 34 (40 sts)
Row 1: Purl across (wrong side)
Row 2: Knit across (right side)
☺︎Row 3: P2 YO ✿ P5 YO P1 YO ✿ Repeat from ✿ to ✿ 3 (4) more times. P5 YO P3
Row 4: K2 SL1, Drop the YO, K4 ◆ SL1, Drop the YO, SL1, Drop the YO, K4 ◆ Repeat from ◆ to ◆ 3 (4) more times. SL1, Drop the YO, K2
Row 5: P2 SL1 P4 ♠︎ SL2 P4 ♠︎ Repeat ♠︎ to ♠︎ 3 (4) more times. SL1 P2
Row 6: K2 ♣︎ Drop the next stitch, K2. Pick up the dropped stitch with the non-working needle. Knit this stitch. SL2 Drop the next stitch. Pass the 2 slipped stitches back to the non-working needle. Pick up and knit the dropped stitch. K2 ♣︎ Repeat from ♣︎ to ♣︎ 4 (5) more times. K2
Row 7: ♥︎ P4 YO P1 YO P1 ♥︎ Repeat from ♥︎ to ♥︎ 4 (5) more times. P4
Row 8: ♦︎ K4, SL1, Drop the YO, SL1, Drop the YO ♦︎ Repeat ♦︎ to ♦︎ 4 (5) more times. K4
Row 9: ✦ P4 SL2 ✦ Repeat from ✦ to ✦ 4 (5) more times. P4
Row 10: K2 ⚽︎ SL2, Drop the next stitch. Pass the 2 slipped stitches back to the non-working needle. Pick up the dropped stitch with the non-working needle and knit this stitch. K2. Drop the next stitch. K2. Pick up and knit the dropped stitch. ⚽︎ Repeat from ⚽︎ to ⚽︎ 4 (5) more times. K2. ☺︎.
Repeat from ☺︎ to ☺︎ 4 (5) more times. (Rows 3 – 10 make up one repeat of the diamond motif).
Next row: Purl across
Next row: Cast off
Edging
The edging is a backwards single crochet (Bsc) that creates a more ropey kind of look.
You may have to play around a bit with the size of hook that’s going to work the best for you. For me, based on my tension for knitting the dishcloth and tension for how I crochet, a 3.75 mm crochet hook worked best.
Row 1: With right side facing, and in the first cast off stitch that you can easily insert your hook, Bsc (backwards single crochet) around edge. Bsc in every 2nd cast off stitch along the top and bottom edges. Bsc in every other row along the sides.
Join to the start of the row. Work in ends.
I found there is enough slack that you don’t need multiple stitches in the corner.
Hints and Tips
You may have to play around a bit with the size of the crochet hook you use.
I haven’t had any problem with the dropped stitch unraveling while knitting other stitches. If you do, you can use a cable needle to hold it in place.
Try a variation in colours too! You could make each diamond repeat a different colour. What’s marked with ? to ?. And you can also make the edging a different colour like I did. It would be a great way to use up the extra bits of cotton yarn you have.
Abbreviations
Non-working needle – Left needle if you are right handed. Right needle if you are left handed)
YO – Yarn Over. When doing a YO for the purl stitch, pull your yarn to the back of your work (like you were going to knit) and purl the next stitch. The yarn will form an extra stitch on your needle.
Starting the yarn over
Pull the yarn to the back of your work
Pull your yarn forward and work the stitch. Increase made.
The yarn over (increased stitched)
K – Knit
P – Purl
SL – Slip the next stitch, without working it, onto your working needle. (Right needle if you’re right handed. Left needle if you’re left handed).
After a bit of math and a little tweaking of the results, the child sizes of the FREE Knitted Slipper Pattern is finally available! (You can click that link if you need the adult sizes). Because these are made for little feet, they often don’t need much yarn. This makes them a great way to use up the smaller leftover bits from larger projects. Not to mention, these tend to sell like hotcakes at local farmers’ markets, craft fairs and consignment shops. The smaller pairs are “so cute” making for an easy sale and the return on the investment of your time is great! They’re quick to make and since the yarn has already been bought for a larger project, anything made from the leftovers, like these child shippers, is gravy, baby!
If you enjoy this pattern and my other free online knitting patterns, please consider making a small donation or helping me out by visiting my Help Support My Work page. If you can’t help financially, I totally get it. Sharing on your social media is the next best thing.
And yes, you have my permission to sell or give away anything you make from my patterns. You’re just not allow to redistribute any of the patterns themselves in any form. Linking to and sharing is always welcome though! You can use those buttons ?? to do so easily.
Please note, this isn’t a pattern for beginners, but if you know how to knit a stitch, pick up stitches and knit two stitches together, you should be okay. I used a very different technique involving multiple sets of needles, but no worries! I included photos and now a how-to video demonstrating how I’m using the extra set and it totally works! Trust me.
And if you are concerned with the number of ends you’ll need to weave in when done, I’ve also created a tutorial to help you with that too! It’s so much easier to work the ends in as you go, though there will be a few you’ll have to do (i.e. when you sew up the seam for the heel), but if you are interested in easing your work load, here’s the link showing you How to Weave in the Ends While Knitting. A new window will open so you won’t lose this page ?. There’s also a clickable card in the scrolling free pattern pics running across the top of this website if you need to find the page again.
If you don’t want to read it online and want to print it, this knitting pattern is available in all the usual places including this website – Knitted Moccasin Bootie Slippersfor Children, Ravelry, in my Etsy shop, LoveCrafts, a paperback on Amazon, and as an ePub that you can download on your Kindle. I’ll link to all of them as I get them completed and uploaded to the retailers. If a link isn’t working, it’s on its way. I need to reformat everything to get things on Amazon…
FYI I’m working at uploading my work to a distributor that also works with libraries. I’m publishing paperbacks of the patterns that you’ll be able to borrow! Some are available right now like the slipper and fingerless glove compilations I have. The single pattern paperbacks should be available as I get them uploaded and the distributor gets them out to the libraries. If they aren’t there now, you can always ask them to get it for you ?
The printable version of this pattern will also be in the member section and at Patreon also. Here are the links where you can get it.
If you are uncertain or having trouble finding what you need to make these slippers, clicking any of the links below will show you exactly what you need. And if you decide to order through Amazon, it will be delivered right to your door and help support the hosting costs of the website (I do get a small commission from sales through Amazon).
And because this pattern is so basic with no pattern of any sort, it’s a great knitting pattern to highlight the colour of your yarn. I have a weakness for variegated/shaded yarns. I really enjoying watching how the colours pool on the finished project. Little weird, I know… And In case you were thinking of trying self-striping yarn. Don’t. It looks terrible.
1 ball of worsted weight yarn (average 260 yard, 5 oz or 141 gram ball will be more than enough). I used Red Heart and Bernat worsted weight yarn when designing the pattern but any worsted weight yarn will suffice.
Use this product to help prevent slippers from sliding on slick floors
Gauge
With size 4 mm (US size 6) needles or whatever size you need to obtain the correct number of stitches and rows. Be sure to check your gauge otherwise the sizing won’t be correct.
I’m using a colour code to denote the number of stitches for the various sizes. I hope this helps when making the sizes of slippers.
Size
Length
1-2
4 inches
10 cm
3-4
4.5 inches
11.4 cm
5-6
5 inches
12.5 cm
7-8
5 3/4 inches
14.5 cm
9-10
6 inches
15 cm
11-12
6 3/4 inches
17 cm
13-1
7 1/4 inches
18.5 cm
2-3
8 1/4 inches
21 cm
4-5
8 3/4 inches
22 cm
All measurements are approximate. Knitted slippers are very forgiving for size and foot shape.
To Begin
Cast on 18 (20,22, 24,26,28,30, 32,34)
Knit across for 10 (12,12, 14,14,16,18, 20,20) rows. Break yarn when completed last row.
Toe Flap
Next Row: With RIGHT side facing, transfer the first 6 (7,7, 8,8,9,10, 10,11) stitches to a stitch holder. Reattach the yarn and knit the next 6 (6,8, 8,10,10,10, 12,12) to create the toe flap. Leave the remaining 6 (7,7, 8,8,9,10, 10,11) stitches on the needle unworked.
The following rows are worked back and forth on the 6 (6,8, 8,10,10,10, 12,12) toe flap stitches only!
Knit across for 18 (20,22, 24,26,30,32, 36,40) rows.
Break yarn. You’ll have the 6 (6, 8, 8, 10,10,10, 12, 12) stitches of the toe flap on your needle and the 6 (7, 7, 8, 8,9,10, 10, 11) stitches you left on the needle when you started making the toe flap.
Making the Sides of the Slipper
This is where you’re going to need the extra set of knitting needles. You’ll be knitting back and forth in rows but the turn around the toe is too tight to use circular needles. For this, you’ll put the toe flap stitches on one of your extra needles. It’s a little unconventional, but it works.
Next Row: With the RIGHT side facing, transfer the 6 (7,7, 8,8,9,10, 10,11) stitches from the stitch holder onto one of your needles. Attach your yarn and knit these stitches. Pick up 9 (10,11, 12,13,15,16, 18,20) stitches evenly along the edge of the toe flap. (All of these stitches are now on ONE needle – 15 (17,18, 20,21,24,26, 28,31) stitches
With another needle, knit the 6 (6,8, 8,10,10,10, 12,12) stitches of the toe flap. Leave the remaining 6 (7,7, 8,8,9,10, 10,11) stitches on the other needle unworked for now.
With another needle, pick up 9 (10,11, 12,13,15,16, 18,20) stitches evenly along the side of the toe flap. Knit the remaining 6 (7,7, 8,8,9,10, 10,11) stitches on the next needle. There are now 15 (17,18, 20,21,24,26, 28,31) stitches on this needle.
You should now have 3 needles holding stitches with all the points pointing as shown below when laid flat. You also have one spare needle to knit with. You are now going to knit in rows, back and forth with these three needles. Once you finish knitting all the stitches on one needle, move on to the next needle (the point of the needle is right there) until you complete the row.
I used double pointed needles because they were handy and I don’t like the longer needles flopping and waggling about while I knit. Regular knitting needles work perfectly fine, too!
Another way to say it for the following rows, knit all the stitches forming the side of the slipper, knit the stitches holding the toe flap stitches, then knit the other side of the slipper (counts as one row). Turn. Repeat.
Knit the next 4 (4,6, 6,8,8,8, 10,10) rows.
There are 2 (2,3, 3,4,4,4, 5,5) ridges on the tip of the toe.
The photo below shows the 5 ridges for the sizes 2-3 and 4-5.
These are the ridges picked up along the toe flap
The 2 ridges for small size 1-2 and 3-4.
Next Row: With WRONG side facing. Cast off all the stitches from the first needle loosely. You’ll need to pass the last stitch from the first needle over the first stitch of the toe flap stitches (second needle).
Using the same needle that now has one stitch, knit the remaining 5 (5,7, 7,9,9,9, 11,11) stitches of the toe flap.
Cast off all the stitches from the third needle loosely. Break yarn.
Making the Sole
If you need help with making the sole, picking up stitches along the side etc, you can watch this video. It starts exactly where you need it to.
Next Row: With the RIGHT side facing, attach yarn and knit the first stitch of the cast off stitches by the toe flap (cast off stitch on the right by the point of the needle).
Pick up this stitch at the start of the row.
K2tog. Knit to the last 2 stitches K2tog. Pick up the cast off stitch by the point of your needle. – 6 (6,8, 8,10,10,10, 12,12) stitches
Pick up this stitch at the end of the row.
Quick tip – wrap the yarn counterclockwise around your needle and turn it down to pull the yarn through the cast off stitch on the right. If you have a hard time doing this, you can also use a crochet hook to pull the loop through and place that loop on your working needle.
You now are working back and forth along the bottom of the foot picking up one cast off stitch on each side as you go.
Next Row: Knit across.
? Next Row: Pick up the next stitch of the cast off stitches. K2tog. Knit to the last 2 stitches K2tog. Pick up the cast off stitch on the other side of the slipper by the point of your needle. – 6 (6, 8, 8, 10, 10, 10, 12, 12) stitches
Keep working your way down the slipper to make the sole.
Next Row: Knit across ?
Repeat from ? to ? in every stitch down the entire length of the foot. There are equal number of cast off stitches along each side. How many rows varies depending on the size of slipper you’re making. Be sure to end with a completed knit across row.
Starting the sole. Right side. This is shows the adult size but will have less stitches for child sizes.
Working your way down while making the sole. Wrong side.
Continuing to work down the length of the sole.
Still further down the sole. Note how the cast off edges are being picked up as you go. Keep working your way down the length of the sole until you’ve picked up all the cast off stitches.
If you need help with making the heel, you can watch the video. It starts where you need it to. As mentioned in the video, you’ll need to follow how to decrease with the pattern as written below.
If You Have 6 Stitches
Next Row: With the RIGHT side facing, pick up a stitch in the row closest to the sole of the slipper. Count how many ridges it is for the size you are making. K2tog 3 times. Count down the same number of ridges and pick up a stitch in the space beneath it on the other side.
The photo above shows 9 rows of ridges.
These are rows you knit to form the edges of the slipper.
Stitch picked up on the right edge in the 9th row shown above
After you K2tog at the end of the row, you’ll pick up a stitch here.
Stitch picked up on the left or end of the row.
Next Row: Knit across.
Next Row: K2tog, K1, K2tog. Pass the middle stitch on your working needle over the stitch on the left. Pass the stitch on the right over the stitch on the left. (Or you can turn your work and knit the 3 sts together).
Break yarn leaving a length of yarn long enough (8ish inches) to sew up the remaining seam.
Make another slipper.
If You Have 8 Stitches
Next Row: With the RIGHT side facing, pick up a stitch in the row closest to the sole of the slipper. Count how many ridges it is for the size you are making. K2tog 4 times. Count down the same number of ridges and pick up a stitch in the space beneath it on the other side. (Scroll up to the “If you have 6 stitches” section to see the photos if you need help).
Next Row: Knit across.
Next Row: Pick up a stitch beneath the next ridge. K2tog 3 times. Pick up a stitch in the space beneath the next ridge on the other side.
Next Row: Knit across.
Next Row: K2tog, K1, K2tog. Pass the middle stitch on your working needle over the stitch on the left. Pass the stitch on the right over the stitch on the left. (Or you can turn your work and knit the 3 sts together).
Break yarn leaving a length of yarn long enough (8ish inches) to sew up the remaining seam.
Make another slipper.
If you have 10 or More Stitches
♀️ Next Row: With the RIGHT side facing, pick up a stitch in the row closest to the sole of the slipper. Count how many ridges it is for the size you are making. K2tog twice. Knit to the last 4 stitches. K2tog twice. Count down the same number of ridges on the other side and pick up a stitch in the space beneath it. (Scroll up to the “If you have 6 stitches” section to see the photos if you need help).
Next Row: Knit across.
Next Row: Count down one ridge less than the previous row and pick up a stitch in the space beneath it. K2tog. Knit until the last 2 stitches. K2tog. Count down the same number of ridges and pick up a stitch in the space beneath it on the other side.
Next Row: Knit across. ♀️ Repeat from ♀️ to ♀️ until 6 stitches remain.
Next Row: Pick up a stitch beneath the next ridge. K2tog 3 times. Pick up a stitch in the space beneath the next ridge on the other side.
Next Row: Knit across.
Next Row: K2tog, K1, K2tog. Pass the middle stitch on your working needle over the stitch on the left. Pass the stitch on the right over the stitch on the left. (Or you can turn your work and knit the 3 sts together).
Break yarn leaving a length of yarn long enough (8ish inches) to sew up the remaining seam.
Make another slipper.
Yes, they do look a little boxy when they’re done and not on a foot. The stretch of the garter stitch allows these slippers to stretch around the contours of any foot easily.
Hints and Tips
If you want a longer cuff at the top, work more rows than stated at the beginning when you cast on. Because smaller kid-lettes tend to have chunkier legs (aka – cankles ?), which is so gosh-darn cute btw, don’t go too crazy with the length.
When picking up stitches from the cast off row, be sure you’re really moving on to the next cast off stitch! It’s an easy mistake to pick up a stitch in a stitch you already picked up. If in doubt, give the needle holding the stitches a bit of a tug. You’ll see the yarn move slightly at the very back, closest to the needle. Pick up a stitch at the NEXT cast off stitch.
If you don’t have the same number of stitches on both sides when you are forming the sole, you may have picked up a stitch twice in one stitch or missed one. Don’t worry! This is fixable. You can skip one cast off stitch if you need to make it even, or pick up a cast off stitch twice on the other side. There’s enough stretch in the slipper that any puckering this causes won’t be overly visible if you’re off by a stitch or two.
Picking up the stitches evenly along the toe flap is roughly 1 stitch every ridge.
To speed up finishing the slippers and not have so many ends to sew in, hold the yarn ends to the back of your work as you knit. And yes, this is the third time I’m sharing it, but I made a photo tutorial showing how to do this. You can see it here – How to Work in the Ends as You Knit.
If you have any questions, please feel free to leave a comment below or send me your questions here. If there is a typo or stitch count that’s off, let me know in the comments! I type these out from notes I make when designing the slippers. It’s easy, and embarrassingly common for me to miss something. Especially on the smaller slippers that involve so many different stitch counts for the numerous sizes.
To see how you can keep the free patterns coming, visiting this page – Help Support My Work! A financial donation is always appreciated but a share, like and follow on social media also helps me immensely ?
If you’ve run across any of my slipper patterns before this, one thing you’ll be very familiar with is my unreasonable dislike for sewing seams on projects. I equally dislike working in ends (go to How to Work in Ends While Knitting for more on this). I have a embarrassing amount of nearly finished projects that collect in a box with unsewn seams and dangling ends. Yes. I just admitted that to everyone. No shame in my game.
This is another attempt to make this happen. It’s quite difficult to make something seamless when the design calls for it to be knit flat on 2 needles. This automatically means there are going to be ends that need to meet at some point. The idea is to make them meet as you knit so they are permanently fixed together with no extra work.
Don’t forget to share this pattern with your family and friends! You can use these buttons☝🏼☝🏼☝🏼
This pattern starts with the cast on stitches going around the foot (sans heel). You’ll then work your way up to the top cuff. I’ve pointed out where we’re starting in this photo.
Another way to avoid ads and pop-ups, get instant, PRINTABLE downloads of this pattern and others, is by becoming a Member. When you become a Website Supporter at $4/month, you’ll gain access to exclusive member only posts on Buy Me A Coffee. You can download as many patterns as you like for the same $4 each month. You can go to this page to learn more, become a member and support my work… Exclusive Member Area
Now that we’re done all that, if you just need the pattern, you can click this button. Please note, if you click the button you’ll skip the other info like gauge, how much yarn, needle size, etc.
PM1 – Make one (purl wise). Increase one stitch between the stitches. Pick up the yarn between the stitches. Twist it slightly and place it on your non-working needle. Purl the stitch. Watch this video on How to PM1 or Purl Make 1 to see how.
M1 – Make one (knit wise). Increase one stitch between the stitches. Pick up the yarn between the stitches. Twist it slightly and place it on your non-working needle. Knit the stitch. Watch this video on How to M1 or Make 1 to see how.
K2tog – knit 2 stitches together
K3tog – knit 3 stitches together
P2tog – purl 2 stitches together
P2tog TBL – purl 2 together through the back loop.
Things You Need
Worsted weight yarn – 2 (two) standard balls of yarn (215 yards/197 m). Any colours of your choosing.
or
Super Bulky yarn – 2 standard balls of ONE colour with matching lot numbers (90 yards/82 m).
One ball makes one slipper. There will be some yarn left over from each ball.
Size 5 mm (size 8 US) knitting needles (or whatever you require to get the correct gauge).
Tapestry needle to sew the seam and work in the ends.
Gauge
In stockinette stitch
8 sts – 5 cm (2″)
7 rows – 5 cm (2”)
Sizes are written as such:
Women 6-7 (8-9, 10-11, 12)
Men 6 (7-8, 9-10, 11-12)
The Pattern
Cast on 56 (60, 64, 68)
Knit across for 6 (6, 8, 8) rows.
Next Row: K26 (28, 30, 32) K2tog. Sl 1 as if to knit. K1 PSSO. K26 (28, 30, 32).
This photo will help you in how and where to pick up the following stitches. Hold your work so it looks like this with the pointy end up. The RED arrow is for right handed knitters.
Pick up 6 sts at the toe in bottom loop of cast on stitches. (3 sts on either side of middle clearly marked with p2tog line.)
Next Row: Knit across.
Next Row: Pick up a stitch in the bottom loop of the cast on stitches. K6. Pick up a stitch in the bottom loop of the cast on stitches.
Next Row: Knit across.
Next Row: Pick up a stitch in the bottom loop of the cast on stitches. K8. Pick up a stitch in the bottom loop of the cast on stitches.
Next Row: Knit across.
If you are making women’s sizes 6-9 or men’s sizes 6-8, skip to row marked with ♥
For all other sizes continue as follows:
Next Row: Pick up a stitch in the bottom loop of the cast on stitches. K10. Pick up a stitch in the bottom loop of the cast on stitches.
Next Row: Knit across.
♥ ☼ Next Row: Pick up a stitch in the bottom loop of the cast on stitches. K2tog. Knit to last 2 sts. K2tog. Pick up a stitch in the bottom loop of the cast on stitches.
Next Row: Knit across. ☼
Repeat rows marked with ☼ to ☼ down the length of the sole. You will ALWAYS have 10 (10, 12, 12) sts on your needle.
Forming the Heel
There are two ways to do this. The easiest way is to make a small triangle.
Using the 10 (10, 12, 12) sts on your needle.
♦ Next 2 Rows: Knit across.
Next Row: K2tog. Knit to last 2 sts. K2tog.
Next Row: Knit across. ♦
Repeat from ♦ to ♦ until 5 (5, 6, 6) sts
If making women’s sizes 6-9 or men’s sizes 6-8:
Next Row: K2tog K1 K2tog.
Next Row: K3tog. Cut yarn and draw yarn through last st. Leave a length of yarn long enough to sew the remaining seam.
If making women’s sizes 10-12 or men’s sizes 9-12:
Next Row: K2tog 3 times.
Next Row: K3tog. Cut yarn and draw yarn through last st. Leave a length of yarn long enough to sew the remaining seam.
For all sizes:
Flip up the triangle to fit into the back of the heel. Sew seams along sides of triangle and up the back of the slipper.
Or
Make the seams as you go:
I recently made a video showing how to do this. It’s how I make a lot of my slipper heels including this pattern. You can watch the video below to help you if the photos aren’t enough.
Using the 10 (10, 12, 12) sts on your needle,
♦ Next Row: Pick up a st along side of the slipper. K2tog twice. Knit to last 4 sts. K2tog twice. Pick up a st along side of the slipper and work in the ends.
Next Row: Knit across. ♦
Repeat from ♦ to ♦ until 6 (6, 8, 8) sts.
§ Next Row: Pick up a st along side of the slipper. K2tog across. Pick up a st along side of the slipper.
Next Row: Knit across. §
If making women’s sizes 10-12 or men’s sizes 9-12, repeat from § to § once.
Next Row: Pick up a st along side of the slipper. K2tog, K1, K2tog. Pick up a st along side of the slipper.
Next Row: K2tog, K1, K2tog.
Next Row: K3tog. Cut yarn and draw yarn through last st. Leave a length of yarn long enough to sew the remaining seam. Sew the seam up the back of the slipper and work in the ends.
You can make the slippers truly seamless when you are making the seamed triangle for the back of the heel. Continue picking up stitches on each side while working up the heel seam. Continue doing this using the 5 sts and repeating as follows:
Next Row: Pick up a st along side of the slipper. K2tog, K1, K2tog. Pick up a st along side of the slipper.
Next Row: Knit across.
I didn’t include it in the instructions because… I didn’t. It was already complicated enough for the heel.
If you are up in arms about how many ends there are to sew in, you can work the ends in while you are knitting. I have a detailed photo tutorial on my website here that you can watch – How to Work In the Ends While Knitting.
Play around with the colours you choose if you’re using worsted weight yarn. You can get some neat effects by blending a solid colour with a variegated one, or by using colours that are the same colour but a different tone. I used both of these techniques for the red booties.
Like all of my patterns you have my permission to sell and/or give away the physical items that you make using this pattern. You are NOT permitted to reprint or duplicate this pattern in any form unless you have obtained my written permission to do so.
If you have any questions, please feel free to leave a comment or send me your questions at kweenbee_crafts@hotmail.ca.
If you have ever made one of my dishcloths in the past, it really bothers me when one side of a dishcloth doesn’t look the same way on the reverse side. To me, a dishcloth should be reversible. I know, it’s weird and really isn’t that important, but we all have these random, arbitrary rules we like to follow. Well, this one hits that same-both-side requirement! Yay! My mildly OCD brain is happy.
Want to make the scarf or the coasters instead? It’s easy peasy! Follow the pattern below shows which rows to repeat when making the scarf. And when making the coasters, only make it about 26 stitches wide instead of the 50 stitches for the dishcloth. Any even number will work for the width regardless if you’re making the scarf, dishcloth or the coasters.
As always, if you would prefer a printable paper version of this pattern, you can purchase and download the PDF from all of my usual sites. You can make a purchase from this website here – Textured Knitted Scarf, Dishcloth and Coasters Pattern. You can also purchase a download from my other online retailers which are LoveCrafts, Etsy and Ravelry. If the link isn’t working I haven’t upload the pattern to the site yet.
Want to make a monthly contribution, avoid ads and pop-ups, and get instant, PRINTABLE downloads of my patterns? Become a Member on this website! When you become a Website Supporter for $3/month, you’ll gain access to exclusive member only posts. These posts contain one click downloads of the patterns. Simply click the Download & Print button. The PDF will automatically download to your computer or smart device. You can then read it on your device or print it at your leisure. You can download as many patterns as you like for the same $3 each month. You can go to this page to learn more, become a member and support my work… Exclusive Member Area
Worsted weight yarn – I always use cotton yarn for dishcloths. You can use something else if you are going to make a scarf with this pattern. The amount of yarn you’ll need depends on how long and wide you want a scarf. If making dishcloths or coasters, one standard ball will be enough.
Row 2: Increase in the first knit stitch. K across.
Row 3: Increase in the first knit stitch. K1 P1 K3
Row 4: Increase in the first knit stitch. K1 P1 K1 P1 K2
Row 5 – 6: Increase in the first knit stitch. K across.
★ Row 7: Increase in the first knit stitch. K1 *P1 K1* Repeat from * to * to the last 4 stitches P1 K3.
Row 8: Increase in the first knit stitch. K1 *P1 K1* Repeat from * to * to the last 3 stitches P1 K2.
Row 9 – 10: Increase in the first knit stitch. K across. ★ Repeat from ★ to ★ until you have 50 stitches total.
♥︎ Next row: K2 *P1 K1* Repeat from * to * to the last 4 stitches P1 K3.
Next row: K2 *P1 K1* Repeat from * to * to the last 4 stitches P1 K3.
Next 2 rows: K across. ♥︎
If you are making a scarf, repeat from ♥︎ to ♥︎ until it’s the length you want. If NOT making a scarf, continue with the pattern as follows…
♦︎ Next row: K2tog *P1 K1* Repeat from * to * to the last 4 stitches P1 K3.
Next row: K2tog *P1 K1* Repeat from * to * to the last 3 stitches P1 K2.
Next 2 rows: K2tog. K across. ♦︎ Repeat from ♦︎ to ♦︎ until down to 8 stitches. You will have finished the first knit across row when there are 8 stitches on your needle.
Next row: K2tog. K the next stitch. Pass the K2tog loop on your working needle over the stitch you just knitted (AKA Cast off). Continue to cast off until there are 2 stitches on your non-working needle. K2tog these 2 stitches. You now have 2 stitches on your working needle. Pass the stitch over the the K2tog loop (the loop on the right over the loop on the left, if you are right handed).
This pattern can easily be made into a scarf of any width. I used fringe on the point for my scarf but you could attach tassels if you so desire. If you want to make this into a scarf, repeat the rows in the middle marked with the ?. It’s always 4 rows for one repeat of the pattern. The scarf in the photos is 26 stitches wide.
Not a fan of the scarf but could use some coasters? This pattern could easily be made smaller following the pattern exactly as written for the dishcloth but only making the coaster 26 stitches wide.
Make this as wide or as narrow as you like. If you feel 50 stitches are too wide, or not wide enough, do what you wish. Just always end on the second row of the knitting across rows to maintain the pattern texture.
If you want a more finished edge, you can easily do a single crochet around the edge of the dishcloth. The lighter beige dishcloth has the single crocheted edge if you’d like to see an example. I found that 2 stitches at each of the corners maintained a spaced out edging that lays flat.
Like all of my patterns you have my permission to sell and/or give away the slippers that you make using this pattern. You are NOT permitted to reprint this pattern in any form unless you have obtained my written permission to do so.
If you have any questions, please feel free to leave a comment or send me your questions at kweenbee_crafts@hotmail.ca.
Help Support My Work!
Follow me on TikTok, Instagram, Twitter, Facebook, Pinterest and YouTube. Every follow, subscribe, thumbs up, like, heart and share help increase my popularity on the web and get more viewers to my work. It costs you nothing but helps me sooooo much!
If you would like to help a little more, you can always support me on Patreon or you can make a single time donation at Buy Me a Coffee.
And just to see how many people read the entirety of a blog post…
For even more FREE knitting and crochet patterns, be sure to check out my newest website – KweenBee.ca I add new patterns regularly.
If you are a fibre artist and have a pattern you would like to share, I’d love to show case your work! Paid or free, on your own website, in your Etsy shop, on Ravelry or anywhere else, you can add your pattern. Go to – KweenBee.caThe service is free for anyone to use. I’m trying to generate a safe space for everyone to share their work that isn’t related to any of the social media sites.
Knit fast and keep your feet toasty warm with this quick to knit pattern. Made with 2 strands of worsted weight yarn, or choose to use super bulky yarn, these extra thick, super quick slippers are sure to be a hit with you and anyone that wears the slippers.
I had a number of people over the years ask about faster to knit and thicker versions of my slippers using either 2 strands of worsted weight yarn or using the thicker yarns that are available. I decided to do the math and come up with something simple and quick for anyone to make. I decided on the thicker version of my Easy to Knit Rolled Cuff Slippers that I published a while back. It’s simple and made one piece. This lent itself well to a rewrite of the pattern taking into account the new gauge of the yarn.
A word on yarn. You can use super bulky yarn. This is equal to 14 ply or No. 6 yarn. How it’s referenced depends on where you live. This pattern also works well, and for our purposes, equals to a double strand of worsted weight yarn (10 ply or No. 4 yarn). As long as the gauge is the same, the sizing of the slippers should be consistent. I found that using size 5 mm (US 8) knitting needles worked for both the super bulky and the double strand of worsted weight giving the same stitches and rows per inch for both.
A note on super bulky yarn selections. Make sure what you are using is the one that is like regular worsted weight yarn but only thicker. Using any of the blanket yarns (the ones that are similar to a terry towel type texture) don’t stretch the way they should.
It’s easier to use 2 separate balls of yarn when using two strands of worsted weight yarn for this project. It also lets you play with colour a bit. Using colours that are in the same colour family or have a slightly different shade can make for some interesting variations. Mixing a solid colour with a variegated yarn can also make for unique effects. It really is up to you how you want to blend the colours. Of course, you can use the same colour for both strands. The choice is yours.
Love the free patterns? You can say thanks in a couple of ways. You can read more about how you can Support My Work by clicking that link or make a small donation and Buy Me a Coffee. ?? That is a website where you can make a one time donation as a thanks. (FYI I have some great offers if you would like to buy me multiple coffees. You can see those by clicking on the Extras tab or you can click this link Janis Frank Extras).
If you don’t want to or are unable to make a financial donation, sharing this pattern through social media is a great way to help out too! The links below are a super easy way for you to do so.
Another way to avoid ads and pop-ups, get instant, PRINTABLE downloads of this pattern and others, is by becoming a Member on this website. When you become a Website Supporter for $3/month, you’ll gain access to exclusive member only posts. These posts contain one click downloads of the patterns. Simply click the Download & Print button. The PDF will automatically download to your computer or smart device. You can then read it on your device or print it at your leisure. You can download as many patterns as you like for the same $3 each month. You can go to this page to learn more, become a member and support my work… Exclusive Member Area
Worsted weight yarn – 2 (two) standard balls of yarn (215 yards/197 m). Any colours of your choosing.
or
Super Bulky yarn – 2 standard balls of ONE colour with matching lot numbers (90 yards/82 m). One ball makes one slipper. There will be some yarn left over from each ball.
Size 5 mm (size 8 US) knitting needles (or whatever you require to get the correct gauge).
Tapestry needle to sew the seam and work in the ends.
Gauge
In garter stitch
8 sts – 5 cm (2″)
7 rows – 5 cm (2”)
The sizing for this pattern is written as such:
Women 6-7 (8-9, 10-11, 12)
Men 6 (7-8, 9-10, 11-12)
Abbreviations
K – knit
P – purl
K2tog – knit 2 stitches together
P2tog – purl 2 stitches together
st – stitch
sts – stitches
The Pattern
Cast on 2
Row 1-2: Knit across.
Row 3: Increase in both stitches. (4 sts)
Row 4-5: Knit across.
Row 6: Increase in the first st. K to the last st. Increase in the last st. (6 sts)
Row 7-8: Knit across.
Row 9: Increase in the first st. K to the last st. Increase in the last st. (8 sts)
Row 10-11: Knit across.
Row 12: Increase in the first st. K to the last st. Increase in the last st. (10 sts)
Row 13-14: Knit across. Go to the row marked with ◘ for women’s sizes 6-9 and for men’s sizes 6-8. Continue for all larger sizes as follows:
Next row: Increase in the first st. K to the last st. Increase in the last st. (12 sts)
Next 2 rows: Knit across.
◘ Next row: Cast on 12 (12, 15, 15). 22 (22, 27, 27 sts)
Next row: P3 *K2 P1* Repeat from * to * 2 (2, 3, 3) times more. K 10 (10, 12, 12).
Next row: Cast on 12 (12, 15, 15) Knit across. 34 (34, 42, 42 sts)
♥ Next row: P3 *K2 P1* Repeat from * to * 2 (2, 3, 3) times more. K 10 (10, 12, 12). *P1 K2* Repeat from * to * 2 (2, 3, 3) times more. P3.
Next row: Knit across. ♥ Repeat from ♥ to ♥ 11 (12, 13, 14) more times for a total of 24 (26, 28, 30) rows.
Next row: P2tog P1*K2 P1* Repeat from * to * 2 (2, 3, 3) times more. K 10 (10, 12, 12). *P1 K2* Repeat from * to * 2 (2, 3, 3) times more. P1 P2 tog. 32 (32, 40, 40 sts)
☻ Next row: Knit across.
Next row: P2 *K2 P1* Repeat from * to * 2 (2, 3, 3) times more. K 10 (10, 12, 12). *P1 K2* Repeat from * to * 2 (2,3, 3) times more. P2.☻ Repeat from ☻ to ☻ 10 (11, 10, 11) more times for a total of 22 (24, 22, 24) rows.
Next row: *K2tog K1* Repeat from * to * 3 (3, 4, 4) times more. K2tog 5 (5, 6, 6) times. *K1 K2tog * Repeat from * to * 2 (2, 3, 3) times more. K1.
Next row: P2 *K1 P1* Repeat from * to * 2 (2, 3, 3) times more. K5 (5, 6, 6). *P1 K1* Repeat from * to * 2 (2, 3, 3) times more. P1.
For women’s size 6-9 and men’s size 6-8
Next row: K1 K2tog 9 times. K1.
Next row: P5 K2 P4.
Draw through and pull tight.
For women’s size 10-12 and men’s size 9-12
Next row: K1 K2tog 7 times. K1 K2tog 4 times. K1.
Next row: P6 K3 P5.
Draw through and pull tight.
Sew the seam on the top of the foot. Flip up the triangle of the heel and sew the seams on both sides. Sew the ends of the rolled cuff section together above the tip of the triangle.
Like all of my patterns you have my permission to sell and/or give away the physical items that you make using this pattern. You are NOT permitted to reprint or duplicate this pattern in any form unless you have obtained my written permission to do so.
If you have any questions, please feel free to leave a comment below.
These slippers are perfect for a beginner! If you know how to cast on, knit, purl, K2tog,M1, and draw through (or gather) stitches you will be able to make these slippers. Don’t know how? I have a full online video tutorial to show you how to do it!.
If you’re looking for the pattern, keep scrolling down the page. It’s written out in full below.
Loving the free patterns on this site? You can always help me out by sharing this with people you think may like it. A share on social media is always appreciated. You can use the links below. Financial donations are always welcome, too! I recently started a profile on Buy Me a Coffee. It’s a one time donation that is a simple thanks for all the hard work I put into my patterns and this website.
Another way to avoid ads and pop-ups, get instant, PRINTABLE downloads of this pattern and others, is by becoming a Member. When you become a Website Supporter at $4/month, you’ll gain access to exclusive member only posts on Buy Me A Coffee. You can download as many patterns as you like for the same $4 each month. You can go to this page to learn more, become a member and support my work… Exclusive Member Area
With size 4 mm (US size 6) needles or whatever size needles you need to create the number of stitches and rows. Be sure to check your gauge or the sizing could be off. But even in saying that, this is a very forgiving pattern. If you’re off a bit, it’ll be okay.
4″ = 16 stitches
4″ = 40 rows
Sizes are written as follows:
Women 6-7 (8-9, 10-11,12-13)
Men’s 5-6 (7-8, 9-10, 11-12)
It’s only the numbers of rows that are going to change with the sizing.
To Begin – Making the Heel Flap
Cast on 3 stitches
(I’m counting this as row 1 only because I mis-numbered the rows when I originally posted this knitting pattern. It was easier to change it at the beginning than renumbering the entire pattern.)
Rows 2 – 3: Knit across
Row 4: K1 M1 K2. (4 sts)
Rows 5 – 6: Knit across
Row 7: K1 M1 K2 M1 K1 (6 sts)
Rows 8 – 9: Knit across
Row 10: K1 M1 K4 M1 K1 (8 sts)
Rows 11 – 12: Knit across
Row 13: K1 M1 K6 M1 K1 (10 sts)
Rows 14 – 15: Knit across
Row 16: K1 M1 K8 M1 K1 (12 sts)
Rows 17 – 18: Knit across
Row 19: K1 M1 K10 M1 K1 (14 sts)
Rows 20 – 21: Knit across
Row 22: K1 M1 K12 M1 K1 (16 sts)
Row 23 – 24: Knit across
If you are having difficulties with casting on the stitches, the video above ???? starts exactly at that spot. If you know how to do that, keep on going with the pattern.
Row 25: Cast on 14 sts. (Yes, you already have 16 stitches on your needle. Don’t break your yarn. Simply cast on. The next stitches are knit into the stitches you cast on and the original 16 that were there). * P1 K1 * Repeat from * to * 6 more times. P1 K14 P1. (30 sts)
Row 26: Cast on 14 sts. (Yes again.) ⟡ K1 P1 ⟡ Repeat from ⟡ to ⟡ 6 more times. K16 ⦷ P1 K1 ⦷ Repeat for ⦷ to ⦷ 6 more times. (44 sts)
⧭ Row 27: ⧱ P1 K1 ⧱ Repeat from ⧱ to ⧱ 6 more times. P1 K14 P1. ⨳ K1 P1 ⨳ Repeat from ⨳ to ⨳ 6 more times (44 sts)
Row 28: ⋚ K1 P1 ⋚ Repeat from ⋚ to ⋚ 6 more times. K16 ⨈ P1 K1 ⨈ Repeat from ⨈ to ⨈ 6 more times.⧭
Repeat ⧭ to ⧭ 28 (31, 34, 37) times.
Another way to think of it, you will have knit 56 (62, 68, 74) rows TOTAL.
Like with the casting on, some people have difficulties with forming the toe. The video below starts exactly at that point.
Next row: K1 K2tog 12 times. K1 K2tog to the end of the row.
Next row: P8 K7 P8
Next row: K2tog across. Knit the last stitch.
Next row: P5 K3 P4.
Pull the yarn through or draw stitches together. Cut the yarn leaving 12″ or so.
Finishing
Sew up the seam from where you gathered the toe stitches to roughly 2/3 up the foot.
Flip up the heel flap and sew up the seams on the back of the heel.
Work in your ends.
Hints and Tips
It’s important to sew the toe seam close to 2/3 of the way from the toe to the ankle. Any less and it will feel a bit sloppy on the wearer’s foot. Any further and it will be too tight for the wearer to get over their heel. You can lay it out and measure it or simply eyeball it. It’s not rocket science.
If you want to pick up stitches to add the heel flap after instead of how I did it in one piece, cast on 44 sts to start and then start at row 27.
This is a good pattern to use variegated yarn. The pattern is very simple so the yarn texture and print can really show off. You can use the self striping yarn, but getting the stripes to match will be difficult.
Like all my patterns, you can sell whatever slippers you make with this pattern. You are NOT permitted to print or copy this pattern in any way. You are not permitted to copy or redistribute this pattern in any form including, but not limited to, any physical or digital versions. To do so will violated copyright law. And give you bad karma.
It wasn’t until this very moment in my life that I realized that naming a knitting pattern for winter headgear was going to be complicated. For those that don’t know about the internet and how information is found, writers have to write around keywords so web crawlers can find the information. I won’t bore you any further with that, but it does cause some, indecision, shall we say, when it comes to naming this knitting pattern. As it so happens, there are at least 3 ways to spell what I know as a touque. I’m Canadian. That’s what we call it and how I have always spelled it. My autocorrect on the other hand, is calling me a doofus and insists that it’s toque. In a state of mild rage I went to the internet to see what’s what in regard to this winter hat dilemma. Turns out there is a third option: tuque. What the actual “f”?!
I do realize that a lot of people generally refer to winter headwear as beanies. TBH that to me is a more tight fitting winter hat that conforms to the shape of your head and NEVER has a pom pom. These are the manly toques worn under hooded things like hoodies and winter jackets, especially when it gets really cold outside.
This pattern is different from most touque patterns I’ve seen and knit up over the years. I’m a little obsessed with short rows this last couple of months. So far I’ve made dishcloths and coasters and slippers using this technique. Instead of casting on all the stitches you’ll need to go around the head, this touque is knit from the forehead to the crown or top of the head. It’s still knit flat, with the shaping of the head being worked as you go. It also gives a neat vertical striping effect if you’re using self striping yarn. And just so you know, the smaller the stripes the narrower the stripes on the toque.
If you would prefer a printed copy of this pattern, there are a couple options for you. No, you don’t need to message me how you’re up in arms that you can’t print this webpage. You can keep scrolling down this page and read the pattern row by row on your phone or tablet in the comfort of your chair as you knit. A printed copy is a preference but not necessary to read and use this pattern.
Another way to avoid ads and pop-ups, get instant, PRINTABLE downloads of this pattern and others, is by becoming a Member. When you become a Website Supporter at $4/month, you’ll gain access to exclusive member only posts on Buy Me A Coffee. You can download as many patterns as you like for the same $4 each month. You can go to this page to learn more, become a member and support my work… Exclusive Member Area
If you like the vertical stripes but have no self striping yarn, I’ve marked in the pattern where to change the colours. This makes this touque a great project to use up all those left over bits of yarn from other projects. I keep them too. I just can’t bring myself to throw out those bits. I always feel I’ll find a use for them.
But enough. You’re here to knit…
Things You Need:
Worsted weight yarn – a standard ball of yarn (215 yards/197 m). It may need to be more if you want a big, dense and fluffy pom pom.
Size 5 mm (size 8 US) knitting needles or whatever you need to acquire the correct gauge.
Tapestry needle to sew the seam and work in the ends
Pom pom maker – or you can use the two pieces of cardboard method. I’m sure there’s a video on YouTube showing how to do this.
Gauge
In stockinette
9 sts – 5 cm (2″)
12 rows – 5 cm (2”)
Sizes are for small, medium and large and are written as such sm (med, lg).
Small – 21 inches
Medium – 22.5 inches
Large – 24 inches
Sizing is always general for knitting as it has a fair amount of stretch to it and tends to contract and expand as needed.
Abbreviations
K – knit
P – purl
st – stitch
sts – stitches
Starting the Toque, Touque, Tuque, Beanie….*Sigh* I give up SMH
Any type of yarn will work for this project. It doesn’t have to be striped just because that’s how I did it. A solid colour would look just as good. Another option it to use the ombre yarns that gently shift from one colour to another. It’s nice to be able to make a beanie that has the colour transition go up and down instead of the usual horizontal way.
Colour changes have to be done in groups of 2 or 7 colours if you want to maintain the proper sequence. For example: black, white, black white, black white, etc. for 2 colours. If you want 7 different colours it would have to be something like: red, orange, yellow, green, blue, purple, black and then repeat those colours again in that order. Of course, it you’re using up leftover yarn and aren’t repeating colours, it doesn’t matter.
Another way to think of it…there are 14 possible colour sections to this winter hat. Any number that fits equally into 14 can be repeated in sequence around the hat.
When making colour changes, you can work in the ends as you go for the first colour change. I show how to do that here – How to Work in the Ends While Knitting. You can also work them in with the tapestry needle when done.
The second colour change occurs at the top of the hat. I tie and knot the ends of the yarn together as I change colour. When done, I thread them up and through the pom pom and cut off the dangly bits so they blend in with it. The knots are above the crown of the head and don’t actually touch the scalp. It’s an easy, time saving short cut.
Like all my patterns, you have my permission to sell, give away or keep any of the physical items you make. You are NOT permitted to reproduced this pattern in any way, including but not limited to, all digital or physical copies.
I’ve been looking to simplify my Adult Moccasin Slippers for some time now. I wanted to design a minimalist style slippers that were knit on a single set of knitting needles, without the sewing of seams (which I try to avoid at all costs, btw). I also wanted to keep any tricky techniques to a minimum. With this pattern, there are no additional sets of needles required, and no knitting in the round on double pointed needles (DPN) to make the edging.
And because there is a bit of starting and stopping when making the sections, this leaves a number of ends to sew in. I strongly recommend working in your ends while you knit. If you don’t know how to do that, you can check out How to Work in the Ends While Knitting on my website. For a quick how to: hold the yarn on the back of your work (the wrong side) and catch the yarn every other stitch. It totally works and in all the slippers I’ve made over the years, I’ve never had a single complaint about it coming undone.
Please note that in some of the photos showing parts of the slipper, I used double pointed needles. These needles are NOT necessary. I just prefer to use shorter needles when knitting narrow pieces. Regular single pointed needles work just as well.
Another way to avoid ads and pop-ups, get instant, PRINTABLE downloads of this pattern and others, is by becoming a Member. When you become a Website Supporter at $4/month, you’ll gain access to exclusive member only posts on Buy Me A Coffee. You can download as many patterns as you like for the same $4 each month. You can go to this page to learn more, become a member and support my work… Exclusive Member Area
If you enjoy this pattern and my other free online knitting patterns, please consider making a small donation or helping me out by visiting my Help Support My Work page. If that’s not possible, that’s totally fine too! Even sharing this page on your social media helps me out immensely. You can use those buttons ?? to do so easily.
Things You Need
Size 6 US (4 mm) knitting needles
Worsted weight yarn – any standard ball of yarn will suffice. (I’m a fan of Red Heart and Bernat worsted weight as it is easy to find and economical.)
Tapestry needle – to work in the ends.
Abbreviations
K – knit
K2tog – knit 2 together
st – stitch
sts – stitches
Gauge
Make sure you match the gauge or sizing will be off.
Stop here for men’s size 11-12. Eighth of a circle completed.
۞ Come here when indicated to stop for the size you are making.
Repeat from ☺ to ☺ once to make another eighth of a circle.
First 1/8th of a circle looks like this.
The second 1/8th looks like this. You now have 1/4th of a circle.
When you have made a quarter circle (1/8 + 1/8 = 1/4), start knitting rows as follows:
Next row: Knit across for 40 (42, 46, 50) rows total.
Starting the back and forth rows.What it looks like finished is below.
Cast off.
With the RIGHT side of your work facing you, pick up 12 (13, 14, 15) sts along the original cast on row.
Side finished (but not cast off. Make sure yours is!!)
Picking up the stitch.
Stitch picked up.
Two stitches picked up.
Stitches picked up along the edge.
Repeat from ☺ to ☺ twice.
First repeat.
Second repeat.
Knit across for 40 (42, 46, 50) rows total.
Starting the back and forth rows.
Done the toe and sides.
Cast off.
Edging (Done before sole)
I know it’s a little unconventional to add an edging at this point. This is usually something you do as a last step. But, to keep this slipper pattern as simple as possible, and to not need any other knitting needles or need to know how to knit in the round, we’ll make the edging now. You can use a complimentary colour or the same colour that you are already using. The choice is yours.
With the RIGHT side of your work facing you, pick up 20 (21, 23, 25) sts along the edge, 7 sts over the curve of the toe and 20 (21, 23, 25) sts along the other edge.
If you spread the rows apart a bit you can see where to pick up the stitch.
First 2 stitches picked up..
Stitches picked up along edge
It doesn’t have to be perfect. As long as the 7 stitches are picked up evenly in this space it’s ok.
Seven stitches picked up.
All stitches picked up.
Knit 2 (4, 4, 4) rows over the picked up stitches. Cast off loosely on the WRONG side.
With the RIGHT side of your work facing you, find the middle seam of the toe. This is the line where you picked up the stitches the first time after making the first quarter section and side strip. Count over 5 (6, 6, 6) ridges. Pick up 11 (13, 13, 13) sts to start the sole. The middle stitch (the 6th (7th, 7th, 7th stitch) should be picked up in the middle seam.
Stitches picked up.This is the smallest size so there are only 11 stitches.
Next row: Knit across.
♥ Next row: With the RIGHT side facing, attach yarn and pick up a stitch in the ridges by the toe flap. K2tog. Knit to the last 2 stitches K2tog. Pick up a stitch in the ridges by the point of your needle. You now have 11 (13, 13, 13) stitches.
Keep picking up a stitch on each side down the entire length to form the sole.
Next row: Knit across. ♥ Repeat from ♥ to ♥ down the length of the slipper until there are no ridges left.
As you pick up stitches along the side, the sole will automatically curve around the toe like this.
Keep working your way down the length of the slipper.
Forming the Heel
I recently made a video showing how to do this. It’s how I make a lot of my slipper heels including this pattern. You can watch the video below to help you if the photos aren’t enough.
◘ Next row: With the RIGHT side facing, pick up a stitch in the cast off stitch closest to the sole of the slipper. K2tog twice. Knit to the last 4 stitches. K2tog twice. Pick up the cast off stitch on the other side.
Next row: Knit across.
Next Row: Pick up a stitch in the next cast off stitch. K2tog. Knit until the last 2 stitches. K2tog. Pick up the cast off stitch on the other side.
Next row: Knit across. ◘ Repeat from ◘ to ◘ until 7 stitches remain.
Working up the back of the heel.
Next row: K2tog, Knit 3 stitches together, K2tog.
Next row: Knit the 3 stitches together.
Break yarn leaving a length of yarn long enough (8ish inches) to sew up the remaining seam.
Make another slipper.
The back of the heel completed.
Heels sewn and complete.
Yes, the toe does look a little boxy when they’re not on a foot. The stretch of the garter stitch allows these slippers to stretch around the contours of any foot easily.
Hints and Tips
If you are up in arms about sewing in the ends when you are done, there is away to avoid it. You can work in the ends on the back side of your work as you are knitting. Not sure how to do that? I have a photo tutorial on my website that will show you how – How to Work in the Ends While Knitting
You can add rows to the edging to make more of a cuff if you like. Or you could also do a K1 P1 ribbing over the stitches. I didn’t like how the slipper fit or looked when it was longer. That’s why I didn’t add any photos of it.
If you have picked up a different number of stitches on each side when making the sole, it’s not a big deal as long as it’s only a row or two. I suggest picking up 2 stitches in one row, rather than skipping a row. It’s less noticeable.
I designed this pattern to have a very minimalist feel to it. Of course, not everyone is into function only wearables. If you want to add pompoms, fancy large buttons or some other decorations, have at it! Be creative and add your personal touch to the design.
Like all of my patterns you have my permission to sell and/or give away the slippers that you make using this pattern. You are NOT permitted to reprint this pattern in any form unless you have obtained my written permission to do so.
If you have any questions, please feel free to leave a comment or send me your questions at kweenbee_crafts@hotmail.ca.
This knitting pattern is very versatile and can be made to be any size of square. For myself, I like it as a dishcloth. But when I started to knit up samples for the photos I realized that this design could transfer into any thing that can be square. Regardless of the size, because of the method of making it, it will always be square regardless of how many, or few, stitches are cast on at the outset.
And no need to worry about picking up stitches or any other difficult techniques. If you can knit and cast on and cast off, you can make this. It’s not complicated at all.
For myself, I found that 32 stitches made for the perfect size dishcloth and used a little less than one of the smaller balls of cotton yarn. I like mine to be bigger but not unmanageably so. I also found that making a coaster or mini face scrubber, took about 18 stitches. These are just approximate cast on stitch counts. I found that there is some variation in the worsted weight (medium 4) yarn thickness. You may need to add 2 or 3 more cast on stitches if it’s on the thinner side.
I’ve written the pattern to make a dishcloth so started with 32 stitches cast on. A quick tip, if you use a size smaller needle (4 mm or US 6) to cast on, then switch back to the 5 mm (US 8) the starting edge looks a bit more finished and tight.
Another plus about this pattern, I finally designed something that really highlights variegated yarn. I have a great appreciation for the colour changing yarns that are available (I do not have similar feelings towards self striping yarn, but that’s a rant for another time). I found that the variegated yarn did really well with smaller size squares, though I like the pooling of colours when making the larger sized dishcloths as well.
And to sooth my quest for sameness, these washcloths are the same on both sides!! Both sides look pretty much the same. I know in the scheme of things this matters very little, but it somehow screams “correct” to me. I’m weird. I know.
Another way to avoid ads and pop-ups, get instant, PRINTABLE downloads of this pattern and others, is by becoming a Member on this website. When you become a Website Supporter for $3/month, you’ll gain access to exclusive member only posts. These posts contain one click downloads of the patterns. Simply click the Download & Print button. The PDF will automatically download to your computer or smart device. You can then read it on your device or print it at your leisure. You can download as many patterns as you like for the same $3 each month. You can go to this page to learn more, become a member and support my work… Exclusive Member Area
And, yes. I know this pattern becomes very obvious in how to make it once you start knitting. I wrote it out in full regardless, as some people (the few but very vocal) have a tendency to contact me if even the most obvious thing is not mentioned in my patterns. I’m trying to avoid these critical emails, just so you know.
It’s so obvious that you may be able to knit this without the pattern at all. That’s why I made the video. I’m sure some of the more experienced knitters out there will watch the first couple minutes of the video below and be like, “Ya. I got this.”
Things You Need
Size 8 US (5 mm) knitting needles
1 3/4 oz (42g) ball of 100% cotton worsted weight yarn
Large sewing needle (for working in the ends)
Gauge isn’t really important for this project as sizing is approximate.
Abbreviations
K – Knit
st – stitch
That’s it! This is a VERY simple pattern.
The Pattern
Cast on 32 (You will always have 32 stitches on your needle when the right side is facing you)
Row 1 – 2: Knit across
Row 3: K31. Leave the last stitch unworked. Turn.
Back side of work always looks likenormal knitting when the row is completed
Row 4: K31.
Row 5: K30. Leave the last 2 stitches unworked. Turn.
Row 6: K30.
Row 7: K29. Leave the last 3 stitches unworked. Turn.
Row 8: K29.
Row 9: K28. Leave the last 4 stitches unworked. Turn.
Row 10: K28.
Row 11: K27. Leave the last 5 stitches unworked. Turn.
Row 12: K27.
Row 13: K26. Leave the last 6 stitches unworked. Turn.
Row 14: K26.
Row 15: K25. Leave the last 7 stitches unworked. Turn.
Row 16: K25.
Row 17: K24. Leave the last 8 stitches unworked. Turn.
Row 18: K24.
Row 19: K23. Leave the last 9 stitches unworked. Turn.
Row 20: K23.
Row 21: K22. Leave the last 10 stitches unworked. Turn.
Row 22: K22.
Row 23: K21. Leave the last 11 stitches unworked. Turn.
Row 24: K21.
Row 25: K20. Leave the last 12 stitches unworked. Turn.
Row 26: K20.
Row 27: K19. Leave the last 13 stitches unworked. Turn.
Row 28: K19.
Row 29: K18. Leave the last 14 stitches unworked. Turn.
Row 30: K18.
Row 31: K17. Leave the last 15 stitches unworked. Turn.
Row 32: K17.
Row 33: K16. Leave the last 16 stitches unworked. Turn.
Row 34: K16.
Row 35: K15. Leave the last 17 stitches unworked. Turn.
Row 37: K14. Leave the last 18 stitches unworked. Turn.
Row 38: K14.
Row 39: K13. Leave the last 19 stitches unworked. Turn.
Row 40: K13.
Row 41: K12. Leave the last 20 stitches unworked. Turn.
Row 42: K12.
Row 43: K11. Leave the last 21 stitches unworked. Turn.
Row 44: K11.
Row 45: K10. Leave the last 22 stitches unworked. Turn.
Row 46: K10.
Row 47: K9. Leave the last 23 stitches unworked. Turn.
Row 53: K6. Leave the last 26 stitches unworked. Turn.
Row 48: K9.
Row 49: K8. Leave the last 24 stitches unworked. Turn.
Row 50: K8.
Row 51: K7. Leave the last 25 stitches unworked. Turn.
Row 52: K7.
Row 54: K6.
Row 55: K5. Leave the last 27 stitches unworked. Turn.
Row 56: K5.
Row 57: K4. Leave the last 28 stitches unworked. Turn.
Row 58: K4.
Row 59: K3. Leave the last 29 stitches unworked. Turn.
Row 60: K3.
Row 61: K2. Leave the last 30 stitches unworked. Turn.
Row 62: K2.
Row 63: K1. Leave the last 31 stitches unworked. Turn.
Halfway Point
If you would like the other half of your square to use a different colour like shown above, attach it now.
Row 64: K1.
Row 65: K2. Leave the last 30 stitches unworked. Turn.
Row 66: K2.
Row 67: K3. Leave the last 29 stitches unworked. Turn.
Row 68: K3.
Row 69: K4. Leave the last 28 stitches unworked. Turn.
Row 70: K4.
Row 71: K5. Leave the last 27 stitches unworked. Turn.
Row 72: K5.
Row 73: K6. Leave the last 26 stitches unworked. Turn.
Row 74: K6.
Row 75: K7. Leave the last 25 stitches unworked. Turn.
Row 76: K7.
Row 77: K8. Leave the last 24 stitches unworked. Turn.
Row 78: K8.
Row 79: K9. Leave the last 23 stitches unworked. Turn.
Row 80: K9.
Row 81: K10. Leave the last 22 stitches unworked. Turn.
Row 82: K10.
Row 83: K11. Leave the last 21 stitches unworked. Turn.
Row 84: K11.
Row 85: K12. Leave the last 20 stitches unworked. Turn.
Row 86: K12.
Row 87: K13. Leave the last 19 stitches unworked. Turn.
Row 88: K13.
Row 89: K14. Leave the last 18 stitches unworked. Turn.
Row 90: K14.
Row 91: K15. Leave the last 17 stitches unworked. Turn.
Row 92: K15.
Row 93: K16. Leave the last 16 stitches unworked. Turn.
Row 94: K16.
Row 95: K17. Leave the last 15 stitches unworked. Turn.
Row 96: K17.
Row 97: K18. Leave the last 14 stitches unworked. Turn.
Row 98: K18.
Row 99: K19. Leave the last 13 stitches unworked. Turn.
Row 100: K19.
Row 101: K20. Leave the last 12 stitches unworked. Turn.
Row 102: K20.
Row 103: K21. Leave the last 11 stitches unworked. Turn.
Row 104: K21.
Row 105: K22. Leave the last 10 stitches unworked. Turn.
Row 106: K22.
Row 107: K23. Leave the last 9 stitches unworked. Turn.
Row 108: K23.
Row 109: K24. Leave the last 8 stitches unworked. Turn.
Row 110: K24.
Row 111: K25. Leave the last 7 stitches unworked. Turn.
Row 112: K25.
Row 113: K26. Leave the last 6 stitches unworked. Turn.
Row 114: K26.
Row 115: K27. Leave the last 5 stitches unworked. Turn.
Row 116: K27.
Row 117: K28. Leave the last 4 stitches unworked. Turn.
Row 118: K28.
Row 119: K29. Leave the last 3 stitches unworked. Turn.
Row 120: K29.
Row 121: K30. Leave the last 2 stitches unworked. Turn.
Row 122: K30.
Row 123: K31. Leave the last stitch unworked. Turn.
Row 124: K31.
Row 125: K32.
Cast off on the WRONG side.
Hints and Tips
If you would like to make smaller squares for coasters or pot scrubbers, cast on fewer stitches. The basic idea for the pattern is to always leave one less stitch done every other row. Once you’re down to one stitch, knit one extra stitch every other row.
I know I mentioned this in the intro but it deserves repeating. If you use a size smaller needle (4 mm or US 6) to cast on, then switch back to the 5 mm (US 8) the starting edge looks a bit more finished and tight.
You don’t have to use cotton yarn if you’re going to make coasters. An acrylic or wool blend would also work well. And you can also use up some of your yarn stash this way too. Great little things to sell at a garage sale, or craft fair and recoup a little of the money already spent on the yarn.
Use these squares for anything! As long as your yarn is the same thickness and type, all acrylic let’s say, you could easily use up your last little yarn bits to make an afghan or throw blanket. I don’t quilt but I know that triangles and squares make up a good portion of quilt designs. Knitting squares that are two colours along the diagonal put together the solid coloured squares could make some very interesting patterns.
These also make good trivets or pot holders for taking things out of the oven, but only if… they are NOT wet and are made of 100% cotton. Any acrylic or polyester blend will melt to the pot and possible fingers, counter tops or tables. And ain’t nobody got time for that!!
Like all my work, you are permitted to sell, give away or keep whatever physical items you make using this pattern. You do NOT have permission to copy or redistribute this pattern (or any of my patterns) in any form either digitally or physically. That includes printed copies of the pattern either as photos or any file format.
If you wanted to learn how to knit, this is the perfect project! Using only 3 basic stitches and including a complete step-by-step video embedded on this page, you can make a beautiful lace like dishcloth. If you’d prefer to download the pattern so you can take it wherever you go, the download is available on this website – Dishcloth Pattern, Etsy, Ravelry and Buy Me a Coffee.
And here’s a bit more info for you. Not only can you use the pattern create a dishcloth, but if you add more rows, you can easily use the same pattern to make a scarf!
This is exactly what a newbie knitter needs to get his or her knit on! For more the seasoned knitter, this pattern doesn’t require a gauge as it’s a dishcloth and sizing isn’t important. Also, if you want to make a larger dishcloth, increase the number of initial stitches cast on and increase the number of repeated rows to make it square.
Another way to avoid ads and pop-ups, get instant, PRINTABLE downloads of this pattern and others, is by becoming a Member. When you become a Website Supporter at $4/month, you’ll gain access to exclusive member only posts on Buy Me A Coffee. You can download as many patterns as you like for the same $4 each month. You can go to this page to learn more, become a member and support my work… Exclusive Member Area
1 3/4 oz (50g) ball of 100% cotton worsted weight yarn
Size 8 US (5 mm) crochet hook – this is optional
Large sewing needle
Don’t forget to share this page with your fellow knitters!
Cast on 35 sts
Row 1 – 5: Knit across
* Row 6: Lace knit stitch across.
To make this stitch, simply wrap the yarn twice around the knitting needle and work as any knit stitch. (Watch the how-to for this stitch at the top of this post.)
Row 7 – 11: Knit across.* Repeat from * to * 8 more times. There will be 9 lace rows.
Cast off
If you want to make a scarf simply repeat from * to * as many times as you like until you knit the length you want.
More of my stuff on Etsy
You can stop here if you choose to not crochet the edge. If you prefer a more finished edge for your dishcloth, single crochet evenly around the edge. Make 2 sc in each set of 5 rows, 1 sc in the lace knit row, 3 sc in each corner, and 1 sc in each knitted stitch along the cast on edge and the cast off edge.
That’s it! Like I said before, this is a very repetitive pattern that enables the newbie knitter to master a few basic stitches while still making something they can be proud of. A more experienced knitter can make these in a few hours or less and great to whip up if you want to give them as a gift, sell them online or at a local market, or even if you need a dishcloth for yourself. An let’s be honest, can you ever have too many dishcloths? Or is that just me…
This is the current list of patterns available to download and print. Once you become a member on Buy Me A Coffee, you can print ALL of the patterns listed below for ONE monthly fee. You can become a member for as long or as short a time period as you like.
Membership supports my work and is like a tip you give. As a thank you for the tip, you get to print ALL of the patterns listed below through the membership portal.
Use this link here:
👇🏼👇🏼👇🏼👇🏼👇🏼👇🏼👇🏼👇🏼
The printable patterns are also for sale on Buy Me A Coffee. When you’re a member, the price turns to zero and you can downnload and print all the patterns as long as you are a member.
The individual pattern links listed below connect to the FREE ad-supported versions that are NOT printable. You do NOT need to be a member if you stay online to read the patterns.
All the patterns below are currently available at Buy Me A Coffee. New patterns are added to this list continually.
All titles below are also clickable links to the online, ad-supported versions.
Glad to see you here and considering becoming a member to support my work. I’m currently adding my patterns to this list, starting with my most popular. I also am writing new stuff all the time so be sure to check back often.
You still have access to all previously purchased patterns, and can still buy individual patterns to print if a subscription isn’t something you’re interested in. I have a number of printable pattern purchase options including this website, my Etsy Shop, Ravelry, LoveCrafts and both digital and paperback versions on Amazon. Of course, you can read the ad supported versions on the website for free. There will always be a free version of this site for anyone who wants it. I believe in making my work as accessible as possible while still being able to pay my mortgage and feed my family each month.
Member patterns and patterns on Buy Me a Coffee are available in English only. Only the ad supported, online versions of my patterns are translated into other languages.
This easy to knit slipper pattern is a variation of my Rolled Cuff Slipper pattern. This pattern has the same foot design, but I know that some people prefer a longer cuff to help keep their ankles warm.
Like my previous slipper pattern, this was written to avoid any difficult techniques, specifically, picking up stitches. That is why this pattern is done in one piece; starting at the heel flap and working towards the toe.
Also, the extended cuff is worked in one piece as you knit the slipper. I’ve given instructions and included photos to show how you’ll need to flip the slipper so the seam for the folded down section is on the right side. When folded, the seam disappears. You can read more about that when you go to the Hints and Tips section at the end of this post.
Love the free patterns? You can say thanks in a couple of ways. You can read more about how you can Support My Work by clicking that link or make a small donation and Buy Me a Coffee. ?? That is a website where you can make a one time donation as a thanks. (FYI I have some great offers if you would like to buy me multiple coffees. You can see those by clicking on the Extras tab or you can click this link Janis Frank Extras).
If you don’t want to or are unable to make a financial donation, sharing this pattern through social media is a great way to help out too! The links below are a super easy way for you to do so.
If you would like to avoid the ads on this page or would like to print the pattern, you can purchase the PDF for a small fee from this website atEasy to Knit Long Cuffed Slippers , through my Etsy shop or on Ravelry.
Another way to avoid ads and pop-ups, get instant, PRINTABLE downloads of this pattern and others, is by becoming a Member on this website. When you become a Website Supporter for $3/month, you’ll gain access to exclusive member only posts. These posts contain one click downloads of the patterns. Simply click the Download & Print button. The PDF will automatically download to your computer or smart device. You can then read it on your device or print it at your leisure. You can download as many patterns as you like for the same $3 each month. You can go to this page to learn more, become a member and support my work… Exclusive Member Area
Yarn (a standard ball of worsted weight yarn such as this will be more than enough)
Size 5 mm (US 8 ) single pointed needles
Tapestry needle to sew seams and work in ends
Gauge
18 stitches = 4 inches
24 rows = 4 inches
in stockinette
Sizes are written as such:
Women’s 6-7 (8-9, 10-11, 12)
Men’s 6 (7-8, 9-10, 11-12, 13)
Heel Flap
Cast on 2
Row 1: Knit across.
Row 2: Increase in each stitch. (4 sts)
Row 3 – 4 : Knit across.
Row 5: Increase in the first stitch. K until one stitch remains. Increase in this stitch. (6 sts)
Row 6 – 7: Knit across.
Row 8: Increase in the first stitch. K until one stitch remains. Increase in this stitch. (8 sts)
Row 9 – 10: Knit across.
Row 11: Increase in the first stitch. K until one stitch remains. Increase in this stitch. (10 sts)
Row 12 – 13: Knit across.
Row 14: Increase in the first stitch. K until one stitch remains. Increase in this stitch. (12 sts)
Row 15 – 16: Knit across.
PLEASE NOTE:
The following rows are for sizes Women’s size 12 and Men’s sizes 11, 12 and 13 ONLY:
Next row: Increase in the first stitch. K until one stitch remains. Increase in this stitch (14 sts)
Next 2 rows: Knit across.
Continue the pattern for all sizes.
Next row: Cast on 29 stitches. (Yes, you already have 12 (12, 12, 14, 14) stitches on your needle. After casting on, you’ll have 41 (41, 41, 43, 43) sts on your needle). The following is worked over the stitches you just cast on and the stitches from the heel. K8 P1 Knit to the end of the row. As you worked those stitches, your work was transferred onto the other needle. Cast on another 29 sts onto this needle. (You now have 70 (70, 70, 72, 72 sts) on your needle)
Next row: K16 P1 *K3 P1* Repeat from * to * 2 more times. K12 (K12, K12, K14, K14) *P1 K3* Repeat from * to * 2 more times. P1 K16.
♥ ☺ Next row: P9 K52 (K52, K52, K54, K54) P9
Next row: K16 P1 *K3 P1* Repeat from * to * 2 more times. K12 (K12, K12, K14, K14) *P1 K3* Repeat from * to * 2 more times. P1 K16.
Next row: K8 P1 K52 (K52, K52, K54, K54) P1 K8.
Next row: K16 P1 *K3 P1* Repeat from * to * 2 more times. K12 (K12, K12, K14, K14) *P1 K3* Repeat from * to * 2 more times. P1 K16. ♥ Repeat from ♥ to ♥ 6 (6, 7, 7, 8) times more for 30, (30, 34, 34, 38) rowstotal.
Please note – Repeat the row marked with ☺ once to maintain the pattern.
Shaping Toe
Next row: Cast off 15 sts. P1 *K3 P1* Repeat from * to * 2 more times. K12 (K12, K12, K14, K14) *P1 K3* Repeat from * to * 2 more times. P1 K16.
Next row: Cast of 15 sts. Knit across.
◊ ♫ Next row: P2 *K3 P1* Repeat from * to * 2 times more. K12 (12, 12, 14, 14).◘ P1 K3 ◘ Repeat from ◘ to ◘ 2 times more. P2.
Next row: Knit across. ◊ Repeat from ◊ to ◊ 9 (10, 10, 11, 11) times more for 22 (24, 24, 26, 26) rows total.
Please note – Repeat the row marked with ♫once to maintain the pattern.
End Toe
Next row: K2tog 10 (10, 10, 11, 11) times. K1 K2tog to last 3 sts. K1 K2tog.
Next row: P1 K2 *P1 K1* Repeat from * to * once P1 K6 (6, 6, 7, 7) *P1 K1* Repeat from * to * 2 time more. P1.
Next row: K1 K2tog 4 (4, 4, 5, 5) times. K1 (1, 1, 0, 0). K2tog until last st. K1
Next row: P1 K1 P3 K3 P4.
Break yarn and pull through. Pull tight to draw loops together.
Hints and Tips
Leave a longer length of yarn when you first start the slipper. You can use this piece to sew one of the seams along the heel flap. When you end the slipper, leave that yarn length longer too. You can use the length to sew the toe seam.
When sewing the seams to form the cuff, when you get to the part that folds over, be sure to turn the slipper inside out so the seam is on the RIGHT side.
The sizing of these slippers is very forgiving. The garter stitch used throughout helps the slipper to stretch both width and length wise. If your gauge is off by a row or a stitch, you should be able to get the size of slipper you want.
Abbreviations
K – Knit
P – Purl
K2tog – knit 2 together
sts – stitches
st – stitch
The use of this pattern allows you to make and sell the slippers you make, but you may not redistribute or resell this pattern.
I’ve written a number of slipper patterns over the years with a couple of goals in mind, two goals to be specific. The first is to never have any seams to sew. This pattern didn’t meet this requirement. I offer a heartfelt apology for this.
The other goal is to make them as easy as possible so new knitters or those with not as much experience, can knit something that gives a great final product. This pattern was written specifically to avoid any difficult techniques, specifically, picking up stitches. That is why this pattern is done in one piece; starting at the heel and working towards the toe.
The cuff is made as you knit the piece. Because of the stitches used, it automatically rolls back up on itself giving a nice finished edge without adding any additional stitches or work.
Love the free patterns? You can say thanks in a couple of ways. You can read more about how you can Support My Work by clicking that link or make a small donation and Buy Me a Coffee. ?? That is a website where you can make a one time donation as a thanks. (FYI I have some great offers if you would like to buy me multiple coffees. You can see those by clicking on the Extras tab or you can click this link Janis Frank Extras).
If you don’t want to or are unable to make a financial donation, sharing this pattern through social media is a great way to help out too! The links below are a super easy way for you to do so.
If you would like to avoid the ads on this page or would like to print the pattern, you can purchase the PDF for a small fee from this website atEasy to Knit Rolled Cuff Slippers , through my Etsy shopor on Ravelry.
Another way to avoid ads and pop-ups, get instant, PRINTABLE downloads of this pattern and others, is by becoming a Member on this website. When you become a Website Supporter for $3/month, you’ll gain access to exclusive member only posts. These posts contain one click downloads of the patterns. Simply click the Download & Print button. The PDF will automatically download to your computer or smart device. You can then read it on your device or print it at your leisure. You can download as many patterns as you like for the same $3 each month. You can go to this page to learn more, become a member and support my work… Exclusive Member Area
Yarn (a standard ball of worsted weight yarn will be more than enough)
Size 5 mm (US 8 ) single pointed needles
Tapestry needle to sew seams and work in ends
Gauge(in stockinette)
18 stitches = 4 inches
24 rows = 4 inches
Sizes are written as such:
Women’s 6-7 (8-9, 10-11, 12)
Men’s 6 (7-8, 9-10, 11-12, 13)
Heel Flap
Cast on 2
Row 1: Knit across.
Row 2: Increase in each stitch. (4 sts)
Row 3 – 4 : Knit across.
Row 5: Increase in the first stitch. K until one stitch remains. Increase in this stitch. (6 sts)
Row 6 – 7: Knit across.
Row 8: Increase in the first stitch. K until one stitch remains. Increase in this stitch. (8 sts)
Row 9 – 10: Knit across.
Row 11: Increase in the first stitch. K until one stitch remains. Increase in this stitch. (10 sts)
Row 12 – 13: Knit across.
Row 14: Increase in the first stitch. K until one stitch remains. Increase in this stitch. (12 sts)
Row 15 – 16: Knit across.
PLEASE NOTE:
The following rows are for sizes Women’s 10, 11 and 12 and Men’s sizes 9, 10, 11, 12 and 13 ONLY:
Next row: Increase in the first stitch. K until one stitch remains. Increase in this stitch (14 sts)
Next 2 rows: Knit across.
Continue the pattern for all sizes.
Next row: Cast on 16 stitches. (Yes, you already have 12 (12, 14, 14, 14) stitches on your needle. After casting on, you’ll have 28 (28, 30, 30, 30) sts on your needle). The following is worked over the stitches you just cast on and the stitches from the heel. P4 *K3 P1* Repeat from * to * 2 times more. K12 (12, 14, 14, 14).As you worked those stitches, your work was transferred onto the other needle. Cast on another 16 sts onto this needle. (You now have 44 (44, 46, 46, 46 sts) on your needle)
♥ Next row: Knit across.
Next row: P4 *K3 P1* Repeat from * to * 2 times more. K12 (12, 14, 14, 14).◘ P1 K3 ◘ Repeat from ◘ to ◘ 2 times more. P4. ♥ Repeat from ♥ to ♥ 11 (12, 13, 14, 15) times more for 24, (26, 28, 30, 32) rowstotal.
Shaping Toe
Next row: K2tog K to the last 2 sts K2tog. (42 (42, 44, 44, 44) sts)
Next row: P3 *K3 P1* Repeat from * to * 2 times more. K12 (12, 14, 14, 14).◘ P1 K3 ◘ Repeat from ◘ to ◘ 2 timesmore. P3.
Next row: K2tog K to the last 2 sts K2tog. (40 (40, 42, 42, 42) sts)
Next row: P2 *K3 P1* Repeat from * to * 2 times more. K12 (12, 14, 14, 14).◘ P1 K3 ◘ Repeat from ◘ to ◘ 2 timesmore. P2.
☺ Next row: Knit across.
Next row: P2 *K3 P1* Repeat from * to * 2 times more. K12 (12, 14, 14, 14).◘ P1 K3 ◘ Repeat from ◘ to ◘ 2 timesmore. P2. ☺ Repeat from ☺ to ☺ 12 (13, 14, 15, 16) times more for 26 (28, 30, 32, 34) rows total.
End Toe
Next row: K2tog 10 (10, 11, 11, 11) times. K1 K2tog to last 3 sts. K1 K2tog.
Next row: P1 K2 *P1 K1* Repeat from * to * once P1 K6 (6, 7, 7, 7) *P1 K1* Repeat from * to * 2 time more. P1.
Next row: K1 K2tog 4 (4, 5, 5, 5) times. K1 (1, 0, 0, 0) times. K2tog until last st. K1
Next row: P1 K1 P3 K3 P4.
Break yarn and pull through. Pull tight to draw loops together.
Sew seam on top of toe and the heel flap to the sides of the slipper (the 16 stitches you cast on earlier) and join the edges of the cuff together in the back above the flap.
Hints and Tips
Sew the seam on the top of the toe up to where you K2tog when shaping the toe. If you don’t like what the join looks like, you can always make a pom pom to cover it.
Leave a longer length of yarn when you first start the slipper. You can use this piece to sew one of the seams along the heel flap. When you end the slipper, leave that yarn length longer too. You can use the length to sew the toe seam.
The sizing of these slippers is very forgiving. The garter stitch used throughout helps the slipper to stretch both width and length wise. If your gauge is off by a row or a stitch, you should be able to get the size of slipper you want.
Abbreviations
K – Knit
P – Purl
K2tog – knit 2 together
sts – stitches
st – stitch
The pattern allows you to make, sell or give away any of the slippers that you make. You are NOT permitted to redistribute this pattern in any way. The purchase the PDF is for your PERSONAL USE ONLY! Sharing copies of my patterns robs me of what I financially gain from my hard work and creativity that goes into designing my patterns. Please respect my copyright.
These two slipper styles are actually the same knitting pattern but showcase one side of the work or the other. They are easily made with the same basic knitting stitches and if you can make one style, you can make the other! The pattern is for slippers from a men’s size 6 to 13 and for a women’s 6 to 13. I’ve also provided direct links in the pattern to my YouTube videos demonstrating the knitting stitches required if you need a little help.
If you have never picked up stitches or knitted in the round, this is a great pattern to learn. I made a YouTube video showing how to do this for another pattern (you can read that pattern here – How to Knit Adult Booties), but the technique is similar. You can watch the video snippet right here – Picking up Stitches to Make the Heel the Cuff. The stitch pattern used this video is different, but would still look ok when done the final project.
If you’re loving the free patterns on this site, please consider a small donation to help with the hosting costs of the site. You can learn more about how you can help by going to my page Help Support My Work. If you’re not in the position to help financially, which is totally ok btw, please share this pattern with anyone you think may like it. You can use these handy links ?????? to share on social media or send it as an email to your friends and family.
And if you’re wanting to get off the internet and would prefer to have this on your phone, tablet or computer, you can download this pattern from my website here – Two Slipper Styles with One Pattern. You can also purchase this pattern through my Etsy shop or throughRavelry. The download is a PDF that you can read on any device or even print if you so desire.
Things you will need:
Click any of the links below to have everything you need to make these slippers sent right to your door.
With double pointed needles, pick up 18 sts over half of one side, 18 sts on the other, and transfer the 4 stitches created when making the heel. Pick up the stitches over the first half of the slipper and leave the rest for the toe. Fold the sides of the slipper together to give an approximate of where to start picking up stitches on the other side of the slipper. You can also count back 18 stitches along the edge for a starting point.
Row 1- 6: P3 K1 repeat 9 more times for total of 40 sts.
Rows 7 – 10: K around
Bind off loosely.
Sew seams and work in ends of the yarn.
Slipper B
Heel and Cuff – Slipper “B”
With right side facing pick up 14 stitches.
Row 1: Knit across
Row 2: Knit across
Repeat the two rows one more time
Row 5: K2tog K10 K2 tog
Row 6: K12
Row7: K12
Row 8: K2tog K8 K2tog
Row 9: K10
Row10: K10
Row 11: K2tog K6 K2 tog
Row 12: K8
Row 13: K8
Row 14: K2tog K4 K2tog
Row 15: K6
Row 16: K6
Row 17: K2tog K2 K2tog
Row 18: K4
Start Cuff:
With double pointed needles, pick up 18 sts over half of one side, 18 sts on the other, and transfer the 4 stitches created when making the heel. Pick up the stitches over the first half of the slipper and leave the rest for the toe. Fold the sides of the slipper together to give an approximate of where to start picking up stitches on the other side of the slipper. You can also count back 18 stitches along the edge for a starting point.
Row 1- 6: K3 P1 repeat 9 more times for total of 40 sts.
Rows 7 – 10: K around
Bind off loosely.
Sew seams and work in ends of the yarn.
Extra hints and tips:
When selecting your yarn, I recommend that you choose a lighter shade of a solid colour. A lighter colour with flecks also works quite well. You can use darker or variegated yarn, but the texture of the pattern won’t be as visible.
The “right side” of the slipper is the side you’ve chosen to be on the outside. For Slipper “A” it is the side that has a more striped appearance. Slipper “B” looks more ribbed. No one said that the heel and cuff had to match anyways, so you may want to switch them up!
Abbreviations:
K – Knit
P – Purl
K2tog – knit 2 together
P2tog – purl 2 together
sts – stitches
If you have any questions or comments you’d rather keep private, you can send me an email through my contact page.
Well, I’m back at it again. Updating my old patterns with new photos and the occasional typo fix. I’m also very pleased to say that I have had enough of rehashing the old and am nearly done. Just a couple more to go.
So like always I’ve made this compilation of my original slipper patterns available as a PDF, Kindle and physical book. The book is available only through Amazon at this point. Like my other compilations, please pick the country you’re from so if you are an Amazon Prime member, you’ll get the shipping for free.
The patterns themselves are still all free to read on the website (the links are listed further down this post). You won’t be able to print them from the site. I lose ad revenue if you do… Betchya didn’t even think of that before ?. I’ve kept the cost for a printable PDF very low so it’s definitely within everyone’s budget. It’s less than a ball of yarn! You can purchase the PDF through this website here – Eight Slipper Styles to Knit or you can get it through my Etsy shop here – Eight Slipper Styles to Knit – Updated and Revised.
For those comfortable with reading patterns online, clicking any of the links below will take you right to it.
And to beat any Karen’s to the punch…if you’re scrolling past everything here to leave a nasty comment that I’m lying about free patterns. Or maybe you feel you need some passive/aggressive, poor you bullish!t that it’s too hard to close an ad to follow a link, please move on and don’t use my patterns. I don’t want my good in the world tarnished by someone as entitled as yourself. And also, learn how to use the internet before you start your self absorbed, unfounded complaints.
I’ve been busy as of late! I’ve updated photos and rewritten a few of my fingerless glove and mitt patterns over the last few weeks to bring you yet another compilation of my mitt and glove patterns! In this edition, there are a total of 9 patterns with all the classic favourites, plus a couple that were so old you may not have even known they existed!
If you don’t want to purchase the collection, that’s cool too! 😁 I have 2 options for you.
Scroll down the page to the links to the free-to-read online versions further down the page.
Leave a comment below for a chance to win a FREE printable copy! Scroll to the bottom👇🏼 of the page to learn more.
If you would like to purchase a copy, you can purchase and print the PDF yourself . It is cheaper that way, of course. You can purchase it from my website here – Nine Fingerless Gloves and Mitten Patterns to Knitor from my Etsy shop here – Nine Knitting Patterns! – Fingerless Gloves and Mitten Collection. Either way I would like you to know it’s 93 pages. It’s a lot to print, but if you are comfortable reading PDF’s on your tablet or phone, this a very economical option.
All of the mitts and gloves shown in the photos below are included in this pattern collection.
Flip mitts – over the fingers
Flip mitts – fingers exposed
Flip mitts with no flap attached
FREE Knitting Pattern – Texting Mitts
Grey Cable Fingerless Gloves
Taupe Fingerless Gloves
This collection contains patterns for fingerless gloves knit flat on 2 needles and seamless gloves and mittens knit in the round on double pointed needles (DPN). This compilation also includes mitts that are specifically designed for texting. And lastly, another design to free your fingers when you need them but cover your fingers when required. In short, this collection meets all your fashion and functionality requirements.
If you want to purchase the printed, paperback book, delivered to your door, you can buy it from Amazon. If you’re an Amazon Prime member, shipping is FREE. To make sure you’re getting the best deal for where you live, please click the country you are in or closest to:
Like always, all of the patterns are free to read on this website. They are ad supported and unprintable. Sorry, but too many people were just printing the pages leaving me with nothing but a bill for web hosting costs. You may not realize this, but with each illegal print, you cost me advertising revenue. I am writing patterns to help support me and my family. I’m not a charity. I can only give so much folks!
The list of the patterns in this collection include the following (all titles are clickable links to the read online pattern btw):
Win a free digital copy of this pattern collection by leaving a comment on this post! To increase your karma points, share this page (and my other patterns) on your social media platforms, like Facebook and Pinterest with the floating buttons along the right side of every page or with the buttons below 👇🏼 These handy share buttons are on all my other patterns, too!
Your email address is required but will remain private and won’t be visible to the public. I won’t send you any emails unless you sign up to my email list specifically. You can read my Privacy Policy for more information. Contest closes October 20, 2024.
Make yourself a nifty pair of flip mitts. They’re hip, trendy and handier than a pocket on a shirt! Not only can you make these super awesome mitts for just about anyone from teen to adult, but you can forgo the finger portion and make some cool fingerless gloves. Technically, they’re fingerless mittens but that just sounds weird.
They’re knitted on double point needles, also known as DPN. Though this sounds intimidating, it really is very simple. You’ll need to know how to knit to make this project, but knitting in the round is the same as knitting flat. Only difference is you don’t flip your work back in forth; it’s done a continuous circle.
Flip mitts – over the fingers
Flip mitts – fingers exposed
Flip mitts – over the fingers
Flip mitts – fingers exposed
Flip mitts – over the fingers
Flip mitts with no flap attached
The sizing for mittens, like socks or slippers, is somewhat general. The small size will fit someone with a smaller hand, medium is an average lady’s hand, large is for an average man’s hand, and extra large will fit a very large man’s hand. Each size is written out in full as the row and stitch counts differ for each. Keep scrolling to read how to make the finger flap. Sorry, this pattern is a bit of a mammoth
If you would prefer, you can also download this pattern to any device such as a smartphone, computer or tablet. The PDF of this pattern is available on my website here: Knitted Flip Mitts and Fingerless Gloves. It will be available in all my retailers such as Ravelry,Etsy and Lovecrafts. I’m also working on a compilation of all my glove and mitten patterns that will be a book on Amazon.
Enjoying the free patterns and would like to Help Support My Work, GREAT! Please give what you can and like, share and follow me on social media.
Another way to avoid ads and pop-ups, get instant, PRINTABLE downloads of this pattern and others, is by becoming a Member. When you become a Website Supporter at $4/month, you’ll gain access to exclusive member only posts on Buy Me A Coffee. You can download as many patterns as you like for the same $4 each month. You can go to this page to learn more, become a member and support my work… Exclusive Member Area
Instructions are written for small (medium, large, extra large)
Cast on 32 (36, 40, 44) loosely.
Round 1 – 6: K2 P2
Round 7 and on: Knit around until work measures 3 (3.5, 4, 4.5) inches from the cast on edge.
Next round: K1 K2tog K10 (12, 14, 16) K2 tog K2 K2tog K10 (12, 14, 16) K2tog K1.
Next 2 rounds: Knit
Next round: K1 K2tog K8 (10, 12, 14) K2 tog K2 K2tog K8 (10, 12, 14) K2tog K1.
Next 2 rounds: Knit
Next round: K1 K2tog K6 (8, 10, 12) K2 tog K2 K2tog K6 (8, 10, 12) K2tog K1.
Next 2 rounds: Knit
Next round: K1 K2tog K4 (6, 8, 10) K2 tog K2 K2tog K4 (6, 8, 10) K2tog K1.
Next 2 rounds: Knit
Transfer the stitches onto two needles being sure that the thumb is along the edge of fold.
Break yarn leaving enough to graft the fingertips and sew in ends. 12 inches is plenty.
Graft Fingertips
The divided stitches will look something like this:
With a darning needle, insert the needle through the front loop of the first needle as if to PURL.
Insert needle through the stitch on the back needle as shown.
Insert the needle through the back loop of the first stitch AND through the stitch of the next stitch as if to PURL. Drop the first stitch.
Insert the needle through the stitch on the back needle as if to PURL. Drop this stitch.
? Insert the needle through the back loop of the next stitch on the front needle and the front loop of the next stitch as if to PURL. Drop the first stitch.
Insert the needle through the stitch on the back needle as if to PURL. Drop this stitch. ?
Repeat from ? to ? until there are no stitches left on either needle.
Pull the yarn tight.
Make another mitten to match.
Attaching the Velcro
Cut a small piece of Velcro. Keeping both halves of the Velcro together, attach it to the back of the mitten first. Glue it in place.
Keeping the Velcro pieces together, place some glue on the other half of the Velcro. Pull the finger flap back (off the fingers). Press firmly. DO NOT pull the Velcro apart until ALL the glue has dried completely.
How to Pick Up a Stitch
I use this method to increase a stitch or pick up a stitch because it doesn’t leave a hole in your work. It takes a little longer to do but worth the effort in the final piece.
Make the stitch in the yarn stretched between two stitches.
Pick the yarn up with the needle.
Transfer the stitch onto the opposite needle.
Knit this newly formed stitch. You may have to pull the yarn forward a bit to get your needle beneath the yarn.
It automatically twists the stitch eliminating the hole.
Abbreviations
K – Knit
P – Purl
K2tog – knit 2 together
sts – stitches
st – stitch
Helpful Hints
You don’t need a stitch holder. Even a piece of yarn will work.
Instead of glue, you can also sew the Velcro on. I find glue is simpler and quicker.
Customise this pattern as you see fit. If you want the cuff longer, do so. If you need a longer thumb or finger flap, add more rows. As long as your stitch counts stay the same, it should work out fine.
Some folks like to felt their mittens as it can help stop the wind from blowing through the stitches. Be careful though because felting shrinks your work! It’s hard to guess how much shrinkage will happen as there are so many variables involved, from temperature of the water to how much agitation occurs during the felting process. You can give it a try but make sure you use PURE wool! Anything that is a blend won’t felt properly. My last attempt at felting a pair of mittens for myself resulted in my young son getting a new pair of mitts. At least they didn’t go to waste :-/
If you have any questions or comments you can reach me here.
Like always, you can sell or give away whatever you make from my patterns. Don’t be a douche and try to pass this pattern off as your own in any way or form (physical or digital). See how handy fingerless gloves can be ?
Improve your texting in cold climates with these thumbless mittens. More than just a pair of fingerless gloves, these keep your hands warm and only expose your thumbs when needed. The thumb pocket is sewn on and the flap is secured at the base of the palm with Velcro* for easy access. The flap hangs in the back out of the way to enable your texting abilities. Plan on using your thumbs for a while? Then simply tuck the flap into the thumb pocket.
The sizes are each written separately as each size is a bit different in row and stitch counts. Scroll down this post to the size you would like to make. Medium fits the average lady’s hand, large for men, and small for pre-teens.
Don’t forget to share this post!
Don’t want to come back here to read the pattern? You can download the pattern to your tablet, phone or computer from my website at Knit a Pair of Texting Mitts. You can also get it from other ebook retailers such as Ravelry, Etsy, and LoveCrafts. If the link isn’t working, I haven’t uploaded it to the site yet. It will be ASAP.
If you enjoy this and my other free knitting and crochet patterns, please Help Support My Work. It doesn’t have to be financial, though that’s always appreciated. Every like, share and follow also helps me keep this website running.
Another way to get instant, PRINTABLE downloads of this pattern and more, is by becoming a patron and supporting me on Patreon. When you support my work at the $4/month level or higher, the locked posts become visible and you can immediately access the download link. No waiting for an email. Simply click the PDF link at the bottom of the Patreon post and the download is now on your computer, smart phone, tablet or whatever device you’re using. You can then read it on your device or print it at your leisure. You can download as many patterns as you like for the same $4 each month. You can go to this website to become a patron and support my
Round 19: K1, pick up a st (scroll down to the bottom of the page if you want to see photos of how I do this), k1, pick up a stitch. Knit remaining sts.
Round 20 – 21: Knit
Round 22: K1, pick up a st, k3, pick up a stitch. Knit remaining sts.
Round 23 – 24: Knit
Round 25: K1, pick up a st, k5, pick up a stitch. Knit remaining sts.
Round 26 – 27: Knit
Round 28: K1, pick up a st, k7, pick up a stitch. Knit remaining sts.
Round 29 – 30: Knit
Round 31: K1, pick up a st, k9, pick up a stitch. Knit remaining sts.
Round 32 – 33: Knit
Round 34: K1, place next 11 sts onto the stitch holder. Knit the remaining sts.. There should be 31 sts divided on the three needles.
Round 35 and on: Knit in the round on these remaining 31 sts until work measures approximately 3.5 inches from the stitches held back to form the thumb.
Transfer the stitches onto two needles being sure that the stitches held back for the thumb are along the fold.
Break yarn leaving enough to graft the fingertips (if you scroll to the end of the post there are photos showing you how to do this) and sew in ends. 12 inches is plenty.
Finishing the Thumb
Worked over the 11 sts on the stitch holder. Leave the end you attach to complete the thumb longer than you normally would. You can use this to sew the thumb flap onto the mitten.
Pick up and divided the 11 sts on the stitch holder between the 3 double pointed needles. One of the needles will have more sts than the others.
Round 1 – 5: Knit
Bind off loosely.
Thumb Flap
Using 2 of your double pointed needles and working back and forth.
Cast on 3 sts.
Row 1: Knit
Row 2: Purl
Row 3: K1, pick up a st, K1 pick up a st, K1. (5 sts)
Row 4: Purl
Row 5: Knit
Row 6: Purl
Row 7: Knit
Row 8: Purl
Row 9: K1, pick up a st, K3, pick up a st, K1. (7 sts)
Row 10: Purl
Row 11: Knit
Row 12: Purl
Row 13: Knit
Row 14: Purl
Row 15: With the right side of your work facing you, cast on 3 sts. Working over the 3 sts you just cast on, K3. Leave these 3 sts on the needle you used to knit them. With another double pointed needle, knit the 7 sts from the previous row. With the wrong side of you work facing you, cast on 3 sts. Transfer these 3 sts onto another double pointed needle. You will now start knitting in the round.
Round 19: K1, pick up a st (scroll down to the bottom of the page if you want to see photos of how I do this), k1, pick up a stitch. Knit remaining sts.
Round 20 – 21: Knit
Round 22: K1, pick up a st, k3, pick up a stitch. Knit remaining sts.
Round 23 – 24: Knit
Round 25: K1, pick up a st, k5, pick up a stitch. Knit remaining sts.
Round 26 – 27: Knit
Round 28: K1, pick up a st, k7, pick up a stitch. Knit remaining sts.
Round 29 – 30: Knit
Round 31: K1, pick up a st, k9, pick up a stitch. Knit remaining sts.
Round 32 – 33: Knit
Round 34: K1, pick up a st, k11, pick up a stitch. Knit remaining sts.
Round 35 – 36: Knit
Round 37: K1, place next 13 sts onto the stitch holder. Knit the remaining sts. There should be 35 sts divided on the three needles.
Round 38 and on: Knit in the round on these remaining 35 sts until work measures approximately 4 inches from the stitches held back to form the thumb.
Transfer the stitches onto two needles being sure that the stitches held back for the thumb are along the fold.
Break yarn leaving enough to graft the fingertips (scroll to the bottom of the post where there are photos showing you how to do this) and sew in ends. 12 inches is plenty.
Finishing the Thumb
Worked over the 13 sts on the stitch holder. Leave the end you attach to complete the thumb longer than you normally would. You can use this to sew the thumb flap onto the mitten.
Pick up and divided the 13 sts on the stitch holder between the 3 double pointed needles. One of the needles will have more sts than the others.
Round 1 – 5: Knit
Bind off loosely.
Thumb Flap
Using 2 of your double pointed needles and working back and forth.
Cast on 3 sts.
Row 1: Knit
Row 2: Purl
Row 3: K1, pick up a st, K1 pick up a st, K1. (5 sts)
Row 4: Purl
Row 5: Knit
Row 6: Purl
Row 7: Knit
Row 8: Purl
Row 9: K1, pick up a st, K3, pick up a st, K1. (7 sts)
Row 10: Purl
Row 11: Knit
Row 12: Purl
Row 13: Knit
Row 14: Purl
Row 15: With the right side of your work facing you, cast on 5 sts. Working over the 5 sts you just cast on, K5. Leave these 5 sts on the needle you used to knit them. With another double pointed needle, knit the 7 sts from the previous row. With the wrong side of you work facing you, cast on 5 sts. Transfer these 5 sts onto another double pointed needle. You will now start knitting in the round.
With the right side of your work facing you:
Round 16 – 27: Knit
Round 28: K2tog twice, K1, K2 tog 3 times, K1, K2 tog twice, K1.
Round 29: Knit
Round 30: K2tog, K1, K2tog twice, K2tog, K1
Draw loops together and sew in the ends.
Large
The Mitt
Cast on 40 sts (loosely). Divide these evenly as possible on three of the double pointed needles.
Round 19: K1, pick up a st (scroll down to the bottom of the page if you want to see photos of how I do this), k1, pick up a stitch. Knit remaining sts.
Round 20 – 21: Knit
Round 22: K1, pick up a st, k3, pick up a stitch. Knit remaining sts.
Round 23 – 24: Knit
Round 25: K1, pick up a st, k5, pick up a stitch. Knit remaining sts.
Round 26 – 27: Knit
Round 28: K1, pick up a st, k7, pick up a stitch. Knit remaining sts.
Round 29 – 30: Knit
Round 31: K1, pick up a st, k9, pick up a stitch. Knit remaining sts.
Round 32 – 33: Knit
Round 34: K1, pick up a st, k11, pick up a stitch. Knit remaining sts.
Round 35 – 36: Knit
Round 37: K1, pick up a st, k13, pick up a stitch. Knit remaining sts.
Round 38 – 39: Knit
Round 40: K1, place next 15 sts onto the stitch holder. Knit the remaining sts. There should be 39 sts divided on the three needles.
Round 41 and on: Knit in the round on these remaining 39 sts until work measures approximately 5 inches from the stitches held back to form the thumb.
Transfer the stitches onto two needles being sure that the stitches held back for the thumb are along the fold.
Break yarn leaving enough to graft the fingertips (scroll to the bottom of the post where there are photos showing you how to do this) and sew in ends. 12 inches is plenty.
Finishing the Thumb
Worked over the 15 sts on the stitch holder. Leave the end you attach to complete the thumb longer than you normally would. You can use this to sew the thumb flap onto the mitten.
Pick up and divided the 15 sts on the stitch holder between the 3 double pointed needles. One of the needles will have more sts than the others.
Round 1 – 8: Knit
Bind off loosely.
Thumb Flap
Using 2 of your double pointed needles and working back and forth.
Cast on 3 sts.
Row 1: Knit
Row 2: Purl
Row 3: K1, pick up a st, K1 pick up a st, K1. (5 sts)
Row 4: Purl
Row 5: Knit
Row 6: Purl
Row 7: Knit
Row 8: Purl
Row 9: K1, pick up a st, K3, pick up a st, K1. (7 sts)
Row 10: Purl
Row 11: Knit
Row 12: Purl
Row 13: Knit
Row 14: Purl
Row 15: K1, pick up a st, K5, pick up a st, K1. (9 sts)
Row 16: Purl
Row 17: Knit
Row 18: Purl
Row 19: Knit
Row 20: Purl
Row 21: With the right side of your work facing you, cast on 5 sts. Working over the 5 sts you just cast on, K5. Leave these 5 sts on the needle you used to knit them. With another double pointed needle, knit the 9 sts from the previous row. With the wrong side of you work facing you, cast on 5 sts. Transfer these 5 sts onto another double pointed needle. You will now start knitting in the round.
With the right side of your work facing you:
Round 22 – 38: Knit
Round 39: K2tog twice, K1, K2 tog 4 times, K1, K2 tog twice, K1.
Round 40: Knit
Round 41: K2tog, K1, K2tog twice, K1, K2tog, K1
Draw loops together and sew in the ends.If you are unfamiliar with how to end the fingertips on mittens (this works for socks as well), I’ve added a picture tutorial at the end of another pattern. Instead of me adding all the photos and instructions again, here’s the link to learn how – How to Graft Fingertips.
Make another mitten to match.
Attaching the Thumb Flap
With the yarn left from where you continued the thumb, attach the thumb flap to the mitten. Make sure that you attach the thumb flap to the back side of the left and right mittens accordingly. Easiest way is to lay the mitts flat with the thumbs pointing in opposite directions.
Attaching the Velcro
Cut a small piece of Velcro that will fit on the base of the thumb flap. Keeping both halves of the Velcro together, attach it to the THUMB FLAP first. Glue it in place.
Keeping the Velcro pieces together, place some glue on the other half of the Velcro. Pull the thumb flap forward in the toasty warm thumb position. With the Velcro still together, place the Velcro where the bottom of the flap touches the palm of the mitten. Press firmly. DO NOT pull the Velcro apart until ALL the glue has dried completely.Like grafting the fingertips, I’ve also shown how to pick up a stitch without leaving a hole. If you’d like to see how it’s done, here’s the link to learn how – How to Pick up a Stitch.
Abbreviations
K – Knit
P – Purl
K2tog – knit 2 together
sts – stitches
st – stitch
Helpful Hints
Make sure when attaching the Velcro to the thumb flap, that the fuzzy half of the Velcro is what you use for the flap. In other words, which ever side feels less rough. The other pokey side should go on the palm of the mitt. That way the Velcro won’t stick to the inside of the thumb flap when folded back into itself.
When picking up stitches to finish the thumb on the mitt, leave a long piece of yarn to sew on the thumb flap. This saves on the number of ends to sew in when you’re done.
You don’t need a stitch holder. Even a piece of yarn will work.
Instead of glue, you can also sew the Velcro on. I find glue is simpler and quicker.
I don’t usually do posts like this but I thought I’d make it easier for everyone to get this knitting pattern collection. There is both a physical book you can get, a downloadable PDF that you can print and of course, all the individual patterns are free to read on this website if purchasing isn’t an option for you.
A quick note on other places that you can get this collection from. Amazon does offer the Kindle version of the slipper pattern collection in all countries. I don’t think you can print the pattern off on a Kindle. That defeats the purpose of creating this post that helps you find where you can get a physical copy of the slipper patterns.
Seven Slipper Styles to Knit – Paperback Version
If you would like to purchase the paperback version of the slipper pattern collection, it’s available on Amazon only. It is very reasonably priced at $12.99 USD and shipping is included if you’re a prime member. The price is automatically converted into your county’s currency equivalent. Be sure that you order it from YOUR COUNTRY. If not you’ll be charged shipping. I’ve included the links from each country. Unfortunately, the paperback version isn’t available in very county.
If the patten collection isn’t available in your country or you would prefer a less expensive option and print it yourself, you can purchase the PDF Version from two places. Ravelry and LoveCrafts don’t allow for collections like this.
All of the included are FREE to read online. They are ad supported and can’t be printed. Clicking on the title will take you to the pattern page. I’ve listed the slipper patterns included in the publication below:
And in case you were unaware, I did another collection of my slipper patterns years ago. I never made it into a paperback (though if anyone was interested, please let me know).
You can purchase the printable PDF from the following places:
This is a great knitting pattern for beginners because it only uses basic stitches that are very easy master. I’ve included links in the pattern to videos on YouTube that show you how to preform each stitch, making this a great pattern to teach yourself how to knit.
This is also a great project for experienced knitters because these slippers are very quick and easy to make. The pattern enables you to make a variety of sizes, from a woman’s size 6 up to a man’s size 14.
If you are loving the free patterns, please feel free to share this pattern with anyone and everyone you think may like it. You can use any of the buttons below to share it with whatever social media accounts you have.
If you’d rather have the ad free downloadable version of this pattern for a small fee, you can find it here – Easy to Knit Slippers or in my Etsy shop.
Another way to avoid ads and pop-ups, get instant, PRINTABLE downloads of this pattern and others, is by becoming a Member. When you become a Website Supporter at $4/month, you’ll gain access to exclusive member only posts on Buy Me A Coffee. You can download as many patterns as you like for the same $4 each month. You can go to this page to learn more, become a member and support my work… Exclusive Member Area
Having a hard time finding what you need? Click any of the links below to have exactly what you require to finish these slippers mailed right to your door.
200 grams of worsted weight yarn (I find Red Heart wears well and easy to maintain).
Set of size 5 ( US size 8) knitting needles or whatever size to obtain correct gauge.
Darning needle to sew up the seams and work in the ends.
Gauge:
12 rows stockinette = 2″
9 stitches stockinette = 2″
Be sure to check your gauge to obtain correct sizing!
Slippers are given for a woman’s size 6-7 (8-9, 10-11, 12-13, 14-15) or man’s sizes 5-6 (7-8, 9-10, 11-12, 13-14). The foot lengths of a woman’s size 6-7 are about the same as that of a man’s size 5-6 and so on.
Row 1: *K2P2* Repeat from * to* 2 (3, 3, 3, 3) times more. K2 P12 Repeat from * to* 3 (4, 4, 4, 4) times K2.
Row 2: *P2 K2* Repeat from * to * 2 (3, 3, 3, 3) times more. P2 K12 Repeat from * to * 3 (4, 4, 4, 4) times P2.
Row 3: Repeat row 1.
Row 4: Knit across.
Repeat rows 1 through 4 10 (11, 12, 13, 14) times more.
Shape toe:
Next row: Repeat row 1.
Next row: Repeat row 2.
Next row: *K2tog P2tog* Repeat from * to * 2 (3, 3, 3, 3) times more. K2tog. (P2tog) Repeat 5 times more. Repeat from * to * 3 (4, 4, 4, 4) times. K2tog. [20 (24, 24, 24, 24) sts remain.]
Next row: Knit across.
Next row: K1 *K2tog* Repeat from * to * 2 (3, 3, 3, 3) times more. (P2tog) Repeat 2 times more. Repeat from * to * 3 (4, 4, 4, 4) times. K1. [11 (13, 13, 13, 13) sts remain.]
Cut the yarn leaving approximately 12” to sew up toe seam. Draw yarn through stitches and pull tight to form toe. Bring edges together and sew half of the stitches together to form toe taking care to match the stitches together to form an invisible seam. Make another slipper to match.
To Make Heel Flap:
***For woman’s size 6-7 and man’s size 5-6 ONLY!***
With right side of the slipper facing you, pick up 12 stitches along the sole edge.
Make a heal flap for the other slipper. Sew up the seams of heal flap and work in all the yarn ends.
Extra Tips
The pattern is written as simply as possible, but here are a few extra tips that may help you.
Knit what is between the * * once. Then knit whatever is between the * * again however many times more the pattern instructs you to.
When the pattern say repeat between * * however many times, knit the portion as many times as it instructs. Simply put, the slippers always have an equal number of knitted “ridges” and purled “valleys” on each side of the sole. There are 4 “ridges” and 3 “valleys” on the smallest size and 5 “ridges” and 4 “valleys” on all the other sizes.
When selecting your yarn, I recommend that you choose a lighter shade of a solid colour. You can use darker or variegated yarn but the texture of the pattern won’t be as visible.
Happy knitting!
If you have any questions or comments you can reach me through my contact page.
This pattern enables you to sell or give away anything you may make with it. It does NOT allow you to redistribute, sell, give away or copy the pattern in any way without WRITTEN permission.
Hand knit slippers are wonderful, but it’s always nice to be able to make a fancier pair, especially if you are making them as a gift. This pattern shows you how to make slippers for girls from size 9 up to a woman’s size 12. You can keep scrolling or click here to read the child pattern.
The stitches used to make the slippers are very basic and this pattern includes detailed instructions and step by step photos that show how to create the bows. This makes it a great project for a knitter with some experience but wanting to make something that is a little more challenging.
If you are just learning how to knit or need to brush up on your knitting skills, I’ve also included links in the pattern to videos that show you how to do all the basic stitches including: casting on, knit stitch, purl, bind off, knit 2 together, draw through, and how to pick up stitches to make the heel.
If you are enjoying the free patterns, please consider helping out financially by going to my page Help Support My Work. If you’re not in the position to make a small donation, please help me out by sharing this pattern with anyone you think may enjoy it. I’ve include these handy buttons to make it super easy. All you have to do is click!
Not a fan of reading things online or would like to print this pattern? You can download the ad free PDF version of this pattern for a small here – Easy to Knit Bow Slippers, from Ravelry, LoveCrafts or from my Etsy Shop.
Another option, become a member on this site. It’s not overly expensive, only $3 per month, and you can cancel at any time.
In the exclusive member area, I’ve listed all of my patterns by category and you can download them with a single click. No waiting for links through an email. Simply click the link, the pattern downloads, and depending on your computer or smart device settings, opens automatically. Easy peasy. Once you become a member, you can also read the pattern online without ads or pop-ups. Interested? Click the link below…
Somehow found yourself on this page and absolutely LOVE these but don’t know or have the time to knit yourself a pair. I sell them right here too! Here’s the link to this shameless plug – Custom Order Bow Slippers
Things you will need:
Having a hard time knowing what you need? Click any of the links below to have everything sent right to your door.
200 gr of worsted weight yarn (usually this is less but better to have too much).
Row 3: K5 *P1 hold the yarn in front of your work. Pass the next 3 stitches over to the other needle (Strand made).
Purl the next stitch*
K24 Repeat from * to * K5.
(Row 3 rewritten without photos: K5 *P1 hold the yarn in front of your work. Pass the next 3 stitches over to the other needle (Strand made). Purl the next stitch* K24 Repeat from * to * K5.
Row 4: Repeat row 2.
Row 5: Repeat row 3.
Row 6: Repeat row 2.
Row 7: Repeat row 3.
Row 8: Repeat row 2. The bow portion will look like this.
Row 9: K5 *P1 K1 Pick up the three strands from the bottom up.
Knit the next stitch.
Pull the loop down through the 3 strands (Bow completed).
K1 P1* K24. Repeat from * to * K5.
(Row 9 rewritten without photos: K5 *P1 K1 Pick up the three strands from the bottom up. Knit the next stitch and pull the loop down through the 3 strands (Bow completed). K1 P1* K24. Repeat from * to * K5.
The bow portion will look like this.
Row 10: Repeat row 2.
Repeat rows 3 to 10 3(3, 4, 4) more times.
Next row:K2tog K3 *P1 Hold the yarn in front of your work. Pass the next 3 stitches over to the other needle (strand made). P1* K24 Repeat from * to *K3 K2tog. (42 sts)
Next row: K5 P3 K6 P1 K12 P1 K6 P3 K5.
Next row: K2tog K2 *P1 Hold the yarn in front of your work. Pass the next 3 stitches over to the other needle (strand made). P1* K24 Repeat from * to * K2 K2tog. (40 sts)
Next row: K4 P3 K6 P1 K12 P1 K6 P3 K4.
Next row: K3 *P1 Hold the yarn in front of your work. Pass the next 3 stitches over to the other needle (strand made). P1* K24 Repeat from * to * K3. (40 sts)
Next row: K4 P3 K6 P1 K12 P1 K6 P3 K4.
Next row: K3 *P1 K1 Pick up the three strands from the bottom up. Knit the next stitch and pull the loop down through the 3 strands (Bow completed). K1 P1* K24. Repeat from * to * K3.
Next row: K4 P3 K6 P1 K12 P1 K6 P3 K4.
♥︎ Next row: K3 *P1 Hold the yarn in front of your work. Pass the next 3 stitches over to the other needle (strand made). P1* K24 Repeat from * to * K3.
Next row: K4 P3 K6 P1 K12 P1 K6 P3 K4.
Next row: K3 *P1 Hold the yarn in front of your work. Pass the next 3 stitches over to the other needle (strand made). P1* K24 Repeat from * to * K3.
Next row: K4 P3 K6 P1 K12 P1 K6 P3 K4.
Next row: K3 *P1 Hold the yarn in front of your work. Pass the next 3 stitches over to the other needle (strand made). P1* K24 Repeat from * to * K3.
Next row: K4 P3 K6 P1 K12 P1 K6 P3 K4.
Next row: K3 *P1 K1 Pick up the three strands from the bottom up. Knit the next stitch and pull the loop down through the 3 strands (Bow completed). K1 P1* K24. Repeat from * to * K3.
Make another slipper to match. Sew up seams, work in the ends and enjoy!
Child Slippers size 9 – 3
Numbers in parenthesis are written for sizes as such 9-10 (11-12, 13-1, 2-3)
Cast on 34
Row 1: K3 P1 K3 P1 K18 P1 K3 P1 K3
Row 2: K4 P3 K4 P1 K10 P1 K4 P3 K4
Row 3: K3 *P1 hold the yarn in front of your work. Pass the next 3 stitches over to the other needle (Strand made). P1* K18 Repeat from * to * K3
Row 4: Repeat row 2.
Row 5: Repeat row 3.
Row 6: Repeat row 2.
Row 7: Repeat row 3.
Row 8: Repeat row 2.
Row 9: K3 *P1 K1 Pick up the three strands from the bottom up. Knit the next stitch and pull the loop down through the 3 strands (Bow completed). K1 P1* K18. Repeat from * to * K3.
Row 10: Repeat row 2.
Repeat rows 3 to 10 1(1, 2, 2) more times.
Next row: K2tog K1 *P1 Hold the yarn in front of your work. Pass the next 3 stitches over to the other needle (strand made). P1* K18 Repeat from * to *K1 K2tog. (32 sts)
Next row: K3 P3 K4 P1 K10 P1 K4 P3 K3.
Next row: K2tog *P1 Hold the yarn in front of your work. Pass the next 3 stitches over to the other needle (strand made). P1* K18 Repeat from * to * K2tog. (30 sts)
Next row: K2 P3 K4 P1 K10 P1 K4 P3 K2.
Next row: K1 *P1 Hold the yarn in front of your work. Pass the next 3 stitches over to the other needle (strand made). P1* K18 Repeat from * to * K1.
Next row: K2 P3 K4 P1 K10 P1 K4 P3 K2.
Next row: K1 *P1 K1 Pick up the three strands from the bottom up. Knit the next stitch and pull the loop down through the 3 strands (Bow completed). K1 P1* K18. Repeat from * to * K1.
Next row: K2 P3 K4 P1 K10 P1 K4 P3 K2.
? Next row: K1 *P1 Hold the yarn in front of your work. Pass the next 3 stitches over to the other needle (strand made). P1* K18 Repeat from * to * K1.
Next row: K2 P3 K4 P1 K10 P1 K4 P3 K2.
Next row: K1 *P1 Hold the yarn in front of your work. Pass the next 3 stitches over to the other needle (strand made). P1* K18 Repeat from * to * K1.
Next row: K2 P3 K4 P1 K10 P1 K4 P3 K2.
Next row: K1 *P1 Hold the yarn in front of your work. Pass the next 3 stitches over to the other needle (strand made). P1* K18 Repeat from * to * K1.
Next row: K2 P3 K4 P1 K10 P1 K4 P3 K2.
Next row: K1 *P1 K1 Pick up the three strands from the bottom up. Knit the next stitch and pull the loop down through the 3 strands (Bow completed). K1 P1* K18. Repeat from * to * K1.
Next row: K2 P3 K4 P1 K10 P1 K4 P3 K2. ?
Repeat from ? to ? 0 (0, 1, 1) times more.
Form Toe:
Next row: Knit across.
Next row: K9 P1 K10 P1 K9.
Repeat these two rows 0 (3, 0, 2) times more.
Next row: K2tog K26 K2tog. (28 sts)
Next row: K8 P1 K10 P1 K8.
Next row: K2tog K24 K2tog. (26 sts)
Next row: K7 P1 K10 P1 K7.
Next row: K2tog across. (13 sts)
Next row: Knit across.
Next row: K2tog 3 times K1 K2tog 3 times (7 sts).
Next row: Knit across.
Break yarn and draw yarn through stitches to gather together to finish the toe.
Form Heel:
With the right side of the slipper facing you, pick up 10 sts along the back of the sole between the purl stitches.
Row 1 – 2 : Knit across.
Row 3: K2tog K8 K2tog. (10 sts)
Row 4 – 5: Knit across.
Row 6: K2tog K6 K2tog. (8 sts)
Row 7 – 8: Knit across.
Row 9: K2tog K4 K2tog. (6 sts)
Row 10 – 11: Knit across.
Row 12: K2tog K2 K2tog. (4 sts)
Row 13 – 14: Knit across.
Row 15: K1 K2tog K1. (3 sts)
Row 16: Knit across.
Bind off.
Make another slipper to match. Sew up seams and work in ends.
Hints and tips:
When creating the strands, pull apart the 3 stitches passed over to the other needle. This allows for some additional slack in the strand across the 3 unworked stitches.
Sometimes the bows will appear lopsided. If you put your knitting needle under the 3 strands and pull gently on one side and then the other, you can easily even them out.
This pattern doesn’t contain a child’s size 4-5. Based on the foot measurements I used to develop the pattern there isn’t a need. A woman’s size 5 measures 8 11/16 inches long, while a girl’s size 3 measures 8 9/16 inches long. Knitting is very forgiving with small differences in measurments such as this. But when in doubt, I recommend making the larger size.
Abbreviations:
K – Knit
P – Purl
K2tog – knit 2 together
sts – stitches
If you have any questions, please feel free to leave a comment or send me your questions through my contact page.
There is a certain charm to handmade slippers. Whether they be knitted or crocheted, it is always nice to be able to give someone a handmade gift, even if that gift is for yourself! Made with basic crochet stitches, you can make these very cute and practical slippers for just about anyone. With this pattern you can make slippers from a child’s size 11 to 4, a women’s size 5 to12 and a men’s size 6 to 11). This pattern includes instructions detailing how to make the adorable flower, though the more manly types may not appreciate the extra splash of colour.
If you would prefer to have a permanent copy of this pattern on your smartphone, tablet or computer, you can also download it directly from my website here: Crocheted Ribbed Slippers. A new window will open when you click the link so you won’t lose this page.
And if you are enjoying the free videos and patterns, then please share my work! Those handy little icons along the side or bottom of the page let you do it easily and help me more than you know ?. If you’d like more information on how you can keep things free, learn how you can Help Support My Work.
The first set of brackets are are written for children’s sizes (11-12, 1-2, 3-4). The second set of brackets are women’s sizes (5-6, 7-8, 9-10, 11-12) and men’s (*-*, 6-7, 8-9, 10-11). Men’s size 6-7 are the same as a women’s 7-8. A men’s 8-9 the same as a woman’s size 9-10. A men’s 10-11 the same as a woman’s size 11-12. There is no men’s size 4-5 given.
Ch (22, 26, 30) (30, 32, 32, 36). Sc in 2nd chain from the hook and each remaining ch. Ch 1, turn.
(21, 25, 29 sts) (29, 31, 31, 35 sts)
Row 2: Sc in back loops of next (6, 8, 10) (10, 10, 10, 12) sts. Hdc in next (9, 9, 9) (9, 11, 11, 11) sts. Sc in back loops of next (6, 8, 10) (10, 10, 10, 12) sts. Ch 1, turn. (The sc in the back loops forms the ribbed pattern.)
Row 3: (6, 8, 10) (10, 10, 10, 12) sc in back loops. (9, 9, 9) (9, 11, 11, 11) hdc. (6, 8, 10) (10, 10, 10, 12) sc in back loops. Ch 1, turn. Repeat this row until work measures (6.5, 7.5, 8.5) (8.5, 9, 9.5, 11) cm from the edge. (21, 25, 29 sts) (29, 31, 31, 35 sts)
Next row: (6, 8, 10) (10, 10, 10, 12) sc in back loops. (2, 2, 2) (2, 3, 3, 3) hdc, inc 1 hdc in next hdc, 3 hdc, inc 1 hdc in next hdc, (2, 2, 2) (2, 3, 3, 3) hdc, (6, 8, 10) (10, 10, 10, 12) sc in back loops. Ch 1, turn. (23, 27, 31 sts) (31, 33, 33, 37 sts)
Next row: (6, 8, 10) (10, 10, 10, 12) sc in back loops, (11, 11, 11) (11, 13, 13, 13) hdc, (6, 8, 10) (10, 10, 10, 12) sc in back loops. Ch 1, turn. Repeat this row until work measures (9, 10, 11) (11, 12, 13, 14) cm from the edge.
Next row: (6, 8, 10) (10, 10, 10, 12) sc in back loops, (3, 3, 3) (3, 4, 4,4) hdc, inc 1 hdc in next hdc, (3, 3, 3) (3, 5, 5, 5) hdc, inc 1 hdc in next hdc, (3, 3, 3) (3, 4, 4,4) hdc, (6, 8, 10) (10, 10, 10, 12) sc in back loops. Ch 1, turn. (25, 29, 33 sts) (33, 35, 35, 39 sts)
Next row: (6, 8, 10) (10, 10, 10, 12) sc in back loops, (13, 13, 13) (13, 15, 15, 15) hdc, (6, 8, 10)(10, 10, 10, 12) sc in back loops. Ch 1, turn. Repeat this row until work measures (11, 13, 14)(14, 15, 16, 17) cm from the edge.
Next row: Ch (6, 6, 6)(6, 8, 8, 8), turn. (You should have the ch 1 from your previous row already completed.) Sc in 2nd chain from the hook and each remaining ch. (6, 8, 10)(10, 10, 10, 12) sc in back loops, (13, 13, 13) (13, 15, 15, 15) hdc, (6, 8, 10) (10, 10, 10, 12) sc in back loops. (31, 35, 39 sts)(39, 43, 43, 47 sts)
Next row: Ch (7, 7, 7) (7, 9, 9, 9), turn. Sc in 2nd chain from the hook and each remaining ch. 10 sc in back loops, 15 hdc, 18 sc in back loops. Ch 1, turn. (37, 41, 45 sts) (45, 51, 51, 55 sts)
Next row: (12, 14, 16) (16, 18, 18, 20) sc in back loops, (13, 13, 13) (13, 15, 15, 15) hdc, (12, 14, 16) (16, 18, 18, 20) sc in back loops. Ch 1, turn. Repeat this row until work measures (13.5, 15, 17) (17, 18, 19, 20.5) cm from edge.
Shape Toe:
Children’s Size (11-12)
Next row: *Sc, 2 sctog in back loops* (repeat from * to * 3 times more), 13 hdc, *2 sctog, sc in back loops* (repeat from * to * 3 times more). Ch 1, turn. (29 sts)
Next row: 8 sc in back loops, 13 hdc, 8 sc in back loops. Ch 1, turn.
Next row: 8 sc in back loops, 2 sctog, 9 hdc, 2 sctog, 8 sc in back loops. Ch 1, turn. (27 sts)
Next row: 8 sc in back loops, 11 hdc, 8 sc in back loops. Ch 1, turn.
Next row: *Sc, 2 sctog in back loops* (repeat from * to * 2 times more), 2 sc in back loops, 11 hdc, 2 sc in back loops, *2 sctog, sc in back loops* (repeat from * to * 2 times more). Ch 1, turn. (23 sts)
Next row: 6 sc in back loops, 11 hdc, 6 sc in back loops. Ch 1, turn.
Next row: 6 sc in back loops, 2 sctog, 7 hdc, 2 sctog, 6 sc in back loops. Ch 1, turn. (21 sts)
Next row: 6 sc in back loops, 9 hdc, 6 sc in back loops. Ch 1, turn.
Next row: *2 sctog in back loops* (repeat from * to * 4 times more), 1 hdc, *2 sctog in back loops* (repeat from * to * 4 times more). Ch 1, turn. (11 sts)
Last row: Pull up a loop (scroll to bottom for photos) in each st. (12 loops on hook). Break yarn and draw yarn through each loop. Pull tight. Sew up toe seam.
Children’s Size (1-2)
Next row: *Sc, 2 sctog in back loops* (repeat from * to * 3 times more), 2 sc in back loops, 13 hdc, 2 sc in back loops, *2 sctog, sc in back loops* (repeat from * to * 3 times more). Ch 1, turn. (33 sts)
Next row: 10 sc in back loops, 13 hdc, 10 sc in back loops. Ch 1, turn.
Next row: 10 sc in back loops, 2 sctog, 9 hdc, 2 sctog, 10 sc in back loops. Ch 1, turn. (31 sts)
Next row: 10 sc in back loops, 11 hdc, 10 sc in back loops. Ch 1, turn.
Next row: *Sc, 2 sctog in back loops* (repeat from * to * 2 times more), sc in back loop, 11 hdc, sc in back loop, *2 sctog, sc in back loops* (repeat from * to * 2 times more). Ch 1, turn. (25 sts)
Next row: 7 sc in back loops, 11 hdc, 7 sc in back loops. Ch 1, turn.
Next row: 7 sc in back loops, 2 sctog, 7 hdc, 2 sctog, 7 sc in back loops. Ch 1, turn. (23 sts)
Next row: 7 sc in back loops, 9 hdc, 7 sc in back loops. Ch 1, turn.
Next row: *2 sctog in back loops* (repeat from * to * 2 times more), sc in back loops, 2 sctog twice, 1 hdc, 2 sctog twice, sc in back loops *2 sctog in back loops* (repeat from * to * 2 times more). Ch 1, turn. (15 sts)
Last row: Pull up a loop (scroll to bottom for photos) in each st. (16 loops on hook). Break yarn and draw yarn through each loop. Pull tight. Sew up toe seam.
Children’s Size (3-4) Women’s Size (5-6)
Next row: *Sc, 2 sctog in back loops* (repeat from * to * 4 times more), sc in back loops, 13 hdc, sc in back loops, *2 sctog, sc in back loops* (repeat from * to * 4 times more). Ch 1, turn. (35 sts)
Next row: 11 sc in back loops, 13 hdc, 11 sc in back loops. Ch 1, turn.
Next row: 11 sc in back loops, 2 sctog, 9 hdc, 2 sctog, 11 sc in back loops. Ch 1, turn. (33 sts)
Next row: 11 sc in back loops, 11 hdc, 11 sc in back loops. Ch 1, turn.
Next row: *Sc, 2 sctog in back loops* (repeat from * to * 2 times more), 2 sc in back loop, 11 hdc, 2 sc in back loop, *2 sctog, sc in back loops* (repeat from * to * 2 times more). Ch 1, turn. (27 sts)
Next row: 8 sc in back loops, 11 hdc, 8 sc in back loops. Ch 1, turn.
Next row: 8 sc in back loops, 2 sctog, 7 hdc, 2 sctog, 8 sc in back loops. Ch 1, turn. (25 sts)
Next row: 8 sc in back loops, 9 hdc, 8 sc in back loops. Ch 1, turn.
Next row: *2 sctog in back loops* (repeat from * to * 3 times more), 2 sctog twice, 1 hdc, 2 sctog twice, *2 sctog in back loops* (repeat from * to * 3 times more). Ch 1, turn. (13 sts)
Last row: Pull up a loop in each st. (14 loops on hook). Break yarn and draw yarn through each loop. Pull tight. Sew up toe seam.
Women’s Size (7-8, 9-10) Men’s Size (6-7, 8-9)
Next row: 18 sc in back loops, 2 sctog, 11 hdc, 2 sctog, 18 sc in back loops. Ch 1, turn. (49 sts)
Next row: 18 sc in back loops, 13 hdc, 18 sc in back loops. Ch 1, turn.
Next row: *Sc, 2 sctog* (repeat from * to * 5 times more) in back loops, 13 hdc, *2 sctog, sc* (repeat from * to * 5 times more) in back loops. Ch 1, turn. (37 sts)
Next row: 12 sc in back loops, 13 hdc, 12 sc in back loops. Ch 1, turn.
Next row: 12 sc in back loops, 2 sctog, 9 hdc, 2 sctog, 12 sc in back loops. Ch 1, turn. (35 sts)
Next row: 12 sc in back loops, 11 hdc, 12 sc in back loops. Ch 1, turn.
Next row: *Sc, 2 sctog* (repeat from * to * 3 times more) in back loops, 11 hdc, *2 sctog, sc* (repeat from * to * 3 times more) in back loops. Ch 1, turn. (27 sts)
Next row: 8 sc in back loops, 11 hdc, 8 sc in back loops. Ch 1, turn.
Next row: 8 sc in back loops, 2 sctog, 7 hdc, 2 sctog, 8 sc in back loops. Ch 1, turn. (25 sts)
Next row: 8 sc in back loops, 9 hdc, 8 sc in back loops. Ch 1, turn.
Next row: *2 sctog in back loops* (repeat from * to * 3 times more), 2 sctog twice, 1 hdc, 2 sctog twice, *2 sctog in back loops* (repeat from * to * 3 times more). Ch 1, turn. (13 sts)
Last row: Pull up a loop (scroll to bottom for photos) in each st. (14 loops on hook). Break yarn and draw yarn through each loop. Pull tight. Sew up toe seam.
Women’s Size (11-12) Men’s Size (10-11)
Next row: *Sc, 2 sctog in back loops* (repeat from * to * 5 times more), 2 sc in back loops, 15 hdc, 2 sc in back loops, *2 sctog, sc in back loops* (repeat from * to * 5 times more). Ch 1, turn. (43 sts)
Next row: 14 sc in back loops, 15 hdc, 14 sc in back loops. Ch 1, turn.
Next row: 14 sc in back loops, 2 sctog, 11 hdc, 2 sctog, 14 sc in back loops. Ch 1, turn. (41 sts)
Next row: 14 sc in back loops, 13 hdc, 14 sc in back loops. Ch 1, turn.
Next row: *Sc, 2 sctog in back loops* (repeat from * to * 3 times more), 2 sc in back loop, 13 hdc, 2 sc in back loop, *2 sctog, sc in back loops* (repeat from * to * 3 times more). Ch 1, turn. (33 sts)
Next row: 10 sc in back loops, 13 hdc, 10 sc in back loops. Ch 1, turn.
Next row: 10 sc in back loops, 2 sctog, 9 hdc, 2 sctog, 10 sc in back loops. Ch 1, turn. (31 sts)
Next row: 10 sc in back loops, 11 hdc, 10 sc in back loops. Ch 1, turn.
Next row: *2 sctog in back loops* (repeat from * to * 4 times more), 2 sctog twice, 3 hdc, 2 sctog twice, *2 sctog in back loops* (repeat from * to * 4 times more). Ch 1, turn. (17 sts)
Last row: Pull up a loop (scroll to bottom for photos) in each st. (18 loops on hook). Break yarn and draw yarn through each loop. Pull tight. Sew up toe seam.
Make the Heel
With the wrong side facing you and toe facing down.
Row 1: Sc in the each hdc of sole of slipper along starting edge (the loop left from the original chain stitches). Ch 1, turn. (9, 9, 9,)(9, 11, 11, 11 sts)
Row 10: Sc in back loops. Do NOT make ch st or turn! Sc in each row and stitch around the edge of the slipper.
Row 11: Sc in each st around. Finish off.
Flower:
Rnd 1: Ch 2 (second ch counts as 1 sc) work 9 sc in 2nd ch from hook. Join with sl st to ch 1. (10 sc)
Rnd 2: Ch 3, 1 dc, 1 trc, 1 dc, ch 3. Sl st in the same sc as join. *Sl st in next 2 sc. In same st as the 2nd sl st, ch 3, 1 dc, 1 trc, 1 dc, ch 3. Sl st in the same sc.* Repeat from * to * around. End with st st in the next sc. (5 flower petals).
Pull up a Loop
Pull up a loop in each stitch as if you were going to make a single crochet. Don’t work the loop. Leave the loop on the hook.
Leave the loop on the hook. 12 sts will make 13 loops including the original ch 1.
Draw the yarn through all the loops.
Cut the yarn and pull the yarn through all the loops.
Draw tight.
Tips and Hints:
If your slipper is a little too big when you finish, one way to tighten it up a bit is to decrease some stitches when making the second round on the edging. Sc two stitches every 4 or 5 stitches will help.
To add a little more awesomeness to your slipper you can layer multiple flowers. Make each flower a different colour or you can change the size of your hook to make each flower smaller and stack them.
Work in your ends; don’t knot them off. Knots rub and can hurt the wearer’s foot.
Abbreviations:
sc – single crochet
hdc – half double crochet
dc – double crochet
trc – treble crochet
ch – chain
sl st – slip stitch
st – stitch
sts – stitches
2 sctog – single crochet 2 stitches together
If you have any questions, please feel free to leave a comment or send me your questions here.
Well, since the how-to video showing how to knit these gloves in the round went over like a lead balloon, I’ve put in the effort and redesigned the gloves so they can be knit flat on 2 needles. Perfect for a newbie knitter wanting to learn new techniques!
** 👉🏼 In case you still want to learn how to knit in the round or want the seamless version, you can read the pattern here – How to Knit Owl Fingerless Gloves. 👈🏼 ** The video is embedded on that page too, if you want to watch it.
If you are looking to knit a pair of plain gloves without the owls, the original version this pattern is available here – Super Simple Fingerless Gloves. It’s also knitted flat on 2 needles with a seam on the outside of the hand and inside of the thumb.
If you are so inclined and like to have matching sets of things, I have completed the matching hat or beanie! You could also call it a toque. Whatever floats your boat. It’s free to read on this website too. If you’d like to, click this link –How To Knit A Beanie Hat – With OWLS! – FREE Knitting Pattern
Once again, I’ve made the gloves as one pattern and adjusted the needle size to change the sizes. This makes it a heck of a lot easier to design and keeps the proportion of the owl the same on all sizes. Frankly, the overall look is better.
I am finished creating the downloadable pdf for this pattern and it’s available in all my usual online selling venues including Ravelry, Etsy, and this website – Super Easy to Knit Fingerless Gloves – with OWLS! Click any of those links to avoid the ads and purchase it for a nominal fee.
Another way to avoid ads and pop-ups, get instant, PRINTABLE downloads of this pattern and others, is by becoming a Member. When you become a Website Supporter at $4/month, you’ll gain access to exclusive member only posts on Buy Me A Coffee. You can download as many patterns as you like for the same $4 each month. You can go to this page to learn more, become a member and support my work… Exclusive Member Area
I’ve also created videos for you to see how the stitches are done, if any of them are giving you problems. I do have all the basic stitch videos here – Learn Basic Knitting Stitches, but links to the slightly more advanced stitches that show you how to M1, PM1, C4F and C4B are provided on this page. Clicking the links will take you to the video, but will leave this page window open in your browser. You can also scroll down to the bottom of the page to see the stitch abbreviations that also contain the embedded video you can watch right from this page.
Are you looking for a knitting pattern for a pair of mitts with the same owl motif? You’re now in luck! You can make these thick owl mittens with the pattern here – Extra Thick and Quick to Knit Owl Mittens. You can also click or tap on the photo below.
Love the free patterns? You can say thanks in a couple of ways. You can read more about how you can Support My Work by clicking that link or make a small donation and Buy Me a Coffee. That is a website where you can make a one time donation as a thanks. If you don’t want to or are unable to make a financial donation, sharing this pattern through social media is a great way to help out too! The links below are a super easy way for you to do so.
Gauge
This is important to follow for correct sizing. This is when using the US size 6 (4 mm) knitting needles.
2″ (5 cm) = 10 sts
2″ (5 cm) – 16 rows
in stockinette
Things You Need:
You can click any link below to see what you need.
Row 21: K5 P1 C4F C4B P1 K4 M1 K1 M1 K to the end of the row
Row 22: P20 K1 P8 K1 P to the end of the row
Row 23: K5 P1 K8 P1 K to the end of the row
Row 24: P13 PM1 P3 PM1 P4 K1 P8 K1 P to the end of the row
Row 25: K5 P1 K8 P1 K to the end of the row
Row 26: P22 K1 P8 K1 P to the end of the row
Row 27: K5 P1 K8 P1 K4 M1 K5 M1 K to the end of the row
Row 28: P24 K1 P8 K1 P to the end of the row
Row 29: K5 P1 C4F C4B P1 K to the end of the row
Row 30: P13 PM1 P7 PM1 P4 K1 P2 K4 P2 K1 P to the end of the row
Row 31: K5 P1 K2 P4 K2 P1 K to the end of the row
Row 32: P26 K1 P2 K4 P2 K1 P to the end of the row
Row 33: K5 P1 K2 P4 K2 P1 K4 M1 K9 M1 K to the end of the row
Row 34: P28 K1 P2 K4 P2 K1 P to the end of the row
Row 35: K5 P1 K2 P4 K2 P1 K to the end of the row
Row 36: P13 PM1 P11 PM1 P4 K1 P2 K4 P2 K1 P to the end of the row
Row 37: K5 P1 K2 P4 K2 P1 K to the end of the row
Row 38: P30 K1 P2 K4 P2 K1 P to the end of the row
Row 39: K5 P1 K2 P4 K2 P1 K4 Pass the next 13 sts onto a stitch holder. K to the end of the row
Row 40: P17 K1 P2 K4 P2 K1 P to the end of the row
Row 41: K5 P1 C4F C4B P1 K to the end of the row
Row 42: P17 K10 P to the end of the row
Row 43: Knit across
Row 44: Purl across
Row 45-50: Knit across
Cast off.
Making the Thumb
Pick up the 13 stitches on the stitch holder
Row 1: Knit across
Row 2: Purl across
Row 3: Knit across
Row 4: Purl across
Cast off.
Sew seam along the side of the glove and the inside of the thumb. Work in ends.
Hints and Tips
Make your seams as narrow as possible when sewing them. The bulkier the seam the more noticeable and possibly uncomfortable for the wearer.
You can make these gloves with a ribbed cuff and around the fingers like the originalOwl Fingerless Gloves. You can easily do a K1 P1 ribbing to make that happen.
Abbreviation
K – knit
P – purl
M1 – Make one (knit wise). Increase one stitch between the stitches. Pick up the yarn between the stitches. Twist slightly. Place it on your non-working needle. Knit the stitch. Watch this video below to see how.
M1 or Make 1 – Increase between stitches when knitting.
PM1 – Make one (purl wise). Increase one stitch between the purl stitches. Pick up the yarn between the stitches. Place it on your non-working needle. Purl the stitch as you regularly would.
PM1 or Purl Make 1 – Increase between stitches when purling.
C4F – Pick up the next 2 stitches with your cable needle. Pull the stitches to the FRONT of your work. Knit the next 2 stitches on your non-working needle. Knit the 2 stitches from the cable needle.
C4F or Cable 4 Forward
C4B – Pick up the next 2 stitches with your cable needle. Pull the stitches to the BACK of your work. Knit the next 2 stitches on your non-working needle. Knit the 2 stitches from the cable needle.
The season is getting colder again, the few apples on my trees are turning red and my mind turns back towards knitting. And oh boy, am I coming up with a bunch of knitting designs! Now here’s to finding the time to publish them all. Work is also back to full-time so that’s great news ?
A couple of things about this knitting pattern before we grab our favourite worsted weight yarn, double pointed and cable needles and get to work. Like my Owl Fingerless Gloves pattern, I am keeping the stitch count the same and only changing the needles size to change the size of the glove. The pattern on the back of the hand stays proportional in size and placement on the glove remains the same for a better overall look.
I made a number of different lengths of the glove too, for demonstrative purposes. The taupe with flecks (apparently it’s also known as tweed, who knew) is the pattern exactly as written. I repeated the cable pattern once for the grey pair and 4 times for the purple tweed/flecked. There’s a note in the pattern what rows make up the 5 plait cable pattern. Why do 3 cables when you can do 5? I’ve always been a bit of an overachiever ?
The downloadable PDF version is completed and uploaded it to all my distributors. You can find it on the following fine and upstanding websites – Etsy, Ravelry, LoveCrafts and this website.
Another way to avoid ads and pop-ups, get instant, PRINTABLE downloads of this pattern and others, is by becoming a Member on this website. When you become a Website Supporter for $3/month, you’ll gain access to exclusive member only posts. These posts contain one click downloads of the patterns. Simply click the Download & Print button. The PDF will automatically download to your computer or smart device. You can then read it on your device or print it at your leisure. You can download as many patterns as you like for the same $3 each month. You can go to this page to learn more, become a member and support my work… Exclusive Member Area
And here is the obligatory, shameless self promotion of this website so I have some reason to keep writing patterns. You can check out my Help Support My Work page to read more or you can click this link to Buy Me a Coffee. It’s a place where artists, podcasters and other creatives can go to get a quick, one time donation of support from fans. It’s pretty awesome and I’m always grateful for everything I get.
If you don’t want or can’t afford to give anything. I get it. You can give a shoutout or share on your social media instead. It’s free to do and will only take you a minute. Handy links are below
Want other knitted mitten patterns that are for texting or cover the ends of your fingers? I have those too. You can check out my How to Knit Texting Mittens and How to Knit Flip Mitts. And for those who actually take the time to read these long-winded intro’s, I also have – How to Knit Fingerless Gloves. It uses finer yarn, smaller needles and is sized with different stitch and row counts. It is very plain Jane and it’s the yarn that makes this one pop.
Ok. Enough of that. Let’s get knitting!!!
Things you will need:
worsted weight yarn – I used Red Heart worsted weight (AKA size 4 or 8 ply) yarn when designing the pattern but any kind will do.
As I mentioned previously, the sizing for this pattern is done a little differently. Instead of different stitch counts which I normally do, I’m changing the size of the needles. Chances are good that if you know how to knit in the round, you already have these size needles anyways. If not, it’s a good excuse to go to your favourite yarn store to pick up the needles you’ll need. And since you’re there, check out the yarn sales. You’d be foolish not to.
My standard for sizing was my hand and designed the knitting pattern according to what kind of rubber gloves fit me comfortably. I wear a medium sized rubber glove and the medium sized glove fits perfectly. You may need to use different sized needles to get the correct gauge, but this pattern is very forgiving if you’re a bit off.
Next Row: K1 Pass the next 13 stitches onto a stitch holder. K16 P1 C6F twice K3 P1 K1 (35 sts)
Next Row: K17 P1 K15 P1 K1
Next Row: K1 P1 around to last 2 sts. P2tog
Next 4 Rows: K1 P1 around
Cast off loosely.
Make Thumb
Pick up the 13 stitches from the stitch holder. Work 3 rounds even. Cast off loosely.
Hints and Tips
If you have too many stitches double check to make sure you haven’t picked up a stitch between the needles. If you don’t have enough stitches, did you drop one when you were making the cable? Yes, I do make typos sometimes but I double check and recheck before I publish these patterns and it is more likely you’ve made a slight error while knitting. I’ve given stitch counts at the end of every row to help you along. Please let me know if I legitly did make a mistake. But with saying that, it isn’t always my fault. Some of you get kinda nasty about this and you really need to stop. Here’s the email so you can complain to my manager if that last bit offended you – stfu@email.com. FYI Karens – I am the manager and that email address doesn’t work.
I cast all the stitches on one needle when I start. Then I divide them up between the 3 needles. This helps to avoid the twisting you can sometimes get when casting on to each needle.
I prefer to use bamboo dpn. I find that it helps to prevent that line you get between needles when knitting in the round.
You will probably need to adjust the number of stitches you have on each needle. I usually make one split between the purl and the start of the cable motif with one needle having 15 stitches. It gives more than 12 on one needle and less than 12 on the other, but it makes it easier to knit the cable.
If you like your ribbing to be a little more snug, you can use a smaller size needles to knit this portion. Stepping it down a half size; small – 3.5 mm, medium – 4.5 mm and large 5.5 mm should work. You may want to go smaller. I don’t do this because I always forget to switch back.
I haven’t tried this, but changing to even smaller needles and thinner yarn can make even smaller child sizes. Let me know if you try this and what gauge and needles give the right sizes. You can leave your findings in the comment section if it works. It’s been acting up since I switched hosting plans. Sorry.
Abbreviations:
C6F – Cable 6 forward. With your cable needle, slip 3 stitches off the needle and pull the stitches towards the front of your work. Knit the next 3 stitches. Knit the 3 stitches from the cable needle.
C6B – Cable 6 backward. With your cable needle, slip 3 stitches off the needle and pull the stitches to the back of your work. Knit the next 3 stitches. Knit the 3 stitches from the cable needle.
M1 – Make 1 stitch. Pull up a loop between the stitches and knit.
K – Knit
P – Purl
Sts – stitches
P2tog – Purl 2 together
Well, that wraps up this knitting pattern. I hope you liked it, have a lot of fun with it, and maybe even make a bit of money from what you make. Like all my patterns, you have my permission to sell or give away any gloves/mitts that you make from this pattern. You are NOT permitted to reproduce or republish this pattern in any form. Whether it be illegal screen shots of this page, a copy you print from this webpage, or multiple copies of the ONE pattern you paid for and subsequently give to your friends. Yes. All of those behaviours violate copyright laws. And every time you do that, it makes one less pair of eyeballs on my work that takes away from any ad revenue or other profits I may make from my hard efforts in designing and writing these patterns. I don’t work for free. I’m sure you don’t either.
Knit a fabulous pair of fingerless gloves or mitts with the cutest little bows flowing down the length of your arm and back of your hand. Create the bows as you go; I have pics to show you how. Make them as long or as short as you like. It really depends on how much you like knitting in the round on double pointed needles (DPN).
Don’t want to read this online and avoid the ads. You can download this pattern for 99¢ directly from this website here – How to Knit Fingerless Arm Warmers or Gloves – with Bows! I can now process credit and debit cards right here on the website. Not cool with that? You can also download the pattern through Ravelry, Etsy and other retailers.
Like the owl motif, I have a love affair going on with these bows. So far, I’ve incorporated it into slippers and a dishcloth, both of which are available to read right here on my website for free (that’s right, give those links a click). They are also downloadable in a number of online retailers such as Raverly, Etsy, Google Books and Amazon for a minimal cost. If you’re not a fan of intro blog blather or ads, you can also download this pattern at any of those fine retailers.
A few quick words on sizing. Instead of going through all the effort to remake the pattern for different sizes and having the bows remain centered, I’ve gone about adjusting the sizing by changing the size of your knitting needles. These mitts knitted in the round making them seamless with no scratchy seams to worry about. Because of being knitted in the round, the thumbs have to be on different sides so they fit correctly. You’ll have to make one for theleft hand and the right hand. Instructions are given separately for both. You can click the links or scroll down the page.
If you’re running into problems with this knitting pattern or have a question, scroll down to the Hints and Tipssection at the bottom of the post. I think I’ve pretty much answered everything. You can also click the link above to take you right there. If there are additional questions, they’ll pop up in the comments over time which are at the bottom of the page.
Loving the free knitting patterns? Then please help support this site. You can learn more by going to my Help Support My Work page and make a small financial contribution. Or, you can use these links below ?????? and share this and my other patterns through your social media. More eyeballs on my work helps a bunch too.
Like all my patterns, you have my permission to sell any of the arm warmers, gloves or mitts you make from this pattern. You do NOT have permission to redistribute this pattern in any form. Which includes, reprinting or republishing it in any form: physical, digital or anything else. That statement includes you. No, you can’t print this webpage for yourself, your friends, family or anyone else. Please purchase your printable PDF copy at any of these fine distributors – this website, Ravelry or Etsy for the very minimal cost. Help support the hard work of the author and encourage future publications.
Another way to avoid ads and pop-ups and get instant, PRINTABLE downloads of this pattern and more, is by becoming a Member on this website. When you become a Website Supporter for $3/month, you’ll gain access to exclusive member only posts. These posts contain one click downloads of the patterns. Simply click the Download & Print button. The PDF will automatically download to your computer or smart device. You can then read it on your device or print it at your leisure. You can download as many patterns as you like for the same $3 each month. You can go to this page to learn more, become a member and support my work… Exclusive Member Area
worsted weight yarn (any standard ball will be more than enough to make the shorter, hand only version. You’ll need more if you are making them longer. For example, I used less than a 100 gr or 3.5 oz ball to make the long green gloves in size medium.)
Tapestry needle to sew the hole by the thumb and work in ends
A Note on Sizing
As I mentioned previously, the sizing for this pattern is done a little differently. Instead of different stitch counts which I normally do, I’m changing the size of the needles. Chances are good that if you know how to knit in the round, you already have these size needles anyways. If not, it’s a good excuse to go to your favourite yarn store to pick up the needles you’ll need. And since you’re there, check out the yarn sales. You’d be foolish not to.
Like most things I knit, I use myself for standard sizing. To give you an idea of fit, I wear a medium sized latex glove. The medium size bow glove fits perfectly. You may need to use different sized needles to get the correct gauge, but this pattern is very forgiving if you’re a bit off.
Cast on 36 sts loosely. You need to allow the ribbing to stretch.
Rounds 1 – 7: K1 P1 around
Rounds 8 – 9: K around
♥︎ Round 10: K8 P1 Hold the yarn in front of your work. Pass the next 7 stitches over to the other needle (strand made). P1 K19.
Making the strand. Notice that the stitches passed over are spread apart and not bunched together.
Strand complete. Note the slack of the strand.
Round 11: K8 P1 K7 P1 K19
Round 12: As round 10
Round 13: As round 11
Round 14: As round 10
Round 15: As round 11
Round 16: As round 10
Round 17: As round 11
Round 18: K8 P1 K3 Pick up the 4 strands from the bottom up
Four strands on the working needle
And knit the next stitch.
Four strands and about to knit the stitch
Pull the loop down through the 4 strands (Bow completed).
Pull the yarn down beneath the strands as shown
All strands caught by the knit stitch
The bow once the other 3 stitches are knitted
K3 P1 K19
Round 18 written without photos: K8 P1 K3 Pick up the 4 strands from the bottom up and knit the next stitch. Pull the loop down through the 4 strands (Bow completed). K3 P1 K19
Round 19: K8 P1 K7 P1 K19 ♥︎
Repeat from ♥︎ to ♥︎ if you would like a longer length of glove. Each ? to ? repeat makes 1 bow motif.
Round 20: K1 M1 K1 M1 K6 P1 Hold the yarn in front of your work. Pass the next 7 stitches over to the other needle (strand made). P1 K19
Round 21: K to the P P1 K7 P1 K19
Round 22: K to the P P1 Hold the yarn in front of your work. Pass the next 7 stitches over to the other needle (strand made). P1 K19
Round 23: K1 M1 K3 M1 K6 P1 K7 P1 K19
Round 24: As round 22
Round 25: As round 21
Round 26: K1 M1 K5 M1 K6 P1 Hold the yarn in front of your work. Pass the next 7 stitches over to the other needle (strand made). P1 K19
Round 27: As round 21
Round 28: K to the P. P1 K3 Pick up the 4 strands from the bottom up and knit the next stitch. Pull the loop down through the 4 strands (Bow completed). K3 P1 K19
Round 29: K1 M1 K7 M1 K6 P1 K7 P1 K19
Round 30: As round 22
Round 31: As round 21
Round 32: K1 M1 K9 M1 K6 P1 Hold the yarn in front of your work. Pass the next 7 stitches over to the other needle (strand made). P1 K19
Round 33: As round 21
Round 34: As round 22
Round 35: K1 M1 K11 M1 K6 P1 K7 P1 K19
Round 36: As round 22
Round 37: As round 21
Round 38: K1 Pass next 13 stitches onto the stitch holder. K6 P1 K3. Pick up the 4 strands from the bottom up and knit the next stitch. Pull the loop down through the 4 strands (Bow completed). K3 P1 K19
Round 39: As round 21
Rounds 40 – 41: K around
Round 42: K2tog P1 K1 around. P1 in lat stitch.
Round 43 – 46: K1 P1 around.
Cast off loosely.
Make Thumb
Pick up the 13 stitches from the stitch holder. Work 3 rounds even. Cast off loosely.
Sew in the ends and close the hole at the base of the thumb.
Cast on 36 sts loosely. You need to allow the ribbing to stretch.
Rounds 1 – 7: K1 P1 around
Rounds 8 – 9: K around
♥︎ Round 10: K22 P1 Hold the yarn in front of your work. Pass the next 7 stitches over to the other needle (strand made). P1 K5.
Round 11: K22 P1 K7 P1 K5
Round 12: As round 10
Round 13: As round 11
Round 14: As round 10
Round 15: As round 11
Round 16: As round 10
Round 17: As round 11
Round 18: K22 P1 K3 Pick up the 4 strands from the bottom up and knit the next stitch. Pull the loop down through the 4 strands (Bow completed). K3 P1 K5
Round 19: K22 P1 K7 P1 K5 ♥︎
Repeat from ? to ? if you would like a longer length of glove. Each ♥︎ to ♥︎ repeat makes 1 bow motif.
Round 20: K1 M1 K1 M1 K20 P1 Hold the yarn in front of your work. Pass the next 7 stitches over to the other needle (strand made). P1 K5
Round 21: K to the P. P1 K7 P1 K5
Round 22: K to the P. P1 Hold the yarn in front of your work. Pass the next 7 stitches over to the other needle (strand made). P1 K5
Round 23: K1 M1 K3 M1 K20 P1 K7 P1 K5
Round 24: As round 22
Round 25: As round 21
Round 26: K1 M1 K5 M1 K20 P1 Hold the yarn in front of your work. Pass the next 7 stitches over to the other needle (strand made). P1 K5
Round 27: As round 21
Round 28: K to the P. P1 K3 Pick up the 4 strands from the bottom up and knit the next stitch. Pull the loop down through the 4 strands (Bow completed). K3 P1 K5
Round 29: K1 M1 K7 M1 K20 P1 K7 P1 K5
Round 30: As round 22
Round 31: As round 21
Round 32: K1 M1 K9 M1 K20 P1 Hold the yarn in front of your work. Pass the next 7 stitches over to the other needle (strand made). P1 K5
Round 33: As round 21
Round 34: As round 22
Round 35: K1 M1 K11 M1 K20 P1 K7 P1 K5
Round 36: As round 22
Round 37: As round 21
Round 38: K1 Pass next 13 stitches onto the stitch holder. K to the P. P1 K3. Pick up the 4 strands from the bottom up and knit the next stitch. Pull the loop down through the 4 strands (Bow completed). K3 P1 K5
Round 39: As round 21
Rounds 40 – 41: K around
Round 42: K2tog P1 K1 around. P1 in last stitch.
Round 43 – 46: K1 P1 around.
Cast off loosely.
Sew in the ends and close the hole at the base of the thumb.
Make Thumb
Pick up the 13 stitches from the stitch holder. Work 3 rounds even. Cast off loosely.
Hints and Tips
I cast all the stitches on one needle when I start. Then I divide them up between the 3 needles. This helps to avoid the twisting you can sometimes get when casting on to each needle.
You don’t need a stitch holder. Even a piece of yarn will work.
Spread the 7 passed stitches apart to allow for some slack in the strand. If you don’t the bows will pucker. I usually spread them as far apart as they will go and stay in a relaxed position.
A quick note on making them longer into arm warmers. The green arm warmers repeat the bow section 4 more times than what is written. As it is written you get the short gloves with 3 bow motifs. The final length is about 25 cm or 9.5 inches long. Depending on the circumference of the arm you may need to add and cast on more stitches. This is where having the bows staying centred gets difficult. I can’t really help you with that. It’s a bunch of additional math, frustration and trial and error I really don’t want to get into. Sorry.
Your gauge isn’t overly important but best if it’s at least close. Because the knitted mittens are are fingerless, they are very forgiving if they’re a little small or large.
I prefer to use bamboo dpn. I find that it helps to prevent that line you get between needles when knitting in the round.
You will probably need to adjust the number of stitches you have on each needle. I usually make one split between 2 knit stitches before the purl at the start of the bow motif. It gives more than 12 on one needle and less than 12 on the other, but it makes it easier to knit the bow and lessens the chances of dropping or adding a stitch when switching between working needles.
When you are done making the bows, they may pull a bit weirdly on one side. Simply put your needle beneath the 4 strands and give a bit of a tug up away from the mitt on both sides. That is enough to straighten and even them out.
If you’ve gained a stitch, check to see that you haven’t picked up a stitch between your needles. This is very easy to do and I even do it on occasion. When switching between needles the yarn will catch on the needle, not falling in behind again like it should. If you’re a little distracted, you’ll knit this new “stitch”, gaining an extra stitch on the next round.
I haven’t tried this, but changing to even smaller needles and thinner yarn (DK or 3 perhaps) can make even smaller child sizes. Let me know if you try this and what gauge and needles give the right sizes. You can leave your findings in the comment section.
Abbreviations:
M1 – Make 1 stitch. Pull up a loop between the stitches and knit.
K – Knit
P – Purl
Sts – stitches
K2tog – Knit 2 together
I’m going to repeat this statement just in case you missed it earlier…
Like all my patterns, you have my permission to sell any of the arm warmers, gloves or mitts you make from this pattern. You do NOT have permission to redistribute this pattern in any form. Which includes, reprinting or republishing it in any form: physical, digital or anything else. That statement includes you. No, you can’t print this webpage for yourself, your friends, family or anyone else. Please purchase your copy at any of these fine distributors – this website, Ravelry or Etsy for the very minimal cost of 99¢. Help support the hard work of the author and encourage future publications.
I’m not sure if this happens to anyone else, but I found some fantastic yarn on clearance that I absolutely had to have. Of course, I had no idea what to do with it. Then I got on my fingerless glove kick. I have written other patterns in the past such as my Owl Fingerless Gloves, Flip Mitts, and Texting Mitts, but they were all made with standard worsted weight yarn. The yarn I couldn’t leave behind was light weight; 3 as by North American terminology. So, a redesign of my gloves was in order! I absolutely love that these are a lighter, more delicate version of my previous patterns. AND I can use colour changing yarn and it works! If this is your first time using one of my patterns, I kinda got a thing for shaded yarns…just sayin’.
And if you were looking to buy a pair of these beauties but accidentally wound up here, click this link Hand Knit Fingerless Gloves and you can purchase a finished pair from my website. Or if you prefer to order through Etsy, you can get them there too – Fingerless Gloves by KweenBee on Etsy.
Like my other fingerless mitts, these are knitted on double point needles, also known as DPN. Though this sounds intimidating, it really is very simple. This is definitely not a beginner’s knitting project, but knitting in the round is the same as knitting flat. Only difference is you don’t flip your work back in forth; it’s done a continuous circle.
Plain Cuff Fingerless Gloves
If you are looking to make a pair of longer fingerless mitts, I can help you with that too! The striped fingerless glove pattern is basically the same as this one, but I’ve worked out the decreases to make them go all the way up to the elbow. You can click this link (or the photos) to read the pattern online.
And they don’t need to be striped. For the pair in the photo I used self-striping yarn so no ends to work in. But you can also make a more plain style like the green ones.
The sizing for mittens, like socks or slippers, is somewhat general. The small size will fit someone with a smaller hand. Think a younger teenager. A mediumis an average lady’s hand. I’m a medium when it comes to rubber gloves and I designed the medium mitt to fit my hand. Large is for a larger size hand. Each size is written out in full as the row and stitch counts differ for each.
Enjoying the free patterns and would like to Help Support My Work, GREAT! Please give what you can and like, share and follow me on social media. You can use the links above to easily do so.
The PDF is also available for your viewing pleasure. If you are tired of the ad supported version, you can download the PDF for a small fee from my website – How to Knit Fingerless Gloves, Ravelry or Etsy. All are the same price no matter where you get it from.
Another way to get instant, PRINTABLE downloads of this pattern and more, is by becoming a Member on this website. When you become a Website Supporter for $3/month, you’ll gain access to exclusive member only posts. These posts contain one click downloads of the patterns. Simply click the Download & Print button. The PDF will automatically download to your computer or smart device. You can then read it on your device or print it at your leisure. You can download as many patterns as you like for the same $3 each month. You can go to this page to learn more, become a member and support my work… Exclusive Member Area
M1 – Make 1 stitch. Pull up a loop between the stitches and knit.
K2tog – knit 2 together
sts – stitches
st – stitch
Helpful Hints
You don’t need a stitch holder. Even a piece of yarn will work.
Customise this pattern as you see fit. If you want the cuff longer, do so. If you need a longer thumb, add more rows. As long as your stitch counts stay the same, it should work out fine.
Some folks like to felt their mittens as it can help stop the wind from blowing through the stitches. Be careful though because felting shrinks your work! It’s hard to guess how much shrinkage will happen as there are so many variables involved, from temperature of the water to how much agitation occurs during the felting process. You can give it a try but make sure you use PURE wool! Anything that is a blend won’t felt properly. My last attempt at felting a pair of mittens for myself resulted in my young son getting a new pair of mitts. At least they didn’t go to waste :-/
If you have any questions or comments you can reach me here.
Like always, you can sell or give away whatever you make from my patterns. Don’t be a douche and try to pass this pattern off as your own in any way or form (physical or digital). See how handy fingerless gloves can be ?
I’ve decided to share one of my most favourite things to knit…slippers just like my mom used to make. I’ve given the pattern so anyone can create them for adults from a woman’s size 7-12 or a man’s 6-11. This is one my most popular patterns ( this honour has recently been captured by my Easy to Knit Owl Fingerless Gloves ?). This slipper pattern has been dowloaded and viewed thousands of times through various online channels.
Adult slippers – Free knitting pattern
Free slipper pattern
How to knit adult slippers – free knitting pattern
Free slipper pattern
If you’re not a fan of being online, you can also download the ad free PDF version of the pattern directly from the download section of this website for a small fee – How to Knit Adult Slippers. If that is too much of a hassle, you can also find it in my Etsy shop or Ravelry for the same small fee.
Another way to avoid ads and pop-ups, get instant, PRINTABLE downloads of this pattern and others, is by becoming a Member. When you become a Website Supporter at $4/month, you’ll gain access to exclusive member only posts on Buy Me A Coffee. You can download as many patterns as you like for the same $4 each month. You can go to this page to learn more, become a member and support my work… Exclusive Member Area
As my latest addition, I’ve also converted this pattern to children’s sizes. You can use this link to see my FREE children’s knitted slippers pattern. Both of these patterns are great to practice if you are a new knitter. Make sure you maintain the correct gauge! The sizing for the slippers is based on it. If you match your gauge to mine then the sizing should work out correctly.
I’ve also added all of the the videos for the necessary knitting stitches you’ll need to make these slippers.You can watch them right on this site by clicking this link – Basic Knitting Stitches. I’ve also embedded the complete step-by-step video showing how to make these. Scroll down or click here to the end of the page to watch it right here. FYI – all the links on this page open in a new page so you won’t lose this one.
I’ve also added links to the specific stitches that you need within the pattern itself. For example, if you forget how to gather stitches to form the toe, there’s a link right there to go to the video.
If you are enjoying the free videos and patterns, then please share my work! Those handy little icons above let you do it easily. If you’d like more information on how you can keep things free, learn how you can Help Support My Work.
Don’t think you can make these yourself? Or maybe you would like some examples. Either way you can check them out in my online shop.
Things you will need:
If you are uncertain or having trouble finding what you need to make these slippers, clicking any of the links below will show you exactly what you need. And if you decide to order through Amazon, it will be delivered right to your door and help support the hosting costs of the website (I do get a small commission from sales through Amazon).
200 gr of worsted weight yarn (this is an estimate. One large ball from any retailer will do.)
Be sure to check your gauge to obtain correct sizing!
Slippers are given for a woman’s size 7-8 (9-10, 11-12) or a man’s sizes 6-7 (8-9, 10-11). The foot lengths of a man’s size 6-7 are about the same as that of a woman’s size 7-8 and so on.
Repeat rows 1 and 2 for 36 (42, 48) more times TOTAL.
Shape toe:
Next Row: With right side of work facing you P1 *(K1 P1) Repeat from * 5 more times K14 *(P1 K1) Repeat from * 5 more times. P1 {This is K1 P1 Ribbing.}
Next Row: With wrong side facing you *(K1 P1) Repeat from * 6 more times K12 *(P1 K1) Repeat from * 6 more times.
Repeat these 2 rows for 22 (26, 30) more rows. 24 (28, 32) rows ribbed TOTAL.
Next Row: With right side facing K2tog 12 times. K1. K2tog 7 times P1. 21 stitches remaining.
Next Row: P8 K6 P7
Next Row: K2tog 10 times. K1. 11 stitches.
Next Row: P5 K3 P3.
Last Row: Draw yarn through loops (AKA gather stitches) and pull together to form toe. Sew seam up to start of ribbed stitches.
With right side of work facing you pick up 14 stitches between the fold lines that mark the sole of the slipper. A lot of people have messaged me over the years not knowing how to do this. I made a video! It’s actually for another pattern but is exactly the same as this. Here’s the link to the video – Picking up Stitches for the Heel
Sew up seems for heel flap. Work in ends. Make another to match.
Like all of my patterns you have my permission to sell and/or give away the slippers that you make using this pattern. You are NOT permitted to reprint this pattern in any form, physical or digital, unless you have obtained my written permission to do so. If you would like to link back, that always awesome and feel free to do so. Happy knitting!!
Also known as fingerless mittens, I seem to have a thing going on for this awesome owl motif. If you haven’t seen them already, I also have a Knitted Owl Slipper pattern that you may like. But more about these awesome fingerless gloves… They are fairly quick to make if you’re somewhat of an experienced knitter. If you don’t know how to knit in the round on double pointed needles (dpn), you’re in luck! I rewrote the pattern so anyone who loves the knitted owl motif, but not comfortable knitting in the round can still make an awesome pair of owl fingerless gloves. The pattern is free to read online, too! Click this link – Easy to Knit Owl Fingerless Gloves to see how to knit these flat on 2 needles instead of in the round on 4.
If you are so inclined and like to have matching sets of things, I have completed the matching hat or beanie! You could also call it a toque. Whatever floats your boat. It’s free to read on this website too. If you’d like to, click this link –How To Knit A Beanie Hat – With OWLS! – FREE Knitting Pattern
If you’re willing to learn how to knit on 4 needles, I’ve made a step-by-step video showing you every single round. You can watch it here if you need any help along the way – How to Knit Fingerless Gloves – with Owls! If you scroll down the page, I’ve also embedded the video so you won’t have to leave this page.
Regardless if knitted flat or in the round, this is also a great pattern if you have a bit of left over yarn from other knitting projects. Like enough to knit one slipper, but you’re not sure if you’ll have enough to finish the whole pair. I know. We’ve all been there.
Did you wind up here looking for the finished product and not a pattern? No worries! You can buy your very own pair either from this website here – Hand Knit Owl Fingerless Gloves or in my Etsy shop.
And due to the number of folks contacting me via email and through the comments below, I am now offering a download of this pattern! I can’t give it away for free though; there is a minimal cost. You can download it directly from this site here – Owl Fingerless Gloves, or at other ebook retailers such as Ravelry, Etsy, and LoveCrafts.
Another way to avoid ads and pop-ups, get instant, PRINTABLE downloads of this pattern and others, is by becoming a Member on this website. When you become a Website Supporter for $3/month, you’ll gain access to exclusive member only posts. These posts contain one click downloads of the patterns. Simply click the Download & Print button. The PDF will automatically download to your computer or smart device. You can then read it on your device or print it at your leisure. You can download as many patterns as you like for the same $3 each month. You can go to this page to learn more, become a member and support my work… Exclusive Member Area
A few quick words on sizing. Instead of going through all the effort to remake the pattern for different sizes, and to keep the proportion of the knitted owls the same, I’ve gone about adjusting the sizing by changing the size of your knitting needles. These are knitted in the round making them seamless with no scratchy seams to worry about. Because of being knitted in the round, the thumbs have to be on different sides so they fit correctly. You’ll have to make one for theleft hand and the right hand. Instructions are given separately for both. You can click the links or scroll down the page.
Loving the free knitting patterns? Then please help support this site. You can learn more by going to my Help Support My Work page and make a small financial contribution. Or, you can use these links below and share this and my other patterns through your social media. More eyeballs on my work helps a bunch too.
Want other knitted mitten patterns that are for texting or are more plain Jane and can cover the ends of your fingers? I have those too. You can check out my How to Knit Texting Mittens and How to Knit Flip Mitts. I forgot I even had those… huh! And for those who actually take the time to read these long-winded intro’s, I just finished another fingerless mitten pattern. It’s cleverly titled – How to Knit Fingerless Gloves. It uses finer yarn, smaller needles and is sized with different stitch and row counts. It also is very plain Jane and is owl free!
Things you will need:
worsted weight yarn (less than 50 grams was more than enough to make a pair of large knitted gloves. I know because I weighed them ?). I used Red Heart worsted weight yarn when designing the pattern but any kind will do.
As I mentioned previously, the sizing for this pattern is done a little differently. Instead of different stitch counts which I normally do, I’m changing the size of the needles. Chances are good that if you know how to knit in the round, you already have these size needles anyways. If not, it’s a good excuse to go to your favourite yarn store to pick up the needles you’ll need. And since you’re there, check out the yarn sales. You’d be foolish not to.
My standard for sizing was my hand and designed the knitting pattern according to what kind of rubber gloves fit me comfortably. I wear a medium sized rubber glove and the medium sized glove fits perfectly. the Grey mittens are a medium. The beige is a small if you like your gloves a bit on the snug side. I didn’t even bother trying to model the red. They were too big. You may need to use different sized needles to get the correct gauge, but this pattern is very forgiving if you’re a bit off.
If you are having problems with a particular row, once you push play, you can scroll through the video to find the card with the row number written on it. If you watch the video on YouTube here – How to Knit Fingerless Owls Gloves or Mitts, there are time stamps for each row in the description.
Me on YouTube knitting’ it up!
Left Hand
Cast on 36 sts loosely (you need to allow the ribbing to stretch)
Round 1 – 10: K1 P1
Round 11 – 13: K around
Round 14: K1 M1 K1 M1 K6 P1 K8 P1 K18 (knitted stitches between the M1’s are the thumb increase)
Round 35: K2tog. *P1 K1* Repeat from * to * around ending with P1.
Round 36 – 39: K1 P1 around.
Cast off loosely. It needs to stretch.
Make Thumb
Pick up the 13 stitches from the stitch holder. Work 3 rounds even. Cast off loosely.
Hints and Tips
I cast all the stitches on one needle when I start. Then I divide them up between the 3 needles. This helps to avoid the twisting you can sometimes get when casting on to each needle.
Your gauge isn’t overly important but best if it’s at least close. Because the knitted mittens are are fingerless, they are very forgiving if they’re a little small or large.
I prefer to use bamboo dpn. I find that it helps to prevent that line you get between needles when knitting in the round.
You will probably need to adjust the number of stitches you have on each needle. I usually make one split between the purl and the start of the owl motif. It gives more than 12 on one needle and less than 12 on the other, but it makes it easier to knit the owl.
I haven’t tried this, but changing to even smaller needles and thinner yarn can make even smaller child sizes. Let me know if you try this and what gauge and needles give the right sizes. You can leave your findings in the comment section.
Abbreviations:
C4F – Cable 4 forward. With your cable needle, slip 2 stitches off the needle and pull the stitches towards the front of your work. Knit the next 2 stitches. Knit the 2 stitches from the cable needle.
C4B – Cable 4 backward. With your cable needle, slip 2 stitches off the needle and pull the stitches towards the back of your work. Knit the next 2 stitches. Knit the 2 stitches from the cable needle.
M1 – Make 1 stitch. Pull up a loop between the stitches and knit.
Awesome cozy knitted slippers for women and men with a delightful cabled owl motif. The inspiration came to me while scrolling through the wonders of the internet and stumbling on other knitted slippers that were made in one piece on circular needles but back and forth. I couldn’t for the life of me figure it out, the pattern wasn’t in English, so I decided to design my own!
I came up with a very basic knitted slipper design, but then was inspired to make the top of the toe something special. I loved the look of a knitted cable owls on hats, mitts and scarves and next thing you know, this pattern was born! But also realize not everyone wants owls. That’s why I’ve written another pattern with no owls. You can see that pattern here – Free Knitted Slipper Pattern
Like most of my knitting patterns, this one is available for download, ad free, for a very small fee here – Knitted Owl Slipper Pattern or from my Etsy Shop. If you enjoy this pattern and my other free online knitting patterns, please consider making a small donation or helping me out by visiting my Help Support My Work page. If that’s not possible, that’s totally fine too! Even sharing this page on your social media helps me out immensely. You can use those buttons ?? to do so easily.
Please be warned, this is not a pattern for beginners. I used a very different technique involving multiple sets of needles. I included photos to demonstrate how I’m using the extra set and it totally works! Trust me.
Things You Need
If you are uncertain or having trouble finding what you need to make these slippers, clicking any of the links below will show you exactly what you need. And if you decide to order through Amazon, it will be delivered right to your door and help support the hosting costs of the website (I do get a small commission from sales through Amazon).
1 ball of worsted weight yarn (average 260 yard, 5 oz or 141 gram ball will be more than enough). I used Red Heart worsted weight yarn when designing the pattern.
2 sets of size 4 mm (US size 6) single point knitting needles.
Stitch holder
Cable needle
4 – 4 mm beads for eyes. You can use larger ones or very small buttons, too.
Needle and thread to sew on eyes
Tapestry needle to sew in ends. You can also use this handy tutorial to show you how to work in the ends while knitting these slippers.
Gauge
With size 4 mm (US size 6) needles or whatever size you need to obtain the correct number of stitches and rows. Be sure to check your gauge otherwise the sizing won’t be correct.
Row 7: With RIGHT side facing, transfer the first 15 (17, 20, 22) stitches to a stitch holder. Reattach the yarn and knit the next 14 stitches (the start of the toe flap with the owl motif). Leave the remaining 15 (17, 20, 22) stitches on the needle unworked.
The following rows are worked back and forth on the 14 toe flap stitches only!
Row 32: Purl across. Break yarn. You’ll have the 14 stitches of the toe flap on your needle and the 15 (17, 20, 22) stitches you left on the needle when you started making the toe flap.
Making the Sides of the Slipper
This is where you’re going to need the extra set of knitting needles. You’ll be knitting back and forth in rows but the turn around the toe is too tight to use circular needles. For this, you’ll put the 14 toe flap stitches on one of your extra needles. It’s a little unconventional, but it works.
Row 33: With the RIGHT side facing, transfer the 15 (17, 20, 22)stitches from the stitch holder onto one of your needles. Attach your yarn and knit the 15 (17, 20,22) stitches. Pick up 13 stitches evenly along the edge of the toe flap. (All of these stitches are on ONE needle. (28, 30, 33, 35) stitches on this needle)
With another needle, knit the 14 stitches of the toe flap. Leave the remaining 15 (17, 20, 22) stitches on the other needle unworked for now. (14 stitches on this needle)
With another needle, pick up 13 stitches evenly along the side of the toe flap. Knit the remaining 15 (17, 20, 22) stitches on the next needle. (28, 30, 33, 35 stitches on this needle)
You should now have 3 needles holding stitches with all the points pointing as shown below when laid flat. You also have one spare needle to knit with. You are now going to knit in rows, back and forth with these three needles. Once you finish knitting all the stitches on one needle, move on to the next needle (the point of the needle is right there) until you complete the row.
Another way to say it for the following rows, knit all the stitches forming the side of the slipper, knit the 14 stitches holding the toe flap stitches, then knit the other side of the slipper (counts as one row). Turn. Repeat.
Knit the next 9 (11, 13, 15, 17) rows
There are 5 (6, 7, 8, 9) ridges on the tip of the toe.
The photo below shows the 6 ridges for the women’s size 8-9 or the men’s 7-8.
Making the Sole
Next Row: With WRONG side facing. Cast off all the stitches from the first needle loosely. You’ll need to pass the last stitch from the first needle over the first stitch of the toe flap stitches (second needle).
Using the same needle that now has one stitch, knit the remaining 13 stitches of the toe flap. Cast off all the stitches from the third needle loosely. Break yarn.
Next Row: With the RIGHT side facing, attach yarn and knit the first stitch of the cast off stitches by the toe flap (cast off stitch on the right by the point of the needle).
(The photo above is taken from the wrong side. It’s hard to see it from the right side)
(This photo is taken from the right side.)
K2tog. Knit to the last 2 stitches K2tog. Pick up the cast off stitch by the point of your needle. (14 stitches).
(Left edge)
Quick tip – wrap the yarn counterclockwise around your needle and turn it down to pull the yarn through the cast off stitch on the right. If you have a hard time doing this, you can also use a crochet hook to pull the loop through and place that loop on your working needle.
You now are working back and forth along the bottom of the foot picking up one cast off stitch on each side as you go.
Next Row: Knit across.
*Next Row: Pick up the next stitch of the cast off stitches. K2tog. Knit to the last 2 stitches K2tog. Pick up the cast off stitch on the other side of the slipper by the point of your needle. (14 stitches).Click herefor some help on picking up the correct cast off stitches.
(Right edge)
Next Row: Knit across*
Repeat from * to * down the entire length of the foot. There are equal number of cast off stitches along each side. How many rows varies depending on the size of slipper you’re making. Be sure to end with a completed knit across row.
More of my stuff on Etsy
Making the Heel
I recently made a video showing how to do this. It’s how I make a lot of my slipper heels including this pattern. You can watch the video below to help you.
Next Row: With the RIGHT side facing, count down 8 (9, 10, 11, 12) ridges and pick up a stitch in the space beneath it. K2tog twice. Knit to the last 4 stitches. K2tog twice. Count down 8 (9, 10, 11, 12) ridges and pick up a stitch in the space beneath it. (12 stitches)
The photo above shows 9 rows of ridges on the right edge for women’s size 8-9 or men’s size 7-8.
The photo above shows 9 rows of ridges on the left edge for women’s size 8-9 or men’s size 7-8.
Next Row: Knit across.
Next Row: Count down 7 (8, 9, 10,11) ridges and pick up a stitch in the space beneath it. K2tog. Knit until the last 2 stitches. K2tog. Count down 7 (8, 9, 10, 11) ridges and pick up a stitch in the space beneath it.
Next Row: Knit across.
Next Row: Count down 6 (7, 8, 9, 10) ridges and pick up a stitch in the space beneath it. K2tog twice. Knit until the last 4 stitches. K2tog twice. Count down 6 (7, 8, 9, 10) ridges and pick up a stitch in the space beneath it. (10 stitches)
Next Row: Knit across.
Next Row: Count down 5 (6, 7, 8, 9) ridges and pick up a stitch in the space beneath it. K2tog. Knit until the last 2 stitches. K2tog. Count down 5 (6, 7, 8, 9) ridges and pick up a stitch in the space beneath it.
Next Row: Knit across.
Next Row: Count down 4 (5, 6, 7, 8) ridges and pick up a stitch in the space beneath it. K2tog twice. Knit until the last 4 stitches. K2tog twice. Count down 4 (5, 6, 7, 8) ridges and pick up a stitch in the space beneath it. (8 stitches)
Next Row: Knit across.
Next Row: Count down 3 (4, 5, 6, 7) ridges and pick up a stitch in the space beneath it. K2tog. Knit until the last 2 stitches. K2tog. Count down 3 (4, 5, 6, 7) ridges and pick up a stitch in the space beneath it.
Next Row: Knit across.
Next Row: Count down 2 (3, 4, 5, 6) ridges and pick up a stitch in the space beneath it. K2tog twice. Knit until the last 4 stitches. K2tog twice. Count down 2 (3, 4, 5, 6) ridges and pick up a stitch in the space beneath it. (6 stitches)
Next row: Knit across.
❤︎ Next Row: Pick up a stitch along the edge in the space beneath the next ridge. K2tog. Knit until the last 2 stitches. K2tog. Pick up a stitch along the edge beneath the next ridge.
Next Row: Knit across. ❤︎
Repeat from ❤︎ to ❤︎ until there are no more ridges.
Last Row: Pick up a stitch along the top. K2tog. Knit until the last 2 stitches. K2tog. Pick up a stitch along the top.
Cast off.
Hints and Tips
When picking up stitches from the cast off row, be sure you’re really moving on to the next cast off stitch! It’s an easy mistake to make. If in doubt, give the needle holding the stitches a bit of a tug. You’ll see the yarn move slightly at the very back, closest to the needle. Pick up a stitch at the NEXT cast off stitch.
If you don’t have the same number of stitches on both sides when you are forming the sole, you may have picked up a stitch twice in one stitch or missed one. Don’t worry! This is fixable. You can skip one cast off stitch if you need to make it even, or pick up a cast off stitch twice on the other side. There’s enough stretch in the slipper that any puckering this causes won’t be overly visible if you’re off by a stitch or two.
Picking up the stitches evenly along the toe flap is about 1 stitch every other row.
An odd row is always the right side of your work; an even row is the wrong side
To speed up finishing the slippers and not have so many ends to sew in, hold the yarn ends to the back of your work as you knit.
Abbreviations
k – knit
p – purl
k2tog – knit 2 together
st – stitch
sts – stitches
C4F (cable 4 forward) – With the cable needle, transfer the next 2 stitches to your cable needle. Bring these stitches to the front of your work. Knit the next 2 stitches from the needle. Knit the 2 stitches from the cable needle.
C4B (cable 4 back) – With the cable needle, transfer the next 2 stitches to your cable needle. Bring these stitches to the back of your work. Knit the next 2 stitches from the needle. Knit the stitches from the cable needle.
If you have any questions, please feel free to leave a comment or send me your questions here.
To see how you can keep the free patterns coming, visiting this page – Help Support My Work! A financial donation is always appreciated but a share, like and follow on social media also helps me immensely ?
Aren’t these the cutesiest things! This is one of my first patterns I ever wrote and I still make these for anyone who wants a pair.
A few basics before we start…to make these you need to know how to knit on double pointed needles and knit in the round. This is not a beginner project! It’s not tough to make these slippers, but you may need to practice a bit first. There is a FREE sock tutorial on my blog which is an excellent place to learn to make a basic pair of socks so you can master the technique.
To cast on, I cast all the stitches on one needle, then take the first 1/3 of the stitches and slip them onto a free needle, then take the last 1/3 of the stitches and put those on another needle, leaving the remaining 1/3 on the original needle. This method helps me to not twists my stitches. I then start to knit.
If you appreciate the free knitting patterns and how-to videos, please consider helping to off-set the cost of the web hosting for this site. You can go to my Help Support My Work page to make a one time donation or subscribe to give a little every month. Can’t contribute financially? That’s cool too! Sharing this page with everyone you know will help me immensely. You can use the links I’ve provided below.
Not wanting to read this behemoth online and would prefer to download the ad free version this knitting pattern for a small fee/donation? You can read it here – How to Knit Adult Sheep Slippers. You can also download the PDF from myEtsy Shop or from Ravelry.
Things You Need:
Clicking any links below to get everything you need to make these slippers sent right to your door.
Worsted weight yarn (I’m a fan of Red Heart only because of it’s price, it’s easy to find, wears and washes well).
Also, check your tension first! With worsted weight yarn, you’ll need a tension of:
10 stitches = 2 inches
14 rows = 2 inches
The abbreviations are standard:
K = Knit
P = Purl
K2 tog = Knit 2 stitches together
P2 tog = Purl 2 stitches together
FS = Fluff Stitch. This is the loop stitch and is described in detail here. There is also a complete how-to video at the end of this pattern. You can watch that here – Fluff or Loop Stitch Video
Depending on how tight you knit you may need larger or smaller needles. If you’ve knitted before you probably have a good idea of what needles you need.
So let’s go…
Cast on 36 stitches
Rounds 1-15: *K2 P2; repeat from * around
Round 16 – 20: Knit
Heel flap:
Slip last 9 stitches from round 17 to free needle, knit next 9 stitches from next needle onto needle with the 9 slipped stitches from round 17. You will have four needles and will look like this:
Transfer the three stitches on the two needles onto the back needle. Split these 18 stitches between two needles. It will look like this:
You will work these split 18 stitches later to form the top of the foot.
Turn your work. You are now creating the heel flap from the slipped stitches and will work in rows along the 18 stitches that are on the single needle.
With the wrong side (Purl side) facing you. Purl the row. Turn.
With the right side (Knit side) facing you. Knit the row. Turn.
Repeat stocking knit (Purl one row, Knit one row) until the flap measure approximately 2 1/2 inches ending with a Purl row. Turn.
With right side (Knit side) facing you K8 stitches, K2 tog, K8. Turn. (17 stitches on the needle)
Pick up 10 stitches along heel flap to form the gusset. Transfer the 18 held stitches to one needle. Knit the 18 held stitches. Pick up 10 stitches along heel flap to form gusset.
K4 stitches of heel. Slip remaining 5 stitches onto next needle. It will look like this:
Your needles will hold:
15 stitches side of foot
18 stitches top of foot
14 stitches side of foot
Next round: Knit. Knit another 15 sts until you are at the start of the 18 sts that make up the top of the foot.
Next round:Turn your work inside out!
With wrong side facing you (Purl side). P1, P2tog. P23 P2tog. P1.
Top of foot (over the 18 stitches): P1. FS16
To make the Fluff stitch (FS): *Insert needle into to next stitch as if to KNIT. Wrap the yarn (up
To make the Fluff stitch (FS): Insert needle into to next stitch as if to KNIT. Wrap the yarn (up & over) CLOCKWISE around the needle and the index finger of your LEFT hand TWICE. Leave these loops on your finger until you are finished knitting the entire stitch!
Wrap the yarn ONCE around the needle only.
Pull all 3 loops of yarn through stitch as knitting a regular stitch.
Insert the needle in your LEFT hand through these three loops and transfer these 3 loops onto the LEFT hand needle.
Insert you RIGHT hand needle through these three loops as if to knit.
The stitch is now completed.
Pattern continued…. P1 in the last remaining stitch from the needle that was holding the 18 stitches that formed the top of the foot.
Next round: P18, FS16, P1. * Repeat from * to * until measures the length you want less 2 1/2 inches. To measure lay the sock flat and measure from the needle holding the side gusset stitches to the back of the heel.
Women’s
Men’s
Sizes (USA)
In Inches
Size (USA)
In Inches
5
8 11/16
7
9 11/16
5 ½
8 13/16
7½
9 13/16
6
9
8
10
6½
9 3/16
8½
10 3/16
7
9 5/16
9
10 5/16
7½
9 ½
8
9 11/16
8½
9 13/16
9
10
9½
10 3/16
10
10 5/16
Sizes larger than 10 5/16 inches need extra stitches cast on to go around the foot. Recommended for experienced knitters only!
Next round: P35
Next round: P17. Flip your work right side out! With Knit side facing.
Transfer stitches onto two needles. 7 stitches and 8 stitches on each needle.
Break yarn leaving enough to graft toe and sew in ends. 12 inches is plenty.
Graft toe:
With a darning needle, insert the needle through the front loop of the first needle as if to PURL.
Insert needle through the stitch on the back needle as shown.
Insert the needle through the back loop of the first stitch AND through the stitch of the next stitch as if to PURL. Drop the first stitch.
Insert the needle through the stitch on the back needle as if to PURL. Drop this stitch.
? Insert the needle through the back loop of the next stitch on the front needle and the front loop of the next stitch as if to PURL. Drop the first stitch.
Insert the needle through the stitch on the back needle as if to PURL. Drop this stitch. ?
Repeat from ? to ? until there are no stitches left on either needle.
Pull the yarn tight.
Toe is now grafted.
Make another slipper to match!
Extra Knitting Tips:
Check your tension first! There’s nothing more disappointing than putting a bunch of effort into a project and then having it turn out to be the wrong size. The gauge of the rows is not so important for this project as you can make it to fit any size foot. The number of stitches per inch is VERY important! Make sure your gauge is correct.
Work in your ends instead of just knotting them off. Knots can make your foot sore when you step on them or if they rub on your toe.
This pattern can make any size slipper up to about a man’s size 9 or a woman’s size 10. If you want a bigger size make sure your increase the heel flap length and pick up more stitches when you make the gusset of the sock.
You don’t have to use googly eyes and pompoms for the face but I like to. I’ve also used buttons and they have also turned out well. I prefer to use Beacon Quick Grip glue to stick on the eyes and noses. It’s water proof and it works. I even tested it in my washing machine and dryer and everything remained in place. It didn’t discolour or become unglued.
If you would like to make the ears out of felt like I did, make a template from paper first and see if you like the size and how it fits. Cut a second template smaller than the main colour for the inside of the ear. I glued the pieces together and then sewed the ears to the second row in from face. Fiddle around with it to see where you like the placement best.
You can also make knitted ears with a bit of pink yarn, if you have it, or out of the yarn you knitted the slippers with originally. I made triangles and sewed them together. The inside pink was 2 stitches cast on less than the outside white portion. For example, Cast on 12 sts for the white and 10 sts for the pink.
If you have any questions, please feel free to leave a comment or send me your questions through my contact page.
So social distancing and forced unemployment seems to be going well for me…or at least incredibly productive as far as my pattern designing goes. Sigh! It certainly is a weird time. Anywho…
If you’ve done a little knitting before and are looking for something that’s a bit more challenging, why not give this knitted dishcloth pattern a whirl! It’s not overly complicated and looks awesome when you’re done. If you know knitting basics, you can easily get this done in an evening over the course of a couple of hours. If you are just learning how to knit or need to brush up on your knitting skills, I’ve also included links in the pattern to videos that show you how to do all the basic stitches including: casting on, knit stitch, purl, and bind off.
I really like this bow motif. In case you haven’t run across my other use of these cute AF bows, check out my Easy to Knit Bows Slippers knitting pattern. The bows themselves are made as you go and guaranteed to never fall off. For convenience, I’ve included the same pictorial showing how you knit them. If you’ve already made enough bows to choke a small horse, I have the pattern written in full without all the photos – The Whole Damn Pattern Written Without the Photos.
If you are enjoying the free patterns, please consider helping out financially by going to my page Help Support My Work. If you’re not in the position to make a small donation, please help me out by sharing this pattern with anyone you think may enjoy it. I’ve include these handy buttons ?? to make it super easy. All you have to do is click!
Due to the popularity of other PDF’s I’ve been creating, I finally got around to making the downloadable version of this pattern. For a minimal cost , you can download the ad free version. You can get it directly from this website here – How to Knit a Cute AF Bows Dishcloth. If you would prefer to use another online retailer to download from, you can also find and download this pattern onLoveCrafts, Ravelry or Etsy.
Want to make a monthly contribution, avoid ads and pop-ups, and get instant, PRINTABLE downloads of my patterns? Become a Member on this website! When you become a Website Supporter for $3/month, you’ll gain access to exclusive member only posts. These posts contain one click downloads of the patterns. Simply click the Download & Print button. The PDF will automatically download to your computer or smart device. You can then read it on your device or print it at your leisure. You can download as many patterns as you like for the same $3 each month. You can go to this page to learn more, become a member and support my work… Exclusive Member Area
☺︎ Row 9: K5 ♠︎ P1. Hold the yarn in front of your work. Pass the next 3 stitches over to the other needle (Strand made).
Purl the next stitch.
K5 ♠︎ Repeat from ♠︎ to ♠︎ 2 more times.
(Row 9 rewritten without photos: K5 ♠︎ P1. Hold the yarn in front of your work. Pass the next 3 stitches over to the other needle (Strand made). Purl the next stitch. K5 ♠︎ Repeat from ♠︎ to ♠︎ 2 more times.
Row 10: K5 ♣︎ K1 P3 K1 P5 ♣︎ Repeat from ♣︎ to ♣︎ 1 more time. K1 P3 K6
Row 11: Repeat row 9.
Row 12: Repeat row 10.
Row 13: Repeat row 9.
Row 14: Repeat row 10. The bow portion will look like this.
Row 15: K5 ♦︎ P1 K1 Pick up the three strands from the bottom up.
Knit the next stitch.
Pull the loop down through the 3 strands (Bow completed).
K1 P1 K5 ♦︎. Repeat from ♦︎ to ♦︎ 2 more times.
(Row 15 rewritten without photos: K5 ♦︎ P1 K1 Pick up the three strands from the bottom up. Knit the next stitch and pull the loop down through the 3 strands (Bow completed). K1 P1 K5 ♦︎ Repeat from ♦︎ to ♦︎ 2 more times.
The bow portion will look like this.
Row 16: As row 10
Row 17: K across
Row 18: As row 8.
Row 19: K10 ⚽︎ P1. Hold the yarn in front of your work. Pass the next 3 stitches over to the other needle (Strand made). Purl the next stitch. K5 ⚽︎ Repeat from ⚽︎ to ⚽︎ once. K5.
Row 20: K5 P5 ✦ K1 P3 K1 P5 ✦ Repeat from ✦ to ✦ 1 more time. K5.
Row 21: As row 19.
Row 22: As row 20.
Row 23: As row 19
Row 24: As row 20
Row 25: K10. ☆ P1 K1 Pick up the three strands from the bottom up. Knit the next stitch and pull the loop down through the 3 strands (Bow completed). K1 P1 K5 ☆ Repeat from ☆ to ☆ 1 more time. K5
Row 26: Repeat row 20.
Row 27: Knit across.
Row 28: As row 8. ☺︎ Repeat ☺︎ to ☺︎ (row 9 to row 28 make the pattern.)
☺︎ Row 9: K5 ♠︎ P1. Hold the yarn in front of your work. Pass the next 3 stitches over to the other needle (Strand made). Purl the next stitch. K5 ♠︎ Repeat from ♠︎ to ♠︎ 2 more times.
Row 10: K5 ♣︎ K1 P3 K1 P5 ♣︎ Repeat from ♣︎ to ♣︎ 1 more time. K1 P3 K6
Row 11: Repeat row 9.
Row 12: Repeat row 10.
Row 13: Repeat row 9.
Row 14: Repeat row 10. The bow portion will look like this.
Row 15: K5 ♥︎ P1 K1 Pick up the three strands from the bottom up. Knit the next stitch. Pull the loop down through the 3 strands (Bow completed). K1 P1 K5 ♥︎. Repeat from ♥︎ to ♥︎ 2 more times.
Row 16: As row 10
Row 17: K across
Row 18: As row 8.
Row 19: K10 ♦︎ P1. Hold the yarn in front of your work. Pass the next 3 stitches over to the other needle (Strand made). Purl the next stitch. K5 ♦︎ Repeat from ♦︎ to ♦︎ once. K5.
Row 20: K5 P5 ⚽︎ K1 P3 K1 P5 ⚽︎ Repeat from ⚽︎ to ⚽︎ 1 more time. K5.
Row 21: As row 19.
Row 22: As row 20.
Row 23: As row 19
Row 24: As row 20
Row 25: K10. ✦ P1 K1 Pick up the three strands from the bottom up. Knit the next stitch and pull the loop down through the 3 strands (Bow completed). K1 P1 K5 ✦ Repeat from ✦ to ✦ 1 more time. K5
Row 26: Repeat row 20.
Row 27: Knit across.
Row 28: As row 8. ☺︎ Repeat ☺︎ to ☺︎ (row 9 to row 28 make the pattern.)
Like all of my patterns, the viewing of this patterns allows for you to give away or sell any of the physical items you make from this pattern. You are not allowed to claim this pattern as your own, give it away, sell it or redistribute it in ANY form without my WRITTEN consent. That includes Printing this webpage.
And to those who think it doesn’t matter… meh. It’s theft of my intellectual property (ip) and it makes you look like a douche. Just sayin’.
I only use hand knit dishcloths and have for years. I can’t express the superiority of these things! Regardless of the style, and I have designed a few, they last forever, have fabulous scrubbing power and double as a great heat protector when setting a hot pan on the counter or grabbing something out of the oven. They wash well and it’s nice to have something on hand that reminds you of how truly crafty you are ?
Not only are these great to have around, but this is another great project for anyone learning how to knit. This knitting pattern uses very basic stitches and I’ve made a complete how-to video showing every single step! Learn to cast on, knit, purl, cast off and work in the ends when you are finished. All you need to do is press the ▶️ button to start watching.
Learn how to knit and make a lovely dishcloth!
If you’re learning how to knit, this is a great project to learn on. Even if it doesn’t turn out perfectly, you still have a useable item. And if you do know how to knit already, it’s a great way to use up the left overs from your stash. And who couldn’t use an extra dishcloth or two anyways.
Want to make a monthly contribution, avoid ads and pop-ups, and get instant, PRINTABLE downloads of my patterns? Become a Member on this website! When you become a Website Supporter for $3/month, you’ll gain access to exclusive member only posts. These posts contain one click downloads of the patterns. Simply click the Download & Print button. The PDF will automatically download to your computer or smart device. You can then read it on your device or print it at your leisure. You can download as many patterns as you like for the same $3 each month. You can go to this page to learn more, become a member and support my work… Exclusive Member Area
If you are loving this and all the other free knitting patterns on this site, please consider checking out Help Support My Work page. If you can’t afford to help out financially, which I’m totally cool with btw, please consider sharing this pattern with everyone you think may be interested. I’ve included these handy dandy share buttons below. You can help promote this site with a few simple clicks!
This pattern is now available for download for a small fee/donations. You can download the ad free, printable version from a number of online retailers. You can download it from my website – Bars and Stripes Knitted Dishcloth, my Etsy shop, and Ravelry.
The repeat signs are different in this pattern than what is mentioned in the video. If you haven’t watched the video, then you can ignore the unicorn and teddy bear comments written below.
FYI – this image ♠︎ replaces in the video
This image ♦︎ replaces in the video
I’ve made the pattern so it is a square as I could get it. If you feel it’s too long (or short) add or take away ♠︎ to ♠︎ repeats. It’s a washcloth, not rocket science. The final piece can be however you like it.
I know some people (Me. I’m some people) like things to have the same motif on both sides. This isn’t one of those things. The backside isn’t terrible, just different from the front. It’s either going to offend you to the core of your being or you won’t give a fµ€k. It’s your call.
If you hold the cast on end to the back of your work and catch the yarn every other stitch, you’ll have one less end to sew in. I’ve made a quick photo tutorial showing you how to do it. You can see it here – How to Work in Ends While Knitting. I hate sewing in ends and this is a great technique to learn.
If you have any questions or comments you can send me an email through my contact page. The comment section at the bottom of this pattern is also great to post your questions. I answer them ASAP.
This pattern grants you the pleasure and profit of selling or giving away anything that you make. It does NOT give you permission to publish, print or distribute it in any format. You are NOT permitted to claim this pattern as your own. Please respect mine, and other author’s rights. You’re a huge jerky jerk if you do this and I’m certain puppy dogs don’t like you because you’re such a horrible person. How can you live with yourself???
Because even pirates and rock stars need to do the dishes, I’ve created the coolest dishcloth known to man. That’s right! A crocheted dishcloth that’s reversible with a skull and crossbones on it. Now who DOESN’T want that in their kitchen! Crazy people, that’s who.
This dishcloth is very easy to make and a great project for beginners as it uses very basic crochet stitches that are easy to master. For the tougher points, like making the teeth (simply an elongated double crochet) and the edging, there are photos and a video to help you along. Or you can keep scrolling down the page to watch it here.
Get the PDF version of the pattern from my website. A PDF file will work on any device (iPad, tablet, smartphone, computer, etc.) however you will need Adobe Reader to open and view the file. This is a free program which can be downloaded here – http://get.adobe.com/reader/
Liking the free patterns and would like to see more? Consider supporting my work with a small donation through PayPal or by making a purchase of any of my hand made items. You can do both by going to this page – Help Support My Work. Clicking and sharing this pattern, and my other patterns, on social media also helps me out immensely. I’ve provided links above that enable you to do so easily.
Things you need:
Size 4.25 crochet hook (Size doesn’t really matter but if you use a larger hook, the dishcloth will be larger, and with a smaller hook, it will be smaller)
Row 7: 11 dc, ch 1, skip next st, 7 dc in each dc (click that link or scroll down the page to see photos to help you along) st below, ch 1 skip next st, 12 dc. Ch 2, turn.
With right side facing, Bsc (backwards single crochet) around edge. Bsc between every 2nd dc along the top and bottom edges and around each dc and ch 2 post along the sides. Not sure how to do a backwards single crochet? Watch my how-to video on YouTube here: Crochet Edging for Dishcloths.
Hints and tips:
Use any cotton yarn that you like. Cotton only! Acrylic doesn’t work well for dish washing, and wool will felt and look pretty disgusting after a while. Also, I’ve written the pattern to use less than one ball of the most common cotton yarns available in big box stores (one starts with a “W”). These make great gifts that are extremely affordable to make.
When skipping a stitch you may be making a dc in either a ch or a dc. St is used regardless to make the pattern easier to read.
Hold the starting yarn end behind the your work when making the edging. That way you only have the final end to sew in when done.
You can make the edging in a different colour for a bit of extra pizzazz. I don’t because I strongly dislike sewing in ends. An extra colour means extra work ?
Socks are one of those things that you can make as individual as you are. Made in the round on 4 double pointed needles, it may seem intimidating at first, but really it’s not. And with a little practise you’ll get just as hooked as me.
If you are just getting started one standard ball of yarn, like the kind you can get at Walmart, should be enough to make a pair of ankle socks as pictured above. Choose an acrylic yarn or a blended worsted weight. You can use wool, but cleaning them may be a hassle (shrinkage) and cotton yarn doesn’t stretch enough to make a comfortable pair of socks. It also gets up your nose when working with it. Just want full disclosure here ?
To cast on, I cast all the stitches on one needle, then take the first 1/3 of the stitches and slip them onto a free needle, then take the last 1/3 of the stitches and put those on another needle, leaving the remaining 1/3 on the original needle.This method helps me to not twists my stitches. I then start to knit in the round.
Included with this pattern are photos of every step showing how to graft the toe, or sewing the toe stitches together. Not only does this technique work for socks, but it is the same procedure for grafting the stitches for mittens. If sone correctly, it makes for a nearly perfect seam. Keep scrolling down the page to see the instructions and pics.
This pattern is available as a read online only. No download is available. Sorry. There are so many sock patterns already, I’m sure a quick search will find one you can download.
A quick tip about working with double pointed needles (DPN). I find that using wood or bamboo a bit better than working with the metal needles. Sometimes, when working with the metal needles, you’ll find that you get a line that runs the length of your sock where you start working on a new needle. For some reason, and for me, using bamboo prevents this.
Also, check your tension first! I use a size Size 7 needle (Size 4.5 if your Canadian) with worsted weight yarn and with the tension of:
If you are loving the free patterns, please consider making a small donation to Help Support My Work! If you are unable to do so, I totally understand. Sharing this and other patterns you like with others on your social media or through email, helps me too. I’ve provided handy links above to help you do just that ?
10 stitches = 2 inches
14 rows = 2 inches
Depending on how tight you knit you may need larger or smaller needles. If you’ve knitted before you probably have a good idea of what needles you need.
There needs to be some stretch to be able to get them on.
Rounds 1-15: K2 P2
Rounds 16-17: Knit
Heel flap:
Slip last 9 stitches from round 17 to free needle, knit next 9 stitches from next needle onto needle with the 9 slipped stitches from round 17. You will have four needles and will look like this:
Transfer the three stitches on the two needles onto the back needle. Split these 18 stitches between two needles. It will look like this:
You will work these split 18 stitches later to form the top of the foot.
Turn your work. You are now creating the heel flap from the slipped stitches and will work in rows along the 18 stitches that are on the single needle.
With the wrong side (Purl side) facing you. Purl the row. Turn.
With the right side (Knit side) facing you. Knit the row. Turn.
Repeat stocking knit (Purl one row, Knit one row) until the flap measure approximately 2 1/2 inches ending with a Purl row. Turn.
With right side (Knit side) facing you K8 stitches, K2 tog, K8. Turn. (17 stitches on the needle)
Pick up 10 stitches along heel flap to form the gusset. Transfer the 18 held stitches to one needle. Knit the 18 held stitches. Pick up 10 stitches along heel flap to form gusset.
K4 stitches of heel. Slip remaining 5 stitches onto next needle. It will look like this:
Your needles will hold:
15 stitches side of foot
18 stitches top of foot
14 stitches side of foot
Next 2 rounds: Knit.
Next round: K12, K2tog K1 K18 K1 K2tog K11.
Next 2 rounds: K45
Next round: K11, K2tog K1 K18 K1 K2tog K10.
Next 2 rounds: K43
Next round: K10, K2tog K1 K18 K1 K2tog K9.
Next 2 rounds: K41
Next round: K9, K2tog K1 K18 K1 K2tog K8.
Next 2 rounds: K39
Next round: K8, K2tog K1 K18 K1 K2tog K7.
Next 2 rounds: K37
Next round: K7, K2tog K1 K18 K1 K2tog K6.
Next round: K35
Repeat the last round (K35) until measures the length you want less 2 1/2 inches. To measure lay the sock flat and measure from the needle holding the side gusset stitches to the back of the heel.
Transfer stitches onto two needles. 7 stitches and 8 stitches on each needle.
Break yarn leaving enough to graft toe and sew in ends. 12 inches is plenty.
Graft toe:
With a darning needle, insert the needle through the front loop of the first needle as if to PURL.
Insert needle through the stitch on the back needle as shown. Drop this stitch.
Insert the needle through the back loop of the first stitch AND through the stitch of the next stitch as if to PURL. Drop the first stitch.
Insert the needle through the stitch on the back needle as if to PURL. Drop this stitch.
? Insert the needle through the back loop of the next stitch on the front needle and the front loop of the next stitch as if to PURL. Drop the first stitch.
Insert the needle through the stitch on the back needle as if to PURL. Drop this stitch. ?
Repeat from ? to ? until there are no stitches left on either needle.
Pull the yarn tight.
Toe is now grafted.
Make another sock to match!
Extra Sock Knitting Tips:
Check your tension first! There’s nothing more disappointing than putting a bunch of effort into a project and then having it turn out to be the wrong size. The gauge of the rows is not so important for this project as you can make it to fit any length of foot. The number of stitches per inch is VERY important! Make sure your gauge is correct.
Work in your ends instead of just knotting them off. Knots can make your foot sore when you step on them or if they rub on your toe.
This pattern can make any size sock up to about a man’s size 10 or a woman’s size 11.
This pattern will make ankle length socks. To make a longer sock like these purple ones at the beginning of this post, just knit more plain rows (rows 16-17) before you start to make the heel flap. If you want a sock that will fit further up the calf you will need to cast on more stitches and then decrease evenly to the number of stitches required to make the foot. This takes some tinkering and can be hard if you’re new to sock knitting.
A good point to remember if you are making a larger size sock has to do with decreasing stitches for the gusset. A good rule of thumb is to decrease to the amount of stitches to the amount you originally cast on. For example if you are making an ankle sock to fit a larger size foot, you can cast on 40 stitches, make the heel flap 1/2 inch longer, pick up 12 stitches along each side of the foot for the gusset and decrease stitches until you are down to 39 stitches around the foot.
And if you are making a larger sock, and this is from personal experience, write down how many stitches you cast on, how long you make the heel flap, and how many stitches you pick up along the edge. It can be difficult to recall the numbers if you have to leave the project for a while.
And for the sake of a little shameless self promotion…if you learn how to knit socks you can also knit these sheep slippers. You can read the pattern online here Learn to Knit Adult Sized Sheep Slippers. There are lots of photos and detailed descriptions on how to make them.
If you are enjoying the free patterns and picture tutorials, then please share my work! Those handy little icons along the side or bottom of the page let you do it easily and it helps me so much. If you’d like more information on how you can keep things free, learn how you can Help Support My Work.
Like all of my patterns you have my permission to sell and/or give away the slippers that you make using this pattern. You are NOT permitted to reprint this pattern in any form unless you have obtained my written permission to do so. If you would like to link back, that always awesome and feel free to do so. Happy knitting!
What every overly pretentious bottle of wine needs – a hipster sweater! Dress up that cheap bottle of $8 wine for your next hoity-toity dinner party. I’m nearly certain no one will notice you cheaped out and the sweater alone will wow them into a false sense ostentatiousness!
While this project looks complicated, in truth, cable stitches aren’t that difficult to master. It’s VERY repetitive as you can see by the instructions below. Once you see the pattern forming, you’ll know when to pull your stitches either to the front or the back of your work. That’s all you do with a cable needle. It’s a smaller needle that holds, then let’s you work the stitches in a different order to form braids, or in this instance, cable patterns. If you’re not sure how to cable, I provided a simple explanation how to do it and linked the abbreviations C2BC2F, TS, etc. to these descriptions. There are also a couple videos I added showing how to do the stitches. I’m assuming this isn’t your first knitting project and know knitting basics.
I made this a free pattern because it’s a simple project to learn how to cable knit if you’ve never done it before. It uses less than a standard ball of worsted weight yarn and buttons are optional. The cozy doesn’t have button holes and is simply sewn up to form a tube. You can add buttons if you wish. Being of the lazy ilk, I glued mine on ?.
Also, leave a long length of yarn when starting to cast on. Eighteen inches or so should suffice. You can use this extra yarn to sew up the cozy and save on sewing in ends. No matter how long I’ve been knitting and crocheting I still hate sewing in ends and will try to save everyone from this tedious task whenever possible.
Like the majority of the patterns I’ve written, this pattern is available as an instant download on my website. You can download the PDF version for free at this link: Hipster Wine Cozy or Koozie.
If you are enjoying the free videos and patterns, then please share my work! Those handy little icons along the side or bottom of the page let you do it easily and help me more than words can say! If you’d like more information on how you can keep things free, learn how you can Help Support My Work.
Next row: K3. Pick up a stitch (increase made). K10. Pick up a stitch. K3.
Next row: Knit across.
Next row: K4. Pick up a stitch. K10. Pick up a stitch. K4.
Next row: Knit across.
Next row: K5. Pick up a stitch. K10. Pick up a stitch. K5.
Next row: Knit across.
Next row: K6. Pick up a stitch. K10. Pick up a stitch. K6.
Next row: Knit across.
Next row: K7. Pick up a stitch. K10. Pick up a stitch. K7.
Next row: Knit across.
Next row: K8. Pick up a stitch. K10. Pick up a stitch. K8.
Next row: Knit across.
Next row: K9. Pick up a stitch. K10. Pick up a stitch. K9.
Next row: Knit across.
Next row: K10. Pick up a stitch. K10. Pick up a stitch. K10.
Next row: Cast off.
TS – Twist Stitch
Transfer the next stitch onto a cable needle and hold the stitch to the FRONT of your work. Knit the next stitch. Knit the stitch from the cable needle.
C2B – Cable 2 Back
Transfer the next 2 stitches onto a cable needle and hold the stitches to the BACK of your work. Knit the next 2 stitches. Knit the two stitches from the cable needle. For photos showing how to do this, click this link. Scroll to the bottom of the page.
C2F – Cable 2 Forward
Transfer the next 2 stitches onto a cable needle and hold the stitches to the FRONT of your work. Knit the next 2 stitches. Knit the two stitches from the cable needle. For photos showing how to do this, click this link. Scroll to the bottom of the page.
Sl St K1 PSSO – Slip Stitch Knit 1 Pass Slipped Stitch Over
Transfer the next stitch onto your other knitting needle. Knit the next stitch. Pass the held stitch over the stitch you just made. Kind of like lassoing the stitch you just made with the stitch you transferred over to the other needle.
Pick up a stitch
Pick up the strand of yarn between the two needles and place it on the needle you are knitting your stitches from (If you’re right handed it’s the needle in your left hand. If you’re left handed it the needle in your right hand). Knit this new stitch. You can see pics of how to do this here – Picking up Stitches.
The pattern itself is very easy to do and definitely one that a person new to crocheting could follow. I’ve also provided the pattern with two different edges. My personal preference is to end it with a backwards single crochet, but a single crochet in each stitch and row will also work.
If you are new to crocheting, I’ve included links to points in the video to help you with specific rows and stitches. If you’d like to watch the video from the beginning you can use this link: Crochet a Dishcloth or you can scroll down to watch the video from this page. If you’d like to download the ad free version of this crochet pattern, you can download it for a small fee/donation from my website: Crochet a Dishcloth.
To help you with some of the more tricky parts, all the rows (and a few of the stitches) are clickable links that will take you to the correct point in the video that demonstrates exactly how to do it. The links will take you off this site and on to YouTube. If you want to watch the video here, scroll to the bottom of the page to view it.
Enjoying the free videos and patterns and would like to see more? Then please share my work! Those handy little icons along the side or bottom of the page let you do it easily and help me immensely ?. If you’d like more information on how you can keep things free, learn how you can Help Support My Work.
Row 1: Sc in 4th ch from the hook. *Ch 1, skip a ch, sc in next ch.* Repeat from * to * until the end of the chain. Ch 2, turn. (20 sc) If you have too many chains see how to fix that here: How to Undo Chain Stitches.
Row 2: Sc in the ch 1 space. *Ch 1, sc in next ch 1 space.* Repeat from * to * until the end of the row. Sc in the ch 4 space from the beginning chain. Ch 2, turn.
Row 3:Sc in the ch 1 space. *Ch 1, sc in next ch 1 space.* Repeat from * to * until the end of the row. Sc in the ch 2 space from the previous row. Ch 2, turn.
Repeat row 3 until the dishcloth is square or the desired length.
Edging:
Single Crochet (White dishcloth as shown above):
Row 1: Sc in each row along the left edge of the dishcloth. 3 sc in the corner st. 1 sc in each sc along bottom edge. 3 sc in corner st. Sc in each row along the right edge of the dishcloth. 3 sc in the corner st. 1 sc in each sc along top edge. Finish off.
Backwards Single Crochet (Purple dishcloth as shown above):
Row 1: Complete 1 bsc (backwards single crochet) in every 2nd stitch of the row you just made. 1 bsc in the corner st. 1 bsc in every 2nd row along the right edge of the dishcloth. 1 bsc in the corner st. 1 bsc in every 2nd st along the bottom edge of the dishcloth. 1 bsc in the corner st. 1 bsc in every 2nd row along the left edge. 1 bsc in the corner st. Finish off.
How to do a bsc (backwards single crochet):
Here’s the video that can show you how. Keep scrolling down the page to see the pictorial how-to.
Unlike regular crochet stitches and instead of working from right to left in regular crochet (if you’re right handed), you’re going to work from left to right.
Step 1: Insert the hook from front to back in the next st.
Step 2: Hook the yarn and draw the loop through the front of your work.
Step 3: Hook the yarn and draw through the two loops. Pretty simple, huh?
You can adjust the size as you see fit. I prefer a smaller dishcloth but you may like it larger. You can either add more chains at the start of the cloth or you can make more rows. Either way will work but remember to buy more yarn if you want it larger. You can also use a larger size hook to make the stitches looser.
And as promised, here is the complete step-by-step video for you to watch.
I’ve been asked by a number of people to knit them slippers that are a little more snug. A surprising number of people like to sleep with slippers on and have a difficult time finding ones the don’t keep coming off. Now, I can’t guarantee that these will stay on your feet all night but with the extended cuff, these knitted adult bootie slippers will stay on much better than any of the other knitted slippers that I make. This particular knitted slipper design fits feet that are a woman’s size 6 – 11 and a man’s size 5 – 10. I was going to make them for larger and smaller sizes, but there was no demand for it ?
Don’t forget to show your support and share this pattern with your friends and family on social media. These links make it super easy to do.??
This is also a great pattern to practice your knitting stitches. In particular, picking up stitches and working on double pointed needles, AKA working in the round. Double pointed needles seems very intimidating but really it’s the same as regular knitting needles; you just don’t flip your work back and forth. If you’ve never done it before, don’t worry! In the tutorial below I show every single step including how to pick up the stitches for the heel and cuff. Once you watch how it’s done you’ll wonder why you never did it before.
If you need a more detailed video that shows you each step from casting on to sewing in the ends, scroll to the bottom of the page. You can watch the video without leaving this page. You can also download the ad free version of this pattern for a small fee here – How to Knit Adult Booties, on Ravelry or from my Etsy Shop.
Another way to avoid ads and pop-ups, get instant, PRINTABLE downloads of this pattern and others, is by becoming a Member on this website. When you become a Website Supporter for $3/month, you’ll gain access to exclusive member only posts. These posts contain one click downloads of the patterns. Simply click the Download & Print button. The PDF will automatically download to your computer or smart device. You can then read it on your device or print it at your leisure. You can download as many patterns as you like for the same $3 each month. You can go to this page to learn more, become a member and support my work… Exclusive Member Area
If you are having a tough time finding what you need to make these slippers, click any link below to have all your supplies devoured right to your door.
250 gr of worsted weight yarn (usually this is less but better to have too much).
Break yarn and draw yarn through the stitches to form the toe.
Form Heel:
Need a bit of extra help with the heel and cuff? Scroll to the top of the page for a shorter video demonstrating where and how to do it.
With right side of the slipper facing you, pick up 14 sts on one of your double pointed needles along the sole of the slipper. Work the stitches with another of your double pointed needles.
Row 1-4: Knit across.
Row 5: K2tog K10 K2tog. (12 sts)
Row 6-7: Knit across.
Row 8: K2tog K8 K2tog. (10 sts)
Row 9-10: Knit across.
Row 11: K2tog K6 K2tog. (8 sts)
Row 12-13: Knit across.
Row 14: K2tog K4 K2tog. (6 sts)
Row 15-16: Knit across.
Row 17: K2tog K2 K2tog. (4 sts)
Row 18-19: Knit across.
Row 20: K2tog twice. (2 sts)
Row 21-22: Knit across.
Keeping the two stitches on your double pointed needle, pick up 36(36, 36) stitches to form the cuff. Pick up 17 stitches down one side, evenly spaced, along the length to where you knitted two together. Starting at where you knitted two together along the other edge, pick up another 17 stitches, evenly spaced. There will be 36 stitches total.
Row 1-10: *K2 P2* Repeat from *to* 7 more times. 8 times total for matching ribbed effect.
Row 11-13: Knit around.
Cast off loosely.
Make another slipper to match. Sew up seams and work in ends.
If you like the free videos and patterns, then please share my work on social media! Those handy little icons along the top of the page and embedded in this and all my patterns let you do it easily. It’s quick and easy for you and helps me immensely! ? If you’d like more information on how you can keep things free, learn how you can Help Support My Work.
Because it seemed wrong to not have the children’s version of this knitting pattern, I did all the math and here it is! I’ve made the pattern fit children’s feet from a small size 5 up to a teen size 5. That means you can make a slipper to fit feet that measure 5 1/4″ to 9″ long. Anything larger than that can be made with my other free pattern entitled How to Knit a Pair of Adult Slippers. And just like that pattern, I’ve included links to all the knitting stitches you need to make the slippers. By clicking the links you’ll go to my YouTube channel and I will show you how to do the required stitch or technique. The ad free download for this pattern is available here for a very small fee from this website – How to Knit Children’s Slippers, Etsy and Ravelry.
Another way to avoid ads and pop-ups, get instant, PRINTABLE downloads of this pattern and others, is by becoming a Member. When you become a Website Supporter at $4/month, you’ll gain access to exclusive member only posts on Buy Me A Coffee. You can download as many patterns as you like for the same $4 each month. You can go to this page to learn more, become a member and support my work… Exclusive Member Area
Like the free videos and patterns? Then please share my work on social media! Those handy little icons above let you do it easily and help me so much. If you’d like more information on how you can keep things free, learn how you can Help Support My Work and keep the site free for everyone.
A couple of quick notes before you get started…be sure to use the correct size when ending the toe. The number of stitches knitted together differ depending on the size. Be sure to find the one that is for the size of slipper you are making. Scroll down the page to find the size you need. The same holds true for forming the heel flap. Be sure you pick up the right number of stitches or the heel flap won’t be the right length.
Without further ado, let’s get knitting! And in case you need a little extra help, there’s a complete step-by-step instructional video here:
Things you will need:
If you are uncertain or having trouble finding what you need to make these slippers, clicking any of the links below will show you exactly what you need. And if you decide to order through Amazon, it will be delivered right to your door and help support the hosting costs of the website (I do get a small commission from sales through Amazon).
You can try this product to keep your slippers from sliding on slick floors.
200 gr of worsted weight yarn (usually this is a lot less but better to have too much. I like to use Red Heart because of price, wearability, ease of maintenance, and it’s easy to find online and IRL).
Next Row: With right side of work facing you P1 *(K1 P1) Repeat from *2 (2, 3, 3, 4, 4, 4) more times K9 (K9, K10, K10, K11, K11, K14) *(P1 K1) Repeat from *2 (2, 3, 3, 4, 4, 4) more times. P1 {This is K1 P1 Ribbing.}
Next Row: With wrong side facing you *(K1 P1) Repeat from *3(3, 4, 4, 5, 5, 5) more times K7 (K7, K8, K8, K9, K9, K12) *(P1 K1) Repeat from *3 (3, 4, 4, 5, 5, 5) more times.
Repeat these 2 rows for 12 (12, 16, 16, 18, 18, 20) more rows. 14 (14, 18, 18, 20, 20, 22) rows ribbed TOTAL.
End toe for size 5-6 and 7-8
Next Row: With right side facing K2tog 11 times. K1. (12 stitches remaining)
Next Row: P5 K3 P4
Next Row: K2tog 6 times. (6 stitches. remaining)
Next Row: P3 K1 P2
Last Row:Draw yarn through loops (AKA gather stitches) and pull together to form toe. Sew seam up to start of ribbed stitches.
End toe for sizes 9-10, and 11-12
Next Row: With right side facing K2tog 7 times. K1. K2tog 6 times. K1. (15 stitches remaining)
Next Row: P6 K4 P5
Next Row: K2tog 7 times K1. (8 stitches remaining)
Next Row: P4 K2 P2
Last Row:Draw yarn through loops (AKA gather stitches) and pull together to form toe. Sew seam up to start of ribbed stitches.
End toe for size 13-1 and 2-3
Next Row: With right side facing K2tog 16 times. K1. (17 stitches remaining)
Next Row: P7 K4 P6
Next Row: K2tog 8 times K1. (9 stitches remaining)
Next Row: P4 K2 P3
Last Row:Draw yarn through loops (AKA gather stitches)and pull together to form toe. Sew seam up to start of ribbed stitches.
End toe for sizes 4-5
Next Row: With right side facing K2tog 9 times. K1. K2tog 8 times K1. (19 stitches remaining)
Next Row: P7 K6 P6
Next Row: K2tog 9 times K1. (10 stitches remaining)
Next Row: P4 K3 P3
Last Row:Draw yarn through loops (AKA gather stitches)and pull together to form toe. Sew seam up to start of ribbed stitches.
To form back flap of heel:
For sizes 5-6, 7-8, 9-10, 11-12
With right side of work facing you pick up 10 sts between the fold lines that mark the sole of the slipper.