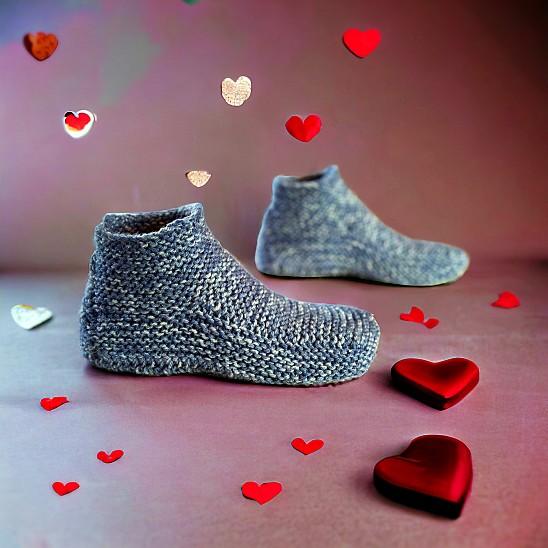
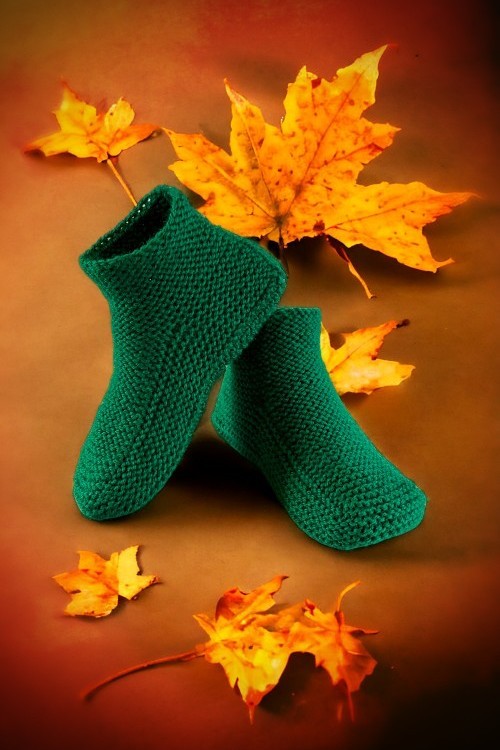
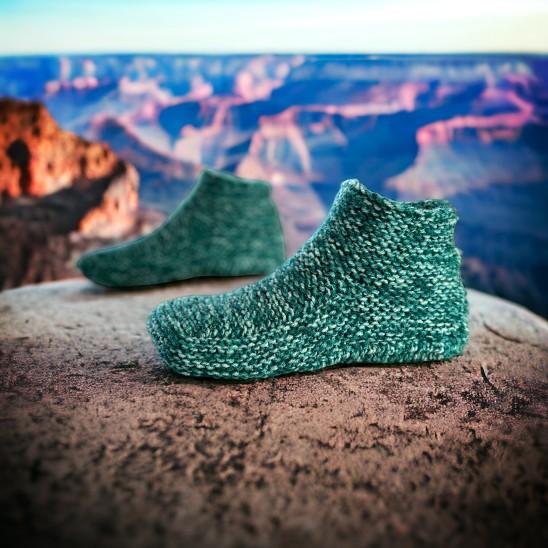
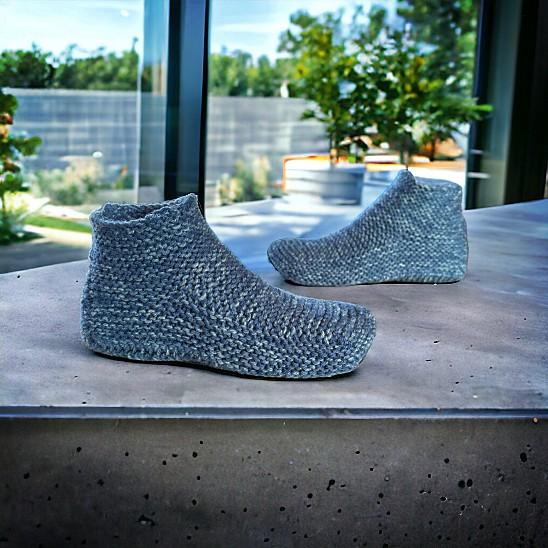
This is the original version of my very popular Knitted Owl Slipper Pattern, Ultra Thick Slip On Bootie Slippers and Ribbed Moccasin Bootie Slippers for Adults. I realized that not everyone may want owls on their slippers. That a more plain slipper was something that any man, woman or child would wear as “knitted slippers” without fear of judgement (and if you’re so inclined to experience that lack of judgment, you can now buy a finished pair here – Adult Moccasin Slippers or in my Etsy shop). I’m not sure about someone who’d judge someone wearing owl slippers, but that’s really not the point. And oh yeah. The child sizes are finished! If you would like to knit up a quick pair of the child version, you can read that pattern here – FREE Knitted Slipper Pattern for Children.

Because of the request by many that they would prefer a PDF download, it’s DONE! You can download this pattern for a small fee/donation. You can download it from a number of places. In particular, my Shopify site here – Adult Moccasin Slippers with a Cuff. You can also get it at a number of other online book retailers such as Ravelry, LoveCrafts, and Etsy. I also have versions available on Amazon as a paperback and for Kindle.


This isn’t a pattern for beginners, but if you know how to knit a stitch, pick up stitches and knit two stitches together, you should be okay. I used a very different technique involving multiple sets of needles. I included photos and now a complete how-to video to demonstrate how I’m using the extra set and it totally works! Trust me.
Another way to avoid ads and pop-ups, get instant, PRINTABLE downloads of this pattern and others, is by becoming a Member. When you become a Website Supporter at $4/month, you’ll gain access to exclusive member only posts on Buy Me A Coffee. You can download as many patterns as you like for the same $4 each month. You can go to this page to learn more, become a member and support my work… Exclusive Member Area
If you enjoy this pattern and my other free online knitting patterns, please consider making a small donation or helping me out by visiting my Help Support My Work page. If that’s not possible, that’s totally fine too! Even sharing this page on your social media helps me out immensely. You can use the buttons below to do so easily.
Things You Need
If you are uncertain or having trouble finding what you need to make these slippers, clicking any of the links below will show you exactly what you need. And if you decide to order through Amazon, it will be delivered right to your door and help support the hosting costs of the website (I do get a small commission from sales through Amazon).
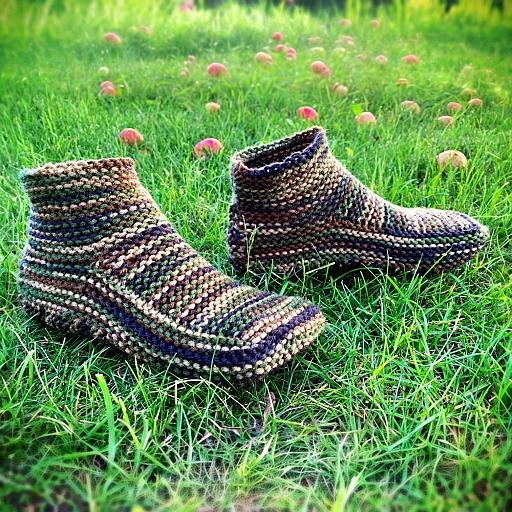
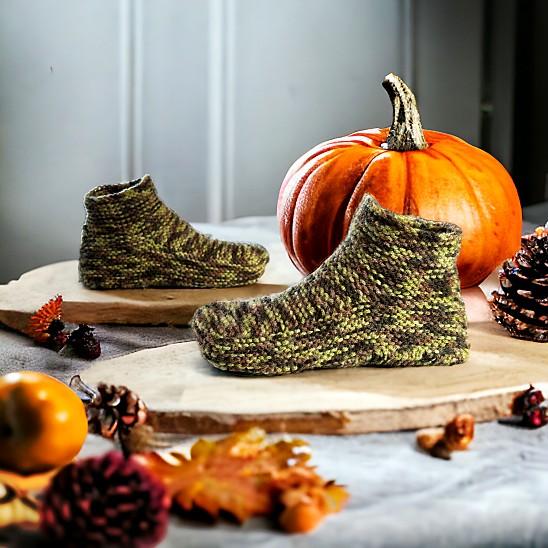
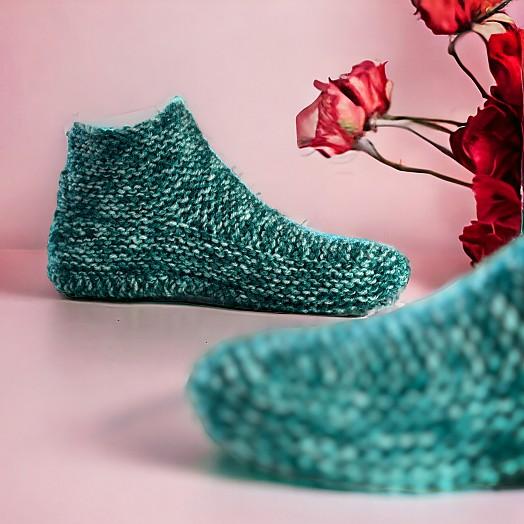
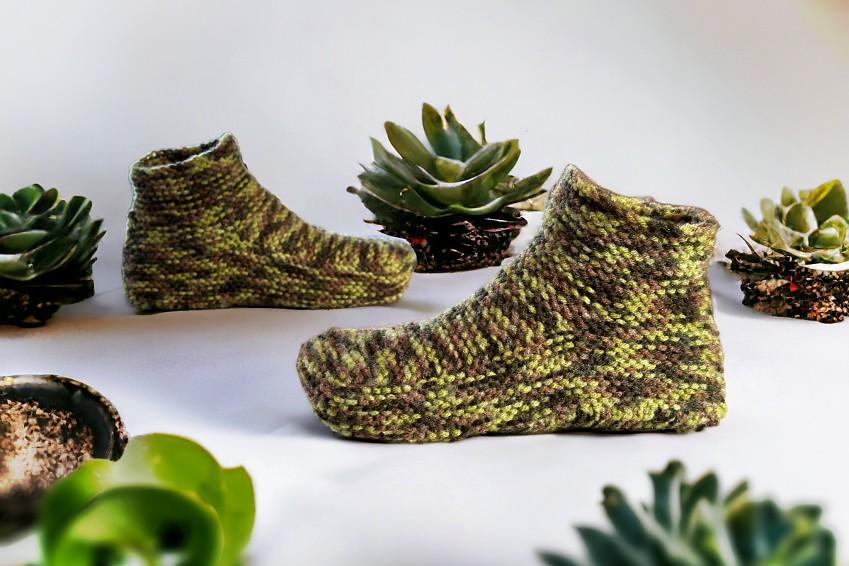
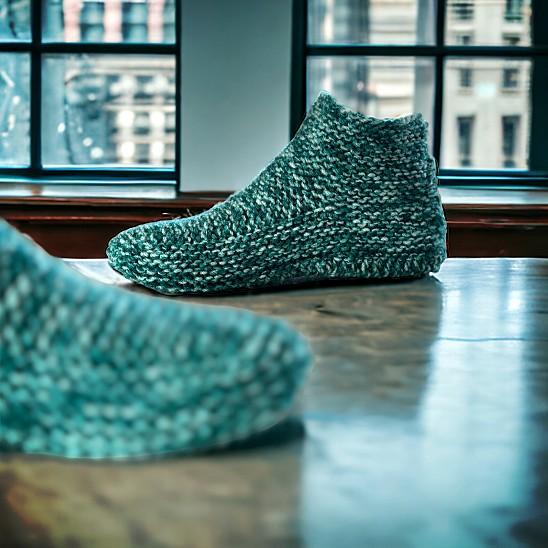
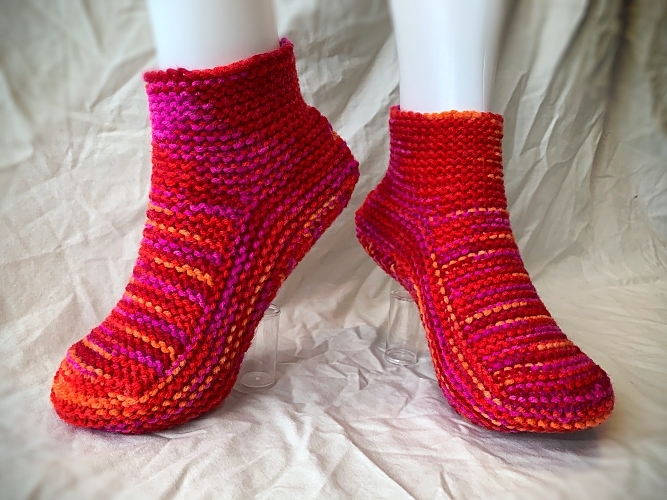
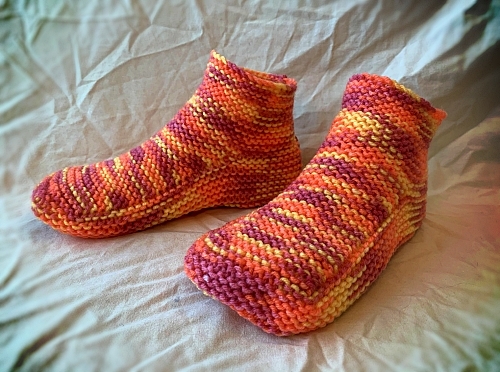
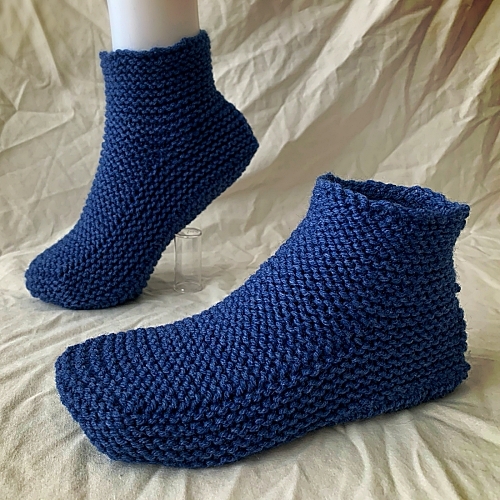
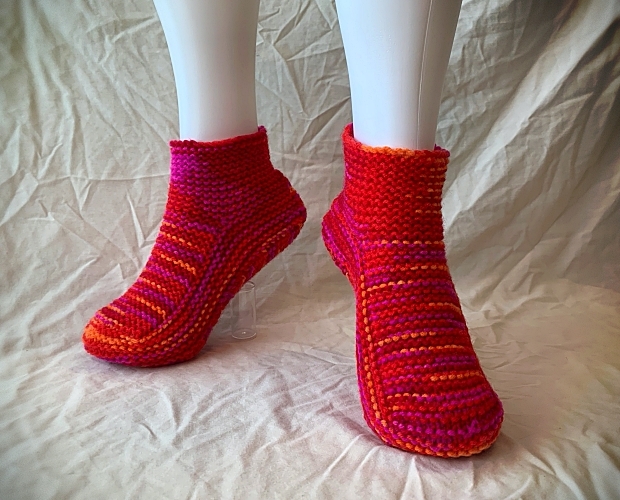
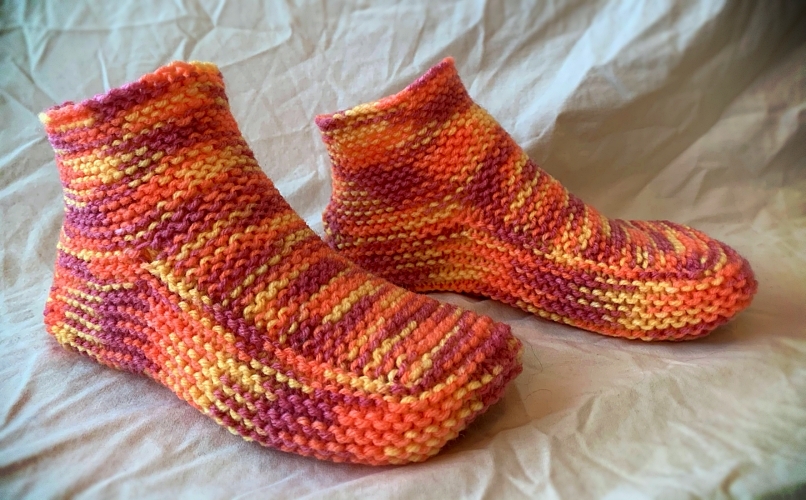
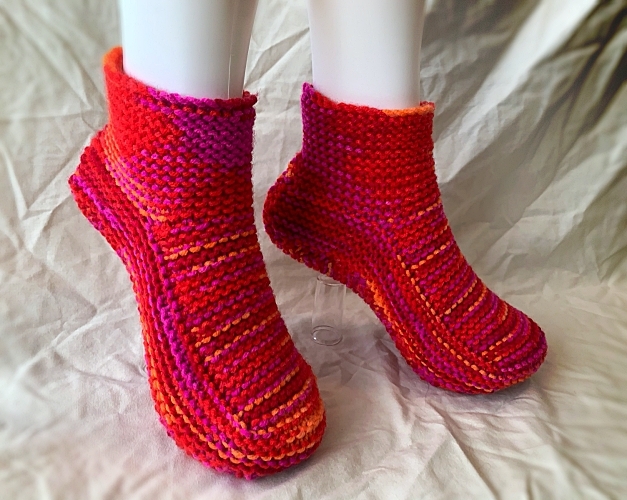
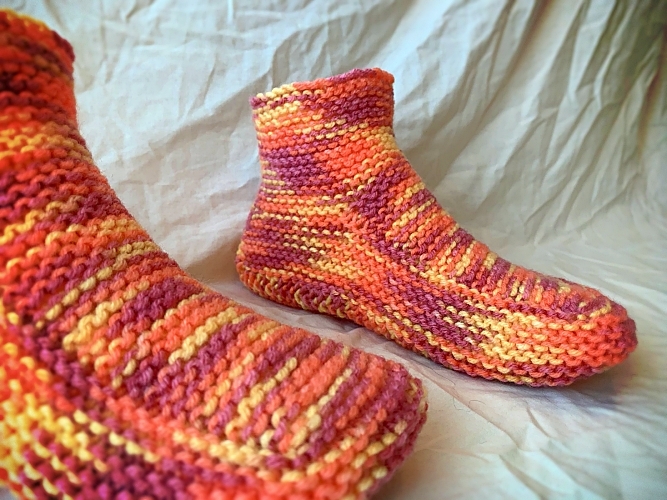
And because this pattern is so basic with no pattern of any sort, it’s a great knitting pattern to highlight the colour of your yarn. I have a weakness for variegated/shaded yarns. Don’t ask me why… My grandma did too. It must be genetic. I find the self-striping looks terrible and give it a 1/10. Would not recommend.
1 ball of worsted weight yarn (average 260 yard, 5 oz or 141 gram ball will be more than enough). I used Red Heart worsted weight yarn when designing the pattern but any worsted weight yarn will suffice.
2 sets of size 4 mm (US size 6) single point knitting needles.
Stitch holder
Tapestry needle to sew in ends. You can also use this handy tutorial to show you how to work in the ends while knitting these slippers and have less ends to work in.
Gauge
With size 4 mm (US size 6) needles or whatever size you need to obtain the correct number of stitches and rows. Be sure to check your gauge otherwise the sizing won’t be correct.
In garter stitch
4” = 16 sts
4” = 40 rows
Sizes (are written as such)
Women’s 6-7 (8-9,10-11, 12-13)
Men’s 5-6 (7-8, 9-10, 11-12)
To Begin
Cast on 36 (38, 40, 42)
Knit across for 22 (24, 26, 28) rows. Break yarn when completed last row.
Toe Flap
Next row: With RIGHT side facing, transfer the first 11 (12, 13, 14) stitches to a stitch holder. Reattach the yarn and knit the next 14 stitches. Leave the remaining 11 (12, 13, 14) stitches on the needle unworked.
The following rows are worked back and forth on the 14 toe flap stitches only!
Knit across for 42 (44, 46, 48) rows.
Break yarn. You’ll have the 14 stitches of the toe flap on your needle and the 11 (12, 13, 14) stitches you left on the needle when you started making the toe flap.
Making the Sides of the Slipper
This is where you’re going to need the extra set of knitting needles. You’ll be knitting back and forth in rows but the turn around the toe is too tight to use circular needles. For this, you’ll put the 14 toe flap stitches on one of your extra needles. It’s a little unconventional, but it works.
Next Row: With the RIGHT side facing, transfer the 11 (12, 13, 14) stitches from the stitch holder onto one of your needles. Attach your yarn and knit the 11 (12, 13, 14) stitches. Pick up 21 (22, 23, 24) stitches evenly along the edge of the toe flap. (All of these stitches are on ONE needle. (32 34, 36, 38) stitches on this needle)
With another needle, knit the 14 stitches of the toe flap. Leave the remaining 11 (12, 13, 14) stitches on the other needle unworked for now. (14 stitches on this needle)
With another needle, pick up 21 (22, 23, 24) stitches evenly along the side of the toe flap. Knit the remaining 11 (12, 13, 14) stitches on the next needle. (32, 34, 36, 38) stitches on this needle)
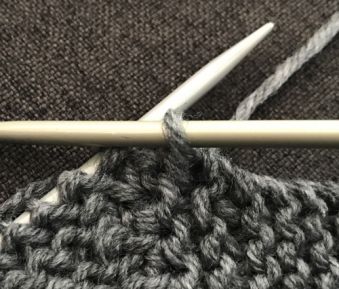
You should now have 3 needles holding stitches with all the points pointing as shown below when laid flat. You also have one spare needle to knit with. You are now going to knit in rows, back and forth with these three needles. Once you finish knitting all the stitches on one needle, move on to the next needle (the point of the needle is right there) until you complete the row.
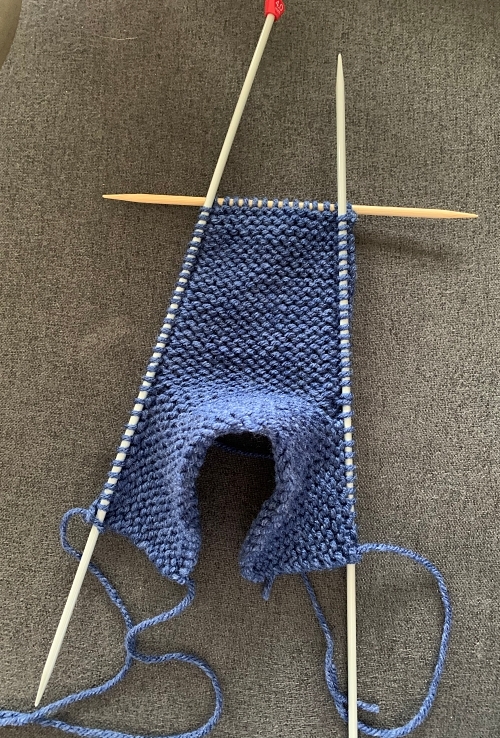
Another way to say it for the following rows, knit all the stitches forming the side of the slipper, knit the 14 stitches holding the toe flap stitches, then knit the other side of the slipper (counts as one row). Turn. Repeat.
Knit the next 10 (12, 14, 16) rows
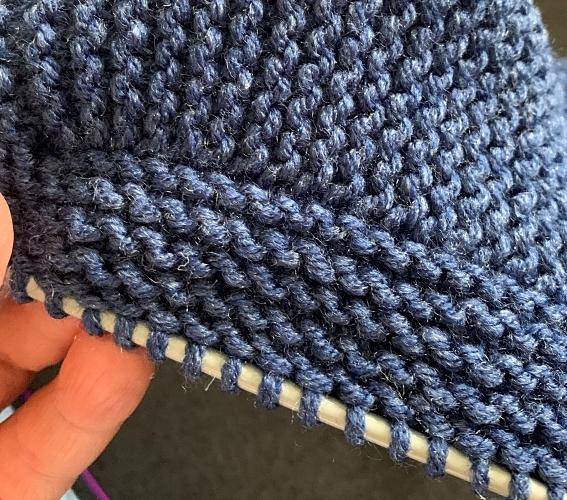
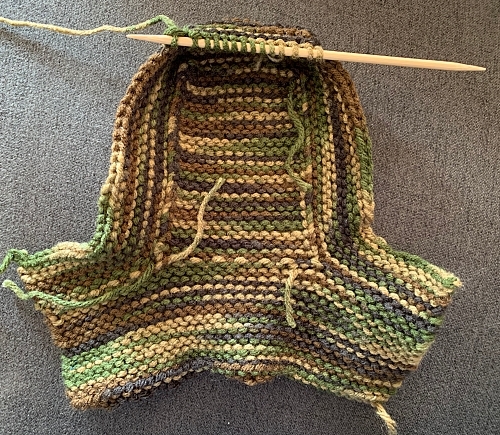
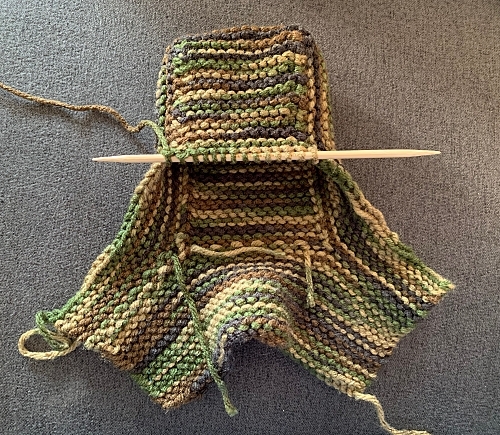
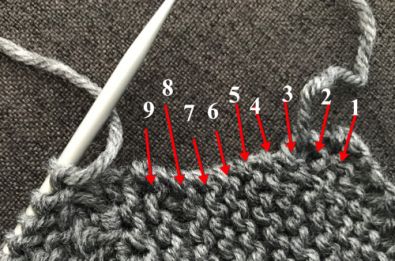
There are 5 (6, 7, 8) ridges on the tip of the toe.
The photo below shows the 5 ridges for the women’s size 6-7 or the men’s 5-6.
Next Row: With WRONG side facing. Cast off all the stitches from the first needle loosely. You’ll need to pass the last stitch from the first needle over the first stitch of the toe flap stitches (second needle).
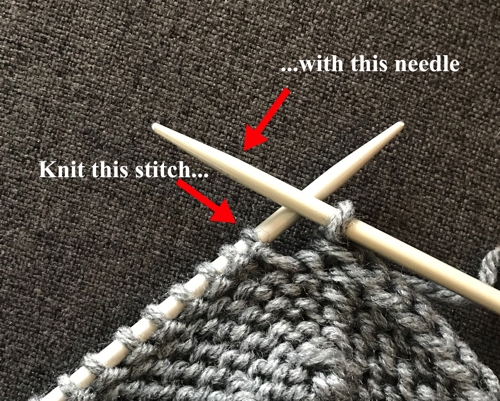
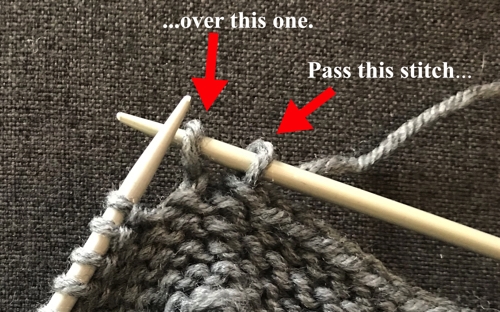
Using the same needle that now has one stitch, knit the remaining 13 stitches of the toe flap. Cast off all the stitches from the third needle loosely. Break yarn.
Please share this page!
More FREE patterns
Click the pic to read online!!


![]()
![]()


FREE Knitting Graph Paper for Colorwork Knitting


Making the Sole
If you need help with the sole, you can watch the video. It starts right where you need it to.
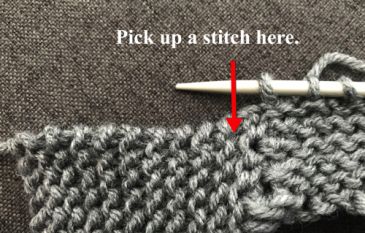
Next Row: With the RIGHT side facing, attach yarn and knit the first stitch of the cast off stitches by the toe flap (cast off stitch on the right by the point of the needle).
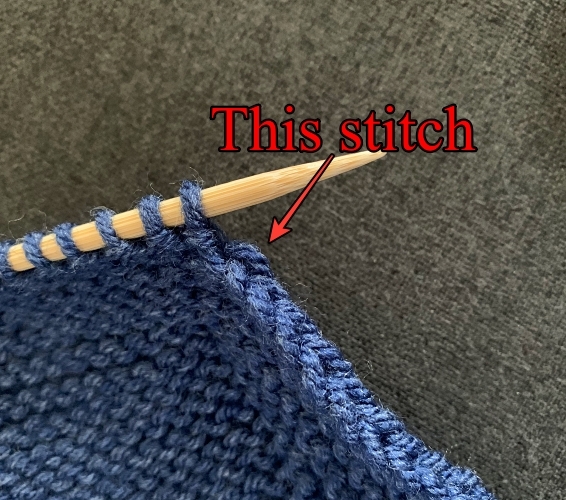
K2tog. Knit to the last 2 stitches K2tog. Pick up the cast off stitch by the point of your needle. (14 stitches).
Quick tip – wrap the yarn counterclockwise around your needle and turn it down to pull the yarn through the cast off stitch on the right. If you have a hard time doing this, you can also use a crochet hook to pull the loop through and place that loop on your working needle.
You now are working back and forth along the bottom of the foot picking up one cast off stitch on each side as you go.
Next Row: Knit across.
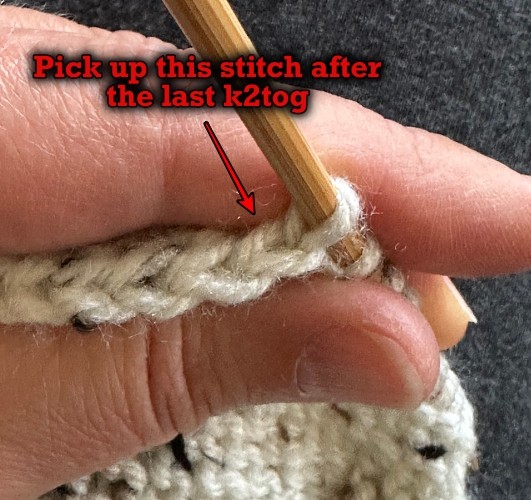
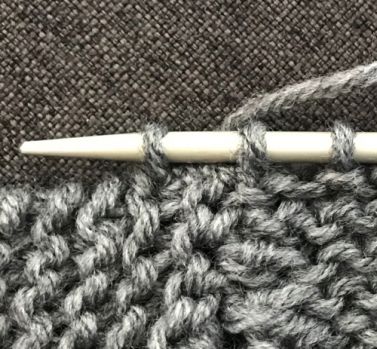
♥︎ Next Row: Pick up the next stitch of the cast off stitches. K2tog. Knit to the last 2 stitches K2tog. Pick up the cast off stitch on the other side of the slipper by the point of your needle. (14 stitches).
Next Row: Knit across ♥︎
Repeat from ♥︎ to ♥︎ down the entire length of the foot. There are equal number of cast off stitches along each side. How many rows varies depending on the size of slipper you’re making. Be sure to end with a completed knit across row.

More of My Stuff on Etsy
You can make a widget like this for your blog or website, too.
Instructions are on my website here: How to Display Etsy Items on Your Website
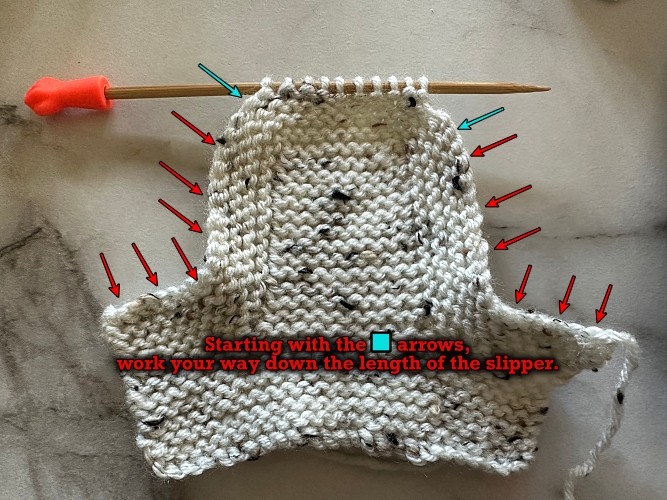
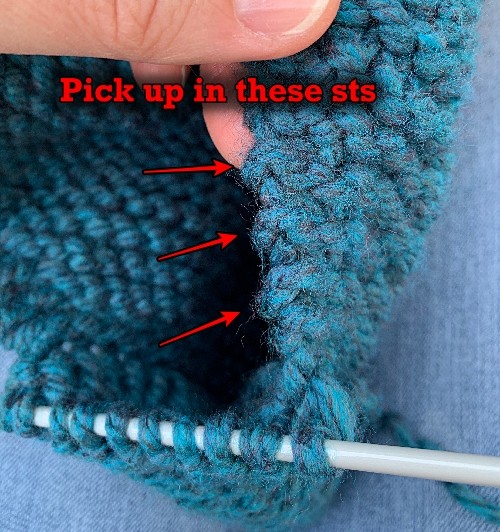
Making the Heel
You’re now going to make a small triangle to fit in the back of the heel. You’re going to fill this space in the slipper. If you need extra help you can watch the video. It begins playing at the exact spot.
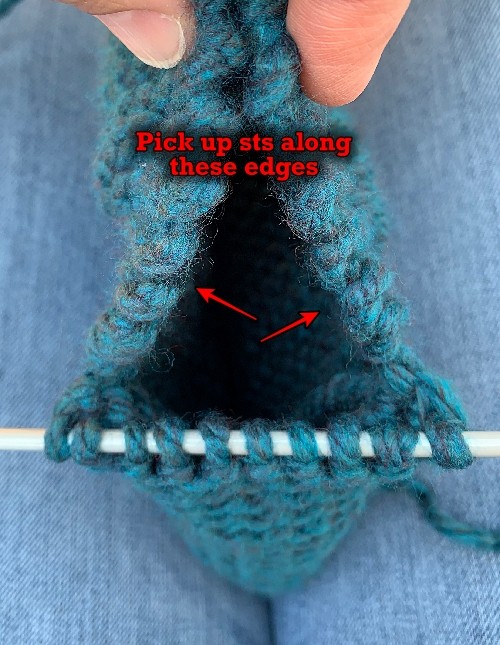
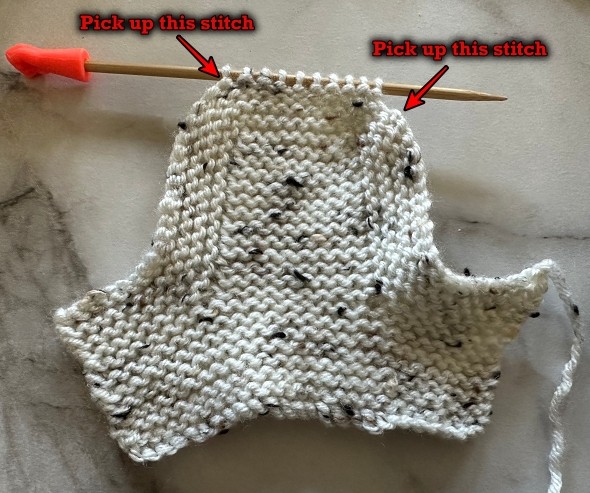
♀️ Next Row: With the RIGHT side facing, pick up a stitch in the row closest to the sole of the slipper. Count how many ridges it is for the size you are making. K2tog twice. Knit to the last 4 stitches. K2tog twice. Count downtime same number of ridges on the other side and pick up a stitch in the space beneath it. (12 stitches).
These are rows you knit to form the edges of the slipper.
Next Row: Knit across.
Next Row: Count down one ridge less than the previous row and pick up a stitch in the space beneath it. K2tog. Knit until the last 2 stitches. K2tog. Count down the same number of ridges and pick up a stitch in the space beneath it on the other side.
Next Row: Knit across. ♀️ Repeat from ♀️ to ♀️ until 6 stitches remain.
Next Row: Pick up a stitch beneath the next ridge. K2tog 3 times. Pick up a stitch in the space beneath the next ridge on the other side.
Next Row: Knit across.
Next Row: K2tog, K1, K2tog. Pass the middle stitch on your working needle over the stitch on the left. Pass the stitch on the right over the stitch on the left. (Or you can turn your work and knit the 3 sts together).
Break yarn leaving a length of yarn long enough (8ish inches) to sew up the remaining seam.
Make another slipper.
Yes, they do look a little boxy when they’re done and not on a foot. The stretch of the garter stitch allows these slippers to stretch around the contours of any foot easily.
Hints and Tips
If you want a longer cuff at the top, work more rows than stated at the beginning when you cast on.
When picking up stitches from the cast off row, be sure you’re really moving on to the next cast off stitch! It’s an easy mistake to pick up a stitch in a stitch you already picked up. If in doubt, give the needle holding the stitches a bit of a tug. You’ll see the yarn move slightly at the very back, closest to the needle. Pick up a stitch at the NEXT cast off stitch.
If you don’t have the same number of stitches on both sides when you are forming the sole, you may have picked up a stitch twice in one stitch or missed one. Don’t worry! This is fixable. You can skip one cast off stitch if you need to make it even, or pick up a cast off stitch twice on the other side. There’s enough stretch in the slipper that any puckering this causes won’t be overly visible if you’re off by a stitch or two.
Picking up the stitches evenly along the toe flap is about 1 stitch every ridge.
To speed up finishing the slippers and not have so many ends to sew in, hold the yarn ends to the back of your work as you knit.
Abbreviations
k – knit
k2tog – knit 2 together
st – stitch
sts – stitches
If you have any questions, please feel free to leave a comment below or send me your questions here. If there is a typo or stitch count that’s off, let me know in the comments! I type these out from notes I make when designing the slippers. It’s easy, and embarrassingly common for me to miss something.
To see how you can keep the free patterns coming, visiting this page – Help Support My Work! A financial donation is always appreciated but a share, like and follow on social media also helps me immensely ?


Struggling with the heel.
I have the stitches from the sole still on my needle – do I cast those off?
Do I pick up the “ridge” stitches with the same needle the sole stitches are on or do I use the other needle?
are the ridge stitches the ones I knit 2 TOG, etc? I would assume if that’s the case I need to start at the end of the row and go across the sole stitches?
Thanks for your help!
Knit back and forth across the row of sole stitches. Don’t cast anything off.
With the stitches from the sole still on your needle, pick up a stitch, knit 2 together, knit until the are 2 stitches, knit those together, pick up a stitch along the ridges.
Knit across.
Do the same thing again but this time you’re decreasing and knitting 2 together twice on each side.
If this is too complicated, form a triangle with the sole stitches. Knit 2 together, knit to the last 2 stitches, knit 2 together. Knit across on the wrong side. Repeat those two rows until your down to 2 stitches. Sew up the seams.
Is there a video for this pattern?
No there isn’t. I haven’t made videos in quite some time. It’s a lot of work with very little to gain. If there is enough interest I may start again. Reply to this comment if you’d like me to do one.
Yeah do you have a free video. I’m an idiot
It’s in the works. Like many things in my life. Maybe sometime this summer… I am in talks with another website to make a live teaching video for this very pattern. I’ll keep you posted.
Could you please explain more/ add more photos about the heel?
Thanks so much for the pattern, I am absolutely loving knitting it. I am stuck at the heel ?
Dear Janis,
Thanks a lot for the pattern, am loving knitting it. I need some more details/photo to do the heel. Can you please send?
There’s not really anymore pics I can add to the heel to explain it. What part are you not understanding?
I love the look of these slippers and all the detail you’ve included in the instructions. In one of your replies you mentioned the idea of making a video of this, which would be awesome. I hope you find some time to do that.
Thank you for the pattern I was looking for the 2 needles pattern thanks again
Hey, Janis. I fell in love with the bright yarn you used to make these slippers and have started on my own pair. I’m doing pretty well – up until I get to the knitting the heel part. I can’t quite visualize what is going on with the sts on the needle. I’m good on where to pick up sts, but I’m not clear on the knitting across and K2tog twice.
Your pattern is very clever and looks good, but there is a too much breaking the yarn and reattaching and weaving in ends. I appreciate your sharing your patterns for free, tho. This is just a bit too much work for charity slippers. I’m gonna try the Slippers like Granny Made after I finish these.
You’re making the sides of the back of the heel come together. You’re narrowing down the 14 stitches that were the sole and drawing the back edges together.
To make less ends, hold the yarn to the back of your work when you’re knitting a row on the right side. When you push the needle through to knit a stitch, place the loose end over your needle and pull it snug. Catch the loose end as you knit the stitch. Knit the next stitch as you would normally. Catch the loose end at the back of your work as described previously. Knit the next stitch as you normally would. Keep catching and skipping as you go for 10 stitches or so. I’ve never had a problem with the yarn coming out when working in stitches this way.
Tbh, I keep saying I need to make a video to demo this. It’s in my “To Do” list.
I finished the slipper by using the method many other patterns use – I picked up all the sts around the bottom of the slipper, knit a few rows back and forth and did a 3-needle bind off to finish the sole. I just sewed up the back of the heel. I do hope you find the time to video or even take more photos of the bottom of the sole finishing.
I do knit in my ends as I go. I meant no offense, just remarking that there seemed to be more places of breaking the yarn and attaching somewhere else than in other patterns I’ve seen. I mis-read the needle size and used a US4 instead of a 4mm, so the slipper is small. No worries, tho – it fits my shorter caregiver perfectly! Now I just need to make a mate. Then on to granny’s slipper. ;D
As they say, there’s more than one way to skin a cat. However you finish the sole and make it work for you is a win in my books!
No worries! No offense was taken. This isn’t like any of my other slipper patterns I’ve designed or made either and it does break and reattach the yarn a lot.
The feedback I get like yours on my patterns is very valuable and I do listen and take it under advisement. Though there are those out there who tend to complain no matter what. I ignore the demanding Karens. You can’t please everyone anyway.
I’ll see what I can do about adding more photos of the sole. This pattern is already so huge; I may wind up dividing it into 2 pages so it loads faster.
What do I click on to get the PDF of this pattern please.
There isn’t a PDF for this pattern. Because of all the photos, formatting it would take a HUGE amount of effort. Time I could be using developing new patterns (and there’s a lot I have handwritten but not published yet).
If there is enough people who want a downloadable version, I may consider creating one. Tbh, I don’t think any of my future patterns will be co-created as PDF’s. It’s too much work for something people don’t want to pay for and I can’t keep giving content away for free.
That’s understandable, I got confused as I received the email to use the word Subscibe to get the PDF version so thought it was for the pattern I was interested in.
Thanks.
There are roughly 20 older patterns you can apply it to. Just not any of my new designs.
I would like to print this slipper pattern.
I can create a PDF pattern that I can save on my computer by right clicking and highlighting the pattern and instead of printing it I save it as a PDF (I have a drop-down where I can designate what action I want to take like print to my printer or create a PDF). I don’t know if everyone has that option.
I debated what to do with this comment. Delete it entirely or address this. I’m going for the latter option.
Ya, you may be able to print it but I would like to give you the reasons why you shouldn’t. And not only my pattern, but any pattern written by any indie designer. And as you can see, I am an indie designer.
What does that mean? It means that I do EVERYTHING to make this pattern free for you to read online. I take weeks designing the pattern while I sit on my couch, making nearly countless versions of the same thing until it’s “just right”. I also take all the how-to photos when making the final version to make sure the stitch and row counts are correct. This takes weeks.
I then go into my spare bedroom, it used to be my living room couch, and set up a photo shoot. Now I use an old sheet and the foot forms I found for purchase online. I take all the pretty photos to showcase what the final piece will look like. This takes a couple hours.
I then sit at my kitchen table to take my hand written notes from the pattern design and transcribe them onto this website. If I have time, I reformat them to make up a PDF you can download. Both of these processes take a least a day.
I then download all the photos I’ve taken, and edit them. This includes cropping, resizing, using various filters and the like. I then add them to the pattern online and add them to the PDF (if there is one). This takes about 4 hours or so. It really depends on the number of photos.
Now let’s talk about the website itself. I pay to host this site and make it secure (that’s why it says https and not http. It’s extra protection for you). Because some of these patterns, like this one, have so many photos, it’s BIG in terms of bytes. That means it can take a long time to load. To make it load faster, I have upped my hosting plan, and have paid to relocate the photos and static content to other servers throughout the world closer to you (standard website stuff) but this too, costs money. In total, the cost is $90+ to run this site every month.
Now let’s talk about the 99¢ charge to download a PDF. Of that 99¢, I receive 65¢ if you download from this site or Ravelry. It’s a little less or a little more from the other retailers and 35¢ when you download it from Amazon. I have to have my patterns set at 99¢ because that’s the minimum the bigger retailers are willing to sell for and you are not permitted to undersell their price through any other venue. I think that’s a fair request on their part.
To upload to all the retailers, I need to create a cover and upload the content, the aforementioned cover and fill out all the pertinent information about the pattern to each retailer individually. This usually take another day to do.
All of this is done on weekends and after work. That’s right! I have a full time job that pays the bills. It isn’t this website. And tbh, since Covid struck I haven’t worked much. Hence why all the patterns lately. I’m stuck at home like the everyone else, looking to supplement my income.
So, ya. You can print off this page and get yourself a free pattern. I can’t stop you. But you may want to think about everything that went into creating your “free” pattern. And really…is 99¢ too much to ask?
I thank you for taking the time to comment respectfully about what it takes to make patterns available to us.
I, at one time, did download as free and convert to PDF. When I realized that I was short changing (read: cheating the designer out of their miniscule profit), I opted to purchase the patterns. Even purchasing several copies of the same pattern as gifts to fellow craftsmen.
I explain to my students what it takes to design, work and publish a pattern. (Going to post your response.) The benefits of purchasing goes beyond the cost, as once purchased it is available indefinitely. Often times free patterns disappear and are lost to the next generation of crafters.
I applaud all the designers and thank you with warm fuzzy hugs for sharing your creativity. Going to purchase this in support of your creativity.
Why? Because you took the time to respond courteously and professionally.
After 50+ years of knitting I surely don’t have a need for another slipper pattern. I do have a desire to support and encourage fellow crafters.
Respectfully yours,
Thank you so much for your kind words, respect for creators’ efforts and your purchase ?
I think everyone, including myself, has taken a pattern and printed it off to never return or give anything back. In the days before the internet, you’d photocopy your friends’ and relatives’ patterns. Not proud of that now for sure. But once you know better, you do better. We can always improve upon our past behaviors.