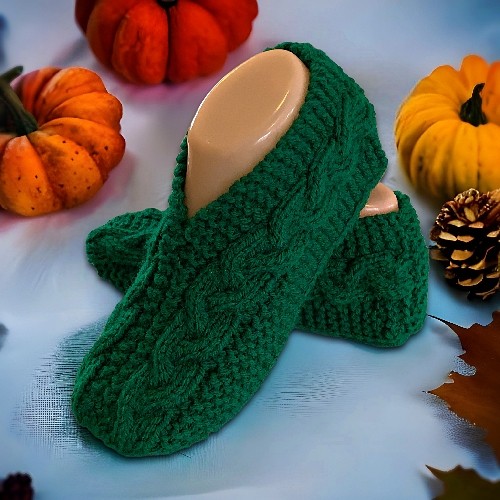
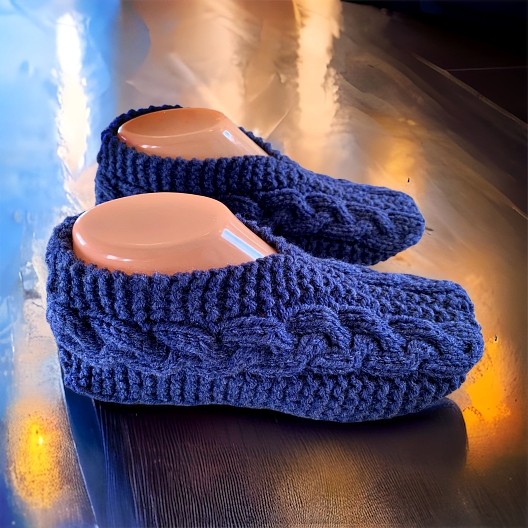
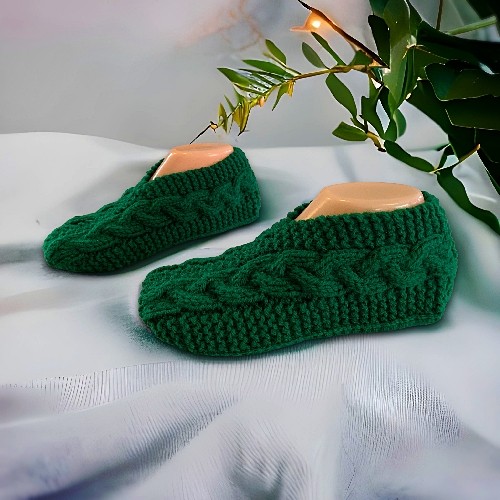
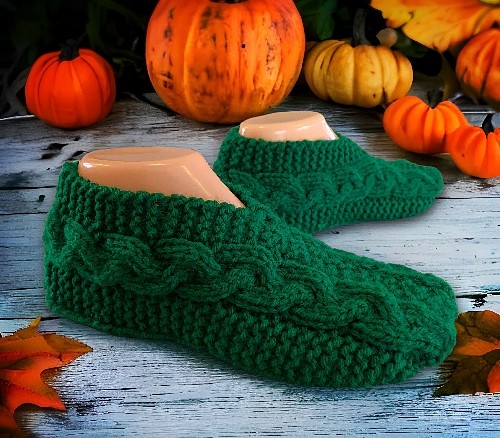
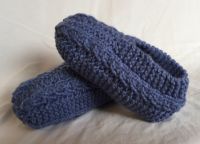
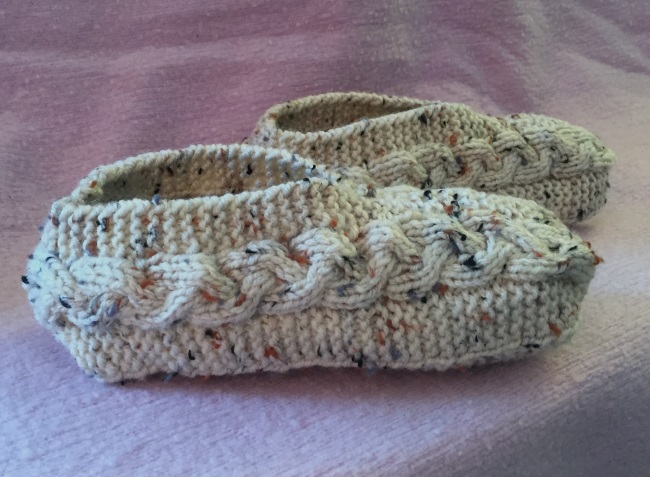
Learn to knit comfy, cozy cabled slippers. This pattern shows you how to make slippers for children from a small size 3 to large 3, and a woman’s and man’s size 4 to 12. This makes it a great project for a knitter with some experience but wanting to make something that is a little more challenging.

If you are newer to knitting and have never done cables before, I’ll show you how. In the Abbreviations section at the end of this pattern, I’ve embedded videos that show you how easy it is to do it. Please note though, in this pattern, one of the first I ever wrote, I refer to the cable as C2F (cable 2 forward) and C2B (cable 2 back). I still refer to it as such in this pattern, though now I refer to it as C4F (cable 4 forward) and C4B (cable 4 back) in my new patterns. It means the same thing. The first refers to the number of stitches you’re pulling forward or back. The later refers to the total number of stitches being used by the cable. People complain about both versions of the terminology so I add this little explanation now 😊
Not wanting to be online all the time? You can also download the ad free version of this pattern from my Shopify shop and in my Etsy shop.
Another way to avoid ads and pop-ups, get instant, PRINTABLE downloads of this pattern and others, is by becoming a Member. When you become a Website Supporter at $4/month, you’ll gain access to exclusive member only posts on Buy Me A Coffee. You can download as many patterns as you like for the same $4 each month. You can go to this page to learn more, become a member and support my work… Exclusive Member Area
If you are enjoying the free knitting patterns, don’t forget to learn more about how you can Help Support My Work. Using those share buttons down there. it is a great way to start! Letting others know about this pattern is good for everyone.
Things you will need:
If you are having a difficult time locating the supplies you need to make these slippers, click any link below to have it mail right to your door.
200 gr of worsted weight yarn (usually this is less but better to have too much).
Size 4.5 (US size 7) single pointed knitting needles or whatever size to obtain correct gauge.
Cable knitting needle
Darning needle to sew the seams and work in the ends.
Gauge:
14 rows stockinette = 2″
9 stitches stockinette = 2″
Be sure to check your gauge to obtain correct sizing!
Children’s Sizes 3 – 3
Numbers in parenthesis are written for sizes as such 3-4 (5-6, 7-8, 9-10, 11-12, 13-1, 2-3)
Cast on 29 (29, 31, 32, 34, 35, 37)
Row 1: K3 (3, 3, 3, 4, 4, 4) P1 K3 P1 K13 (13, 15, 16, 16, 17, 19) P1 K3 P1 K3 (3, 3, 3, 4, 4, 4)
Row 2: K4 (4, 4, 4, 5, 5, 5) P3 K3 (3, 4, 4, 4, 4, 5) P1 K7 (7, 7, 8, 8, 9, 9) P1 K3 (3, 4, 4, 4, 4, 5) P3 K4 (4, 4, 4, 5, 5, 5)
Row 3: K3 (3, 3, 3, 4, 4, 4) P1 C1F K1 P1 K13 (13, 15, 16, 16, 17, 19) P1 C1F K1 P1 K3 (3, 3, 3, 4, 4, 4)
Row 4: Repeat row 2.
Row 5: K3 (3, 3, 3, 4, 4, 4) P1 K1 C1B P1 K13 (13, 15, 16, 16, 17, 19) P1 K1 C1B P1 K3 (3, 3, 3, 4, 4, 4)
Repeat rows 2–5 3 (4, 5, 6, 6, 7, 8) times more.
Next row: Repeat row 2.
Shape Toe
Next row: K2tog once (once, once, once, twice, twice, twice) K 1 (1, 1, 1, 0, 0, 0) P1 C1F K1 P1 K13 (13, 15, 16, 16, 17,19) P1 C1F K1 P1 K 1 (1, 1, 1, 0, 0, 0) K2tog once (once, once, once, twice, twice, twice) Click here for an explanation.
🌸 Next row (and all remaining even rows): K3 P3 K3 (3, 4, 4, 4, 4, 5) P1 K7 (7, 7, 8, 8, 9, 9) P1 K3 (3, 4, 4, 4, 4, 5) P3 K3
Next row: K2 P1 K1 C1B P1 K13 (13, 15, 16, 16, 17, 19) P1 K1 C1B P1 K2
Next row: Repeat row marked with 🌸 (All rows when wrong side of the work is facing you.)
🌼 Next row: K2 P1 C1F K1 P1 K13 (13, 15, 16, 16, 17, 19) P1 C1F K1 P1 K2
Next row: Repeat row marked with 🌸
Next row: K2 P1 K1 C1B P1 K13 (13, 15, 16, 16, 17, 19) P1 K1 C1B P1 K2
Next row: Repeat row marked with 🌸 🌼
Repeat from 🌼 to 🌼 3 (3, 3, 3, 4, 4, 4) times more.
End Toe
Next row: K2tog P1 SL1 K2tog PSSO P1 K1 (1, 1, 0, 0, 1, 0) K2tog 6 (6, 7, 8, 8, 8, 9) times P1 SL1 K2tog PSSO P1 K2tog.
Please share this page!
More FREE patterns
Click the pic to read online!!


![]()
![]()


FREE Knitting Graph Paper for Colorwork Knitting


Next row: Knit
Next row: K2tog to the end of the row. If you have an extra stitch at the end of the row, knit it.
Next row: Knit
Pull yarn through.
Form Heel:
With the right side of the slipper facing you, pick up 10 sts along the back of the sole between the purl stitches.
Row 1 – 3 : Knit across.
Row 4: K2tog K6 K2tog. (8 sts)
Row 5 – 7: Knit across.
Row 8: K2tog K4 K2tog. (6 sts)
Row 9 – 11: Knit across.
Row 12: K2tog K2 K2tog. (4 sts)
Row 13 – 15 : Knit across.
Row 16: K1 K2tog K1. (3 sts)
Row 17 – 19: Knit across.
Bind off.
When shaping the toe, once completed the row, you should have 2 knit stitches before the purl of the cable at the beginning of the row and 2 stitches after the last purl after the cable at the end of the row regardless of the size. Depending on the size you either knit 2 stitches together twice or knit two stitches together once and knit the one remaining stitch. Regardless of size this gives the two stitches.
More of my stuff on Etsy:
You can make a widget like this for your blog or website, too.
Instructions are on my website here: How to Display Etsy Items on Your Website
Adult Sizes:
Numbers in parenthesis are written for sizes as such:
Women’s 4-5 (6-7, 8-9, 10-11, 12)
Men’s 4 (5-6, 7-8, 9-10, 11-12)
A woman’s size 6-7 is the same as a man’s size 5-6. A woman’s size 8-9 is the same as a man’s size 7-8. etc.
Cast on 40 (44, 46, 48, 50)
Row 1: K3 (4, 4, 5, 5) P1 K6 P1 K18 (20, 22, 22, 24) P1 K6 P1 K3 (4, 4, 5, 5)
Row 2: K4 (5, 5, 6, 6) P6 K4 (5, 5, 5, 6) P1 K10 (10, 12, 12, 12) P1 K4 (5, 5, 5, 6) P6 K4 (5, 5, 6, 6)
🍄 Row 3: K3 (4, 4, 5, 5) P1 C2F K2 P1 K18 (20, 22, 22, 24) P1 C2F K2 P1 K3 (4, 4, 5, 5)
Row 4: Repeat row 2.
Row 5: Repeat row 1.
Row 6: Repeat row 2.
Row 7: K3 (4, 4, 5, 5) P1 K2 C2B P1 K18 (20, 22, 22, 24) P1 K2 C2B P1 K3 (4, 4, 5, 5)
Row 8: Repeat row 2.
Row 9: Repeat row 1.
Row 10: Repeat row 2. 🍄
Repeat from 🍄 to 🍄 3 (3, 4, 4, 4) times more.
Shape Toe:
Next row: K2tog 1 (1, 1, 2, 2) times K1 (2, 2, 1, 1) P1 C2F K2 P1 K18 (20, 22, 22, 24) P1 C2F K2 P1 K1 (2, 2, 1, 1) K2tog 1 (1, 1, 2, 2) times. 38 (42, 44, 44, 46) sts.
Next row: K3 (4, 4, 4, 4) P6 K4 (5, 5, 5, 6) P1 K10 (10, 12, 12, 12) P1 K4 (5, 5, 5, 6) P6 K3 (4, 4, 4, 4)
Next row: K2tog K 0 (1, 1, 1, 1) P1 K6 P1 K18 (20, 22, 22, 24) P1 K6 P1 K 0 (1, 1, 1, 1) K2tog. 36 (40, 42, 42, 44) sts.
🌻 Next row: K2 (3, 3, 3, 3) P6 K4 (5, 5, 5, 6) P1 K10 (10, 12, 12, 12) P1 K4 (5, 5, 5, 6) P6 K2 (3, 3, 3, 3)
❤️ Next row: K1 (2, 2, 2, 2) P1 K2 C2B P1 K18 (20, 22, 22, 24) P1 K2 C2B P1 K1 (2, 2, 2, 2)
Next row: Repeat row marked with🌻
⭐️ Next row: K1 (2, 2, 2, 2) P1 K6 P1 K18 (20, 22, 22, 24) P1 K6 P1 K1 (2, 2, 2, 2)
Next row: Repeat row marked with 🌻
🍞 Next row: K1 (2, 2, 2, 2) P1 C2F K2 P1 K18 (20, 22, 22, 24) P1 C2F K2 P1 K1 (2, 2, 2, 2)
Next row: Repeat row marked with 🌻
Next row: Repeat row marked with ⭐️
Next row: Repeat row marked with 🌻
Next row: Repeat row marked with ❤️
Next row: Repeat row marked with 🌻
Next row: Repeat row marked with ⭐️
Next row: Repeat row marked with 🌻 🍞
Repeat from 🍞 to 🍞 0(1, 1, 2, 3) times more.
End Toe:
Next row: K1 (2, 2, 2, 2) P1 C2F K2 P1 K18 (20, 22, 22, 24) P1 C2F K2 P1 K1 (2, 2, 2, 2)
Next row: Repeat row marked with 🌻
Next row: Repeat row marked with ⭐️
Next row: Repeat row marked with🌻
Next row: K2tog across.
Next row: Knit across.
Next row: K2tog 9 (10, 10, 10, 11) times.
Knit the last stitch for women’s sizes 8-9 and 10-11 and the men’s sizes 7-8 and 9-10 only.
Next row: Knit across.
Pull yarn through.
Form Heel:
With the right side of the slipper facing you, pick up 14 sts along the back of the sole between the purl stitches. This video will help you make it if you’re not sure.
Row 1 – 3 : Knit across.
Row 4: K2tog K10 K2tog. (12 sts)
Row 5 – 7: Knit across.
Row 8: K2tog K8 K2tog. (10 sts)
Row 9 – 11: Knit across.
Row 12: K2tog K6 K2tog. (8 sts)
Row 13 – 15 : Knit across.
Row 16: K2tog K4 K2tog. (6 sts)
Row 17 – 19 : Knit across.
Row 20: K2tog K2 K2tog. (4 sts)
Row 21 – 23 : Knit across.
Row 24: K1 K2tog K1. (3 sts)
Row 25 – 27: Knit across.
Bind off.
Hints and tips:
This pattern doesn’t contain a child’s size 4-5. Based on the foot measurements I used to develop the pattern there isn’t a need. A woman’s size 5 measures 8 11/16 inches long, while a girl’s size 3 measures 8 9/16 inches long. Knitting is very forgiving with small differences in measurements such as this. But when in doubt, I recommend making the larger size.
The children’s slipper is made with a smaller cable than the adult sizes. It uses C1F and C1B to allow for the smaller foot size.
Abbreviations:
K – Knit
P – Purl
K2tog – knit 2 together
sts – stitches
SL 1 – Slip 1 stitch off knit ways
PSSO – Pass the slipped stitch over
Side note:
I use both versions of the terminology when it comes to cable stitches. I’ve been corrected that I’m using the wrong one for both occasions so it’s a no win for me. What I mean is that C4F is the same technique as C2F. Just like how C2B is the same as C4B. Do you think of it as the just the stitches you’re pulling or the number of stitches you’re using in total when you do it? It’s a personal choice, I guess. Regardless, there are videos below to show you how to do it.
I’m linking the videos to the C2B and C2F to the newer videos I have for the C4F C4B. THEY ARE THE SAME STITCH I’m choosing to link to the newer videos because the old ones are exactly that – old. The new ones are much better and shot in higher definition.
C1F – Cable 1 forward (this is done the same way as the C2F, but instead of knitting and pulling forward 2 stitches, only knit and pull one stitch forward). With your cable needle, slip 1 stitch off the needle and pull the stitch towards the front of your work. Knit the next stitch. Knit the stitch from the cable needle. There is a video further down this page to help.
C1B – Cable 1 backward (this is done the same way as the C2B, but instead of knitting and pulling of 2 stitches to the back of your work, only knit and pull one stitch back). With your cable needle, slip 1 stitch off the needle and pull the stitch towards the back of your work. Knit the next stitch. Knit the stitch from the cable needle. There is a video further down this page to help.
C2F – Cable 2 forward. With your cable needle, slip 2 stitches off the needle and pull the stitches towards the front of your work. Knit the next 2 stitches. Knit the 2 stitches from the cable needle. The video is called C4F but it is the same as C2F.
C2B – Cable 2 backward. With your cable needle, slip 2 stitches off the needle and pull the stitches towards the back of your work. Knit the next 2 stitches. Knit the 2 stitches from the cable needle. The video is called C4B but it is the same as C2B.
If you have any questions, please feel free to leave a comment or send me your questions at kweenbee_crafts@hotmail.ca or through my contact form.
Copyright 2020
Janis Frank
This pattern gives you permission to sell or give away anything that you make with this pattern. It does NOT give you permission to give away, reproduce in any form or sell this pattern.


Hello. Just finished the toe after starting the heel. I read the other comments, so I know that there is sewing involved. However, for the heel, I have 20 stitches, (counting the plain stitches before and after the bottom seems), 5, 10, 5. SO I’m confused as to having to pick up 14
The easiest way to explain it would be to watch this video I made. It’s for a different style of slipper, but making the heel is the same. https://kweenbee.com/picking-up-stitches-to-make-the-heel-cuff/
My other half has really gigantic feet, a men’s size 16. How would i increase this pattern to accommodate these behemoths?
Can I use circular needles for this pattern? If so, is it possible to use two circular needles to knit two slippers at the same time?
Anything that’s made without seams would look more like a sock. I can’t envision how this could be made slipper like and not be made flat. Are you looking for something more like a sock but with a cable pattern?
Im doing the adult 4-5 slipper ive got to row 3 and have 4 stitches left. adding up the stitches on the row pattern they only add up to 36 stitches? its probably something im doing wrong but any advice would be great thank you x
Has anyone else run into this problem? Is my math off? It happens with typos and such sometimes and I updated all my patterns so it is very possible it happened.
As far as being able to help from a brief description, I can’t really offer much by way of support. One thing that I know I do sometimes is read the pattern size wrong (I’ll cast on for one size, then follow the wrong stitch counts for a different size) maybe it was this ??♀️
Thank you it was my fault not your pattern i was counting the 2 knit stitch as part of the cable, Thank you for your response,I am just starting reading patterns and im really enjoying this one.
Can I start at the heel then add sts to each side and continue knitting the slippers, this would save picking up the stiches
Absolutely! I do this exact same thing with this pattern – https://kweenbee.com/how-to-knit-ribbed-bootie-slippers-for-adults/
Just make sure that it’s long enough to equal the length of the sides. I find that increasing every third row on both ends should be about right.
Please advise how to close the heel, do I just start at the top of the slipper and join down each side , never done this before. Really like this pattern
Yes. Flip up the triangle you made for the heel and sew along the edges.
I am not sure if I am missing something. I just finished the toe and am about to start to p/u stitches on the heel but I am not seeing any finishing directions. Do I just sew up the top? Is there sewing required to finish the heel? Any help would be greatly appreciated. This pattern is really nice and I’m sure I’ll love them.
Yes and yes! Sew up the seams on the top and the heel. Thanks for letting everyone know how to finish them ?
I AM UNABLE TO DOWNLOAD THE FREE PATTERN FOR CABLE KNIT SLIPPERS FOR ADULTS AND CHILDREN
Sorry to hear that you are having difficulties. Can you be more specific where you are experiencing a problem?