
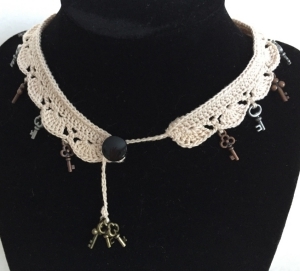
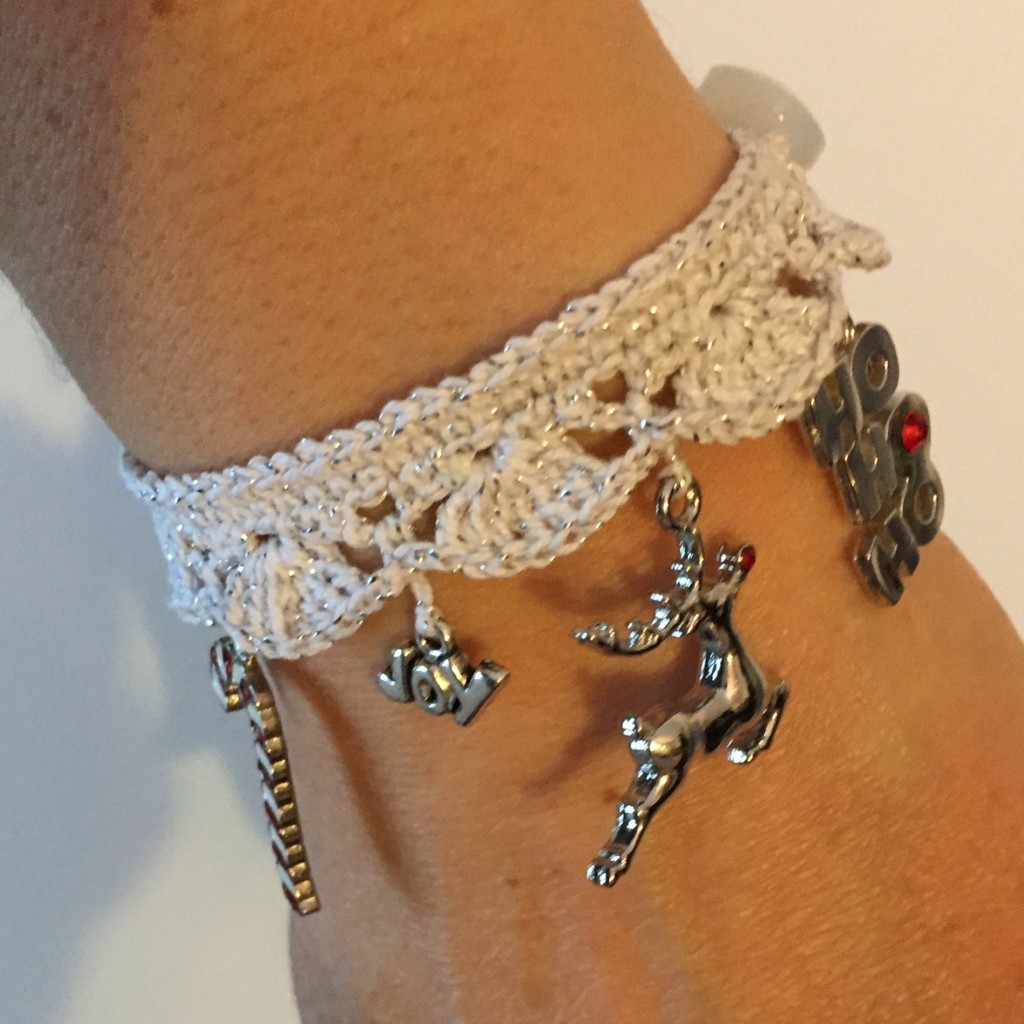
I originally published this pattern way back in 2016; seems like a lifetime ago these days. Back then, I was charging for it, but like all my patterns, I’m making this crochet pattern free for anyone who would like it. This particular pattern started off as a bracelet design, then subsequently morphed into necklaces because I liked it so much. Also, I found some way cool charms and pendants that I just had to use.

As far as the difficulty of the pattern, adding the charms may be a little tricky at first, especially if you’re using charms that have one good side. If the charms are printed or carved, like the teacups or Buddhas shown above in the bracelets, then it’s not so important. If you find one sided charms, no worries. There are a bunch of pictures I’ve included that show you how to attach the charms so they’ll face the right direction.
To make things a smidgen easier for you here is the link if you want to make the bracelet and this is the link for the necklace. I’ve included all the photos in both versions to make it easier for you. If recommend starting with the bracelet so you can get the feel of how to do it. And if you would prefer a ad free, PDF downloadable version of the pattern instead of being online, you can get that for a small fee/donation here – Victorian Steampunk Crochet Necklace and Bracelet Pattern PDF or here in my Etsy shop.
If you are a member of mine on Buy Me A Coffee, the pattern is free with your monthly support. You can download your copy here – Victorian Steampunk Necklace & Bracelet Crochet Pattern
Another way to avoid ads and pop-ups, get instant, PRINTABLE downloads of this pattern and others, is by becoming a Member. When you become a Website Supporter at $4/month, you’ll gain access to exclusive member only posts on Buy Me A Coffee. You can download as many patterns as you like for the same $4 each month. You can go to this page to learn more, become a member and support my work… Exclusive Member Area
Don’t forget to share this pattern. It helps me out a bunch! You can use the icons below to share it to your favourite social media platform.

Things you need:
1 ball of crochet cotton thread
Size 10 (1.3 mm) crochet hook
7 charms for a bracelet (1 more or 1 less if you need it longer or shorter, respectively)
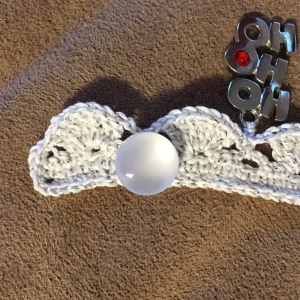
A pretty button
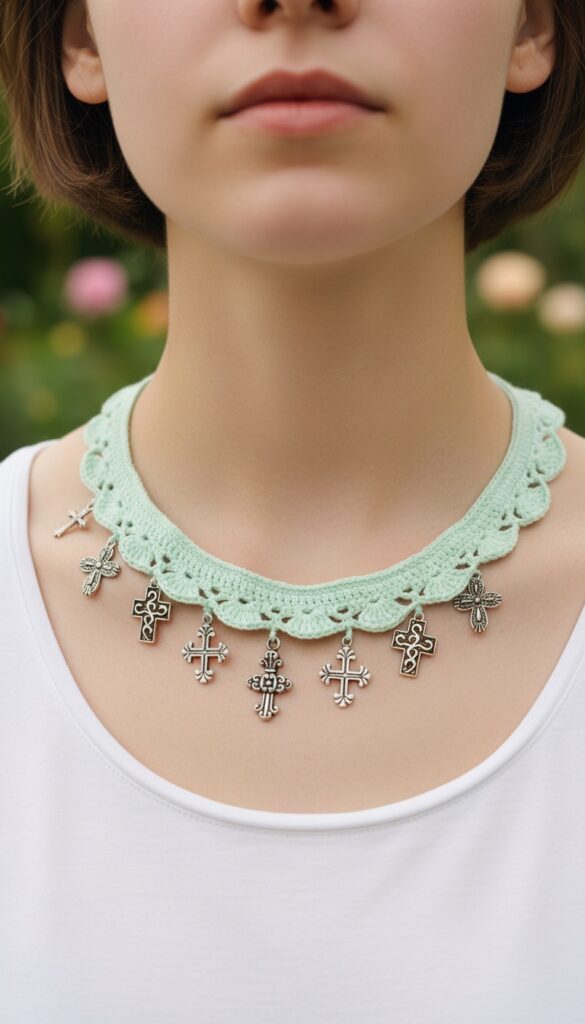
11 charms for a necklace. (I used 18 little keys for the choker in the cover photo and 7 crosses for the necklace in the photo montage above.)
Gauge:
It’s not really important for this project as there isn’t a specific size needed. This pattern can be made as long as you like and you can easily adjust the length to what you want when you’re making it. Each fan adds approximately 25/32″ or 2 cm. Generally speaking, I make my bracelets approximately 7 inches (17.5 cm) in length making 9 fans total. Necklaces vary depending on the length you want. I wrote the instructions for a necklace approximately 18 7/64 inches or 46 cm and 24 fans long.
Another point to remember, your final product will stretch a bit longer as the stitches relax over time or if you press it with an iron.
More of My Stuff On Etsy
You can make a widget like this for your blog or website, too.
Instructions are on my website here: How to Display Etsy Items on Your Website
Crocheted Victorian Charm Necklace
Chain 194. (Instructions are for 11 charm necklace)
Row 1: Dc 3rd chain from hook. Dc in each chain. Ch1. Turn.
Row 2: 4sc *ch2 skip next st. 3sc. Ch3. Skip next st. 3sc.* Repeat from * to * ending with ch2. Skip next st. 3sc. Ch1. Turn. (Click here if you have too many or not enough dc’s)
Row 3: *7trc in ch2 space. Ch2. Sc in ch3 space. Ch2.* Repeat from * to * 6 more times ending the last repeat with the sc in the ch3 space. Ch1.
Add charm as follows:
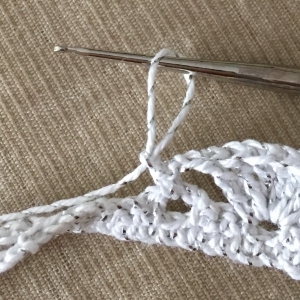
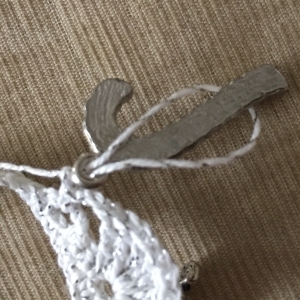
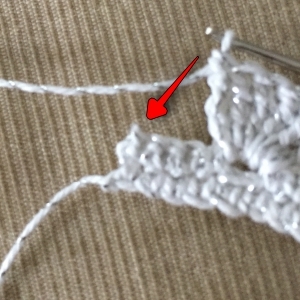
With the loop already on your hook, pull to make larger. Drop the loop from the hook.
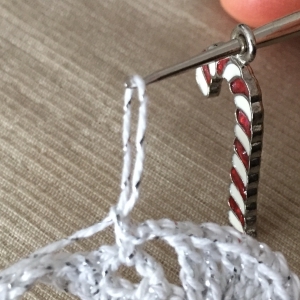
Pick up the charm and put hook through the hole from BACK to FRONT.

Pull loop through the hole. Make sure that the loop isn’t twisted. Slightly pull on it to make sure the thread pulls easily on the LEFT side.
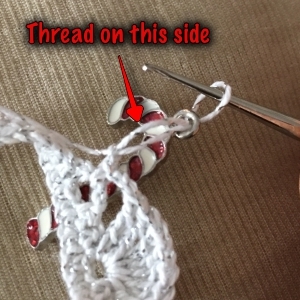
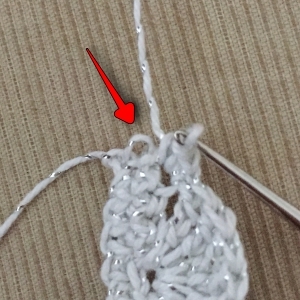
Pass the loop over the charm and pull snug but not tight.
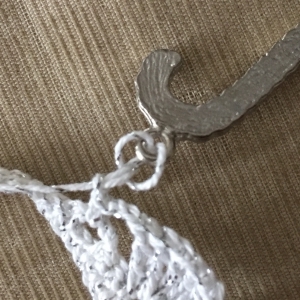
Put the hook through the top of the sc in the ch3 space.

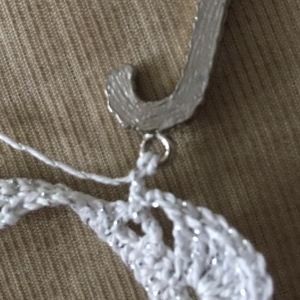
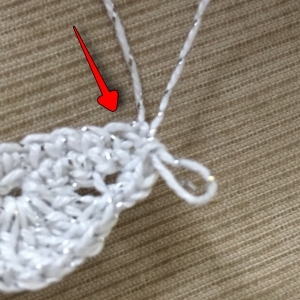
Hook the thread and pull the thread through.
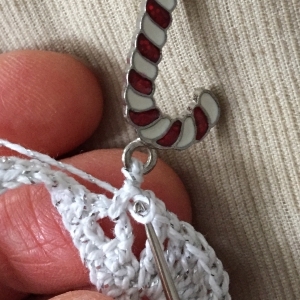
You now have a loop on your hook to continue crocheting. This stitch also turns the charm to the front.
*Ch2. 7trc in ch 2 space. Ch2. Sc in ch 3 space. Ch1. Add charm.* Repeat from * to * until all the charms have been added.
Ch2 *7trc in ch2 space. Ch2. Sc in ch3 space. Ch2.* Repeat from * to * 6 more times ending the last repeat with the 7trc in ch2 space. 3sc in the 1st sc of the 4sc of the previous row (forms the corner for the edging).
Row 4: Working along the edge, sc in the post of the dc.
3Sc in the back loop of the original ch.
For a Round Necklace:
Sc in the loop of each ch to the end of the necklace to the last ch.
For a V-Shaped Necklace (or using a heavy middle charm)
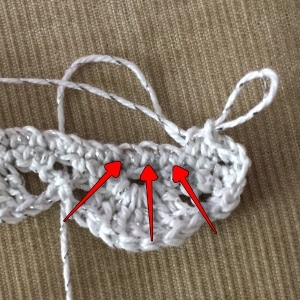
Find the st above the middle charm. Count back 6 stitches. Mark this stitch with a stitch marker, safety pin, etc. Sc in the back loop of the original ch until you reach this marked stitch. Sc2tog 6 times (these 12 stitches are now 6). Sc in the back loop of each ch to the end of the necklace to the last ch
Please share this page!
More FREE patterns
Click the pic to read online!!


FREE Knitting Graph Paper for Colorwork Knitting


![]()
![]()


Instructions regardless of shape
3sc in the corner ch. Sc around the post of the dc. Ch as many chains as required to slip over your selected button. Sl st in the last sc you made. Sc around the sc post. Sc in corner st.
Break thread.
Sew button to the end opposite the loop.
Work in thread ends.
Wear, give away or sell with pride!
Crocheted Victorian Charm Bracelet
Chain 73. (Instructions are for 7 charms)
Row 1: Sc in 2nd chain from hook. Sc in each chain. Ch1. Turn.
Row 2: 4sc *ch2 skip next st. 3sc. Ch3. Skip next st. 3sc.* Repeat from * to * ending with ch2. Skip next st. 3sc. Ch1. Turn. (Click here if you have too many or not enough sc’s)
Row 3: *7trc in ch2 space. Ch2. Sc in ch3 space. Ch1.
Add charm as follows:
With the loop already on your hook, pull to make larger. Drop the loop from the hook.
Pick up the charm and put hook through the hole from BACK to FRONT.
Pull loop through the hole. Make sure that the loop isn’t twisted. Slightly pull on it to make sure the thread pulls easily on the LEFT side.
Pass the loop over the charm and pull snug but not tight.
Put the hook through the top of the sc in the ch3 space.
Hook the thread and pull the thread through.
You now have a loop on your hook to continue crocheting. This stitch also turns the charm to the front.
*Ch2. 7trc in ch 2 space. Ch2. Sc in ch 3 space. Ch1. Add charm.* Repeat from * to * until all the charms have been added.
Ch2 *7trc in ch2 space. Ch2. Sc in ch3 space. Ch2. 7trc in ch2 space. 3sc in the 1st sc of the 4sc of the previous row (forms the corner for the edging.)
Row 4: Working along the edge, sc in the post of the sc.
3Sc in the back loop of the original ch.
Sc in the loop of each ch to the end of the bracelet to the last ch.
3sc in the corner ch.
Sc around the post of the sc. Ch as many chains as required to slip over your selected button. Sl st in the last sc you made. Sc around the sc post. Sc in corner st. .
Break thread.
Sew button to the end opposite the loop.
Work in thread ends.
Wear, give away or sell with pride!
More of my stuff on Etsy:
You can make a widget like this for your blog or website, too.
Instructions are on my website here: How to Display Etsy Items on Your Website
Hints and Tips:
It is very easy to either miss a chain, chain the wrong number, or chain twice by accident in the same chain. This will throw off the counts for Row 2 and you may end up with too many or not enough dc for the necklace (sc for the bracelet) to work Row 3 over. Don’t panic! Make it work with what you have. A stitch or 2 more or less won’t ruin the final piece. You can either sc stitches together if too many or sc 2 stitches in one stitch if you don’t have enough. FYI making things work like this, works great for all projects. Many times it can be hidden in a seam or the back of the work 😉
It’s best to pick charms that have a large hole that you can pass your crochet hook through. If not you can twist up the loop and feed it through the hole. This can be difficult and time consuming though. If the charm’s hole is sideways (hole is left to right), you can use a jump ring to get it to hang correctly.
Not sure where to get charms for your project? If you can’t find what you’re looking for locally, be sure to try Amazon, Ebay or even Etsy. Always shop local when you can and see what your craft store has in stock!
If you want to make either the bracelet or necklace longer or shorter, add or take away 8 stitches. Each group of 8 stitches is approximately 25/32″ or 2 cm. For example, if you would like the bracelet to be 1 1/2″ longer, add 16 stitches. This of course, will make the repeats for adding charms either more or less for the necklace.
If you don’t want to make a v-neck and would prefer a choker or rounded edge, sc in the loop of each chain without sc any of them together. It will form a rounded edge. If your center charm is large or heavy the weight of the charm will naturally form a v regardless whether you gather the stitches. It will buckle awkwardly if you don’t gather the stitches.
You don’t always need to make a loop for a necklace. A long length of chains can also work. Wrap the length of chains a few times around the button to hold the necklace snug. This works great for a choker as the circumference of necks can vary and will fit more comfortably. If you’ve used heavy charms, make the loop. This fastener won’t hold it in place.
Sew the button to the final piece as shown here:
No matter what, don’t stretch out the necklace or bracelet before you are completely finished crocheting the entire piece! If you do, it won’t lay flat when you are done.
To save work of sewing in ends, work in the ends of the threads as you are making your project. Hold the thread behind your work and catch it as you make the next 4-5 stitches.
When making the loop to secure the bracelet or necklace, chain as many stitches as you think you may need. Sl st to the sc and pass the button through the loop. If it is too small, undo the sl st and add more chains. If too long, undo the sl st and take some stitches out. It’s easier to check now than later.
Abbreviations:
sc – single crochet
dc – double crochet
trc – treble (or triple) crochet
sc2tog – single crochet 2 stitches together
ch – chain
sl st – slip stitch
st – stitch
sts – stitches
If you have any questions, please feel free to leave a comment or send me your questions at kweenbee_crafts@hotmail.ca.


Been making your fingerless gloves for a while now, and off to the side of the pattern appeared a link to these patterns. I can’t thank you enough for making this a free pattern! I compete in Steampunk contests at the end of summer at her Renn. fest, and last year I didn’t have anything ( except my makeup) that was homemade. This will tie in perfectly!!!! Hopefully this year I will place instead of an honorable mention. I know I will while wearing your design! Thanks again! Love all your patterns! I’m “hooked” for life!
You are very welcome! I’d love to see what your final project looks like when you’re done, and would love to see the complete outfit when you go to the fest. Please keep me posted!!