
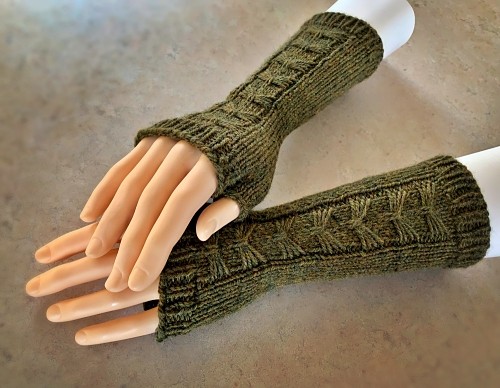
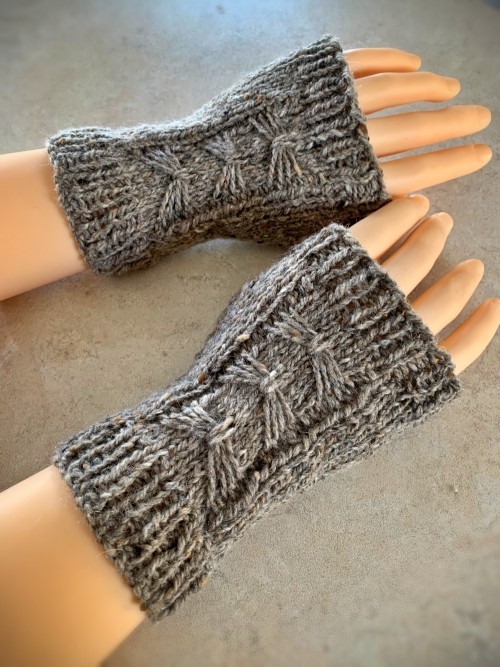
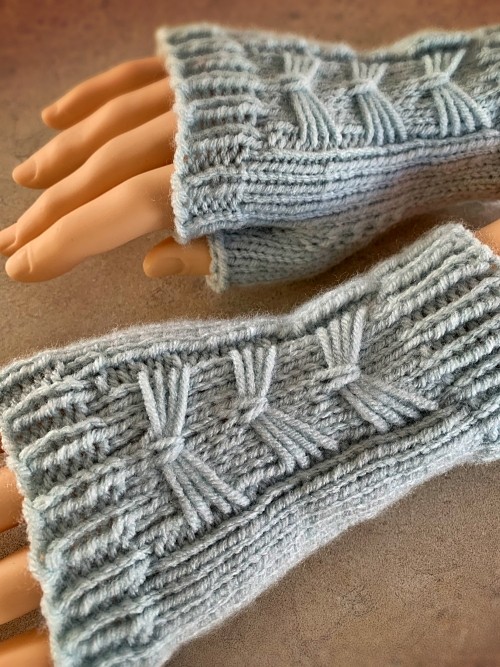
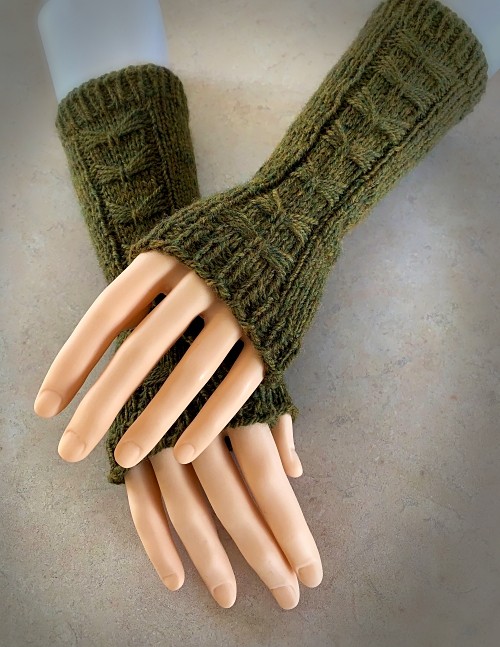
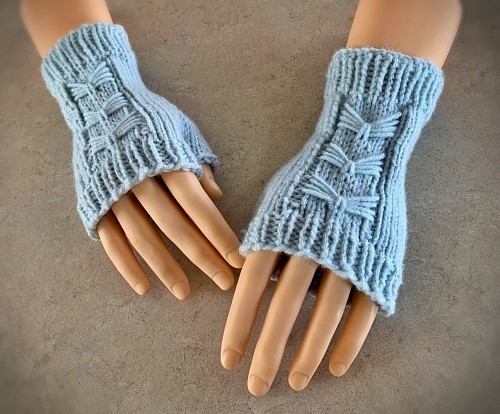
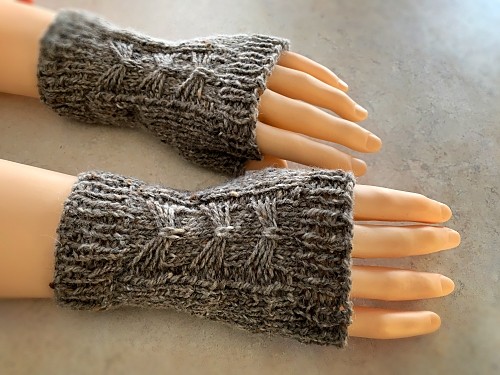
Knit a fabulous pair of fingerless gloves or mitts with the cutest little bows flowing down the length of your arm and back of your hand. Create the bows as you go; I have pics to show you how. Make them as long or as short as you like. It really depends on how much you like knitting in the round on double pointed needles (DPN).


Don’t want to read this online and avoid the ads. You can download this pattern through Ravelry, Etsy and other retailers.
Over the years, I’ve designed a number of other knitted mitten and fingerless glove patterns. You can check out my How to Knit Texting Mittens and How to Knit Flip Mitts, How to Knit Fingerless Gloves (uses a DK or 3 yarn) and my most popular so far Owl Fingerless Gloves. You can click any of those links to read the patterns online.
Like the owl motif, I have a love affair going on with these bows. So far, I’ve incorporated it into slippers and a dishcloth, both of which are available to read right here on my website for free (that’s right, give those links a click).
A few quick words on sizing. Instead of going through all the effort to remake the pattern for different sizes and having the bows remain centered, I’ve gone about adjusting the sizing by changing the size of your knitting needles. These mitts knitted in the round making them seamless with no scratchy seams to worry about. Because of being knitted in the round, the thumbs have to be on different sides so they fit correctly. You’ll have to make one for the left hand and the right hand. Instructions are given separately for both. You can click the links or scroll down the page.
Loving the free knitting patterns? Then please help support this site. You can use the links below and share this and my other patterns through your social media. More eyeballs on my work helps a bunch too.
Like all my patterns, you have my permission to sell any of the arm warmers, gloves or mitts you make from this pattern. You do NOT have permission to redistribute this pattern in any form. Which includes, reprinting or republishing it in any form: physical, digital or anything else. That statement includes you. No, you can’t print this webpage for yourself, your friends, family or anyone else. Please purchase your printable PDF copy at any of these fine distributors – this website, Ravelry or Etsy for the very minimal cost. Help support the hard work of the author and encourage future publications.
Another way to avoid ads and pop-ups, get instant, PRINTABLE downloads of this pattern and others, is by becoming a Member. When you become a Website Supporter at $4/month, you’ll gain access to exclusive member only posts on Buy Me A Coffee. You can download as many patterns as you like for the same $4 each month. You can go to this page to learn more, become a member and support my work… Exclusive Member Area
Things You Will Need
worsted weight yarn (any standard ball will be more than enough to make the shorter, hand only version. You’ll need more if you are making them longer. For example, I used less than a 100 gr or 3.5 oz ball to make the long green gloves in size medium.)
Set of 4 double pointed needles (see note on sizing)
Stitch holder to hold stitches for the thumb
Tapestry needle to sew the hole by the thumb and work in ends
A Note on Sizing
As I mentioned previously, the sizing for this pattern is done a little differently. Instead of different stitch counts which I normally do, I’m changing the size of the needles. Chances are good that if you know how to knit in the round, you already have these size needles anyways. If not, it’s a good excuse to go to your favourite yarn store to pick up the needles you’ll need. And since you’re there, check out the yarn sales. You’d be foolish not to.
Like most things I knit, I use myself for standard sizing. To give you an idea of fit, I wear a medium sized latex glove. The medium size bow glove fits perfectly. You may need to use different sized needles to get the correct gauge, but this pattern is very forgiving if you’re a bit off.
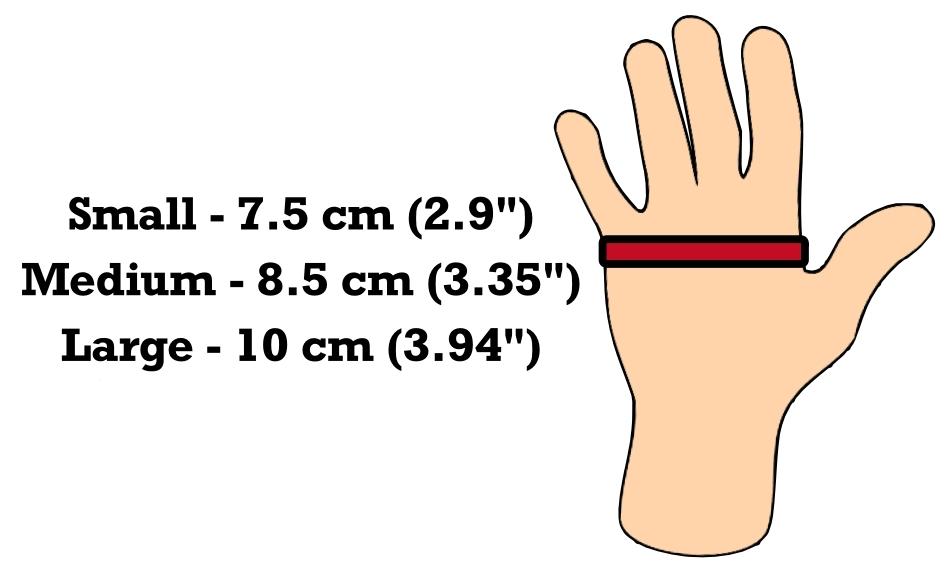
Small
- size 3.5 mm (US size 4) dpn
- 11 stitches every 2 inches (5 cm)
- 16 rows every 2 inches (5 cm)
Medium
- size 4 mm (US size 6) dpn
- 10 stitches every 2 inches (5 cm)
- 14 rows every 2 inches (5 cm)
Large
- size 5 mm (US size 8) dpn
- 9 stitches every 2 inches (5 cm)
- 12 rows every 2 inches (5 cm)
I recently made a video showing how to make the bows. This specific pattern uses 4 strands but is done the same way.
Please note: The printable version of this pattern has NOT been updated to include the video links.
Left Hand
Cast on 36 sts loosely. You need to allow the ribbing to stretch.
Rounds 1 – 7: K1 P1 around
Rounds 8 – 9: K around
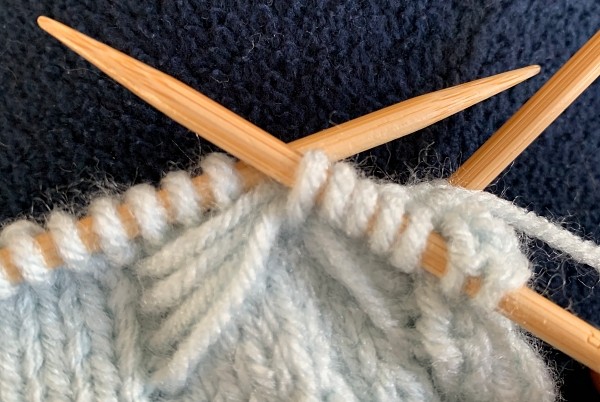
♥︎ Round 10: K8 P1 Hold the yarn in front of your work. Pass the next 7 stitches over to the other needle (strand made). P1 K19.
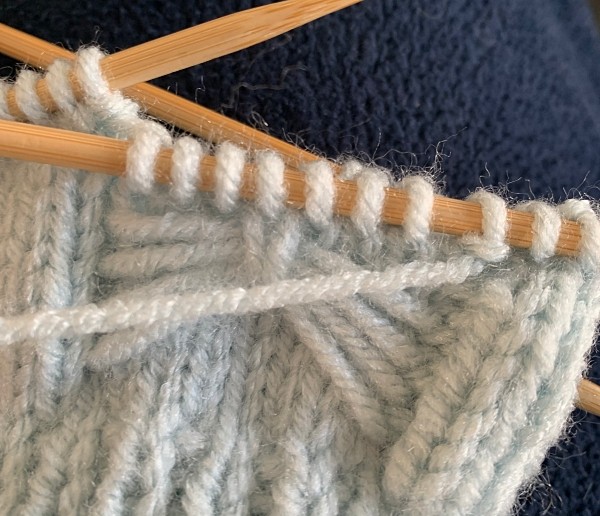
Round 11: K8 P1 K7 P1 K19
Round 12: As round 10
Round 13: As round 11
Round 14: As round 10
Round 15: As round 11
Round 16: As round 10
Round 17: As round 11
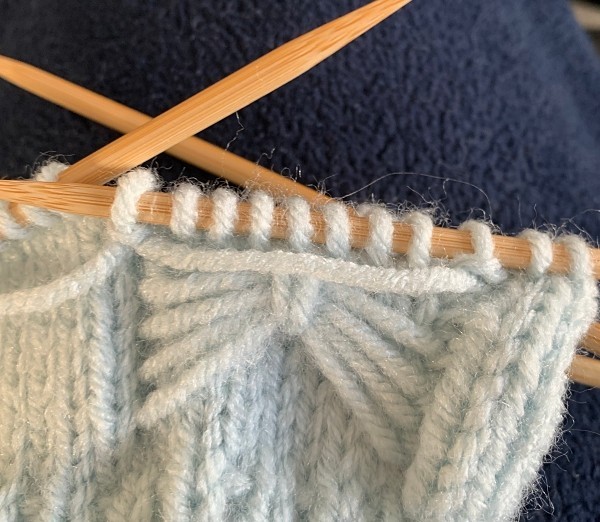
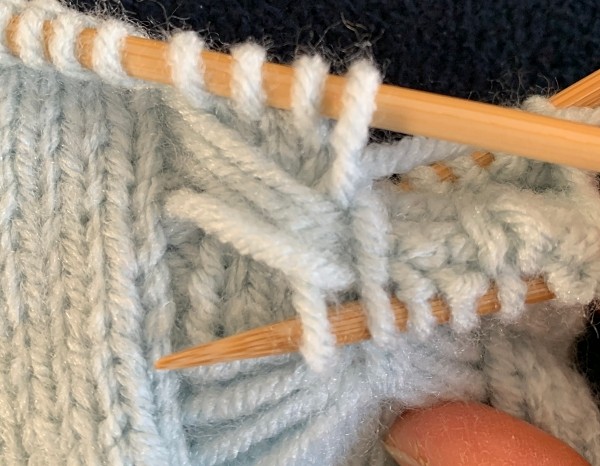
Round 18: K8 P1 K3 Pick up the 4 strands from the bottom up
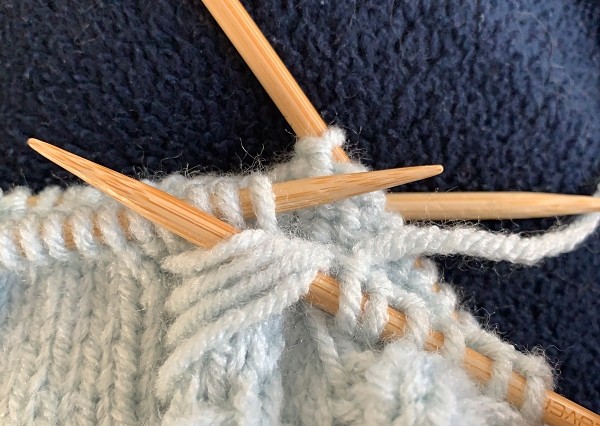
And knit the next stitch.
Pull the loop down through the 4 strands (Bow completed).
K3 P1 K19
Round 18 written without photos: K8 P1 K3 Pick up the 4 strands from the bottom up and knit the next stitch. Pull the loop down through the 4 strands (Bow completed). K3 P1 K19
Round 19: K8 P1 K7 P1 K19 ♥︎
Please share this page!
More FREE patterns
Click the pic to read online!!


![]()
![]()


FREE Knitting Graph Paper for Colorwork Knitting


Repeat from ♥︎ to ♥︎ if you would like a longer length of glove. Each ? to ? repeat makes 1 bow motif.
Round 20: K1 M1 K1 M1 K6 P1 Hold the yarn in front of your work. Pass the next 7 stitches over to the other needle (strand made). P1 K19
Round 21: K to the P P1 K7 P1 K19
Round 22: K to the P P1 Hold the yarn in front of your work. Pass the next 7 stitches over to the other needle (strand made). P1 K19
Round 23: K1 M1 K3 M1 K6 P1 K7 P1 K19
Round 24: As round 22
Round 25: As round 21
Round 26: K1 M1 K5 M1 K6 P1 Hold the yarn in front of your work. Pass the next 7 stitches over to the other needle (strand made). P1 K19
Round 27: As round 21
Round 28: K to the P. P1 K3 Pick up the 4 strands from the bottom up and knit the next stitch. Pull the loop down through the 4 strands (Bow completed). K3 P1 K19
Round 29: K1 M1 K7 M1 K6 P1 K7 P1 K19
Round 30: As round 22
Round 31: As round 21
Round 32: K1 M1 K9 M1 K6 P1 Hold the yarn in front of your work. Pass the next 7 stitches over to the other needle (strand made). P1 K19
Round 33: As round 21
Round 34: As round 22
Round 35: K1 M1 K11 M1 K6 P1 K7 P1 K19
Round 36: As round 22
Round 37: As round 21
Round 38: K1 Pass next 13 stitches onto the stitch holder. K6 P1 K3. Pick up the 4 strands from the bottom up and knit the next stitch. Pull the loop down through the 4 strands (Bow completed). K3 P1 K19
Round 39: As round 21
Rounds 40 – 41: K around
Round 42: K2tog P1 K1 around. P1 in lat stitch.
Round 43 – 46: K1 P1 around.
Cast off loosely.
Make Thumb
Pick up the 13 stitches from the stitch holder. Work 3 rounds even. Cast off loosely.
Sew in the ends and close the hole at the base of the thumb.
More of my stuff on Etsy
You can make a widget like this for your blog or website, too.
Instructions are on my website here: How to Display Etsy Items on Your Website
Right Hand
Cast on 36 sts loosely. You need to allow the ribbing to stretch.
Rounds 1 – 7: K1 P1 around
Rounds 8 – 9: K around
♥︎ Round 10: K22 P1 Hold the yarn in front of your work. Pass the next 7 stitches over to the other needle (strand made). P1 K5.
Round 11: K22 P1 K7 P1 K5
Round 12: As round 10
Round 13: As round 11
Round 14: As round 10
Round 15: As round 11
Round 16: As round 10
Round 17: As round 11
Round 18: K22 P1 K3 Pick up the 4 strands from the bottom up and knit the next stitch. Pull the loop down through the 4 strands (Bow completed). K3 P1 K5
Round 19: K22 P1 K7 P1 K5 ♥︎
Repeat from ? to ? if you would like a longer length of glove. Each ♥︎ to ♥︎ repeat makes 1 bow motif.
Round 20: K1 M1 K1 M1 K20 P1 Hold the yarn in front of your work. Pass the next 7 stitches over to the other needle (strand made). P1 K5
Round 21: K to the P. P1 K7 P1 K5
Round 22: K to the P. P1 Hold the yarn in front of your work. Pass the next 7 stitches over to the other needle (strand made). P1 K5
Round 23: K1 M1 K3 M1 K20 P1 K7 P1 K5
Round 24: As round 22
Round 25: As round 21
Round 26: K1 M1 K5 M1 K20 P1 Hold the yarn in front of your work. Pass the next 7 stitches over to the other needle (strand made). P1 K5
Round 27: As round 21
Round 28: K to the P. P1 K3 Pick up the 4 strands from the bottom up and knit the next stitch. Pull the loop down through the 4 strands (Bow completed). K3 P1 K5
Round 29: K1 M1 K7 M1 K20 P1 K7 P1 K5
Round 30: As round 22
Round 31: As round 21
Round 32: K1 M1 K9 M1 K20 P1 Hold the yarn in front of your work. Pass the next 7 stitches over to the other needle (strand made). P1 K5
Round 33: As round 21
Round 34: As round 22
Round 35: K1 M1 K11 M1 K20 P1 K7 P1 K5
Round 36: As round 22
Round 37: As round 21
Round 38: K1 Pass next 13 stitches onto the stitch holder. K to the P. P1 K3. Pick up the 4 strands from the bottom up and knit the next stitch. Pull the loop down through the 4 strands (Bow completed). K3 P1 K5
Round 39: As round 21
Rounds 40 – 41: K around
Round 42: K2tog P1 K1 around. P1 in last stitch.
Round 43 – 46: K1 P1 around.
Cast off loosely.
Sew in the ends and close the hole at the base of the thumb.
Make Thumb
Pick up the 13 stitches from the stitch holder. Work 3 rounds even. Cast off loosely.
Hints and Tips
I cast all the stitches on one needle when I start. Then I divide them up between the 3 needles. This helps to avoid the twisting you can sometimes get when casting on to each needle.
You don’t need a stitch holder. Even a piece of yarn will work.
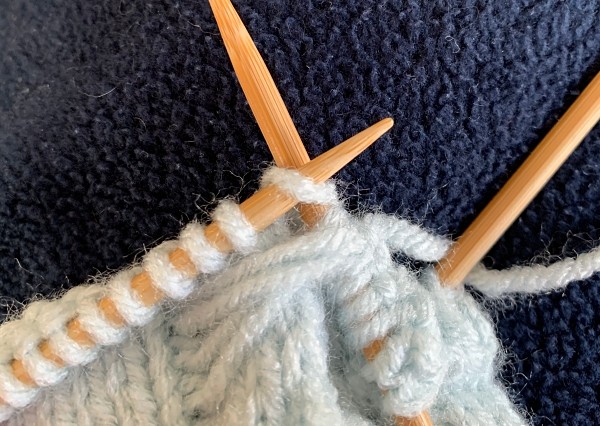
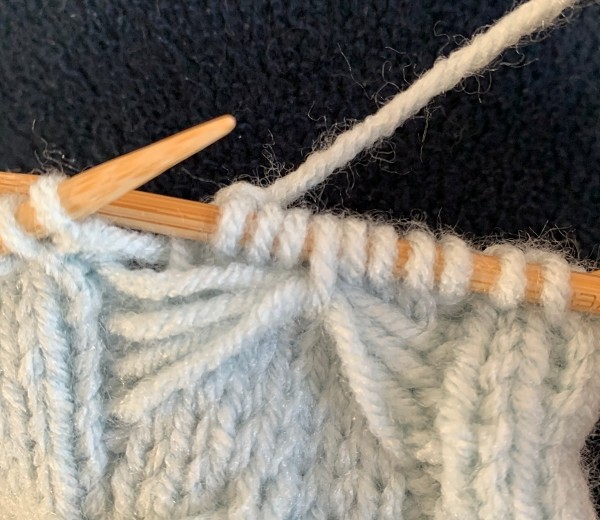
Spread the 7 passed stitches apart to allow for some slack in the strand. If you don’t the bows will pucker. I usually spread them as far apart as they will go and stay in a relaxed position.
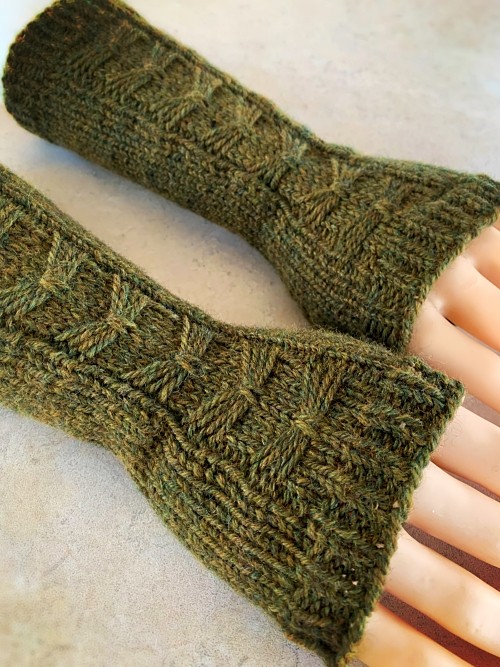
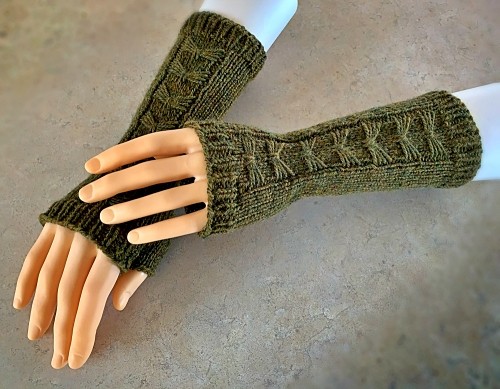
A quick note on making them longer into arm warmers. The green arm warmers repeat the bow section 4 more times than what is written. As it is written you get the short gloves with 3 bow motifs. The final length is about 25 cm or 9.5 inches long. Depending on the circumference of the arm you may need to add and cast on more stitches. This is where having the bows staying centred gets difficult. I can’t really help you with that. It’s a bunch of additional math, frustration and trial and error I really don’t want to get into. Sorry.
Your gauge isn’t overly important but best if it’s at least close. Because the knitted mittens are are fingerless, they are very forgiving if they’re a little small or large.
I prefer to use bamboo dpn. I find that it helps to prevent that line you get between needles when knitting in the round.
You will probably need to adjust the number of stitches you have on each needle. I usually make one split between 2 knit stitches before the purl at the start of the bow motif. It gives more than 12 on one needle and less than 12 on the other, but it makes it easier to knit the bow and lessens the chances of dropping or adding a stitch when switching between working needles.
When you are done making the bows, they may pull a bit weirdly on one side. Simply put your needle beneath the 4 strands and give a bit of a tug up away from the mitt on both sides. That is enough to straighten and even them out.
If you’ve gained a stitch, check to see that you haven’t picked up a stitch between your needles. This is very easy to do and I even do it on occasion. When switching between needles the yarn will catch on the needle, not falling in behind again like it should. If you’re a little distracted, you’ll knit this new “stitch”, gaining an extra stitch on the next round.
I haven’t tried this, but changing to even smaller needles and thinner yarn (DK or 3 perhaps) can make even smaller child sizes. Let me know if you try this and what gauge and needles give the right sizes. You can leave your findings in the comment section.
Abbreviations:
M1 – Make 1 stitch. Pull up a loop between the stitches and knit.
K – Knit
P – Purl
Sts – stitches
K2tog – Knit 2 together
I’m going to repeat this statement just in case you missed it earlier…
Like all my patterns, you have my permission to sell any of the arm warmers, gloves or mitts you make from this pattern. You do NOT have permission to redistribute this pattern in any form. Which includes, reprinting or republishing it in any form: physical, digital or anything else. That statement includes you. No, you can’t print this webpage for yourself, your friends, family or anyone else. Please purchase your copy at any of these fine distributors – this website, Ravelry or Etsy for the very minimal cost of 99¢. Help support the hard work of the author and encourage future publications.


Thanks for sharing this free pattern!