
I’ve always avoided designing anything that required extra sewing because, truth be told, I really dislike it. But I realized that avoiding finishing work was limiting what I could create. And maybe, just maybe, not everyone abhors sewing as much as I do. Once I came to terms with that, it opened up a whole new world of possibilities.

I tried my darndest to come up with a one-piece design for these gloves—just like my reindeer, owl, spider, mushroom, and hippo fingerless gloves—but after an afternoon of experimenting, the wings never looked quite right. That’s when I decided to take a different approach.


The result is a pair of fingerless gloves with a beautiful butterfly on the back of the hand. The butterfly’s body is worked right into the mitt, making it a great way to dip your toes into colour work if you’ve never tried it before. The wings are made separately and attached afterward, giving them a lovely 3D effect that really makes the design stand out.
If you’ve never knitted fingerless gloves before, don’t worry—I’ve got you covered! You can start with my Simple Fingerless Gloves pattern, which is perfect for beginners and will give you the skills you need before trying the butterfly version. Also, it has a full how-to video showing how to knit them from start to finish and sew the seams. Click the pic below if you would like to read the pattern and watch the video.

If you would to prefer to support my work and have access to a printable, ad-free version of this pattern, you can get the downloadable pattern for a small fee you can get it in my Etsy Shop, Ravelry, LoveCrafts, Buy Me A Coffee and from the shop section on this website – KweenBee.com.
If you would prefer to order a Kindle or printed paperback version from Amazon, you can now do so! Shipping is free if you are an Amazon Prime member. Make sure you select the country you are in to take advantage of the free shipping. Click the following link for your country – United States, United Kingdom, Canada, and Australia. The Kindle download and paperback versions are available in English only. .
Another way to avoid ads and pop-ups, get instant, PRINTABLE downloads of this pattern and others, is by becoming a Member. When you become a Website Supporter at $4/month, you’ll gain access to exclusive member only posts on Buy Me A Coffee. You can download as many patterns as you like for the same $4 each month. You can go to this page to learn more, become a member and support my work… Exclusive Member Area
Don’t forget to share this page on Facebook, Pinterest, and the like. Use the icons below for easy click sharing! Your share helps promote my work and helps this website 😊
Things You Need
Worsted weight yarn – 1 standard ball of yarn (215 yards/197 m) for the MC. Any colours of your choosing for the body and wings. It won’t take much to make these parts.
WC – wing colour
MC – main colour
BC – body colour
Knitting needles:
Small – Size 4 US (3.5 mm) knitting needles
Medium – Size 6 US (4 mm) knitting needles
Large – Size 8 US (5 mm) knitting needles
Wings – Size 3 US (3.25 mm) knitting needles
Tapestry needle – to sew the seam and work in the ends.
Gauge
All use stockinette for gauge.
Small
size 3.5 mm (US size 4)
11 stitches every 2 inches (5 cm)
16 rows every 2 inches (5 cm)
Medium
size 4 mm (US size 6)
10 stitches every 2 inches (5 cm)
14 rows every 2 inches (5 cm)
Large
size 5 mm (US size 8)
9 stitches every 2 inches (5 cm)
12 rows every 2 inches (5 cm)
Wings (regardless of size)
Size 3.25 mm (US size 3)
8 stitches every 2 inches (5 cm)
10 rows every 2 inches (5 cm)
You can use 3.5 mm (US size 4) needles too. The sts need to be small and tight for the wing to hold its shape.
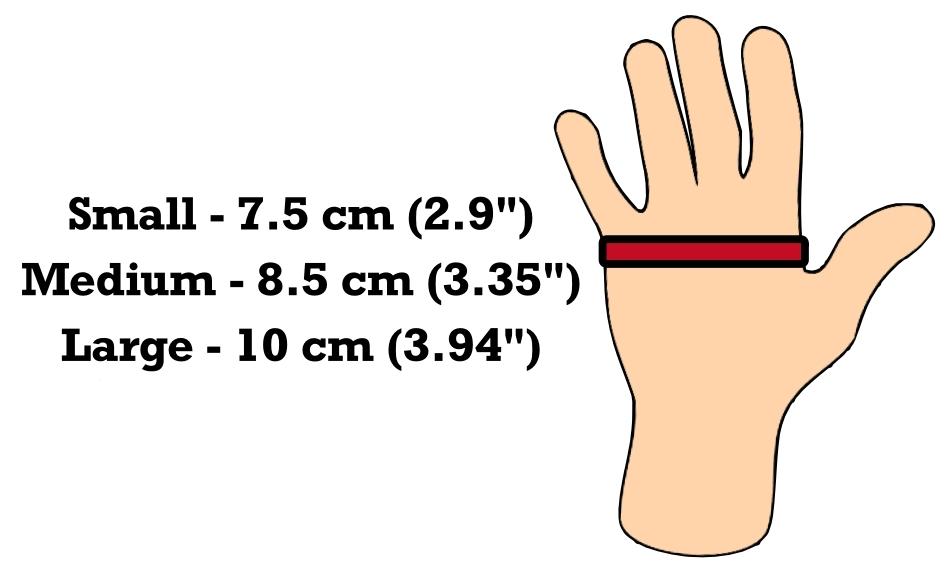
Sizing
Like my other fingerless mitt patterns, I’ve made this as one pattern and adjusted the needle size to change the sizes. This makes it a heck of a lot easier to design and keeps the proportion of the creature the same on all sizes. Frankly, the overall look is better.
To help with the hand sizing, I’ve included a handy infographic (pun intended).
Please share this page!
More FREE patterns
Click the pic to read online!!


FREE Knitting Graph Paper for Colorwork Knitting


![]()
![]()


And because I just couldn’t let newer knitters struggle with making the head, body or wings, I made a quick video to help explain these parts and specific stitches.
Left Glove
With the needles you need for the size you want (3.5, 4 or 5 mm) cast on 34 sts with MC
Row 1: *P1 K2* Repeat from * to * across. P last st.
Row 2: ♠ K1 P2 ♠ Repeat from ♠ to ♠ across. K last st.
Repeat rows 1 and 2 for a total of 10 rows.
Row 11: K across
Row 12: P across
Row 13: K across
Row 14: P across
Row 15: K12 M1 K1 M1 K21 (36 sts)
Row 16: P across
Row 17: K across
Row 18: P11 In BC P1 In MC P9 PM1 P3 PM1 P12 (38 sts)
Row 19: In MC K26. In BC make Head Bobble (K3 into one stitch by alternating knitting into the front and back and front of the stitch, turn. Working the following rows into the 3 stitches in the one stitch, P3, turn, K1 M1 K1 M1 K1, turn, P5 turn, TWK2tog K1 K2tog turn, P3 turn, TWK2tog. Pass this st over to the non-working needle. Pass the st on the LEFT over the st on the RIGHT. Pass the st back over to the working needle (do NOT turn). In MC K11 (38 sts)
If you need help with making the head, the video below is cued up to help you with this specific part.
Row 20: In MC P11. In BC P1 in MC P26
Row 21: In MC K12 M1 K5 M1 K9. In BC K3 into one stitch by alternating knitting into the front and back and front of the stitch. In MC K11 (42 sts) Watch the video below if you need help starting the body.
Row 22: In MC P11. In BC P3. In MC P28
Row 23: In MC K28. In BC K3. In MC K11
Row 24: In MC P11. In BC P3. In MC P9 PM1 P7 PM1 P12 (44 sts)
Row 25: In MC K30. In BC K3. In MC K11
Row 26: In MC P11. In BC P3. In MC P30
Row 27: In MC K12 M1 K9 M1 K9. In BC K3. In MC K11 (46 sts)
Row 28: In MC P11. In BC P3. In MC P32
Row 29: In MC K32. In BC K3. In MC K11
Row 30: In MC P11. In BC P3. In MC P9 PM1 P11 PM1 P12 (48 sts)
Row 31: In MC K34. In BC K3. In MC K11
Row 32: In MC P11. In BC P3. In MC P34
Row 33: In MC K12. Pass the next 13 stitches to a stitch holder. K9. In BC K3, turn. P3, turn. TWK2tog. Pass this st over to the non-working needle. Pass the st on the LEFT over the st on the RIGHT. Pass the st back over to the working needle (do NOT turn). In MC K11. Break BC (33 sts) If you need help ending the body, watch the video below.
Row 34: P across
Row 35: K across
Row 36: P across
♫ Row 37: K1 P1 ♥ K2 P1 ♥ Repeat from ♥ to ♥ to the last st. K1
Row 38: P1 K1 ♦ P2 K1 ♦ Repeat from ♦ to ♦ to the last st. P1 ♫
Repeat from ♫ to ♫ one more time.
Cast off loosely.
Making the Thumb
Pick up the 13 stitches on the stitch holder. With the RIGHT side facing you.
Row 1: *P1 K2* Repeat from * to * across. P last st.
Row 2: ♠ K1 P2 ♠ Repeat from ♠ to ♠ across. K last st.
Repeat rows 1 and 2 for a total of 4 rows.
Cast off loosely.
More of My Stuff on Etsy
You can make a widget like this for your blog or website, too.
Instructions are on my website here: How to Display Etsy Items on Your Website
Right Glove
With the needles you need for the size you want (3.5, 4 or 5 mm) cast on 34 sts with MC
Row 1: *P1 K2* Repeat from * to * across. P last st.
Row 2: ♠ K1 P2 ♠ Repeat from ♠ to ♠ across. K last st.
Repeat rows 1 and 2 for a total of 10 rows.
Row 11: K across
Row 12: P across
Row 13: K across
Row 14: P across
Row 15: K21 M1 K1 M1 K12 (36 sts)
Row 16: P across
Row 17: K across
Row 18: P12 PM1 P3 PM1 P9 In BC P1 In MC P11 (38 sts)
Row 19: In MC K11. In BC make Head Bobble (K3 into one stitch by alternating knitting into the front and back and front of the stitch, turn. Working the following rows into the 3 stitches in the one stitch, P3, turn, K1 M1 K1 M1 K1, turn, P5 turn, TWK2tog K1 K2tog turn, P3 turn, TWK2tog. Pass this st over to the non-working needle. Pass the st on the LEFT over the st on the RIGHT. Pass the st back over to the working needle (do NOT turn). In MC K26 (38 sts)
Row 20: In MC P26. In BC P1 in MC P11
Row 21: In MC K11. In BC K3 into one stitch by alternating knitting into the front and back and front of the stitch. In MC K9 M1 K5 M1 K12 (42 sts)
Row 22: In MC P28. In BC P3. In MC P11
Row 23: In MC K11. In BC K3. In MC K28
Row 24: In MC P12 PM1 P7 PM1 P9. In BC P3. In MC P11 (44 sts)
Row 25: In MC K11. In BC K3. In MC K30
Row 26: In MC P30. In BC P3. In MC P11
Row 27: In MC K11. In BC K3. In MC K9 M1 K9 M1 K12 (46 sts)
Row 28: In MC P32. In BC P3. In MC P11
Row 29: In MC K11. In BC K3. In MC K32
Row 30: In MC P12 PM1 P11 PM1 P9. In BC P3. In MC P11 (48 sts)
Row 31: In MC K11. In BC K3. In MC K34
Row 32: In MC P34. In BC P3. In MC P11
Row 33: In MC K11. In BC K3, turn. P3, turn. TWK2tog. Pass this st over to the non-working needle. Pass the st on the LEFT over the st on the RIGHT. Pass the st back over to the working needle (do NOT turn). In MC K9. Pass the next 13 stitches to a stitch holder. K12. Break BC (33 sts)
Row 34: P across
Row 35: K across
Row 36: P across
♫ Row 37: K1 P1 ♥ K2 P1 ♥ Repeat from ♥ to ♥ to the last st. K1
Row 38: P1 K1 ♦ P2 K1 ♦ Repeat from ♦ to ♦ to the last st. P1 ♫
Repeat from ♫ to ♫ one more time.
Cast off loosely.
Making the Thumb
Pick up the 13 stitches on the stitch holder. With the RIGHT side facing you.
Row 1: *P1 K2* Repeat from * to * across. P last st.
Row 2: ♠ K1 P2 ♠ Repeat from ♠ to ♠ across. K last st.
Repeat rows 1 and 2 for a total of 4 rows.
Cast off loosely.
Left Top Wing (make 2)
With 3.25 mm needles and WC cast on 4 sts
Row 1: K across
Row 2: P1 K2 P1
Row 3: K1 M1 K2 M1 K1
Row 4: P2 K2 P2
Row 5: K2 M1 K2 M1 K2
Row 6: P2 K4 P2
Row 7: K across
Row 8: P2 K4 P2
Row 9: K5 K2tog K1
Row 10: P2 K3 P2
Row 11: K4 K2tog K1
Row 12: P2 K2 P2
Row 13: K3 K2tog K1
Row 14: P2 K1 P2
Row 15: K2 K2tog K1
Row 16: P4
Row 17: TWK2tog K2tog
Row 18: TBLP2tog
Break yarn. If you need help with the end of the wing, watch the video below. It’s cued up exactly for what you need to know.
Left Bottom Wing (make 2)
With 3.25 mm needles and WC cast on 4 sts
Row 1: K across
Row 2: P1 K2 P1
Row 3: K1 M1 K2 M1 K1
Row 4: P2 K2 P2
Row 5: K across
Row 6: P2 K2 P2
Row 7: K3 K2tog K1
Row 8: P2 K1 P2
Row 9: K2 K2tog K1
Row 10: P4
Row 11: TWK2tog K2tog
Row 12: TBLP2tog
Break yarn.
Right Top Wing (make 2)
With 3.25 mm needles and WC cast on 4 sts
Row 1: K across
Row 2: P1 K2 P1
Row 3: K1 M1 K2 M1 K1
Row 4: P2 K2 P2
Row 5: K2 M1 K2 M1 K2
Row 6: P2 K4 P2
Row 7: K across
Row 8: P2 K4 P2
Row 9: K1 TWK2tog K5
Row 10: P2 K3 P2
Row 11: K1 TWK2tog K4
Row 12: P2 K2 P2
Row 13: K1 TWK2tog K3
Row 14: P2 K1 P2
Row 15: K1 TWK2tog K2
Row 16: P4
Row 17: TWK2tog K2tog
Row 18: TBLP2tog
Break yarn.
Right Bottom Wing (make 2)
With 3.25 mm needles and WC cast on 4 sts
Row 1: K across
Row 2: P1 K2 P1
Row 3: K1 M1 K2 M1 K1
Row 4: P2 K2 P2
Row 5: K across
Row 6: P2 K2 P2
Row 7: K1 TWK2tog K3
Row 8: P2 K1 P2
Row 9: K1 TWK2tog K2
Row 10: P4
Row 11: TWK2tog K2tog
Row 12: TBLP2tog
Break yarn.
Arrange the wings so they look like this. Sew the top and bottom sides of the wings together. Now it’s time to start on the gloves.


How to Make the Antenna Dots (French Knots)
You can make the dots on top of the antenna on the head of your butterflies. You can even leave the head plain if you like. It’s up to you. The “stick” part is just a simple single stitch.
The purple butterflies don’t have antenna, the blue gloves do.
If you want to make the dots, they’re French knots, you can watch the video. It’s for a different pattern, but the technique is the same.
Hints and Tips
Pass the MC yarn behind your work when making the body of the butterfly. Because it’s such a small span, there’s no need to catch the yarn as you knit the body. Pull the yarn snug so the stitches hold their shape on each side of the body.
Arrange your wings any way you like. Sew the Top and Bottom wings together, then attach the wings to the body.
Play with colour and use variegated yarn for the body and wings. Colour can really make the butterfly pop.
You don’t have to tack down the head and wings, but I feel it looks a little more finished. It also helps the to hold the wings in place to make them less floppy. I use the end of the yarn used to start the head to attach the head directly to the body. A quick st in the middle of each of the top wings works well.
Make sure you finish the butterfly (attach wings, tack down the head) BEFORE you sew up the seam along the side.
Work in the ends and don’t just knot off your yarn. You don’t want a knot directly rubbing on the back of the wearers hand.
Abbreviations
K – knit
P – purl
st – stitch
sts – stitches
sl – slip the stitch
M1 – Make one (knit wise). Increase one stitch between the stitches. Pick up the yarn between the stitches. Twist it slightly and place it on your non-working needle. Knit the stitch. Click to watch this video.
PM1 – Make one (purl wise). Increase one stitch between the purl stitches. Pick up the yarn between the stitches. Place it on your non-working needle. Purl the stitch as you regularly would.
TWK2tog – (Twist and Knit 2 sts together) – Pick up a stitch as if to knit. Twist the stitch and place it back on your non-working needle. Knit the 2 stitches together from right to left.
TBLP2tog – (Through the Back Loop, Purl 2 sts together) – Purl 2 together through the back loop from left to right.


