Socks are one of those things that you can make as individual as you are. Made in the round on 4 double pointed needles, it may seem intimidating at first, but really it’s not. And with a little practise you’ll get just as hooked as me.

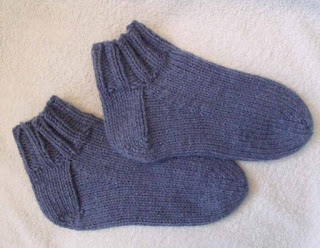
If you are just getting started one standard ball of yarn, like the kind you can get at Walmart, should be enough to make a pair of ankle socks as pictured above. Choose an acrylic yarn or a blended worsted weight. You can use wool, but cleaning them may be a hassle (shrinkage) and cotton yarn doesn’t stretch enough to make a comfortable pair of socks. It also gets up your nose when working with it. Just want full disclosure here ?
To cast on, I cast all the stitches on one needle, then take the first 1/3 of the stitches and slip them onto a free needle, then take the last 1/3 of the stitches and put those on another needle, leaving the remaining 1/3 on the original needle.This method helps me to not twists my stitches. I then start to knit in the round.
Included with this pattern are photos of every step showing how to graft the toe, or sewing the toe stitches together. Not only does this technique work for socks, but it is the same procedure for grafting the stitches for mittens. If sone correctly, it makes for a nearly perfect seam. Keep scrolling down the page to see the instructions and pics.
This pattern is available as a read online only. No download is available. Sorry. There are so many sock patterns already, I’m sure a quick search will find one you can download.
A quick tip about working with double pointed needles (DPN). I find that using wood or bamboo a bit better than working with the metal needles. Sometimes, when working with the metal needles, you’ll find that you get a line that runs the length of your sock where you start working on a new needle. For some reason, and for me, using bamboo prevents this.
Also, check your tension first! I use a size Size 7 needle (Size 4.5 if your Canadian) with worsted weight yarn and with the tension of:
If you are loving the free patterns, please consider making a small donation to Help Support My Work! If you are unable to do so, I totally understand. Sharing this and other patterns you like with others on your social media or through email, helps me too. I’ve provided handy links above to help you do just that ?
10 stitches = 2 inches
14 rows = 2 inches
Depending on how tight you knit you may need larger or smaller needles. If you’ve knitted before you probably have a good idea of what needles you need.
Things You Need:
Size 4.5 mm (Size 7 US) double pointed knitting needles
Large eyed needle for grafting toe and sewing in the ends.
Abbreviations:
K = Knit
P = Purl
K2tog = Knit 2 stitches together
P2tog = Purl 2 stitches together
Cast on 36 stitches loosely.
There needs to be some stretch to be able to get them on.
Rounds 1-15: K2 P2
Rounds 16-17: Knit
Heel flap:
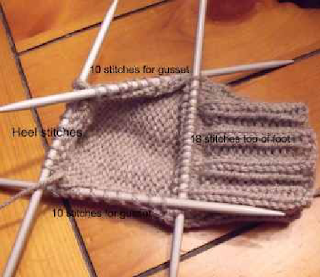
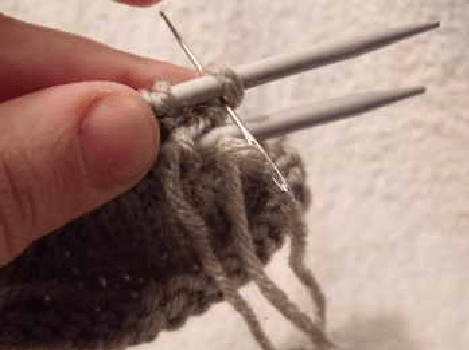
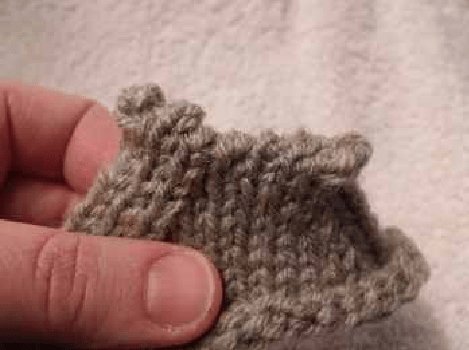
Slip last 9 stitches from round 17 to free needle, knit next 9 stitches from next needle onto needle with the 9 slipped stitches from round 17. You will have four needles and will look like this:
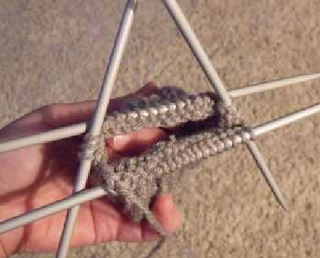
Transfer the three stitches on the two needles onto the back needle. Split these 18 stitches between two needles. It will look like this:
You will work these split 18 stitches later to form the top of the foot.
Turn your work. You are now creating the heel flap from the slipped stitches and will work in rows along the 18 stitches that are on the single needle.
With the wrong side (Purl side) facing you. Purl the row. Turn.
With the right side (Knit side) facing you. Knit the row. Turn.
Repeat stocking knit (Purl one row, Knit one row) until the flap measure approximately 2 1/2 inches ending with a Purl row. Turn.
With right side (Knit side) facing you K8 stitches, K2 tog, K8. Turn. (17 stitches on the needle)
Next row: P8, P2 tog, P1. Leave remaining stitches unworked. Turn.
Next row: K1, K2 tog, K1. Leave remaining stitches unworked. Turn.
Next row: P2 , P2 tog, P1. Leave remaining stitches unworked. Turn.
Next row: K3, K2 tog, K1. Leave remaining stitches unworked. Turn.
Please share this page!
More FREE patterns
Click the pic to read online!!


FREE Knitting Graph Paper for Colorwork Knitting


![]()
![]()


Next row: P4, P2 tog, P1. Leave remaining stitches unworked. Turn.
Next row: K5, K2 tog, K1. Leave remaining stitches unworked. Turn.
Next row: P6, P2 tog, P1. Leave remaining stitches unworked. Turn.
Next row: K7, K2 tog, K1.
You will now start knitting around.
Pick up 10 stitches along heel flap to form the gusset. Transfer the 18 held stitches to one needle. Knit the 18 held stitches. Pick up 10 stitches along heel flap to form gusset.
K4 stitches of heel. Slip remaining 5 stitches onto next needle. It will look like this:
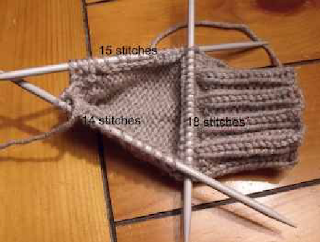
Your needles will hold:
15 stitches side of foot
18 stitches top of foot
14 stitches side of foot
Next 2 rounds: Knit.
Next round: K12, K2tog K1 K18 K1 K2tog K11.
Next 2 rounds: K45
Next round: K11, K2tog K1 K18 K1 K2tog K10.
Next 2 rounds: K43
Next round: K10, K2tog K1 K18 K1 K2tog K9.
Next 2 rounds: K41
Next round: K9, K2tog K1 K18 K1 K2tog K8.
Next 2 rounds: K39
Next round: K8, K2tog K1 K18 K1 K2tog K7.
Next 2 rounds: K37
Next round: K7, K2tog K1 K18 K1 K2tog K6.
Next round: K35
Repeat the last round (K35) until measures the length you want less 2 1/2 inches. To measure lay the sock flat and measure from the needle holding the side gusset stitches to the back of the heel.
More of my stuff on Etsy
You can make a widget like this for your blog or website, too.
Instructions are on my website here: How to Display Etsy Items on Your Website
Toe:
Round 1: K1, K2 tog, K11, K2tog, K2, K2tog, K12, K2tog, K1
Rounds 2-3: Knit
Round 4: K1, K2 tog, K9, K2tog, K2, K2tog, K10, K2tog, K1
Rounds 5-6: Knit
Round 7: K1, K2 tog, K7, K2tog, K2, K2tog, K8, K2tog, K1
Rounds 8-9: Knit
Round 10: K1, K2 tog, K5, K2tog, K2, K2tog, K6, K2tog, K1
Rounds 11-12: Knit
Round 13: K1, K2 tog, K3, K2tog, K2, K2tog, K4, K2tog, K1
Rounds 14-15: Knit.
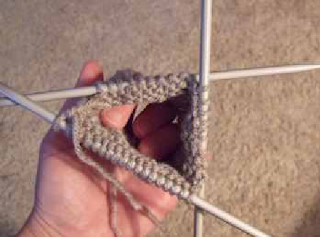
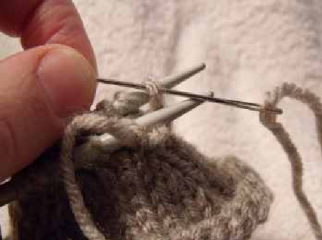
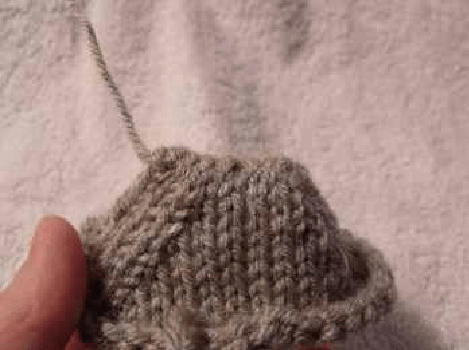
Your needles will look like this:
Transfer stitches onto two needles. 7 stitches and 8 stitches on each needle.
Break yarn leaving enough to graft toe and sew in ends. 12 inches is plenty.
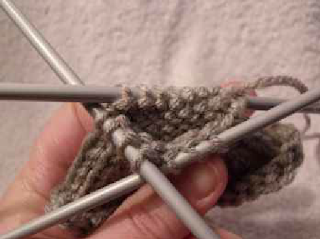
Graft toe:
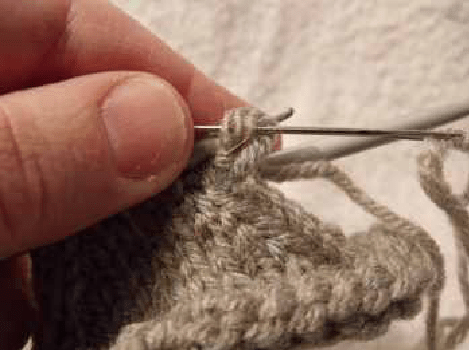
With a darning needle, insert the needle through the front loop of the first needle as if to PURL.
Insert needle through the stitch on the back needle as shown. Drop this stitch.
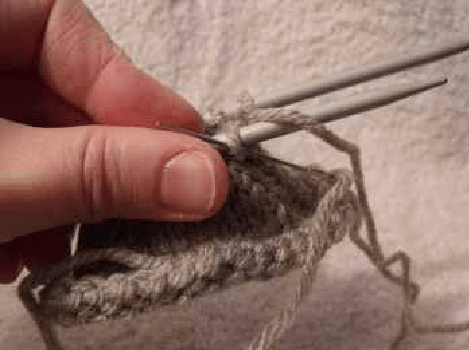
Insert the needle through the back loop of the first stitch AND through the stitch of the next stitch as if to PURL. Drop the first stitch.
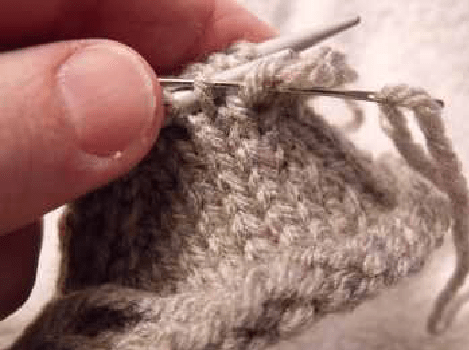
Insert the needle through the stitch on the back needle as if to PURL. Drop this stitch.
? Insert the needle through the back loop of the next stitch on the front needle and the front loop of the next stitch as if to PURL. Drop the first stitch.
Insert the needle through the stitch on the back needle as if to PURL. Drop this stitch. ?

Repeat from ? to ? until there are no stitches left on either needle.
Pull the yarn tight.
Toe is now grafted.
Make another sock to match!
Extra Sock Knitting Tips:
Check your tension first! There’s nothing more disappointing than putting a bunch of effort into a project and then having it turn out to be the wrong size. The gauge of the rows is not so important for this project as you can make it to fit any length of foot. The number of stitches per inch is VERY important! Make sure your gauge is correct.
Work in your ends instead of just knotting them off. Knots can make your foot sore when you step on them or if they rub on your toe.
This pattern can make any size sock up to about a man’s size 10 or a woman’s size 11.
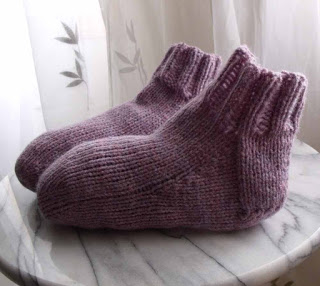
This pattern will make ankle length socks. To make a longer sock like these purple ones at the beginning of this post, just knit more plain rows (rows 16-17) before you start to make the heel flap. If you want a sock that will fit further up the calf you will need to cast on more stitches and then decrease evenly to the number of stitches required to make the foot. This takes some tinkering and can be hard if you’re new to sock knitting.
A good point to remember if you are making a larger size sock has to do with decreasing stitches for the gusset. A good rule of thumb is to decrease to the amount of stitches to the amount you originally cast on. For example if you are making an ankle sock to fit a larger size foot, you can cast on 40 stitches, make the heel flap 1/2 inch longer, pick up 12 stitches along each side of the foot for the gusset and decrease stitches until you are down to 39 stitches around the foot.
And if you are making a larger sock, and this is from personal experience, write down how many stitches you cast on, how long you make the heel flap, and how many stitches you pick up along the edge. It can be difficult to recall the numbers if you have to leave the project for a while.
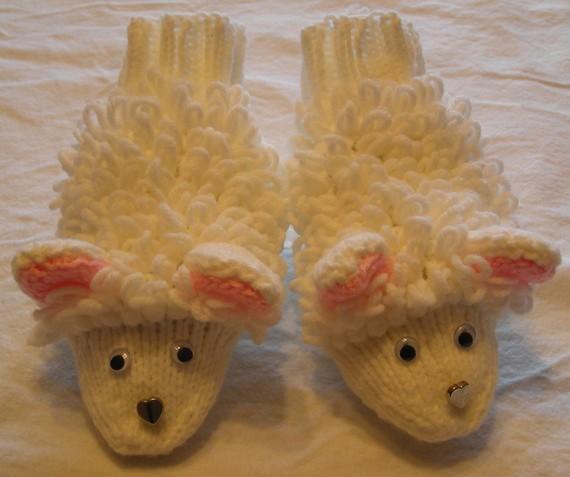
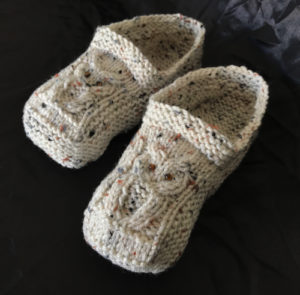
And for the sake of a little shameless self promotion…if you learn how to knit socks you can also knit these sheep slippers. You can read the pattern online here Learn to Knit Adult Sized Sheep Slippers. There are lots of photos and detailed descriptions on how to make them.
If you are enjoying the free patterns and picture tutorials, then please share my work! Those handy little icons along the side or bottom of the page let you do it easily and it helps me so much. If you’d like more information on how you can keep things free, learn how you can Help Support My Work.
Like all of my patterns you have my permission to sell and/or give away the slippers that you make using this pattern. You are NOT permitted to reprint this pattern in any form unless you have obtained my written permission to do so. If you would like to link back, that always awesome and feel free to do so. Happy knitting!