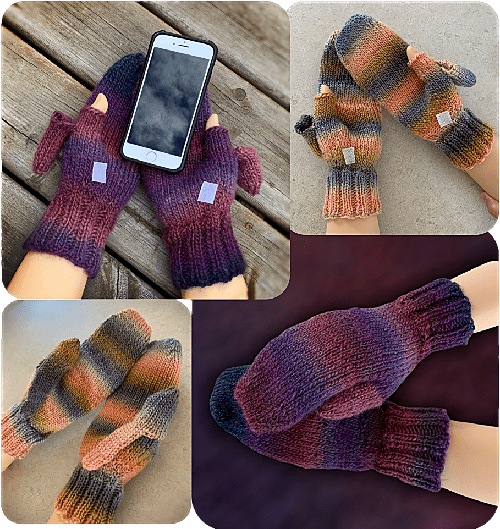
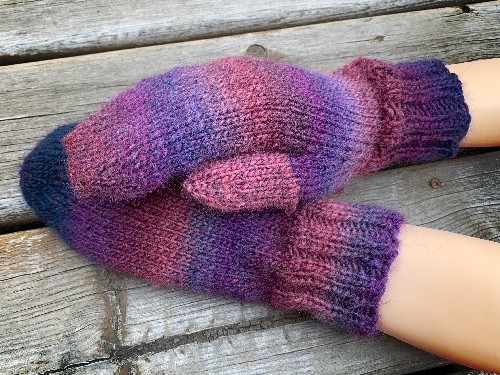
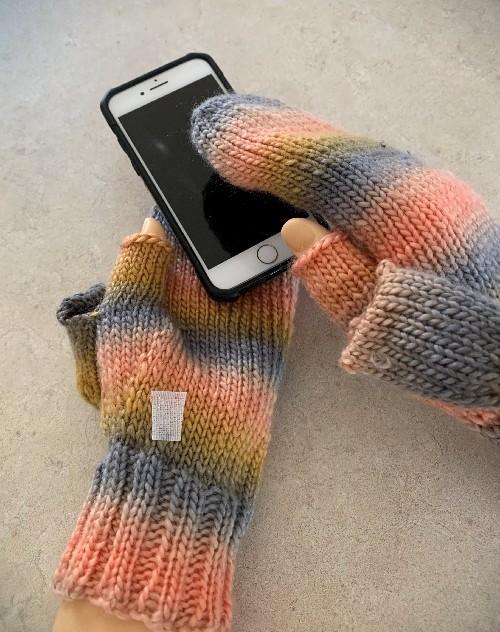
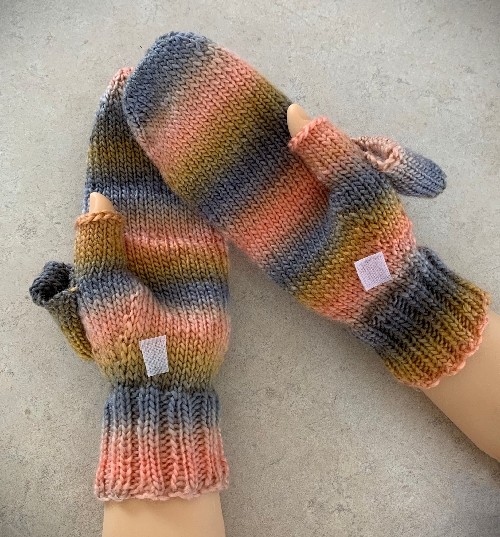
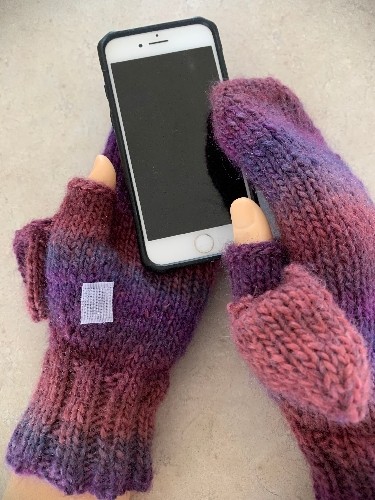
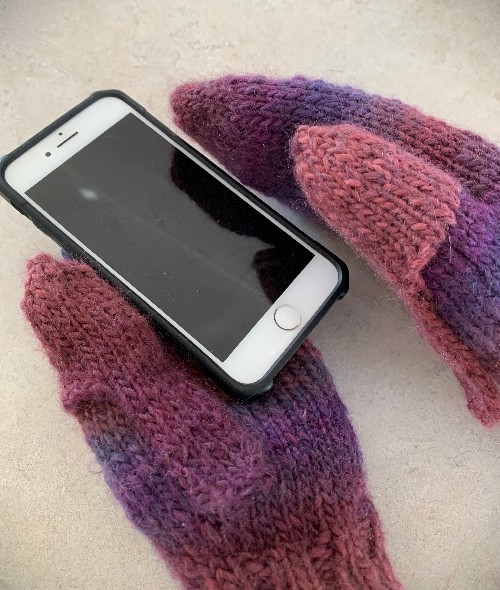
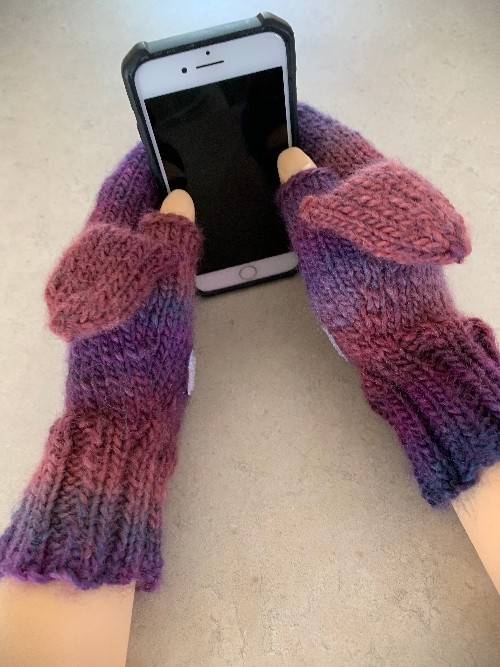
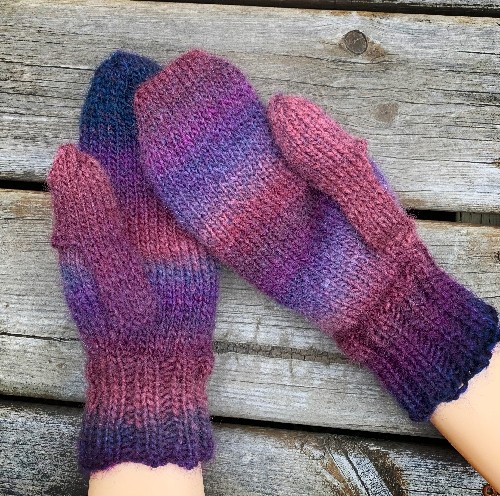
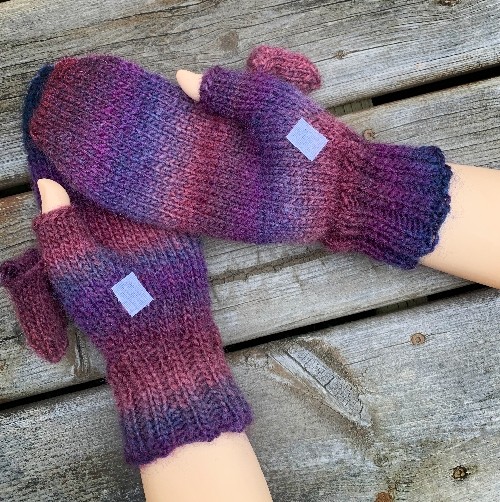
Improve your texting in cold climates with these thumbless mittens. More than just a pair of fingerless gloves, these keep your hands warm and only expose your thumbs when needed. The thumb pocket is sewn on and the flap is secured at the base of the palm with Velcro* for easy access. The flap hangs in the back out of the way to enable your texting abilities. Plan on using your thumbs for a while? Then simply tuck the flap into the thumb pocket.

The sizes are each written separately as each size is a bit different in row and stitch counts. Scroll down this post to the size you would like to make. Medium fits the average lady’s hand, large for men, and small for pre-teens.
Don’t forget to share this post!
Don’t want to come back here to read the pattern? You can download the pattern to your tablet, phone or computer from my website at Knit a Pair of Texting Mitts. You can also get it from other ebook retailers such as Ravelry, Etsy, and LoveCrafts. If the link isn’t working, I haven’t uploaded it to the site yet. It will be ASAP.
If you enjoy this and my other free knitting and crochet patterns, please Help Support My Work. It doesn’t have to be financial, though that’s always appreciated. Every like, share and follow also helps me keep this website running.
Another way to get instant, PRINTABLE downloads of this pattern and more, is by becoming a patron and supporting me on Patreon. When you support my work at the $4/month level or higher, the locked posts become visible and you can immediately access the download link. No waiting for an email. Simply click the PDF link at the bottom of the Patreon post and the download is now on your computer, smart phone, tablet or whatever device you’re using. You can then read it on your device or print it at your leisure. You can download as many patterns as you like for the same $4 each month. You can go to this website to become a patron and support my
Things you need
Yarn (a standard ball of worsted weight yarn will be more than enough)
Size 4.5 mm double pointed needles
Hook and loop fastener (AKA – Velcro)
Glue

Gauge
10 stitches = 2 inches
13 rows = 2 inches
Small
The Mitt
Cast on 32 sts (loosely). Divide these evenly as possible on three of the double pointed needles.
Round 1 – 15: K2, P2 (Creates knit 2 purl 2 ribbing).
Round 16 – 18: Knit
Round 19: K1, pick up a st (scroll down to the bottom of the page if you want to see photos of how I do this), k1, pick up a stitch. Knit remaining sts.
Round 20 – 21: Knit
Round 22: K1, pick up a st, k3, pick up a stitch. Knit remaining sts.
Round 23 – 24: Knit
Round 25: K1, pick up a st, k5, pick up a stitch. Knit remaining sts.
Round 26 – 27: Knit
Round 28: K1, pick up a st, k7, pick up a stitch. Knit remaining sts.
Round 29 – 30: Knit
Round 31: K1, pick up a st, k9, pick up a stitch. Knit remaining sts.
Round 32 – 33: Knit
Round 34: K1, place next 11 sts onto the stitch holder. Knit the remaining sts.. There should be 31 sts divided on the three needles.
Round 35 and on: Knit in the round on these remaining 31 sts until work measures approximately 3.5 inches from the stitches held back to form the thumb.
Form Fingertips
Next round: K1, k2tog, K10 K2tog, K2, K2tog, K9, K2tog, K1.
Next two rounds: Knit
Next round: K1, K2tog, K8, K2 tog, K2, K2tog, K7, K2tog, K1.
Next two rounds: Knit
Next round: K1, K2tog, K6, K2 tog, K2, K2tog, K5, K2tog, K1.
Next two rounds: Knit
Please share this page!
More FREE patterns
Click the pic to read online!!


FREE Knitting Graph Paper for Colorwork Knitting


![]()
![]()


Transfer the stitches onto two needles being sure that the stitches held back for the thumb are along the fold.
Break yarn leaving enough to graft the fingertips (if you scroll to the end of the post there are photos showing you how to do this) and sew in ends. 12 inches is plenty.
Finishing the Thumb
Worked over the 11 sts on the stitch holder. Leave the end you attach to complete the thumb longer than you normally would. You can use this to sew the thumb flap onto the mitten.
Pick up and divided the 11 sts on the stitch holder between the 3 double pointed needles. One of the needles will have more sts than the others.
Round 1 – 5: Knit
Bind off loosely.
Thumb Flap
Using 2 of your double pointed needles and working back and forth.
Cast on 3 sts.
Row 1: Knit
Row 2: Purl
Row 3: K1, pick up a st, K1 pick up a st, K1. (5 sts)
Row 4: Purl
Row 5: Knit
Row 6: Purl
Row 7: Knit
Row 8: Purl
Row 9: K1, pick up a st, K3, pick up a st, K1. (7 sts)
Row 10: Purl
Row 11: Knit
Row 12: Purl
Row 13: Knit
Row 14: Purl
Row 15: With the right side of your work facing you, cast on 3 sts. Working over the 3 sts you just cast on, K3. Leave these 3 sts on the needle you used to knit them. With another double pointed needle, knit the 7 sts from the previous row. With the wrong side of you work facing you, cast on 3 sts. Transfer these 3 sts onto another double pointed needle. You will now start knitting in the round.
With the right side of your work facing you:
Round 16 – 25: Knit
Round 28: K2tog, K1, K2 tog 3 times, K1, K2tog, K1 .
Round 29: Knit
Round 30: K2tog four times
Draw loops together and sew in the ends.
More of my stuff on Etsy
You can make a widget like this for your blog or website, too.
Instructions are on my website here: How to Display Etsy Items on Your Website
Medium
The Mitt
Cast on 36 sts (loosely). Divide these evenly on three of the double pointed needles.
Round 1 – 15: K2, P2 (Creates knit 2 purl 2 ribbing).
Round 16 – 18: Knit
Round 19: K1, pick up a st (scroll down to the bottom of the page if you want to see photos of how I do this), k1, pick up a stitch. Knit remaining sts.
Round 20 – 21: Knit
Round 22: K1, pick up a st, k3, pick up a stitch. Knit remaining sts.
Round 23 – 24: Knit
Round 25: K1, pick up a st, k5, pick up a stitch. Knit remaining sts.
Round 26 – 27: Knit
Round 28: K1, pick up a st, k7, pick up a stitch. Knit remaining sts.
Round 29 – 30: Knit
Round 31: K1, pick up a st, k9, pick up a stitch. Knit remaining sts.
Round 32 – 33: Knit
Round 34: K1, pick up a st, k11, pick up a stitch. Knit remaining sts.
Round 35 – 36: Knit
Round 37: K1, place next 13 sts onto the stitch holder. Knit the remaining sts. There should be 35 sts divided on the three needles.
Round 38 and on: Knit in the round on these remaining 35 sts until work measures approximately 4 inches from the stitches held back to form the thumb.
Form Fingertips
Next round: K1, k2tog, K12 K2tog, K2, K2tog, K11, K2tog, K1.
Next two rounds: Knit
Next round: K1, K2tog, K10, K2 tog, K2, K2tog, K9, K2tog, K1.
Next two rounds: Knit
Next round: K1, K2tog, K8, K2 tog, K2, K2tog, K7, K2tog, K1.
Next two rounds: Knit
Transfer the stitches onto two needles being sure that the stitches held back for the thumb are along the fold.
Break yarn leaving enough to graft the fingertips (scroll to the bottom of the post where there are photos showing you how to do this) and sew in ends. 12 inches is plenty.
Finishing the Thumb
Worked over the 13 sts on the stitch holder. Leave the end you attach to complete the thumb longer than you normally would. You can use this to sew the thumb flap onto the mitten.
Pick up and divided the 13 sts on the stitch holder between the 3 double pointed needles. One of the needles will have more sts than the others.
Round 1 – 5: Knit
Bind off loosely.
Thumb Flap
Using 2 of your double pointed needles and working back and forth.
Cast on 3 sts.
Row 1: Knit
Row 2: Purl
Row 3: K1, pick up a st, K1 pick up a st, K1. (5 sts)
Row 4: Purl
Row 5: Knit
Row 6: Purl
Row 7: Knit
Row 8: Purl
Row 9: K1, pick up a st, K3, pick up a st, K1. (7 sts)
Row 10: Purl
Row 11: Knit
Row 12: Purl
Row 13: Knit
Row 14: Purl
Row 15: With the right side of your work facing you, cast on 5 sts. Working over the 5 sts you just cast on, K5. Leave these 5 sts on the needle you used to knit them. With another double pointed needle, knit the 7 sts from the previous row. With the wrong side of you work facing you, cast on 5 sts. Transfer these 5 sts onto another double pointed needle. You will now start knitting in the round.
With the right side of your work facing you:
Round 16 – 27: Knit
Round 28: K2tog twice, K1, K2 tog 3 times, K1, K2 tog twice, K1.
Round 29: Knit
Round 30: K2tog, K1, K2tog twice, K2tog, K1
Draw loops together and sew in the ends.
Large
The Mitt
Cast on 40 sts (loosely). Divide these evenly as possible on three of the double pointed needles.
Round 1 – 15: K2, P2 (Creates knit 2 purl 2 ribbing).
Round 16 – 18: Knit
Round 19: K1, pick up a st (scroll down to the bottom of the page if you want to see photos of how I do this), k1, pick up a stitch. Knit remaining sts.
Round 20 – 21: Knit
Round 22: K1, pick up a st, k3, pick up a stitch. Knit remaining sts.
Round 23 – 24: Knit
Round 25: K1, pick up a st, k5, pick up a stitch. Knit remaining sts.
Round 26 – 27: Knit
Round 28: K1, pick up a st, k7, pick up a stitch. Knit remaining sts.
Round 29 – 30: Knit
Round 31: K1, pick up a st, k9, pick up a stitch. Knit remaining sts.
Round 32 – 33: Knit
Round 34: K1, pick up a st, k11, pick up a stitch. Knit remaining sts.
Round 35 – 36: Knit
Round 37: K1, pick up a st, k13, pick up a stitch. Knit remaining sts.
Round 38 – 39: Knit
Round 40: K1, place next 15 sts onto the stitch holder. Knit the remaining sts. There should be 39 sts divided on the three needles.
Round 41 and on: Knit in the round on these remaining 39 sts until work measures approximately 5 inches from the stitches held back to form the thumb.
Form Fingertips
Next round: K1, k2tog, K14 K2tog, K2, K2tog, K13, K2tog, K1.
Next two rounds: Knit
Next round: K1, K2tog, K12, K2 tog, K2, K2tog, K11, K2tog, K1.
Next two rounds: Knit
Next round: K1, K2tog, K10, K2 tog, K2, K2tog, K9, K2tog, K1.
Next two rounds: Knit
Transfer the stitches onto two needles being sure that the stitches held back for the thumb are along the fold.
Break yarn leaving enough to graft the fingertips (scroll to the bottom of the post where there are photos showing you how to do this) and sew in ends. 12 inches is plenty.
Finishing the Thumb
Worked over the 15 sts on the stitch holder. Leave the end you attach to complete the thumb longer than you normally would. You can use this to sew the thumb flap onto the mitten.
Pick up and divided the 15 sts on the stitch holder between the 3 double pointed needles. One of the needles will have more sts than the others.
Round 1 – 8: Knit
Bind off loosely.
Thumb Flap
Using 2 of your double pointed needles and working back and forth.
Cast on 3 sts.
Row 1: Knit
Row 2: Purl
Row 3: K1, pick up a st, K1 pick up a st, K1. (5 sts)
Row 4: Purl
Row 5: Knit
Row 6: Purl
Row 7: Knit
Row 8: Purl
Row 9: K1, pick up a st, K3, pick up a st, K1. (7 sts)
Row 10: Purl
Row 11: Knit
Row 12: Purl
Row 13: Knit
Row 14: Purl
Row 15: K1, pick up a st, K5, pick up a st, K1. (9 sts)
Row 16: Purl
Row 17: Knit
Row 18: Purl
Row 19: Knit
Row 20: Purl
Row 21: With the right side of your work facing you, cast on 5 sts. Working over the 5 sts you just cast on, K5. Leave these 5 sts on the needle you used to knit them. With another double pointed needle, knit the 9 sts from the previous row. With the wrong side of you work facing you, cast on 5 sts. Transfer these 5 sts onto another double pointed needle. You will now start knitting in the round.
With the right side of your work facing you:
Round 22 – 38: Knit
Round 39: K2tog twice, K1, K2 tog 4 times, K1, K2 tog twice, K1.
Round 40: Knit
Round 41: K2tog, K1, K2tog twice, K1, K2tog, K1
Draw loops together and sew in the ends.If you are unfamiliar with how to end the fingertips on mittens (this works for socks as well), I’ve added a picture tutorial at the end of another pattern. Instead of me adding all the photos and instructions again, here’s the link to learn how –
How to Graft Fingertips.
Make another mitten to match.
Attaching the Thumb Flap
With the yarn left from where you continued the thumb, attach the thumb flap to the mitten. Make sure that you attach the thumb flap to the back side of the left and right mittens accordingly. Easiest way is to lay the mitts flat with the thumbs pointing in opposite directions.
Attaching the Velcro
Cut a small piece of Velcro that will fit on the base of the thumb flap. Keeping both halves of the Velcro together, attach it to the THUMB FLAP first. Glue it in place.
Keeping the Velcro pieces together, place some glue on the other half of the Velcro. Pull the thumb flap forward in the toasty warm thumb position. With the Velcro still together, place the Velcro where the bottom of the flap touches the palm of the mitten. Press firmly. DO NOT pull the Velcro apart until ALL the glue has dried completely.Like grafting the fingertips, I’ve also shown how to pick up a stitch without leaving a hole. If you’d like to see how it’s done, here’s the link to learn how – How to Pick up a Stitch.
Abbreviations
K – Knit
P – Purl
K2tog – knit 2 together
sts – stitches
st – stitch
Helpful Hints
Make sure when attaching the Velcro to the thumb flap, that the fuzzy half of the Velcro is what you use for the flap. In other words, which ever side feels less rough. The other pokey side should go on the palm of the mitt. That way the Velcro won’t stick to the inside of the thumb flap when folded back into itself.
When picking up stitches to finish the thumb on the mitt, leave a long piece of yarn to sew on the thumb flap. This saves on the number of ends to sew in when you’re done.
You don’t need a stitch holder. Even a piece of yarn will work.
Instead of glue, you can also sew the Velcro on. I find glue is simpler and quicker.
*Velcro is a registered trademark.


Like!! Really appreciate you sharing this blog post.Really thank you! Keep writing.