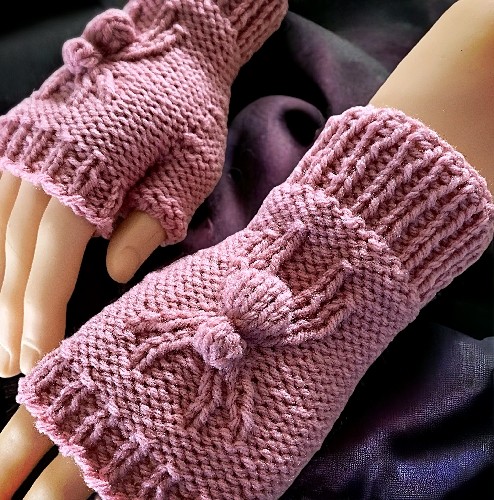
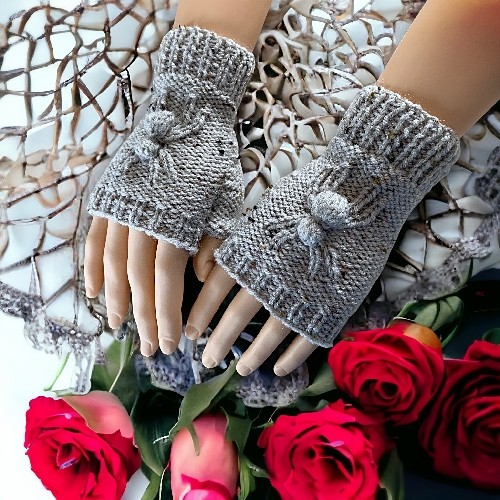
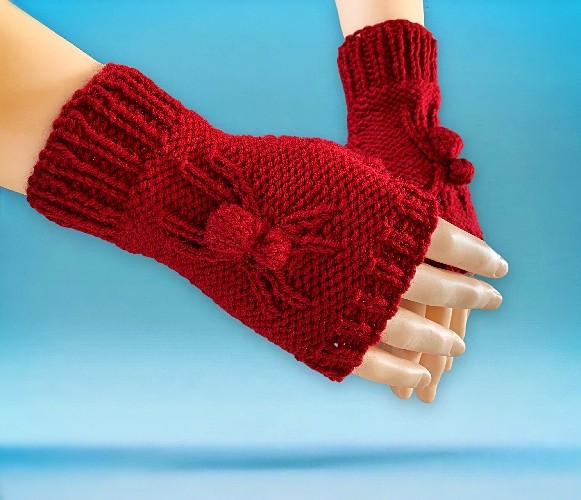
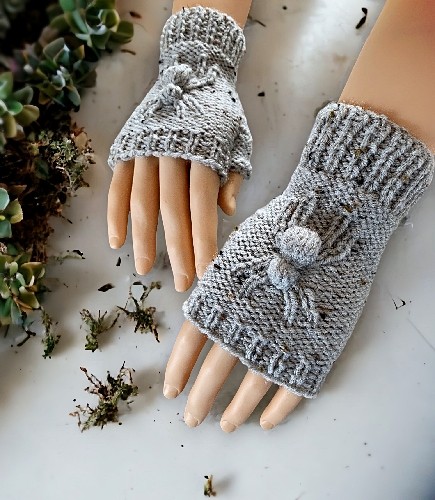
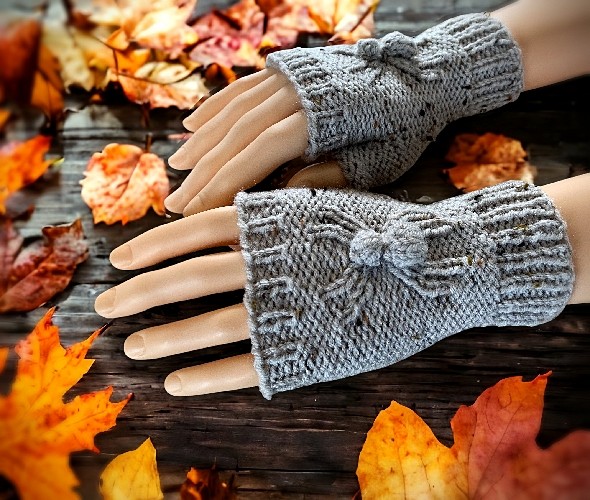
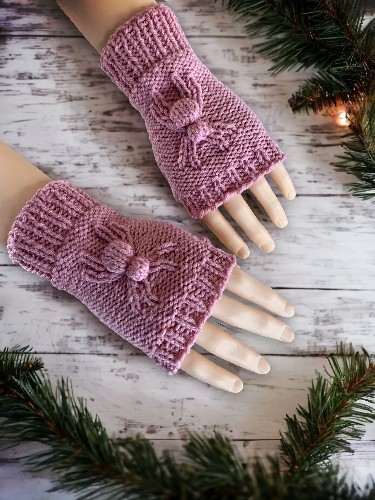
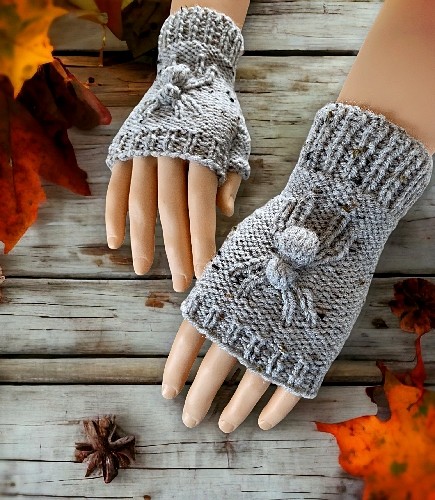
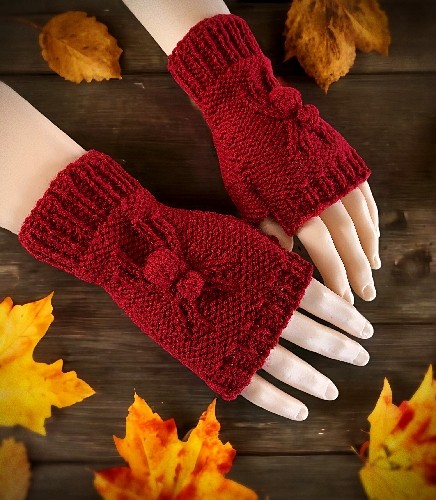
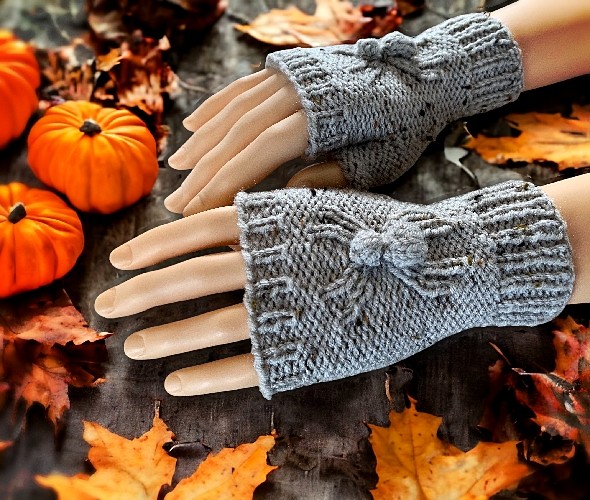
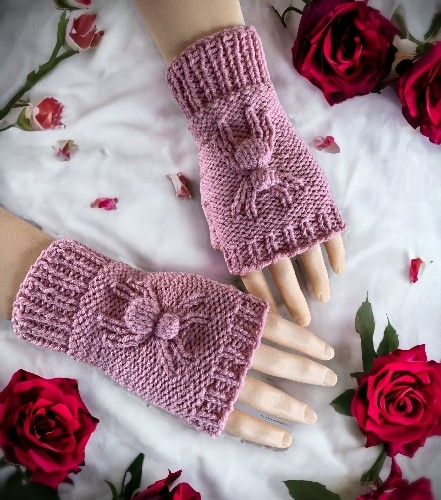
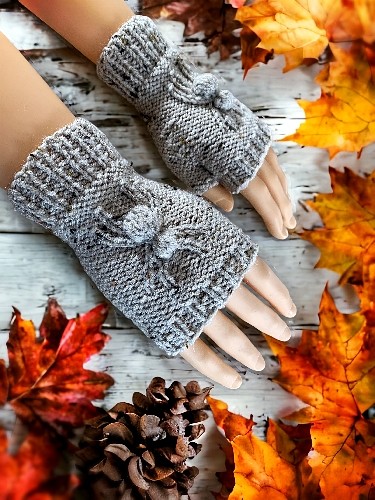
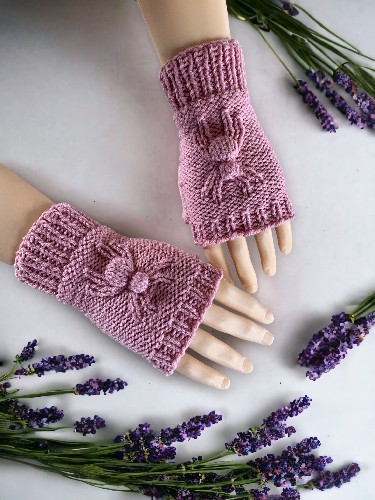
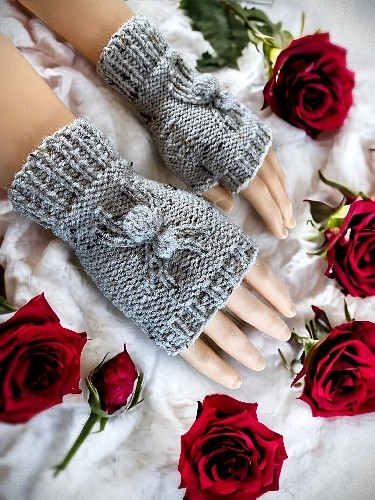
Creepy? No. Awesome? YES! Knit a pair of fingerless gloves with a spider motif on the back of the hand. Guaranteed to never fall off, the 3D spider is created as you make the mitten.

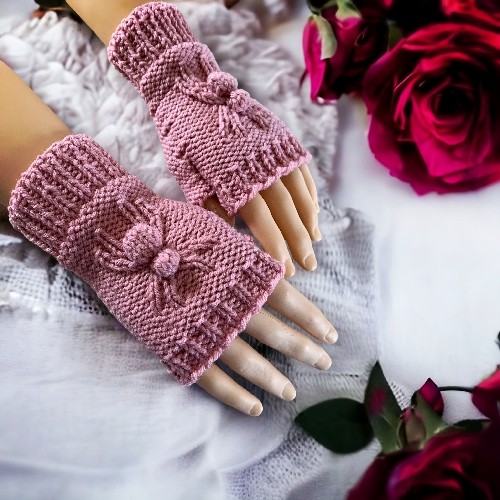
Did you stumble upon this pattern but wanted to buy a pair of spider gloves? Head over to my Etsy shop and you can buy a pair in nearly any colour – CUSTOM MADE Hand Knit Adult Spider Fingerless Granny Gloves
This isn’t a pattern for beginners. You’ll need to think out of the box a bit for this one; making bobbles and working selectively over given stitches to create the body and head. But the basic glove portion is the same as every other glove with a thumb increase you’ve made, just like my Super Simple Fingerless Gloves only done with a purl stitch to make the spider stand out even more.

This pattern has been in the works for a number of years now. It originally started as a knit in the round design, but because of the extensive purling, there were always lines left where the needles met. I couldn’t live with that.
So, there was a change in plans from the initial design. First change; it’s knit flat on 2 needles. The second is that instead of including a bunch of how-to pictures, and there were going to be a lot, I decided it was time to utilize links to how-to videos. Everything that may be challenging, particularly rows 25 – 27 can be a little confusing. I made videos that show the trickier parts of these rows. To watch the video, click the link provided. The video opens a new page on the website and you can watch the embedded YouTube video here.
Too much blib blab for you? Want to just print the damn pattern already? You have some options available to you.
Because of the request by many that they would prefer a PDF download, it’s DONE! You can download this pattern for a small fee/donation. You can get it from a number of places. You can download it from a number of places. In particular, my site here – Knit a Pair of Spider Fingerless Gloves – now with VIDEOS! You can also get it at a number of other online book retailers such as Ravelry, LoveCrafts, and Etsy. And the paperback version is also available on Amazon! It’s available to order in most countries. Be sure to make your purchase in the country you love so you can get free shipping with your Amazon Prime membership.
Another way to avoid ads and pop-ups, get instant, PRINTABLE downloads of this pattern and others, is by becoming a Member on this website. When you become a Website Supporter for $4/month, you’ll gain access to exclusive member only posts. These posts contain one click downloads of the patterns. Simply click the Download & Print button. The PDF will automatically download to your computer or smart device. You can then read it on your device or print it at your leisure. You can download as many patterns as you like for the same $4 each month. You can go to this page to learn more, become a member and support my work… Exclusive Member Area
Wrong Stitch Counts
It is very easy to have the wrong number of stitches created around the spider. This can happen between the gusset for the thumb and the spider, or for the shorter side. If that happens you can take it apart. The other option is to just go with it. Being a stitch or two off won’t be noticable to the wearer.
If you decide to “just go for it”, line up the stitches done to create the spider to previous spider stitches. In general, this is just the legs. They are very obvious. Keep in mind that you always knit the legs on the right side and purl the legs on the wrong side. Adjust the background of the mitt with your incorrect count of purl stitches on the right side and the knit stitches on the wrong side.
For example, if you’re making Row 30, instead of K7 at the start of the row you made a mistake and now have K8. Knit the 8 stitches instead and start the rest of the pattern from there.
Example row:
Row 30: K7 *P1 K1* Repeat from * to * 2 more times. P1 K6 M1 K11 M1 K12
Abbreviations
If you need help with the less common stitches in the abbreviations list below, all are included in this playlist below. Specific videos for rows 25-27 are included in this list and also embedded below each row for the Left Hand glove.
K – Knit
P – Purl
st – stitch
sts – stitches
PM1 – Make one (purl wise). Increase one stitch between the stitches. Pick up the yarn between the stitches. Twist it slightly and place it on your non-working needle. Knit the stitch. Watch this video on How to PM1 or Purl Make 1 to see how.
M1 – Make one (knit wise). Increase one stitch between the stitches. Pick up the yarn between the stitches. Twist it slightly and place it on your non-working needle. Knit the stitch. Watch this video on How to M1 or Make 1 to see how.
P3tog – Purl 3 stitches together
P2tog – Purl 2 stitches together
K2tog – Knit 2 stitches together
K3tog – Knit 3 stitches together
C1B – Cable 1 back. Pick up next stitch on a cable needle. Pull this stitch to the BACK of your work. Knit the next stitch. Purl the stitch on the cable needle. Watch this video on Cable 1 Back to see how.
C1F – Cable 1 forward. Pick up the next stitch on a cable needle. Pull this stitch to the FRONT of your work. Purl the next stitch. Knit the stitch on the cable needle. Watch this video on Cable 1 Forward to see how.
FB2 – Knit in the front and back of the next stitch. This is also known as an increase one in the next stitch. I’m labeling it as this because it is very easy to make a mistake here and pick up an extra stitch. This way I know I have your attention and made you look ? No need to thank me..or complain. Both seem to be a likely response tbh.
Things You Need
Worsted weight yarn – a standard ball of yarn (215 yards/197 m)
Knitting needles – described below in sizing and gauge
Cable Needle
Stitch Holder
Tapestry needle to sew the seam and work in the ends
Sizing & Gauge
Like my other fingerless gloves I’ve designed such as my owl fingerless gloves, I use the size of the needles to change the size of the mitt. This keeps the proportion of the spider consistent to the size of the glove.
My standard for sizing was my hand and designed the knitting pattern according to what kind of rubber gloves fit me comfortably. I wear a medium sized rubber glove and the medium sized glove fits perfectly. You may need to use different sized needles to get the correct gauge, but this pattern is very forgiving if you’re a bit off. Most knitting is tbh.
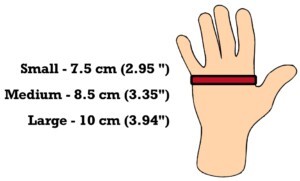
Small
size 3.5 mm (US size 4)
Please share this page!
More FREE patterns
Click the pic to read online!!


FREE Knitting Graph Paper for Colorwork Knitting


![]()
![]()


11 stitches every 2 inches (5 cm)
16 rows every 2 inches (5 cm)
Medium
size 4 mm (US size 6)
10 stitches every 2 inches (5 cm)
14 rows every 2 inches (5 cm)
Large
size 5 mm (US size 8)
9 stitches every 2 inches (5 cm)
12 rows every 2 inches (5 cm)
Left Hand
Cast on 33, loosely
Row 1: K1 P1 across. K last st.
Row 2: P1 K1 across. P last st.
Repeat rows 1 and 2 for a total of 10 rows.
Row 11: P across
Row 12: K across
Row 13: P across
Row 14: K across
Row 15: P12 PM1 P1 PM1 P7 K1 P3 K1 P8 (35 sts)
Row 16: K8 P1 K3 P1 K22 (35 sts)
Row 17: P20 K1 P1 K1 P3 K1 P1 K1 P6 (35 sts)
Row 18: K6 P1 K1 P1 K3 P1 K1 P1 K5 M1 K3 M1 K12 (37 sts)
Row 19: P22 K1 P1 K1 P3 K1 P1 K1 P6 (37 sts)
Row 20: K6 P1 K1 P1 K3 P1 K1 P1 K22 (37 sts)
Row 21: P12 PM1 P5 PM1 P5 C1F twice, P1, C1B twice, P6 (39 sts)
Row 22: K6 *K1 P1* Repeat from *to * 3 more times, K25 (39 sts)
Row 23: P25 C1F K1 P1 K1 C1B P7 (39 sts)
Row 24: K8 P2 K1 P2 K7 M1 K7 M1 K12 (41 sts)
Row 25: P28 K2tog, Bobble 6 (K6 into one stitch by alternating knitting into the front and back of the stitch, turn. Working the following rows into the 6 stitches in the one stitch, P6, turn, K6, turn, P6, turn, K6, turn, P6, turn, K6, turn, P6, turn, K2tog 3 times (do NOT turn). Pass the middle stitch over the stitch closest to the tip of the needle. Two bobble stitches remain. Pass the second bobble stitch over the stitch closest to the tip of the needle. (The bobble is now 1 stitch again on your needle.) K2tog. P8 (39 sts) Click here for the video how-to link – Row 26 Video Tutorial
Row 26: K8 PM1 P3tog PM1 K28 (39 sts) Click here for the video how-to link: Row 26 – Video Tutorial
Row 27: P12 PM1 P9 PM1 P7 FB2 (This is a simple increase knit-wise in the next stitch. These are the start of the front legs). Bobble 5 (K5 into one stitch by alternating knitting into the front and back of the stitch, turn. Working the following rows into the 5 stitches in the one stitch, P5, turn, K5, turn, P2tog P1 P2tog, turn, K3 (do NOT turn). Pass the middle stitch over the stitch closest to the tip of the needle. Two bobble stitches remain. Pass the second bobble stitch over the stitch closest to the tip of the needle. (The bobble is now 1 stitch again on your needle) FB2 (AKA Increase in the next stitch. Makes the other front legs). P8. (43 sts) Click here for the video how-to link: Row 27 – Video Tutorial
Row 28: K8 P2 K1 P2 K30 (43 sts)
Row 29: P29 C1B K1 P1 K1 C1F P7 (43 sts)
Row 30: K7 *P1 K1* Repeat from * to * 2 more times. P1 K6 M1 K11 M1 K12 (45 sts)
Row 31: P30 C1B twice P1 C1F twice P6 (45 sts)
Row 32: K6 P1 K1 P1 K3 P1 K1 P1 K30 (45 sts)
Row 33: P12. Pass the next 13 stitches to a stitch holder. P7 K1 P3 K1 P8 (32 sts)
Row 34: K8 P1 K3 P1 K19 (32 sts)
Row 35: P across
Row 36: K across
Row 37: P across
Row 38: K across
Row 39 – 42: K1 P1 across
Cast off loosely.
Making the Thumb
Pick up the 13 stitches on the stitch holder. Transfer them onto the other needle so you start knitting with the WRONGside facing you. If you don’t transfer them onto the other needle you’ll get a line.
Row 1: K across
Row 2: P across
Row 3: K across
Cast off loosely.
More of my stuff on Etsy
You can make a widget like this for your blog or website, too.
Instructions are on my website here: How to Display Etsy Items on Your Website
Right Hand
Cast on 33, loosely
Row 1: K1 P1 across. K last st.
Row 2: P1 K1 across. P last st.
Repeat rows 1 and 2 for a total of 10 rows.
Row 11: P across
Row 12: K across
Row 13: P across
Row 14: K across
Row 15: P8 K1 P3 K1 P7 PM1 P1 PM1 P12 (35 sts)
Row 16: K22 P1 K3 P1 K8 (35 sts)
Row 17: P6 K1 P1 K1 P3 K1 P1 K1 P20 (35 sts)
Row 18: K12 M1 K3 M1 K5 P1 K1 P1 K3 P1 K1 P1 K6 (37 sts)
Row 19: P6 K1 P1 K1 P3 K1 P1 K1 P22 (37 sts)
Row 20: K22 P1 K1 P1 K3 P1 K1 P1 K6 (37 sts)
Row 21: P6 C1F twice, P1, C1B twice, P5 PM1 P5 PM1 P12 (39 sts)
Row 22: K24 *K1 P1* Repeat from *to * 3 more times, K7 (39 sts)
Row 23: P7 C1F K1 P1 K1 C1B P25 (39 sts)
Row 24: K12 M1 K7 M1 K7 P2 K1 P2 K8 (41 sts)
Row 25: P8 K2tog, Bobble 6 (K6 into one stitch by alternating knitting into the front and back of the stitch, turn. Working the following rows into the 6 stitches in the one stitch, P6, turn, K6, turn, P6, turn, K6, turn, P6, turn, K6, turn, P6, turn, K2tog 3 times (do NOT turn). Pass the middle stitch over the stitch closest to the tip of the needle. Two bobble stitches remain. Pass the second bobble stitch over the stitch closest to the tip of the needle. (The bobble is now 1 stitch again on your needle.) K2tog. P28 (39 sts)
Row 26: K28 PM1 P3tog PM1 K8 (39 sts)
Row 27: P8 FB2 (This is a simple increase knit-wise in the next stitch. These are the start of the front legs). Bobble 5 (K5 into one stitch by alternating knitting into the front and back of the stitch, turn. Working the following rows into the 5 stitches in the one stitch, P5, turn, K5, turn, P2tog P1 P2tog, turn, K3 (do NOT turn). Pass the middle stitch over the stitch closest to the tip of the needle. Two bobble stitches remain. Pass the second bobble stitch over the stitch closest to the tip of the needle. (There is now 1 stitch on your needle.) FB2 (AKA Increase in the next stitch. Makes the other front legs). P7 PM1 P9 PM1 P12. (43 sts)
Row 28: K30 P2 K1 P2 K8 (43 sts)
Row 29: P7 C1B K1 P1 K1 C1F P29 (43 sts)
Row 30: K12 M1 K11 M1 K6 P1 *K1 P1* Repeat from * to * 2 more times. K7 (45 sts)
Row 31: P6 C1B twice P1 C1F twice P30 (45 sts)
Row 32: K30 P1 K1 P1 K3 P1 K1 P1 K6 (45 sts)
Row 33: P8 K1 P3 K1 P7 Pass the next 13 stitches to a stitch holder P12 (32 sts)
Row 34: K19 P1 K3 P1 K8 (32 sts)
Row 35: P across
Row 36: K across
Row 37: P across
Row 38: K across
Row 39 – 42: K1 P1 across
Cast off loosely.
Making the Thumb
Pick up the 13 stitches on the stitch holder. Transfer them onto the other needle so you start knitting with the WRONGside facing you. If you don’t transfer them onto the other needle you’ll get a line.
Row 1: K across
Row 2: P across
Row 3: K across
Cast off loosely.
Finishing
I recommend that you finish the body of the spider before sewing the seams along the edge. It’s easier to work it when flat. I like to make a figure 8 around the body, to the head, around the head and back to the start.
To give the spider body and head a more rounded feel, cut a length of yarn about 12” long. Insert your tapestry needle from the wrong side through the front between the head and the body. Pick up stitches around the edge of the body, back to the head. Pull snug until you are happy with the body shape
Pick up stitches around the head back to the body. Pull snug until you’re happy with the shape.
Pull the yarn to the back of your work. Tie off.
I like to tack the body at it’s base to the glove so it won’t flop around and stay in line with the head. Tie off.
No need to work in the ends when finishing the spider body and head. Simply pull the yarn through the body of the spider. Press the body down and cut the yarn. When the body pops back up, the end will be hidden in the body.
Once the spider finishing is complete, sew the seams along the edge and the thumb, working in the ends when finished to avoid lumps from knots.
Like all my patterns, you are welcome to you this pattern to sell, give away or keep any physical items that you make. All I ask is that you respect my work and don’t make copies of my work in any form.
If you feel the need to complain about not being able to print this pattern from this website page, may I suggest you read this post – Your Patterns Aren’t Free! If you still feel a need to vent in the comments, wtf is the matter with you? It’s bad enough I had to take the time to write the blog post because of your fellow entitled users, don’t be like that too. And reassess your life. Seriously.


I just joined as a member with a yearly membership. I do not know how to find the download and print for a chosen pattern. I clicked on “member area” and then the pattern I wanted and do not see how to download. Help!
You need to go back to the member page and scroll down to the section that you want. Are you looking for a fingerless gloves pattern? Go to that section. All of the fingerless glove patterns are there to click and open the pattern. Read it online, print it or save it to your computer. It works the same for all the sections.
Don’t forget to login to your account so you can access the patterns!!
You can practice with the patterns on this page. Click the link or the button whether you want to read it online or download it. Members Only Demo – Easy Downloads and Printing