Posted on Leave a comment

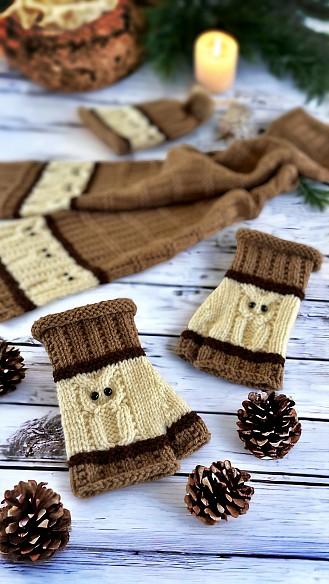
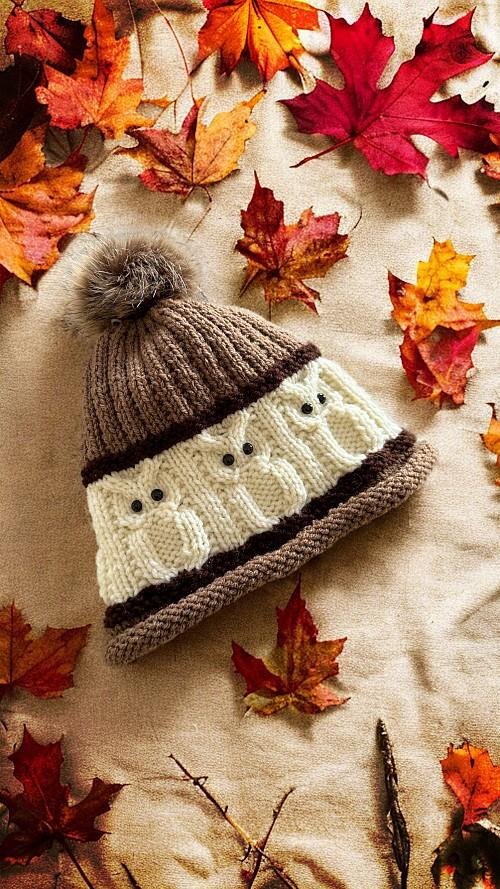
How To Knit A Beanie Hat – With OWLS! – FREE Knitting Pattern

Knit Owl Beanie Hat - FREE Knitting Pattern

I really do like how well the owl motif worked on this hat! And surprisingly didn’t take much figuring or math once I wrote out the Basic Knit Flat BeanieI did have to play around with how many rows tall to make the body and head. I didn’t figure it would stretch as much as it does but I’m happy with the final proportions.

And in case you haven’t found it on the website yet, I have a pair of fingerless gloves that have the same owl motif. There is the knit flat owl gloves and the owl gloves that are knit in the round. The cuffs aren’t a perfect match. I may redesign another pair so it will match the hat better.

This owl hat knit pattern is a fairly easy project to make if you have some knitting experience. I designed it to be flat, knit on 2 straight needles so more people would be comfortable in making it. Though the cabling can look intimidating, it really isn’t. I have videos on YouTube that will show you how if you’ve never done it before. I embedded videos in the pattern to help you along.

The choice of colour is yours as always. I included where to change colours if you would like to make one with 3 colours like I did for the brown and beige version I made. If you’re making a solid colour toque, you can ignore the notifications in the pattern.

As far as the use of a pom pom on the top… Some love it, some hate it. I know for myself, if I have to put my hood up, I hate them, but aesthetically, they do have their charms NGL. I have more information in the Hints and Tips section about the pom pom on the white and blue beanie.

Things You Need

Worsted weight yarn (either complimentary colours or single colour)

5 mm (Size 8 US) single pointed knitting needles

Cable needle

Tapestry needle to sew seams and work in ends

14 or 16 buttons or jewels for eyes (see Hints and Tips)

Pom pom – you can make or buy these, or not use one at all.

Gauge

In stockinette

9 sts = 2 inches (5 cm)

12 rows = 2 inches (5 cm)

Sizes are written as such:

S-M (L-XL)

Small and medium = 21 inches (53 cm) around

Large and Extra large = 24.5 inches (62 cm) around

Uses about 160 meters or 180 yards. Does NOT include pom-pom.

This pattern makes either 7 or 8 owls around. Each owl motif is about 3.5 inches (8.9 cm) wide if you follow the gauge given. You can adjust your stitches accordingly to make larger or smaller sizes than what I’ve given. Each owl motif uses 12 stitches. So, if you wanted it smaller by one owl cast on 74 sts (86 – 12 = 74)

If you would prefer a PDF printable version of the pattern, you can download it for a small fee/donation from a number of places. In particular, my site here – Knit Owl Beanie Hat. You can also get it at a number of other online book retailers such as RavelryLoveCrafts, and Etsy 👈🏼 (40% off on Etsy until the end of March). The Kindle and Paperback version is also on Amazon. If a link isn’t working I either haven’t formatted and published it on that retailer, I am waiting for approval, or I forgot to come back and add the link.

Another way to avoid ads and pop-ups, get instant, PRINTABLE downloads of this pattern and others, is by becoming a Member on this website. When you become a Website Supporter for $3/month, you’ll gain access to exclusive member only posts. These posts contain one click downloads of the patterns. Simply click the Download & Print button. The PDF will automatically download to your computer or smart device. You can then read it on your device or print it at your leisure. You can download as many patterns as you like for the same $3 each month. You can go to this page to learn more, become a member and support my work… Exclusive Member Area

If you enjoy this pattern and my other free online knitting patterns, please consider making a small donation or helping me out by visiting my Help Support My Work page. If that’s not possible, that’s totally fine too! Even sharing this page on your social media helps me out immensely. You can use those buttons below to do so easily.

The Pattern

Cast on 86 (98) sts

♠ Row 1: Knit

Row 2: Purl ♠ Repeat from ♠ to ♠ for a total of 10 rows. (Change colour at the START of row 11 if desired.) 

To save yourself time if you’re changing colours, I suggest that you Work in the Ends While Knitting. You can click that link or watch the video here.

Row 11-15: Knit (Change colour at the START of row 15 if desired.)

Row 16: ♦ P2 K1 P8 K1 ♦ Repeat from ♦ to ♦ until there are 2 sts. P2

Row 17: ♣ K3 C4B C4F K1 ♣ Repeat from ♣ to ♣ to the last 2 sts. K2

If you don’t know how to cable you can watch these videos to show you how.

Row 18: ♥ P2 K1 P2 K4 P2 K1 ♥ Repeat from ♥ to ♥ to the last 2 sts. P2

Row 19: K5 ☺ P4 K8 ☺ Repeat from ☺ to☺ 5 (6) times more. P4 K5

Row 20: As row 18

Row 21: As row 19

Row 22: As row 18

Row 23: As row 19

Row 24: As row 18

Row 25: As row 19

Row 26: As row 18

Row 27: ♣ K3 C4B C4F K1 ♣ Repeat from ♣ to ♣ to the last 2 sts. K2

Row 28: ♦ P2 K1 P8 K1 ♦ Repeat from ♦ to ♦ until there are 2 sts. P2.

Row 29: Knit

Row 30: As row 28

Row 31: Knit

Row 32: As row 28

Row 33: Knit

Row 34: As row 28

Row 35: ♣ K3 C4B C4F K1 ♣ Repeat from ♣ to ♣ to the last 2 sts. K2

Row 36: as row 28 (Change colour at the START of row 37 if desired.)

Row 37 – 40: Knit (Change colour at the START of row 41 if desired.)

▲ Row 41: Knit

Row 42: ◘ P2 K1 ◘ Repeat from ◘ to ◘ tot he last 2 sts. P2 ▲ Repeat from ▲ to ▲ for a total 

of 22 (26) rows.

Next row: ♣ K2tog K1 ♣ Repeat from ♣ to ♣ to the last 2 sts. K2tog

Next row: ◘ P1 K1 ◘ Repeat from ◘ to ◘ to the last st. P1

Next row: K2tog to the end of the row.

Next row: P across

Next row: K2tog to the last st. K1

Next row: P across

Break yarn and draw through. Sew the seam using the blanket stitch. Add a pom-pom to the top if you like.

More of my stuff on Etsy:

ALL patterns on Etsy are
40% off
until March 31


You can make a widget like this for your blog or website, too.
Instructions are on my website here: How to Display Etsy Items on Your Website

Hints and Tips

I used repurposed yarn for the pom pom on the white toque with the blue banding. Unraveling the slippers I had originally made, it left the wool in the crinkly state that occurs. I haven’t washed it so I don’t know if the fluffy/fuzzy look will stay, but I certainly do like the effect it gave to the final pom pom.

If you are using multiple colours for your toque, I suggest you Work in the Ends While You Knit. It saves you time in the long run. You can either click the link or take a photo of the QR code below to learn how.

Sew the seam using a blanket stitch to make it as invisible as possible. I added enough stitches along the sides so you can do this.

You can make the beanie fit closer to the crown of the head by not doing as many repeats of rows 41 and 42. You can also make it longer (taller and floppy) by doing more. 

You can use whatever you like for eyes. Buttons will work. I used 8 mm flat back cabochons. They come in a variety of colours and sizes. I looked for more realistic owl eyes but all I could find were ones for taxidermy and they were too big, and expensive. I also recommend gluing them on as sewing will take a bit of time.

Abbreviations

k – knit

p – purl

k2tog – knit 2 sts together

st – stitch

sts – stitches

Side note: I use both versions of the terminology when it comes to cable stitches. I’ve been corrected that I’m using the wrong one for both occasions so it’s a no win for me. What I mean is that C4F is the same technique as C2F. Just like how C2B is the same as C4B. Do you think of it as the just the stitches you’re pulling or the number of stitches you’re using in total when you do it? It’s a personal choice, I guess.

C4F – Pick up the next 2 stitches with your cable needle. Pull the stitches to the FRONT of your work. Knit the next 2 stitches on your non-working needle. Knit the 2 stitches from the cable needle. Watch this video to see how. How to C4F or Cable 4 Forward

C4B – Pick up the next 2 stitches with your cable needle. Pull the stitches to the BACK of your work. Knit the next 2 stitches on your non-working needle. Knit the 2 stitches from the cable needle. Watch this video to see how. How to C4B or Cable 4 Back

Posted on 1 Comment

YOuR PaTtERnS ArEn’t FreE – I dON’t LIkE tHE AdS

Pearl Clutching Karen.

There’s an ongoing issue that I want to address. I get emails (social media comments and reviews) similar to the ones I included below, on a weekly basis. I think it’s time I let everyone know how hurtful and demoralizing it is to receive these messages.

A direct email I received.
This was posted publicly by this person on my YouTube video. They knew it would be public. That’s why their username is visible.

For years, I have been designing and writing knitting (and a few crochet) patterns and publishing them through various distributors. One of these has been my website. It’s gone though many iterations over the course of my career but my patterns have ALWAYS been free to read online. I make my designs accessible to EVERYONE. They are the complete patterns with links to how-to videos, photos and more. I do this so anyone can access my work. No strings attached. No login required. 

Yes, they are ad supported. I also advertise what I make through other marketplaces like Amazon, Etsy, etc. It’s how I can make a living from doing this without charging users directly. I see it as a win-win for everyone. But here is where the problem lies. It’s the printing of my patterns…

I had to disable printing on my website because people would print off everything on my site, without so much as a thank you. My work that I had literally spent weeks designing and more weeks into formatting and publishing. Yes. It does take that long. 

To offset the loss of ad revenue from the “print users” not being on or returning to the website, I charge a small fee ($3 USD) to print my patterns. I chose this price keeping in mind that a standard ball of acrylic yarn available at a big box store is a little less than $4. This is the yarn users need to make my patterns. I didn’t think it was too much to ask for my work. Apparently, to some, it is. And somehow translates into accusations like those in the attached email and YouTube comment. Messages that illicit some strong emotions in me. But I digress. 

Tbh, these comments are completely inaccurate. Printing of the patterns isn’t necessary. You can pull up my website on your phone or tablet and scroll along with the pattern as you knit. Wanting a paper copy is a preference, not a requirement to read the pattern. 

The impetus of making this post is how I continually feel like I need to defend the choices I make in how I disseminate my patterns. I’m tired of defending my right to be financially compensated for my work. I shouldn’t be berated over a $3 purchase or membership subscription fee because someone doesn’t want to scroll down a webpage to read the pattern. Or even worse, being accused of lying that the patterns aren’t free. If you can read it in its entirety, how is that not free?

In short…Please stop sending me messages like this. 

For the sake of my mental health, I will selectively acknowledge or respond to the selfish, entitled haters. If you don’t like it, don’t use my work. It’s the simplest solution to the “problem”.

If you’re reading this, I probably sent you the link in response to your very unnecessary message. Keep that in mind when you feel the need to “reach out” to creators on the internet. We’re real people. What you said was hurtful. And untrue.

But if you stumble upon this inadvertently and are a supporter of my work, thank you soooo much! To those who have purchased my patterns and given me great reviews; you are why I keep going and I truly thank you!! 

TL;DR – Stop bitching about my patterns not being free or about the ads. You CAN read them for free on my website. I’m allowed to profit from my work. 

Posted on 2 Comments

How to Work in the Ends While Knitting

How to work in ends while knitting

This simple technique is something that I’ve been meaning to share for quite sometime. And since I’ve received a number of comments regarding the number of ends for my Owl Slippers and Moccasin Slippers, I realized I needed to get on this ASAP.

I finally made the video! It shows how to work in the cast on end, work in the yarn at the start of the row if making stripes and how to join a new ball in the middle of a row and leave NO hole. I left the photo tutorial further down this page if you prefer that way of learning.

And I still don’t have instructions for left handed people. I’m so sorry about that. I’m right handed so it’s what I have to work with.

Step 1:

With the right side of your work facing you, put your needle through the stitch as if you were to knit. With the end at the back of your work, lay the end over your working needle. With your left hand, hold the end snug, not tight.

Step 2:

Place the working yarn over the needle as you normally would and knit the stitch. Do NOT catch or pull the end through while knitting the stitch.

Drop the stitch from the non-working needle as you normally would.

Please share this page!

Step 3:

Drop the end (or hold out of the way) and knit the next stitch.

Repeat steps 1-3 for roughly 10 stitches. With this technique you are alternating in order to catch the end between the stitches at the back of your work as shown below.

What it looks like from the wrong side.
View from the front. Can’t see the end at all!

When you are done, pull the end so it is snug. It’ll take up any slack that’s between the stitches you skipped. Before I trim it off, I always stretch the final piece to make sure there is just enough slack to ensure there’s no puckering.

If you need a little more security, you can always give an additional back weave with a tapestry needle to catch the end of the end a bit, but I don’t.

And yes, this does keep the yarn in place even with 100% acrylic yarn. I’ve made a number of slippers with the ends worked in this way and an afghan. I’ve washed the afghan a number of times with no issue whatsoever.

I hope this helps speed up your work. I hate sewing in ends just as much as the next person and anything that lessens the number of them is worth a huge ?? in my books.

And I also haven’t had much success doing this with purl stitches. If you have any ideas, by all means, let us know in the comment section.

The K1 P1 ribbing that I do for the cuffs of my Owl Fingerless Gloves works well using this method, too. Catch the end on your knit stitch and purl the purl stitch as you normally would. Because it is right on the cuff and needs to stretch and contract, I do catch the end a bit with a tapestry needle just to give it a little extra security.

Posted on Leave a comment

FREE Knitting Graph Paper – Knitting Colorwork Paper – Printable PDF

Free colorwork knitting paper for intarsia knitting design

Get your free knitting colorwork paper here! Perfect for all your intarsia motif design needs.

No need to sign in, sign up or give away any personal information. Simply use the download button to download and print as many copies of the knitting graph paper as you like.

It’s a PDF file meaning that you can easily open it on any device be it your computer, phone or tablet.

If you think someone else could use this free knitting color work paper, please let them know and share it on social media.

The knitting graph paper is to create patterns in the stockinette stitch. You can use it to either make stitch patterns, or use colours to create more intricate designs known as intarsia knitting. It’s fairly large so it will meet most of the requirements for your pattern. You can always tape sheets together if you need something larger.

I’ve also included arrows along the side to show which way you will be knitting based on the shape of the stitch. I also include a very faint pink colour so you can easily determine the number of stitches. I’ve marked them off in 5 stitch and row sections.

To help explain the process of designing your own intarsia motifs, there are photos and explanations on how to use the colorwork knitting paper included with the PDF you can download and print for free.

Posted on Leave a comment

Knitting Calculator – Decrease Stitches Evenly Across the Row

Knitter struggling with how to decrease stitches

The term, “decrease evenly across ? number of stitches” in any pattern can be an unpleasant sight to any knitter (me included). Whereas I try to do this calculation in the patterns I write, some don’t. Regardless, the stitch calculator below will help!

Using this calculator will give you evenly spaced decreases over the length of your work. All you need to enter is the number of stitches you have on your needle and the number of stitches you need to decrease. Everything is calculated for you.


Please note: If you have more or less stitches at the end of your work, go ahead and knit them. The number of decreases across the stitches is correct.

I want to be completely transparent in where this increase and decrease knitting calculators originated. I did not write the code myself. After much tweaking of this query to ChatGPT, I’ve developed a stitch calculator to determine how to decrease evenly across your work. I knew what I wanted, I just didn’t know how to write the code to make it happen. AI is useful after all!

Posted on 4 Comments

Knitting Calculator – How to Increase Evenly Across the Row

Knitter frustrated with how to increase stitches

It’s tough, and frustrating, to do the math to figure out how many stitches you need to knit to make your stitches even across the row. We’ve all been there and we all hate doing the math. Well, you’re in luck! I’ll do it for you ?. And if you don’t know how to M1 (make 1 or increase) scroll down the page or click this link to watch the video.

Using the calculator below will give you evenly spaced increases across the length of your work. All you need to enter is the number of stitches you have on your needle and the number of stitches you need to increase. Everything is calculated for you with a single click!


I know that sometimes the stitches are a little off on the ends. Adjust accordingly if it bothers you. I really was focused on the making the increases centered in the work with even spacing between the stitches.

I want to be completely transparent in where this knitting calculator and the decreasing calculator originated. I did not write the code myself. After much tweaking of this query to ChatGPT, I’ve developed a stitch calculator to determine how to increase evenly across your work. I knew what I wanted, I just didn’t know how to write the code to make it happen. AI is useful after all!

My notes I entered into ChatGPT to get the code to work.
Posted on Leave a comment

Members Only Demo – Easy Downloads and Printing

Not sure if you want to become a member of this site? Use this sample page to see how easy it is to read, download and print the patterns in the paid member areas. All ad and pop-up free.

If you would like to access the other patterns on this site, please click the button below to help support this website and future patterns by becoming a member. Downloads are unlimited and you always have access to the exclusive Members Only pattern pages as long as your subscription is up to date. Cancel your subscription at any time.

Netflix & Knit (this scarf)

Hipster Wine Cozy

Fun and Easy Monster Purse

Click the button above ????if you wish to access the patterns in the member only areas.

Posted on 2 Comments

Current List of Member Patterns

Hippo fingerless mittens - free knitting pattern

This is the current list of patterns available to download and print. Once you become a member, you can print ALL of the patterns listed below for ONE monthly fee. You can become a member of the website for as long or as short a time period as you like.

The links below connect to the FREE ad-supported versions that are NOT printable. You do NOT need to be a member if you stay online to read the pattern. Membership supports my work and is like an extra tip you give. As a thank you for the tip, you get to print ALL of the patterns listed below through the membership portal.

See here for membership levels.

Watch how easy it is to use!

Click the red play button ▶️ in the middle of the embedded video below. You can watch the how-to right here on the website.

All the patterns below are available at every membership level. New patterns are added to this list continually.

All titles below are also clickable links.

Knitting Patterns

  1. Easy To Knit Fingerless Gloves – Knit Flat On Straight Needles
  2. Knit A Beanie Hat – With OWLS!
  3. Basic Knit Flat Beanie
  4. Ribbed Moccasin Bootie Slippers for Adults
  5. Super Cute Hippo Fingerless Gloves or Mitts – FREE Knitting Pattern
  6. Ultra Thick Slip-On Bootie Slippers
  7. Knitted Cozy Cuff Slippers
  8. Autumn Leaf Half Gloves – Fingerless Gloves Knit on Straight Needles
  9. How to Knit a Way Cool Monster Purse
  10. Knit a Simple Dishcloth
  11. How to Knit: Step-by-Step Beginners Video and Pattern to Knit Granny Slippers
  12. Snug Slip-On Slippers – Easy Slippers to Knit on Straight Needles
  13. Diamonds Dishcloth and Coasters
  14. Knitted Moccasin Bootie Slippers for Children – FREE Knitting Pattern
  15. Bulky Yarn Slippers on Straight Needles – FREE Knitting Pattern
  16. Easy to Knit Beginner Slipper Pattern – Knit Flat with Bulky Yarn on Straight Needles
  17. How to Knit Children’s Slippers – Free Knitting Pattern
  18. How to Knit Spider Fingerless Gloves – Knit Flat on Two Needles
  19. Chevron Striped Moccasin Slippers
  20. Cable Knit Slippers
  21. Minimalist Round Toe Slippers
  22. Easy to Knit Rolled Cuff Slippers
  23. Super Simple Easy to Knit Slippers
  24. Moccasin Style Slippers
  25. How to Knit Adult Slippers
  26. Easy to Knit Slippers
  27. Easy to Knit Long Cuffed Slippers
  28. How to Knit Adult Bootie Slippers 
  29. Adult Ribbed Booties
  30. Easy to Knit Bow Slippers
  31. Easy to Knit Owl Fingerless Gloves
  32. How to Knit Fingerless Gloves – with OWLS!
  33. How to Knit Fingerless Gloves
  34. Super Simple Fingerless Gloves
  35. Basic Long Fingerless Gloves
  36. Cable Fingerless Gloves or Mitts
  37. Fingerless Gloves or Arm Warmers with BOWS!
  38. One Piece Knitted Dishcloth and Coasters
  39. Easy to Knit Textured Scarf, Dishcloth and Coasters
  40. Bars and Stripes Knitted Dishcloth
  41. Cute AF Bows Dishcloth Pattern
  42. The Beginner Knitter – Learn to Knit a Dishcloth
  43. Vertical Striped Beanie Toque

Crochet Patterns

  1. Crocheted Sun Hat and Bucket Hat
  2. Quick to Make Bracelet
  3. Flower and Friendship Bracelet


Glad to see you here and considering becoming a member to support my work. I’m currently adding my patterns to this list, starting with my most popular. Please be patient. It will all be here soon, ??I also am writing new stuff all the time so be sure to check back often.

The pattern sections listed in the exclusive member areas don’t have ads, and you can easily download and print everything with a single click. To gain access to these areas, you’ll need to become a member for only $3 USD per month. Click here to see how easy to use the member areas.

You still have access to all previously purchased patterns, and can still buy individual patterns to print if a subscription isn’t something you’re interested in. I have a number of printable pattern purchase options including this website, my Etsy Shop, Ravelry, LoveCrafts and both digital and paperback versions on Amazon. Of course, you can read the ad supported versions on the website for free. There will always be a free version of this site for anyone who wants it. I believe in making my work as accessible as possible while still being able to pay my mortgage and feed my family each month ? You can use the buttons below to read ALL my patterns online at no cost to you.

Member patterns are available in English only. Only the ad supported, online versions of my patterns are translated into other languages.

Posted on Leave a comment

Seven Slipper Styles to Knit – A Knitting Pattern Collection

seven slipper styles to knit - a knitting pattern collection

I don’t usually do posts like this but I thought I’d make it easier for everyone to get this knitting pattern collection. There is both a physical book you can get, a downloadable PDF that you can print and of course, all the individual patterns are free to read on this website if purchasing isn’t an option for you.


A quick note on other places that you can get this collection from. Amazon does offer the Kindle version of the slipper pattern collection in all countries. I don’t think you can print the pattern off on a Kindle. That defeats the purpose of creating this post that helps you find where you can get a physical copy of the slipper patterns.

Seven Slipper Styles to Knit

Seven Slipper Styles to Knit – Paperback Version

If you would like to purchase the paperback version of the slipper pattern collection, it’s available on Amazon only. It is very reasonably priced at $12.99 USD and shipping is included if you’re a prime member. The price is automatically converted into your county’s currency equivalent. Be sure that you order it from YOUR COUNTRY. If not you’ll be charged shipping. I’ve included the links from each country. Unfortunately, the paperback version isn’t available in very county.

Canada

USA

United Kingdom

If the patten collection isn’t available in your country or you would prefer a less expensive option and print it yourself, you can purchase the PDF Version from two places. Ravelry and LoveCrafts don’t allow for collections like this.

Etsy – Seven Slipper Styles to Knit

This website – Seven Slipper Styles to Knit – A Knitting Pattern Collection

All of the included are FREE to read online. They are ad supported and can’t be printed. Clicking on the title will take you to the pattern page. I’ve listed the slipper patterns included in the publication below:

Adult Moccasin Slippers

Knitted Plaid Slippers

Ribbed Bootie Slippers

Owl Slippers

Cable Knit Slippers

Super Cozy Texture Bootie Slippers

Super Simple Easy to Knit Slippers


Eight Slipper Patterns to Knit

Eight Slipper Styles to Knit

And in case you were unaware, I did another collection of my slipper patterns years ago. I never made it into a paperback (though if anyone was interested, please let me know).

You can purchase the printable PDF from the following places:

Etsy – Eight Slipper Styles to Knit

This Website – Eight Slipper Styles to Knit


Posted on Leave a comment

How to Display Etsy Items on Your Website

Etsy Mini Widget Demo

I’m not sure if you’ve seen this before, but this is a widget that Etsy offered its users years ago. It gives clickable thumbnails directly linking to your Etsy shop and automatically updates as you upload and sell items. It’s a handy little widget to add to your blog or website.


Go ahead and give it a click ? It’ll take you from this site but you can use your browser’s BACK button to return.

I originally added it to my blog on blogspot and just kept it there. I recopied it onto my blog posts ever since. Today I realized I need to share it. To do this you will need to have some very basic coding skills. Literally adding a html block and pasting the code in it if you’re running a WordPress site like this one. There will be something similar on all web building sites I imagine. There’s a bunch of tutorials that can help you do this for whatever you’re using.

And for the record, I am not affiliated or endorsed by Etsy to do this. This is their code originally and for some reason, they got rid of it years ago. As long as they’re cool with this post, I’ll leave this info up. If I’m told to delete, it I will.

But back to this widget; I can’t tell you how awesome this little piece of wonder is. It automatically updates as you sell items (though this can take a while), plus you can have it show the 4 most important items in your shop. Those are the items you have featured in your listings section. See this link on Etsy to find out how to do that – Featuring Items. Those items are then followed by your most recent listings.

You don’t have to feature items for this to work. It will automatically pull the first items you have in your shop otherwise.

Below is my automatic Etsy Mini with the settings set at 5 columns and 1 row showing. The first 4 items are those featured in my shop (marked with a star when on my listing on Etsy), with the last item being my latest listing. It’s always changing based on what is selling and what I’m listing.


Go ahead and give it a click ? It’ll take you from this site but you can use your browser’s BACK button to return.

Setting Up Your Etsy Mini

Copy and paste this code where you want it to appear on your website or blog post.

<script src="https://www.etsy.com/assets/js/etsy_mini_shop.js" type="text/javascript"></script><script type="text/javascript">new Etsy.Mini(*******,'thumbnail',3,1,1,'https://www.etsy.com');</script>

The ******* is your Etsy ID number. Finding this is actually really easy. It’s a part of every photo that you upload to your listings. I use a Mac so the process may differ slightly with a PC.

  • Go to any of your photos in any of your listings.
  • Right click and select “open image in a new tab” or “open image in a new window”. It’ll be something like that. Do what you need to do to open an image on your web browser. This is NOT the same steps as saving a photo. That won’t work.
  • Go to the address bar at the top of the page
  • Your Etsy ID number is what is shown in red. (It is white in the address bar but I made it a different colour so you can easily see where it is). I looked at a number of different photos and tried out their numbers. All I saw was 7 digits and they all worked. It may be more or less for you.

How the code will look with the Etsy Id number replaced:

<script src="https://www.etsy.com/assets/js/etsy_mini_shop.js" type="text/javascript"></script><script type="text/javascript">new Etsy.Mini(1234567,'thumbnail',3,6,1,'https://www.etsy.com');</script>

Please share this post with these handy links ????????


Changing the Display

Once you replace all of the ******* with your Etsy ID number, you can play with what you would like to display.

The numbers after the word ‘thumbnail’ adjust what is displayed.

  • The first number is the columns.
  • The second number is the rows.
  • I honestly don’t know what the 3rd number does. I always leave it alone. Let me know in the comments if you figure it out.

For example, the Etsy Mini below is set at 3 column and 6 rows.

The code for the display above (without an id number):

<script src="https://www.etsy.com/assets/js/etsy_mini_shop.js" type="text/javascript"></script><script type="text/javascript">new Etsy.Mini(*******,'thumbnail',3,6,1,'https://www.etsy.com');</script>

The maximum number of items the code displays is 25. So the number of rows and columns you choose have to equal or be less than that amount.

Center Your Etsy Mini

If you want to center your display like the one below, you can easily add the <p align=”center”> </p> tags around the code like this.

<p align="center">
<script src="https://www.etsy.com/assets/js/etsy_mini_shop.js" type="text/javascript"></script><script type="text/javascript">new Etsy.Mini(*******,'thumbnail',3,6,1,'https://www.etsy.com');</script>
</p>

There you go. I’m not a coder by any stretch and tried to explain this the best way I could. I hope you get a lot of use out of this.

I’ll try to help and answer your questions as I have time. I work full time and run my own Etsy shop. I can only do so much.

My comments sometimes work and sometimes don’t. I’ve been having issues with it. Please log in to add comments or help answer anyone that may be having troubles.

Good luck! Sell a bunch ?