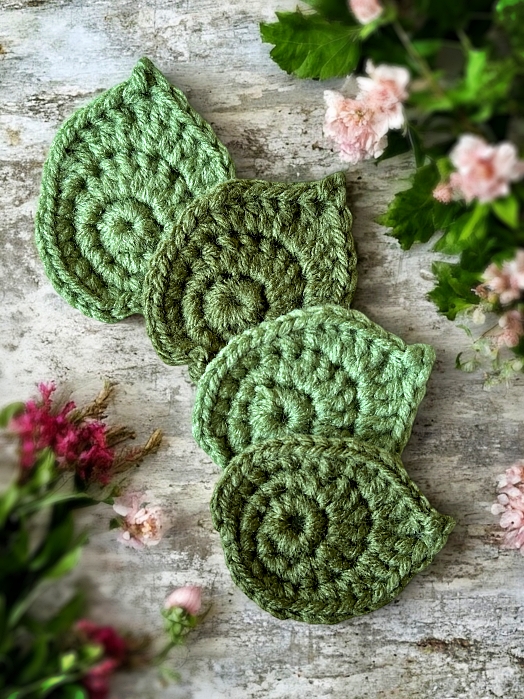
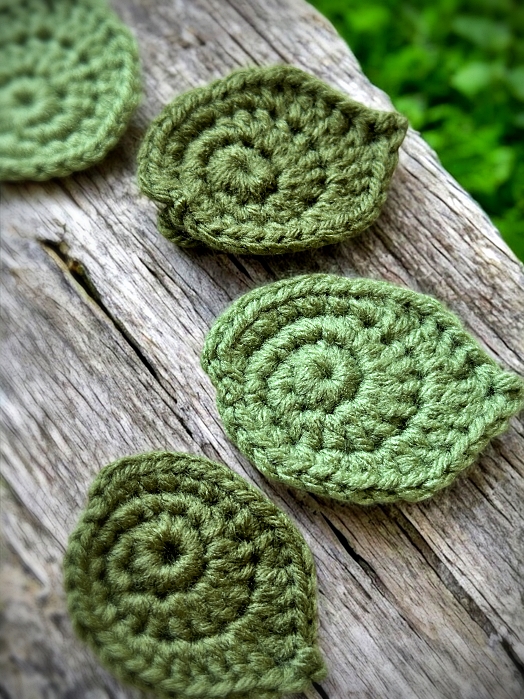
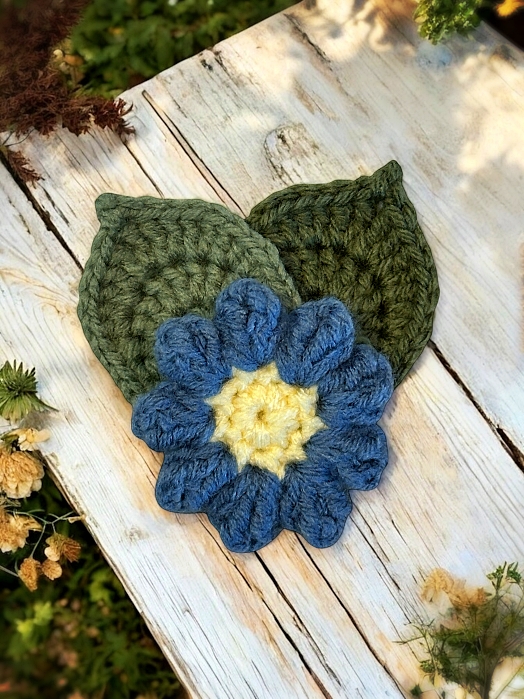
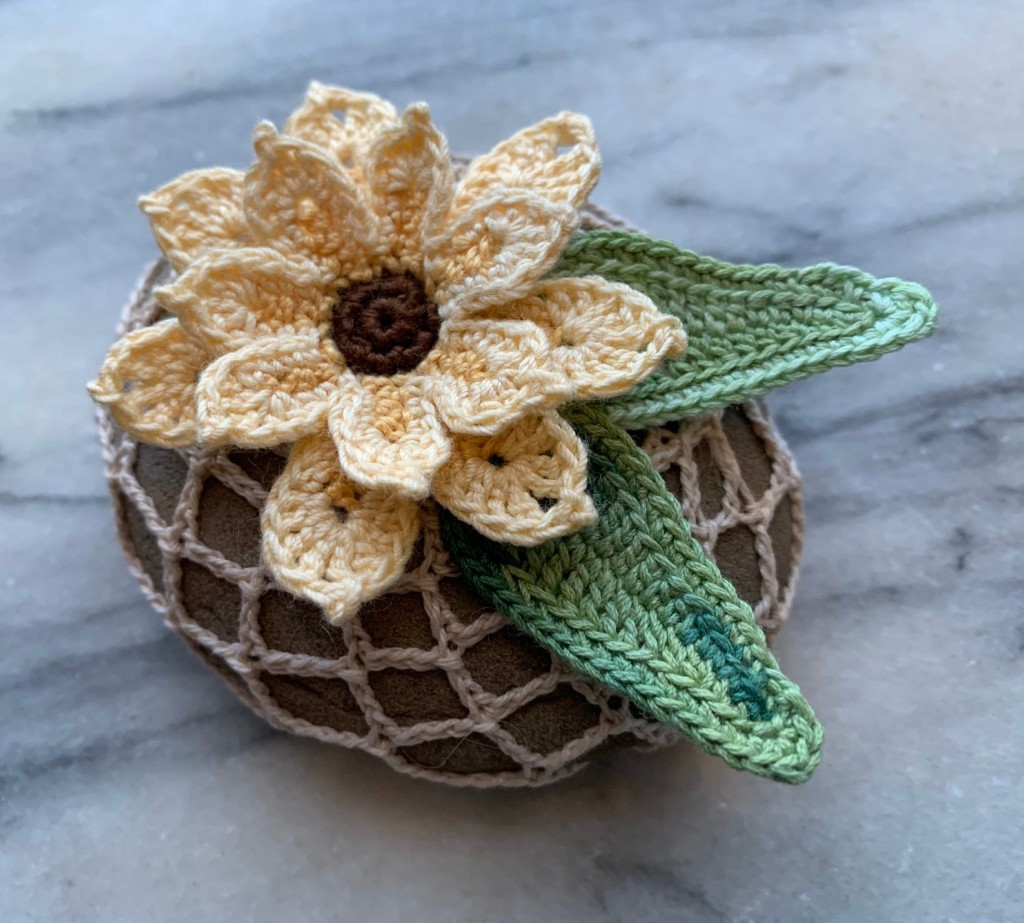
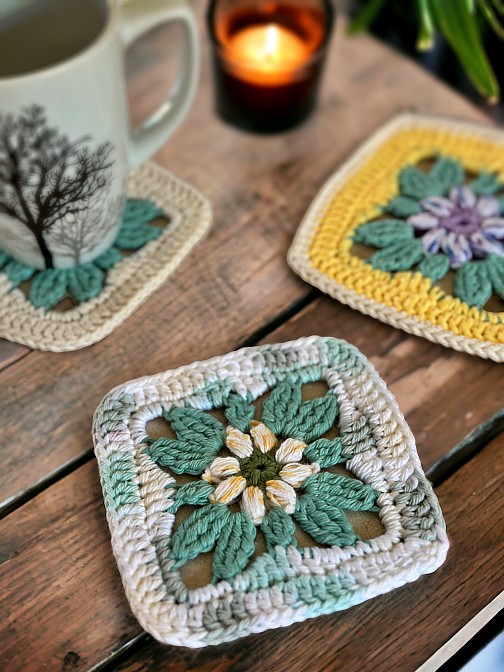
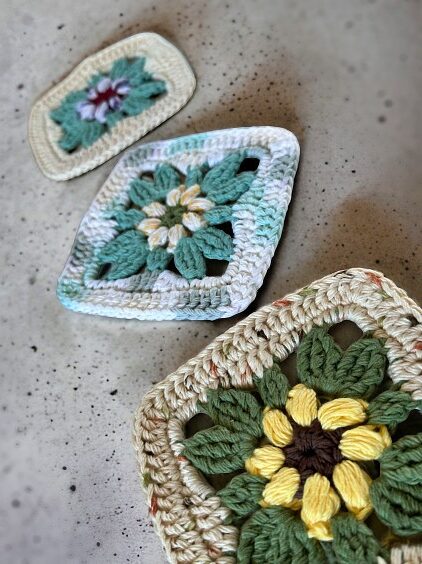
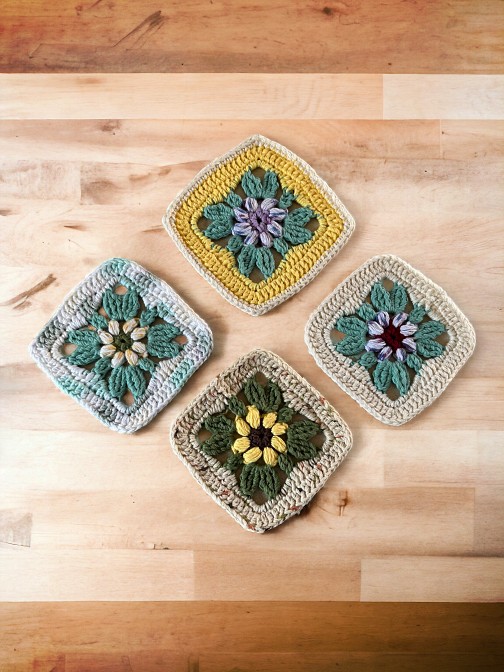
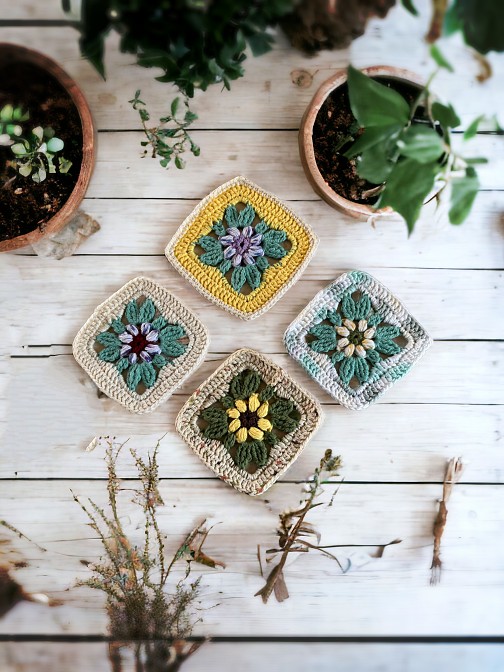
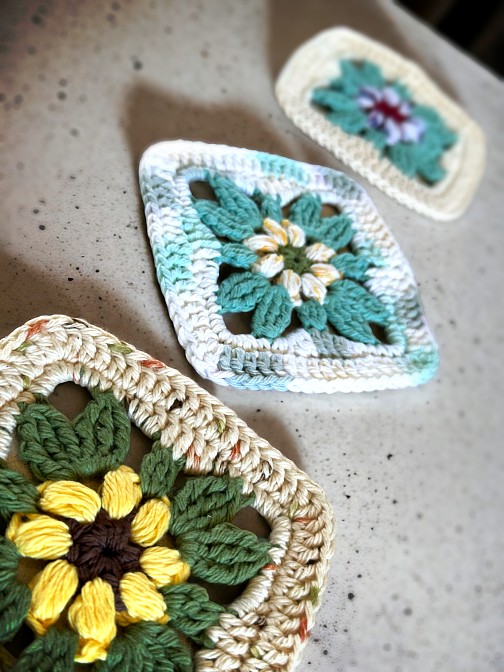
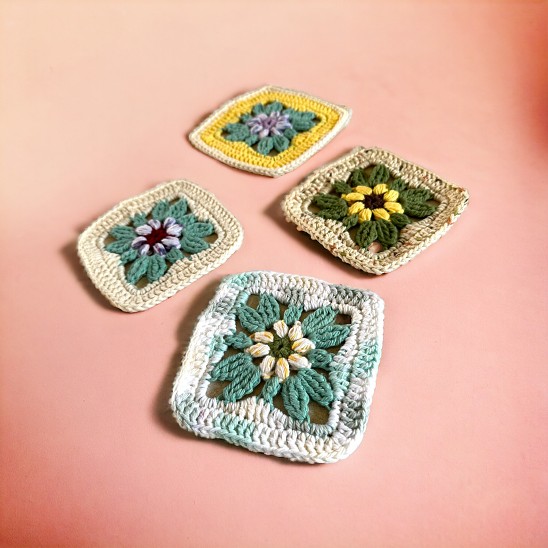
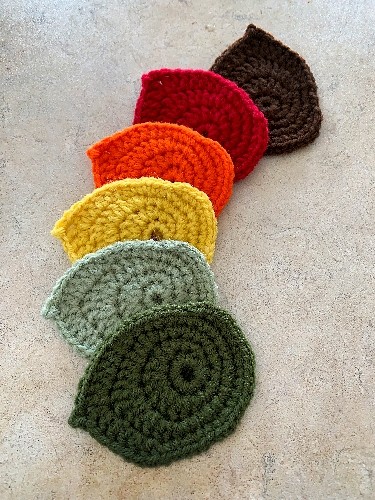
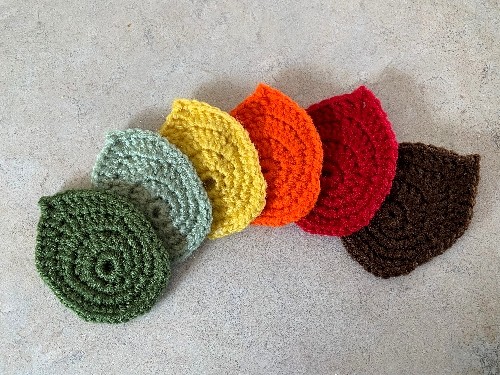
This crochet leaf pattern was created as an accent to complement the flowers in myCrochet Jar with Lid Pattern. On their own, the leaves aren’t meant to stand out—I designed them to serve as subtle fillers that enhance the flowers and draw attention to the main design.
These leaves are a smaller adaptation of the original pattern I designed for my Sun Hat. Since both the original leaf and flower were too large for the jar lid, I did a simple redesign and came up with this perfectly sized version.
This pattern isn’t available alone as a downloadable and printable PDF. It will be included with the Crochet Jar with Lid Pattern along with the flower. It was easier to divide the jar, flower and leaf into separate pages on the website.
If you know someone you think would like this post, by all means, share it! The more eyeballs on my work the better. If you are enjoying the free patterns, this is a great way to support my work. You can also Buy Me A Coffee or check out the other options when you check out the Help Support My Workpage. If you’re looking for something new to share with your friends on your website or on social media, these links will help you do it.
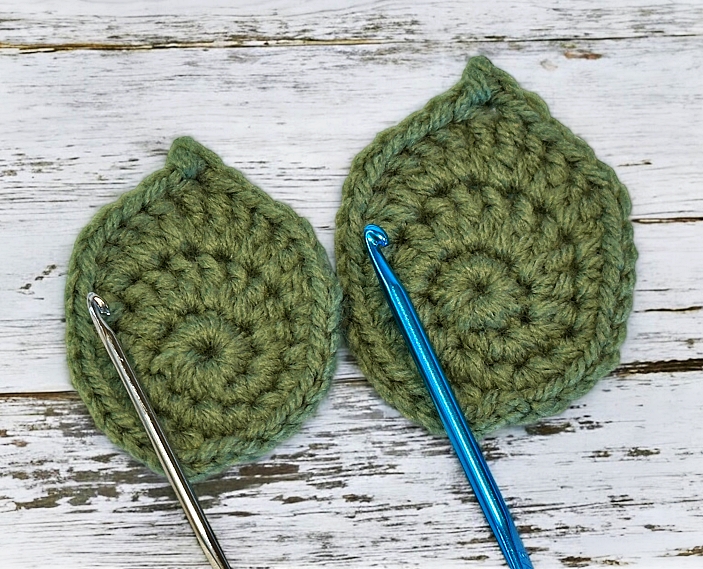
I used the smallest hook to make the smaller leaf, the largest for the big leaf.
Gauge
It isn’t really important with this project. Make sure to maintain tension throughout the project so the lid fits correctly. See the Hints and Tips section for more information on hook size.
I also made a how-to video showing all the steps and stitches needed to make the leaf. If you are having trouble with any part, it’s all here 😊
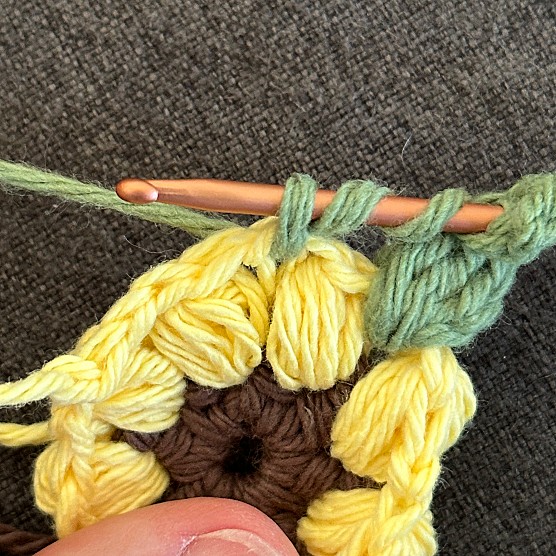
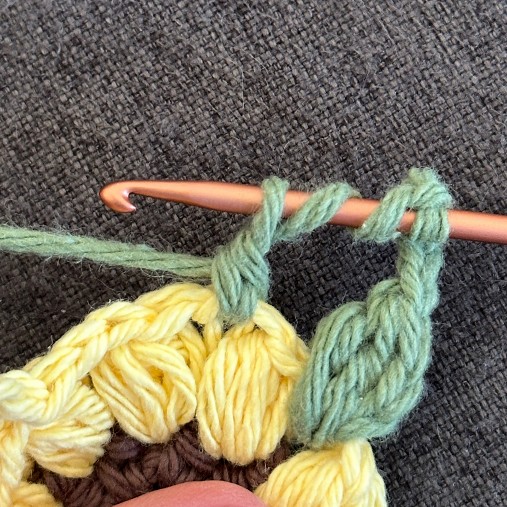
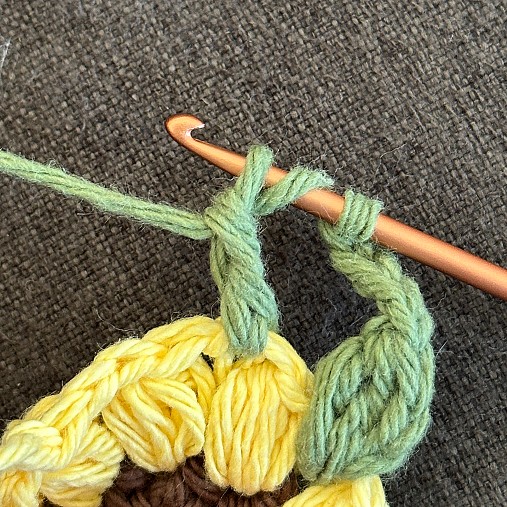
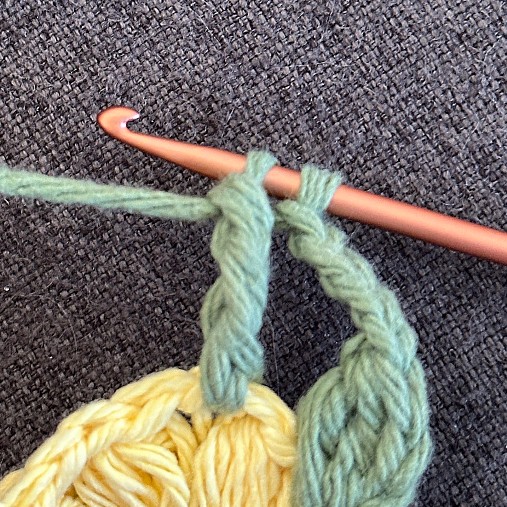
Leaf
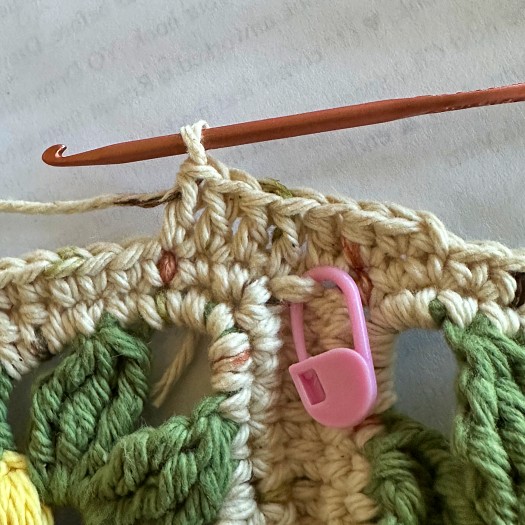
Please note: The rounds end in various places on the bottom of the leaf. Regardless, the stitch counts work.
With ONE strand of worsted weight yarn and hook size of your choice.
Ch 2 (make the first chain large enough to fit in all the stitches for Round 1)
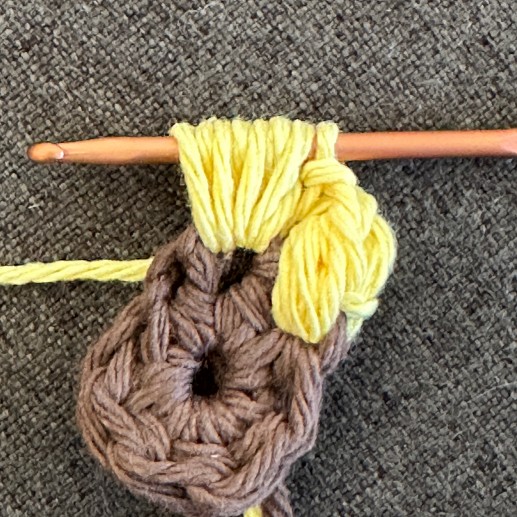
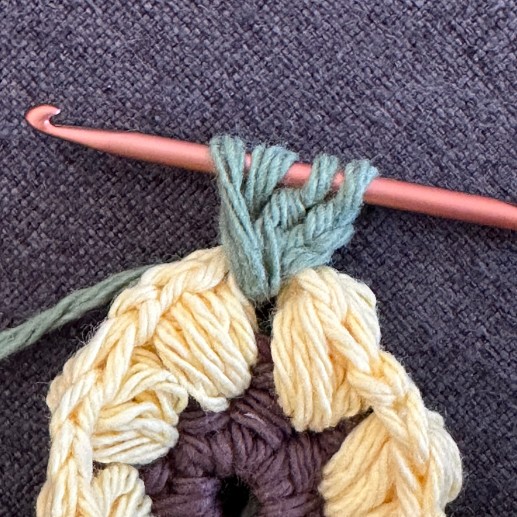
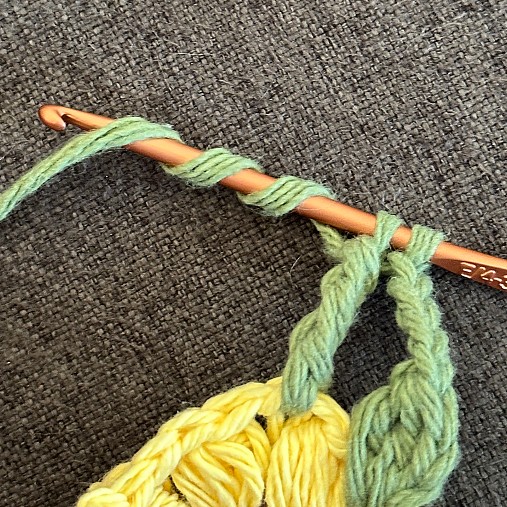
Round 1: 11sc in 2nd chain from hook. Do NOT join. Begin to work in the round.
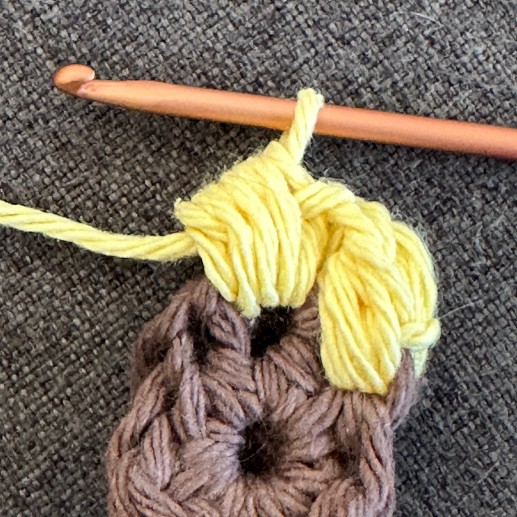
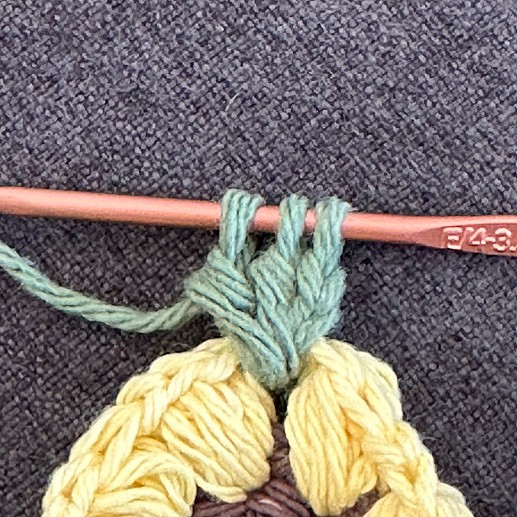
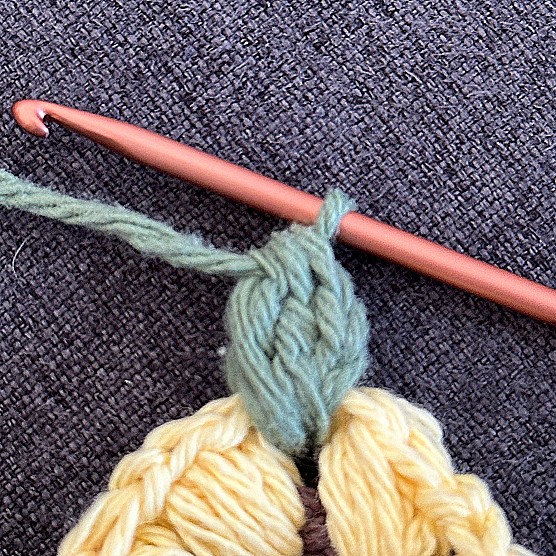
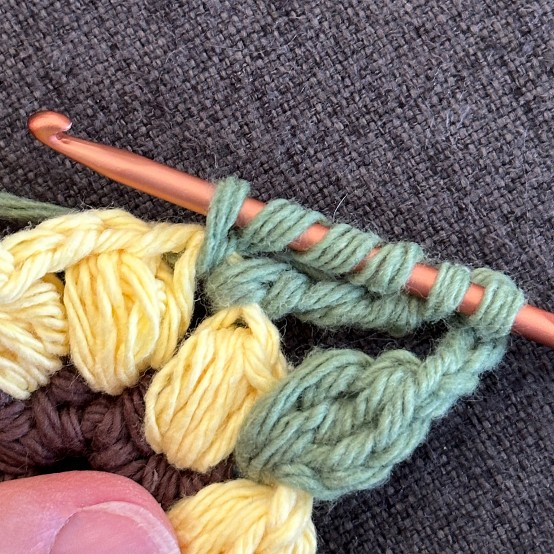
Round 2: In the 1st sc from the last round, sc. 2sc in the next st. In the next st, sc, hdc. In the next st, hdc, dc. 2dc in the next 2 sts. In the next st, dc, hdc. In the next st, hdc, sc. 2sc in the next st. Sc.
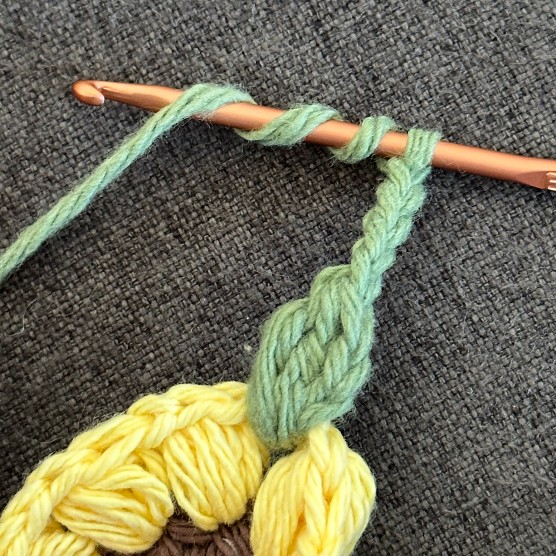
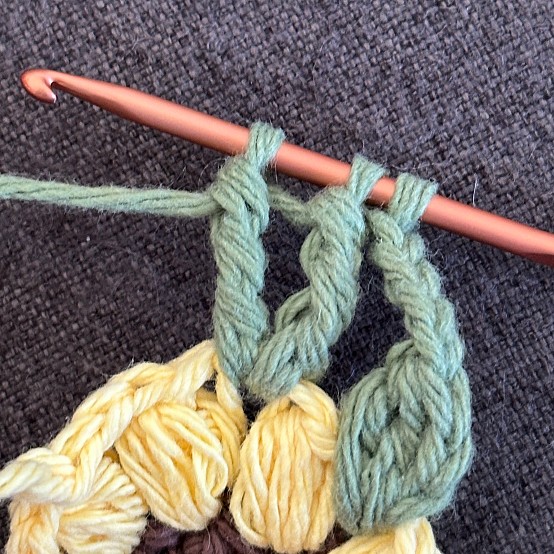
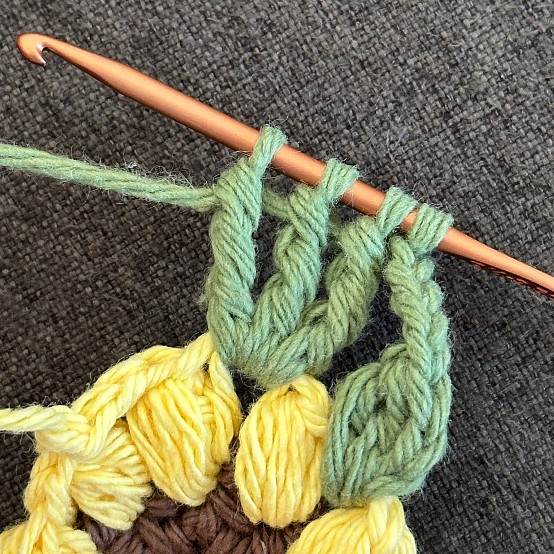
Round 3: *2sc in the next st, sc* Repeat from * to * 2 more times. In the next st, sc, hdc. In the next st, hdc, dc. 2dc in the next st. In the next st, dc, trc. Ch 2, sl st in the 2nd chain from hook (picot made). In the next st, trc, dc. 2dc in the next st. In the next st, dc, hdc. In the next st, hdc, sc. *Sc, 2sc in the next st* Repeat from * to * 2 more times. Sl st in next st. Break yarn. Work in the ends and sew into place.
Add extra embroidered details to the leaves as you see fit. Maybe some extra veining lines or stitches around the edge in a slightly darker shade? It really is up to you.
I prefer to make at least 2 leaves to fill in behind the flowers. It makes a group of 3 which always balances out itself. Five is also a good number to aim for btw. If you want to make a bit more pizzaz to the combo, use differnt shades of green. To make them different sizes, use a larger hook for one and smaller hook for the other.
As much as I wanted to avoid pressing anything, the leaves also may need to be pressed to have them lie flat. Be sure to do a test swatch BEFORE you press anything. Acrylic is notorious for melting and losing all constructive properties when pressed. It melts to give a flat, melted look. Press with your iron at the lowest setting possible. Press with a damp cloth between the iron and the leaf. Iron the leaves from the BACK only!
Click here (or the photo) to read the pattern to make the flower
Abbreviations
Sl st – slip stitch
Ch – chain
sc – single crochet
hdc – half double crochet.
dc – double crochet.
tr – treble crochet. Wrap the thread 2 times around the hook.
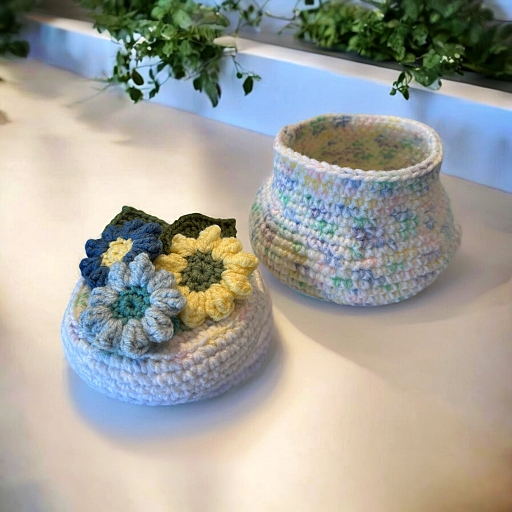
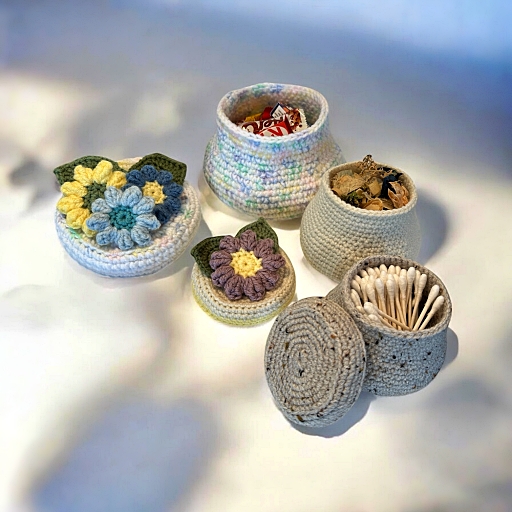
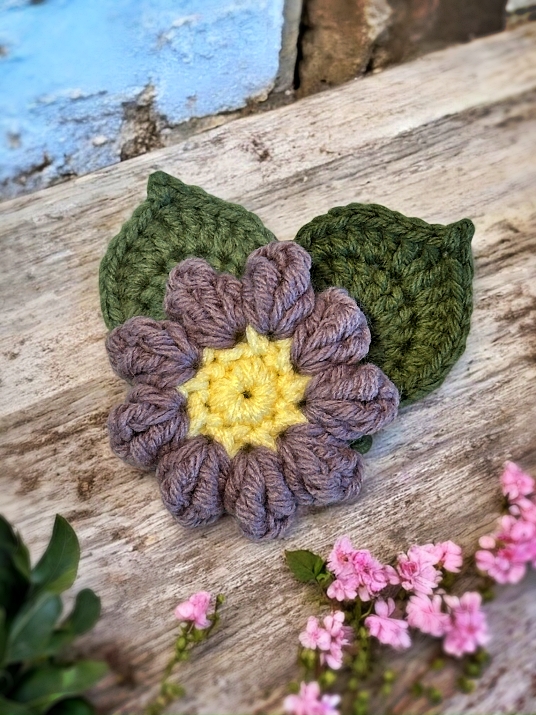
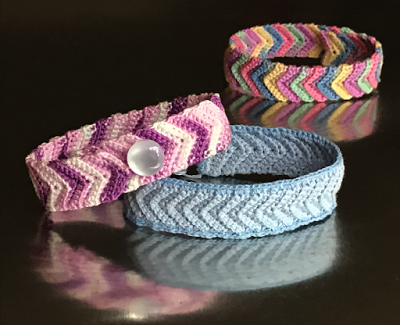
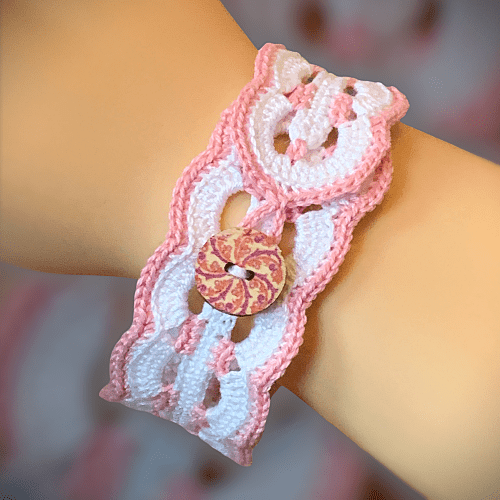
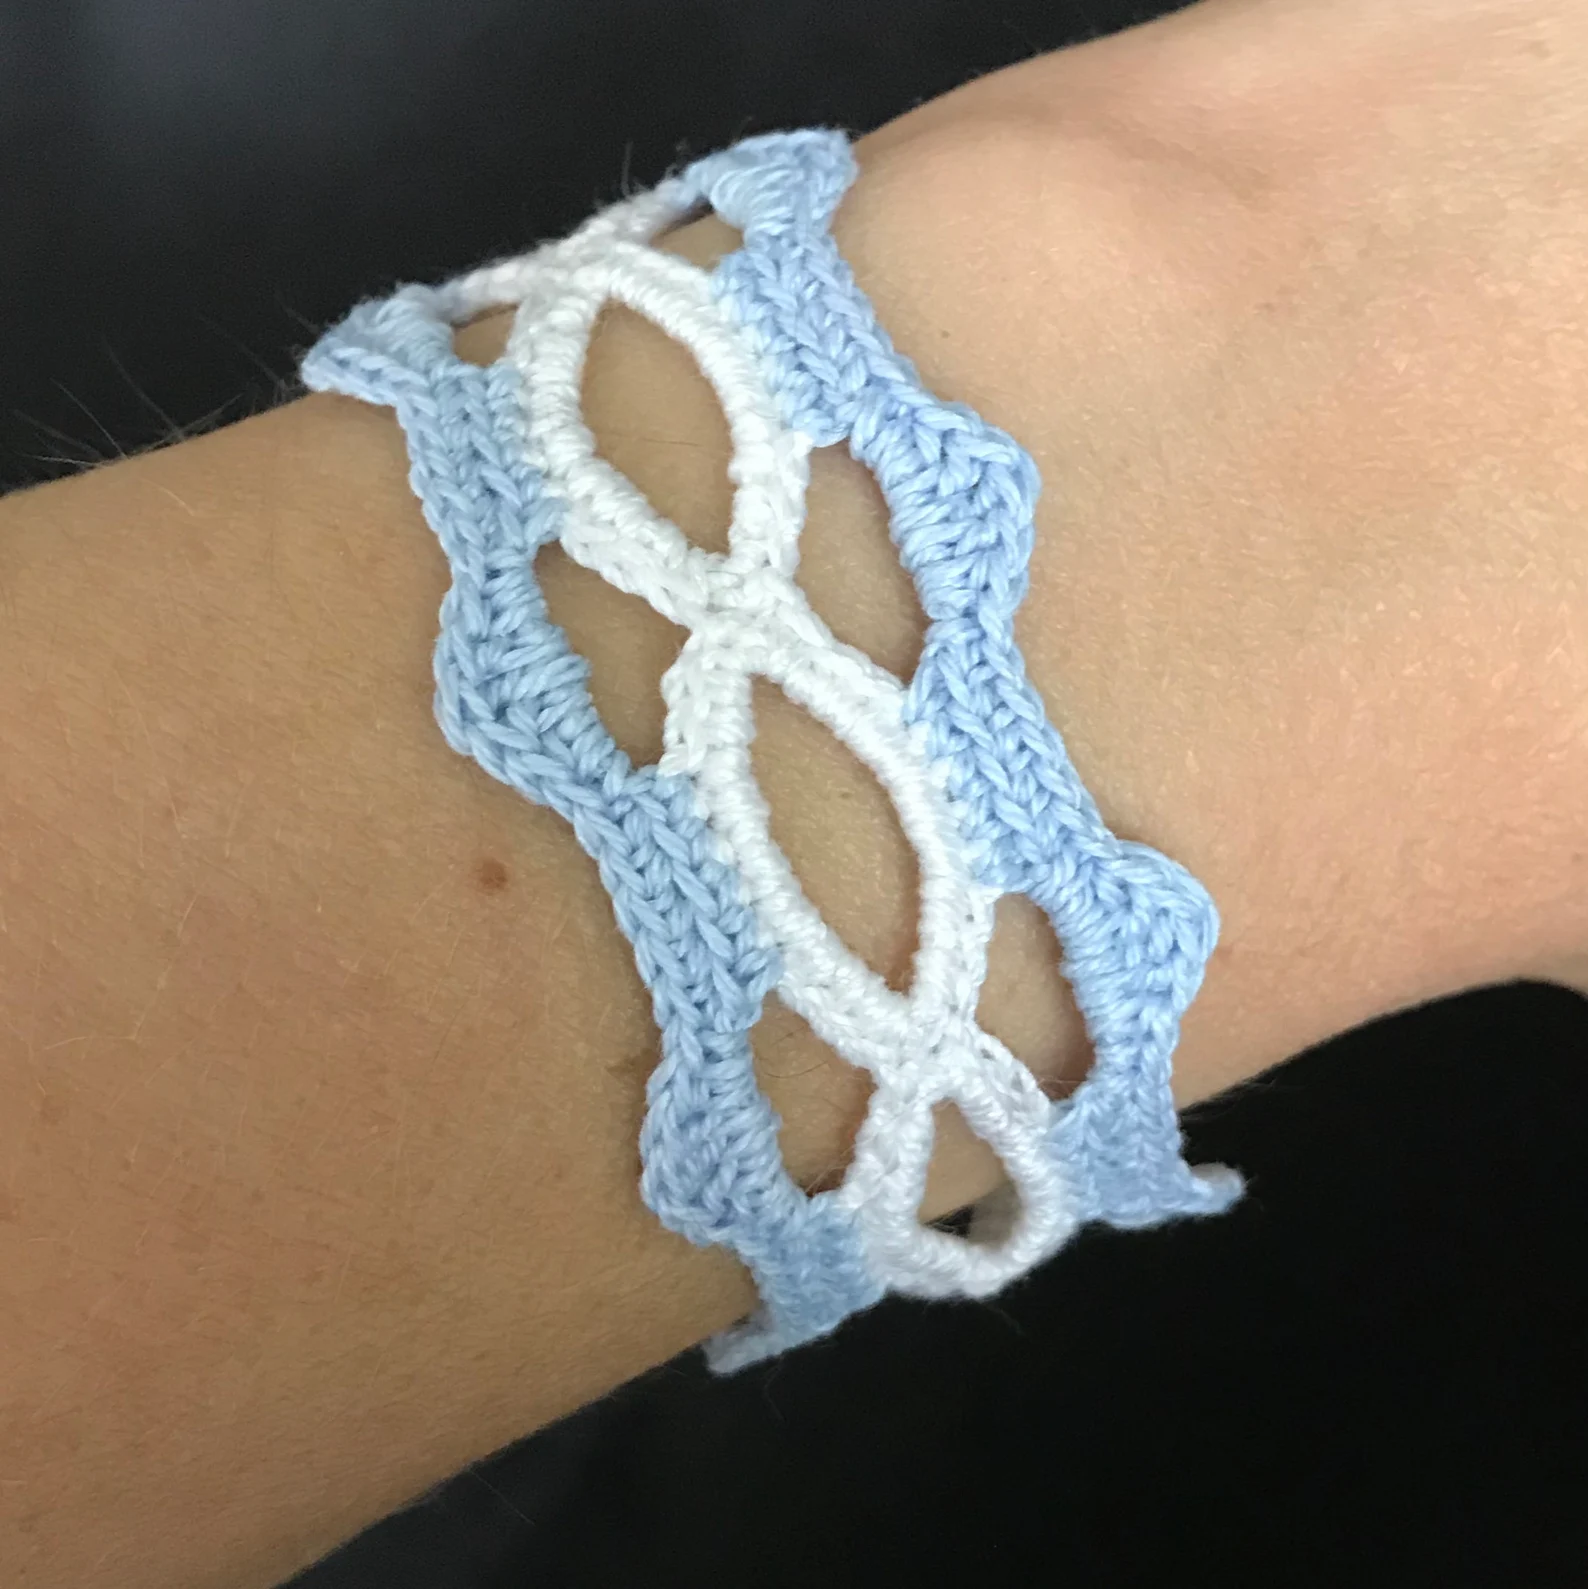
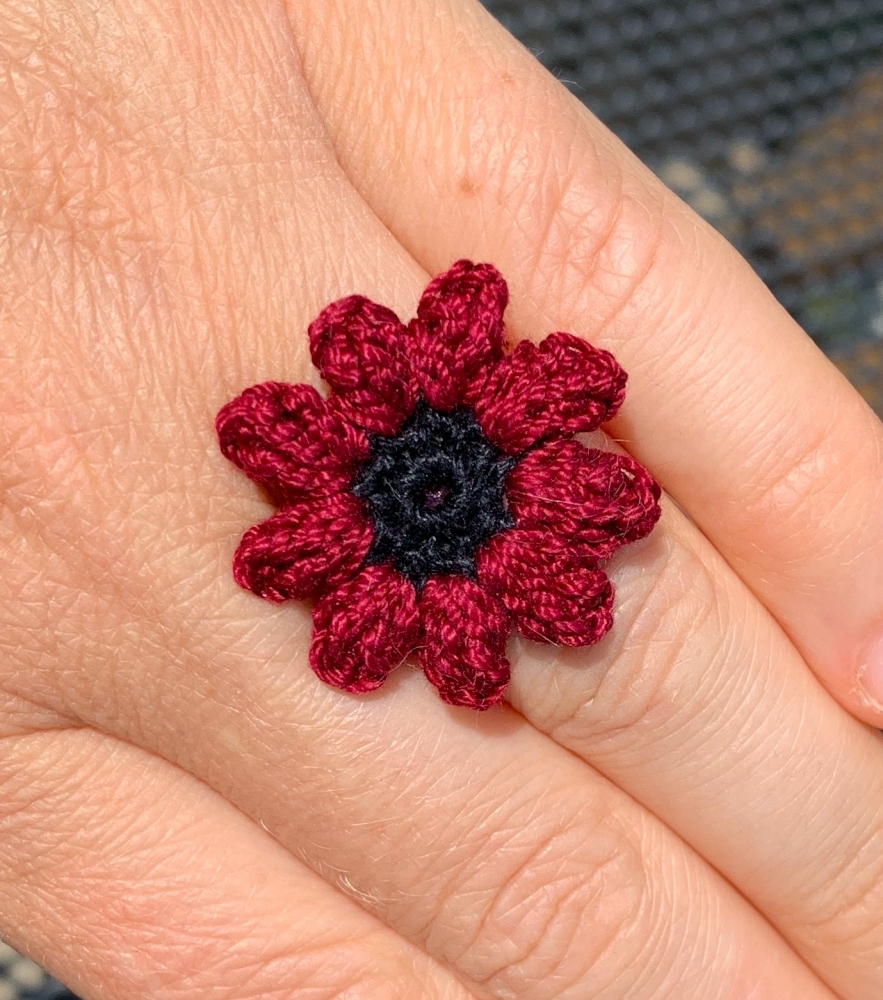
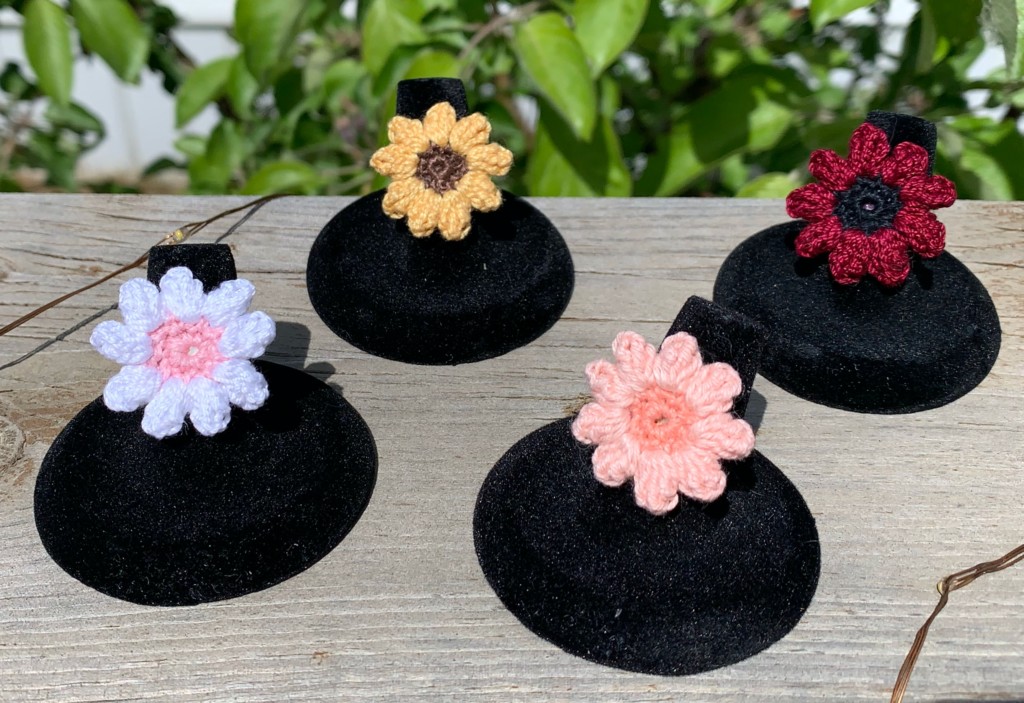
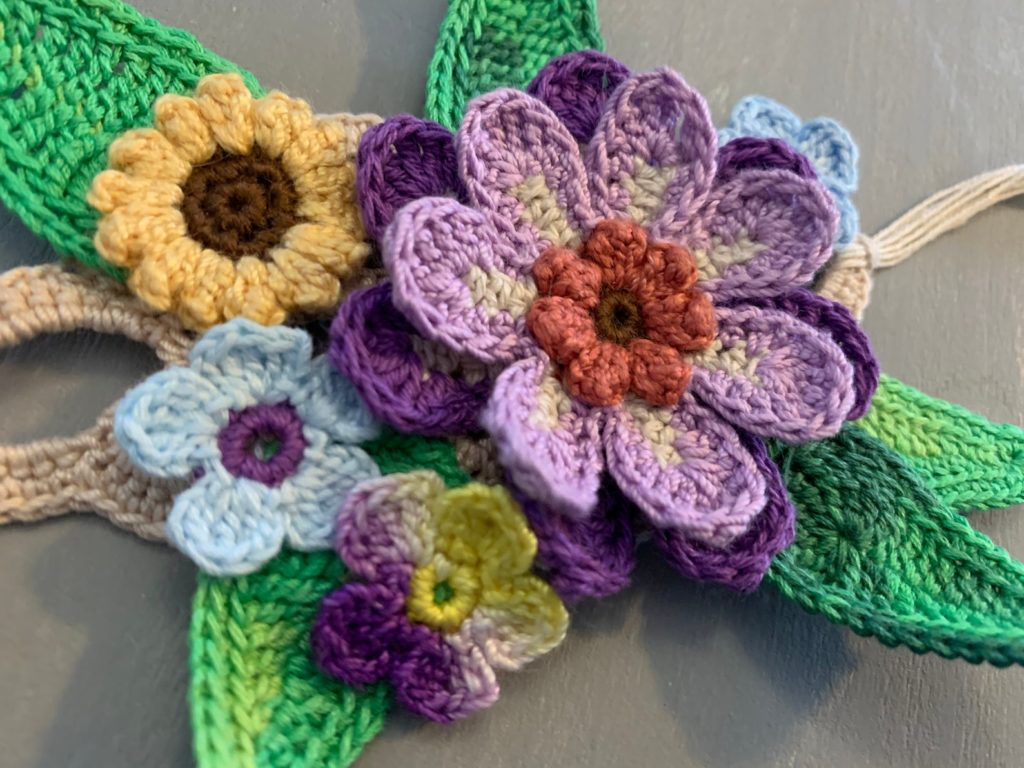
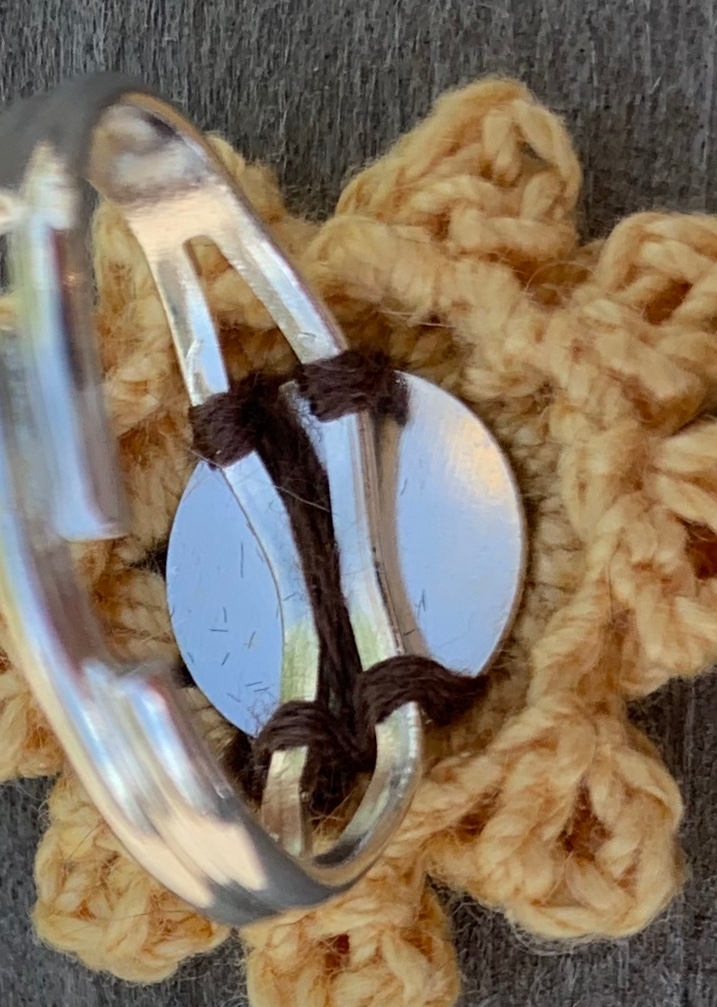
Nice idea, but what can I do with a crocheted flower, you may be asking yourself? Well, you can do a lot with them actually. In particular, I designed this pattern to be the perfect size to be a ring. Make a matching set and you have a pair of earrings. Sew the flowers together and you can make a necklace or choker. Add them as an embellishment on one of my existing crochet bracelet patterns. You can see those by click these links: Quick and Easy Bracelet, Fans Bracelet, andWaves Bracelet or any pic below. If you’d like to add leaves, I’ve included the link to that too.
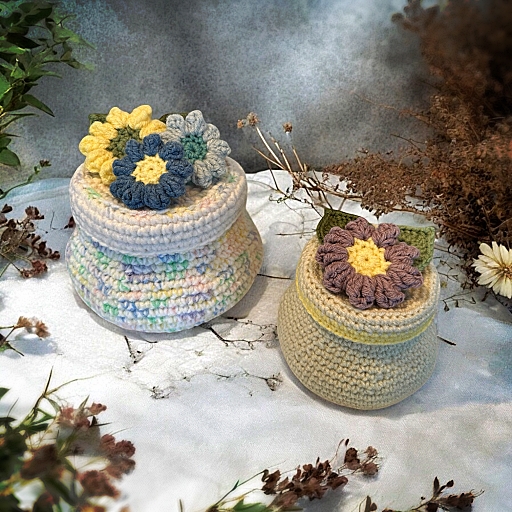
And now …Crochet a Pot With a Lid. If you come up with more ideas, I loved to read about them in my comment section below.
Click any pic for the FREE pattern
I have been designing crochet flowers for number of years but never really got around to publishing any of them to share. Most are done on the fly, free from crochet if you will, with more and more detail being added to each time I make a new crochet flower.
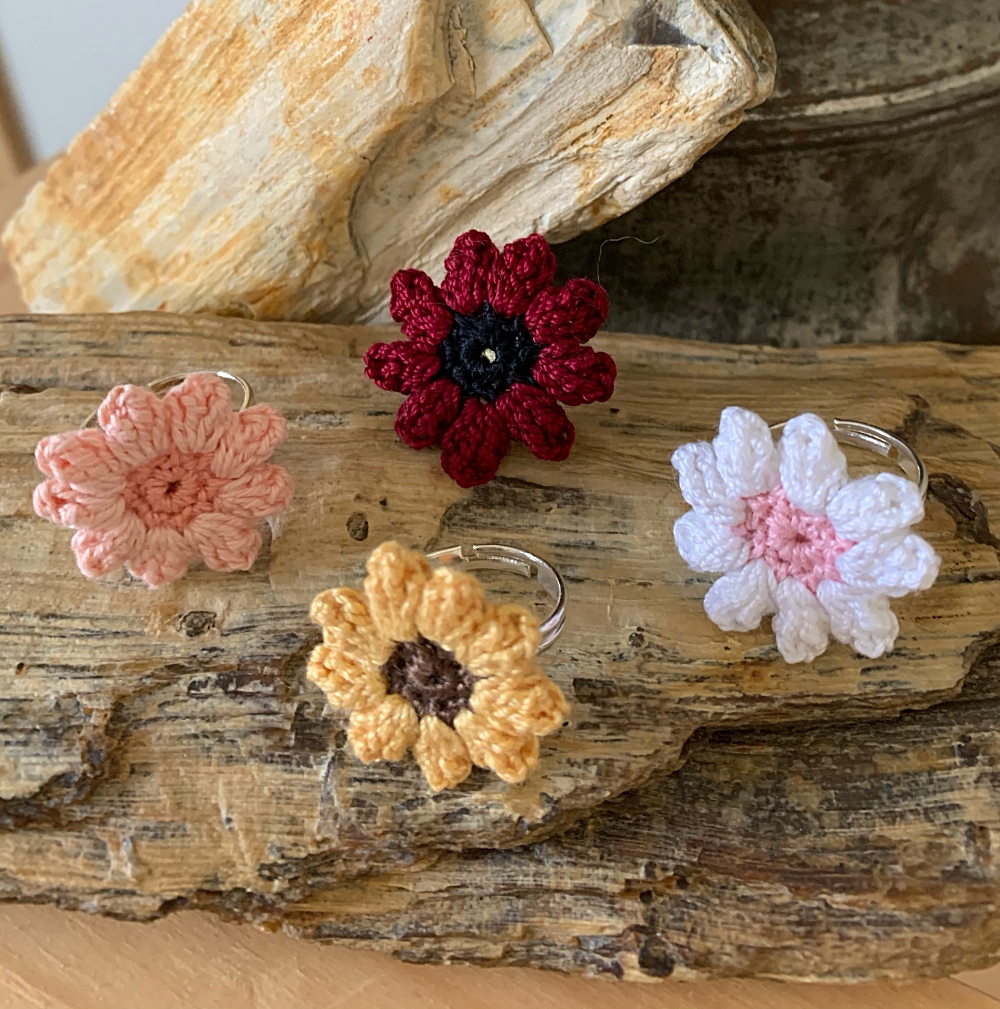
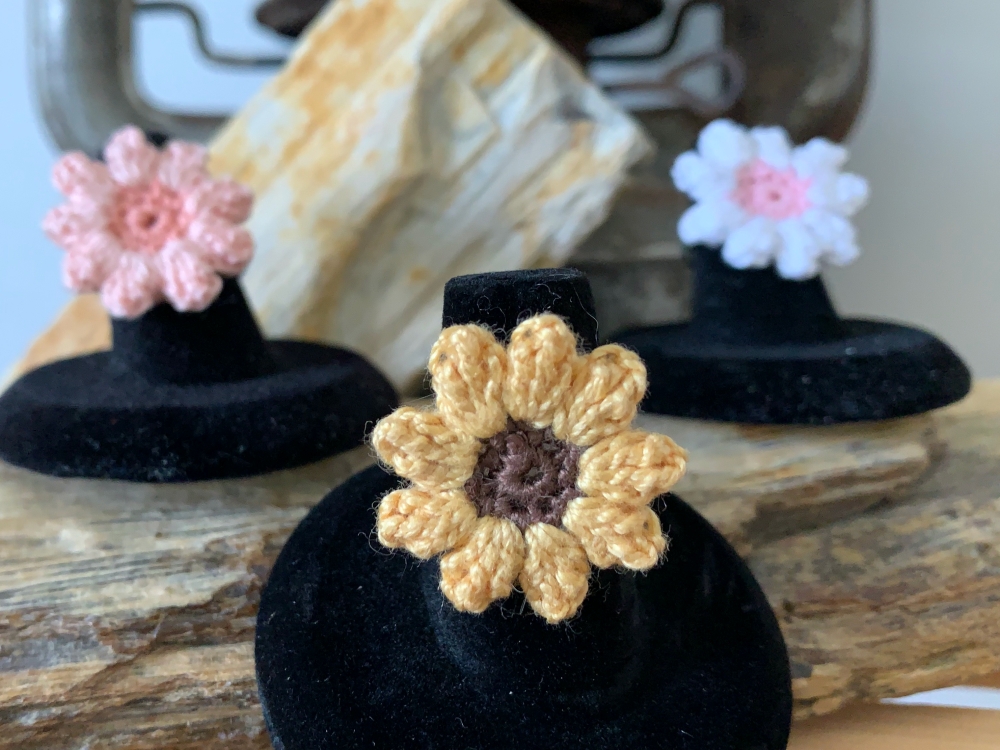
Flowers made to rings
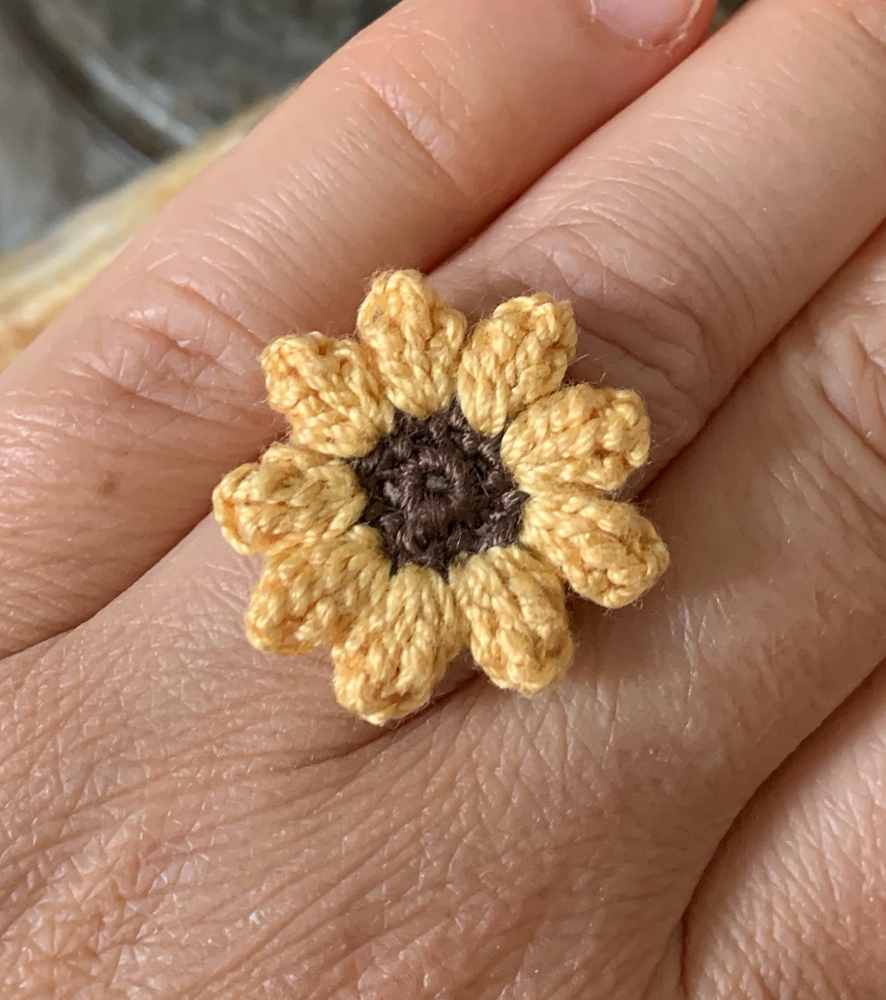
Sunflower Ring
Same rings different angle
Sorry for the wrinkly fingers.
More crochet flower rings.
Crochet sunflower ring
I have shared a few of my flower designs, in particular my Friendship and Flower Bracelet crochet pattern that has been relatively popular. Mostly I made flowers to add to my art projects like you can see here.
Depending on the response to this, my first stand alone crochet flower pattern, I may add the others.
While I wouldn’t consider this project crochet for beginners, if you know your basic crochet stitches, this is quick and fairly easy to make. Originally when I designed this I was aiming for a crochet sunflower. While it is a bit small to be a sunflower, It does have a sunflower type feel to it. At least I feel it does. Depending on your colour selections, you really can make this be any sort of generic “crochet flower”.
But without further ado, except for the handy share icons, here is how to crochet a flower step by step and what you will need.
Things You Will Need
Crochet cotton thread (size 10) – 2 colours of your choice
Size 10 (1.3 mm) crochet hook
Needle to sew in the ends and attach to ring base
Ring base (I prefer the kind that is pictured here. It gives more security when you tie it on and fits any size finger.)
If you are making this flower to go on the Pot and Lid
Size E/ 4 (3.5 mm) to size C/2 (2.5 mm) crochet hook (the size of the hook changes the size of the flower)
Worsted weight yarn – 2 colours of your choice)
Tapestry needle to sew in the ends and attach to lid.
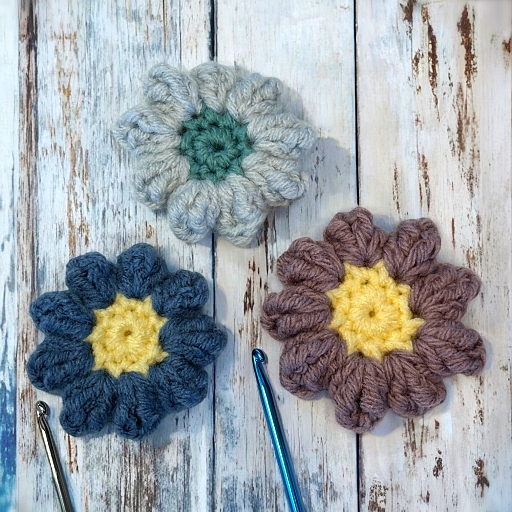
I used the smallest size hook for the blue flower, the largest hook for the purple.
Crocheting the Flower
With the centre colour crochet thread
Ch 2 (make the first loop slightly larger so you can fit in the sc coming up).
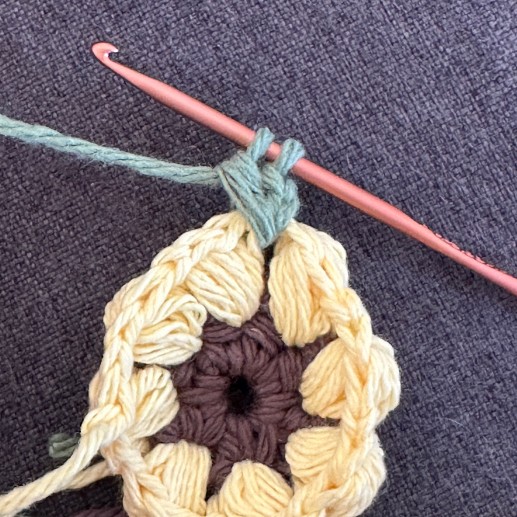
Round 1: 9 sc in 2nd ch from the hook. Join with sl st in the top of the first sc (not the ch. Ignore it. It’ll be fine. Trust me.)
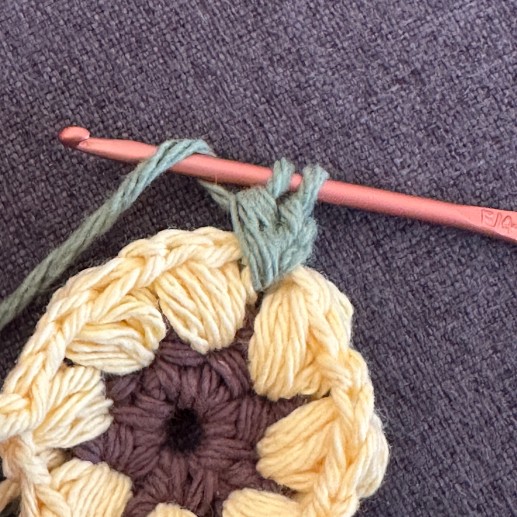
Round 2: Ch 2. *(Sc, ch 1)* in the next sc of previous round. Repeat from * to * in each sc around. Join in the first ch 1 of first ch 2. Break thread.
Round 3: Join petal colour thread in any ch 1 space. Ch 2, tr (wrap thread 2 times around hook), tr +1 (wrap thread 3 times around hook), tr, dc. Ch 1. Turn. Join with sl st to top of ch 2. Ch 2. *In next ch 1 space, dc, tr , tr +1 , tr, dc. Ch 1. Turn. Join with sl st to top of the first dc. Ch 2.* Repeat around. Join with a sl st to the sl st at the top of the ch 2 of first petal made. Break thread.
Work in the ends. Sew the flower to the ring base.
When starting your flower, leave a generous tail when you make your original ch 2. You can use this thread to sew the flower to the ring.
Hold your thread or yarn to the back of your work when making the petals if you can. If you catch the thread or yarn when making a few stitches, it will stay in place without any extra sewing. (I really need to show how to do this with some photos at some point. It’s a huge time saver.)
If you can’t find the shade of crochet cotton thread that you want, you’ll be able to find the embroidery thread (aka embroidery floss) that is the correct colour. For the life of me I can’t find any brown crochet cotton thread locally so I decided to use embroidery thread instead. It worked great! It’s actually the centre of the crochet sunflower. Couldn’t tell could you ?. You will have to separate 2 or 3 threads from the skein to acquire the same thickness as the crochet cotton thread. I found 2 pulled out worked best but it may be different depending on what embroidery thread you’re using.
You can make as many petals on the flowers as you like. Either add more original sc at the beginning and corresponding number of sc, ch 1 on the second row. Be carful though. Too many and the flower won’t lie flat. Not enough and it will look less full and not be enough to go around.
If you ended up with more or less petals than 9, technically, you made it wrong. It doesn’t really matter. But if you’re trying to make a product to sell or make a matching set for earrings or a choker, make sure you do it the same way every time. You want to be consistent. To get 9 ch 1 spaces exactly each time, I count the number of ch 1’s I make INCLUDING the first ch 1 at the start of row 2 (the first ch of the ch 2 is really a sc. The 2nd ch is creating the ch 1 space), then I join in the first ch 1 space I made.
You can adjust the size of the petals by changing up the stitches used to make them. Smaller stitch combo’s such as sc, hdc, dc, hdc, sc in each ch 1 space will make it smaller. Tr, tr +1, (3 times around hook), dtr (4 times around the hook) tr tr, tr can give some interesting effects.
I prefer the ring type that I’ve shown in the affiliate link (yes, I’ll make a bit of money from the sale) but you may prefer something else. I’ve tried a variety of glues and double sided tape (even professional grade) and none of the products worked to my satisfaction in holding the final crochet flower to the ring base. I found sewing it on by passing the thread through the middle hole and around the sides held it securely. And I could also find these bases easily at my local big box craft store. ?
Crochet flower sewn to the ring.
I never ironed my crochet flower before sewing it to the base. It wouldn’t hurt but it’s a very stitch dense item and I don’t think it would really do much to the finished crochet flower.
Abbreviations
Sl st – slip stitch
Ch – chain
sc – single crochet
dc – double crochet. Wrap the thread 1 time around the hook.
tr – treble crochet. Wrap the thread 2 times around the hook.
tr +1 – treble crochet plus one additional thread wrap. Or, wrap the thread 3 times around the hook. (This isn’t a standard stitch so I just made up the most logical name and abbreviation).
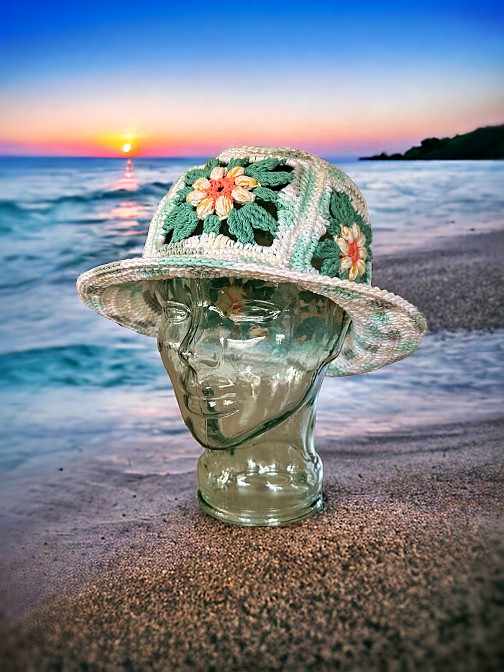
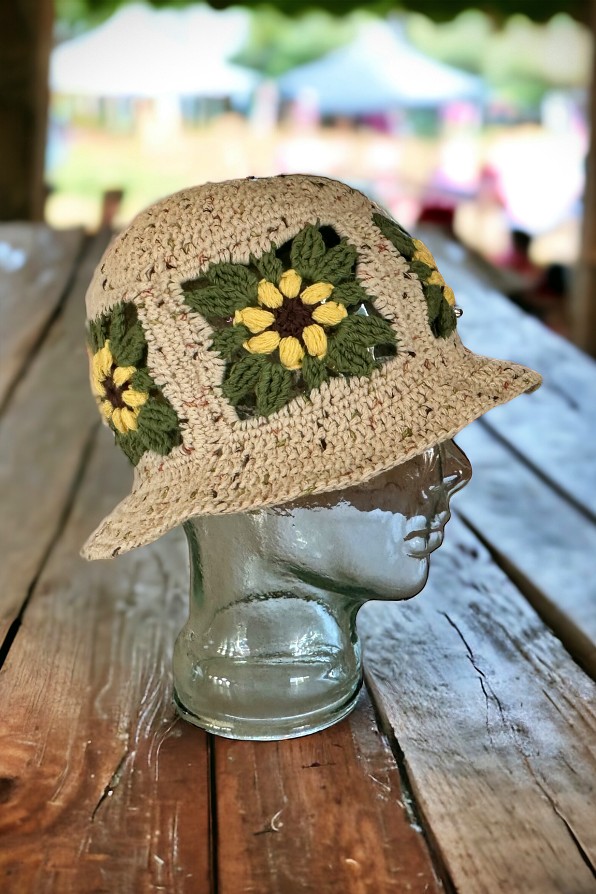
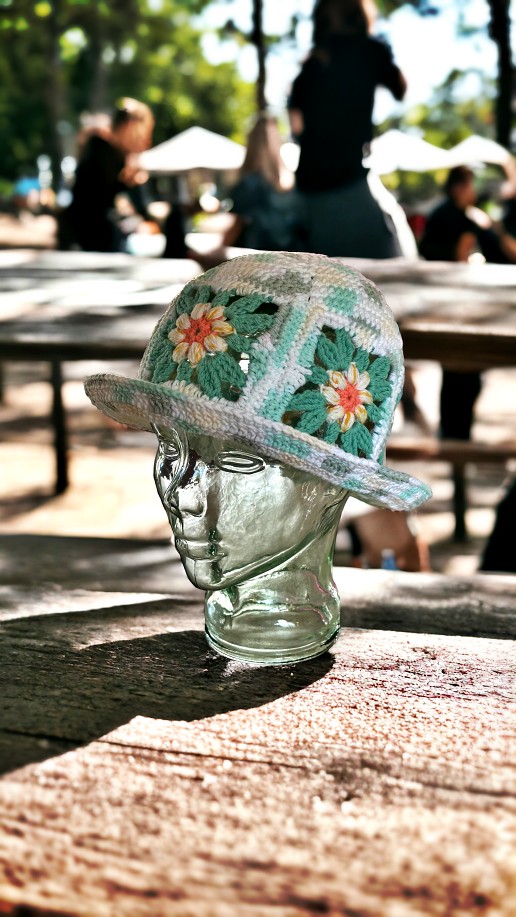
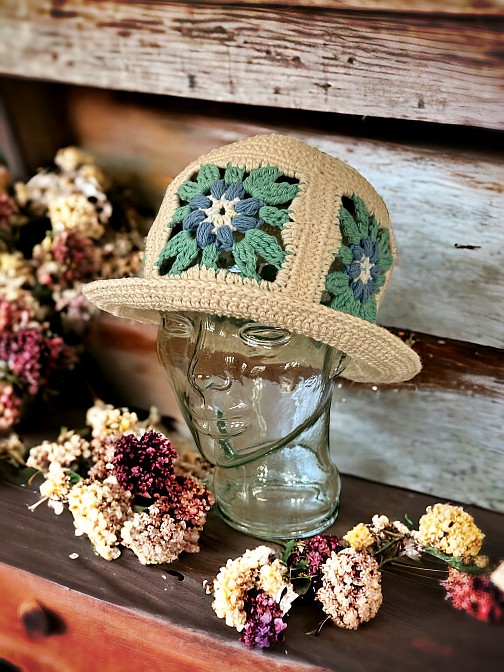
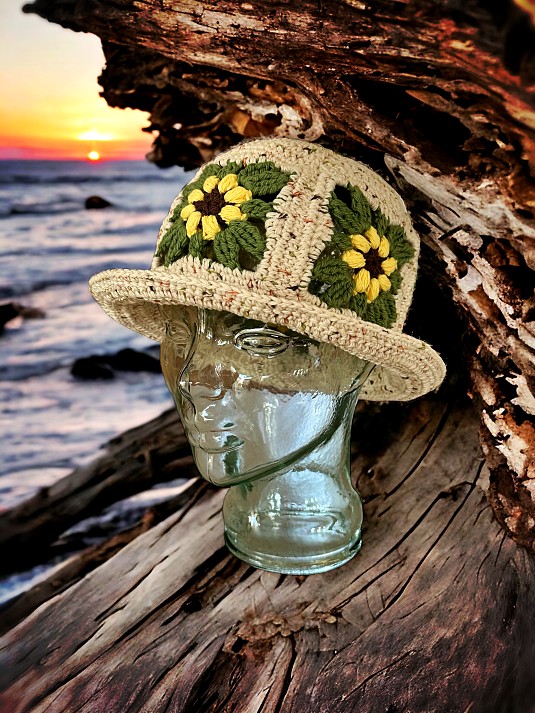
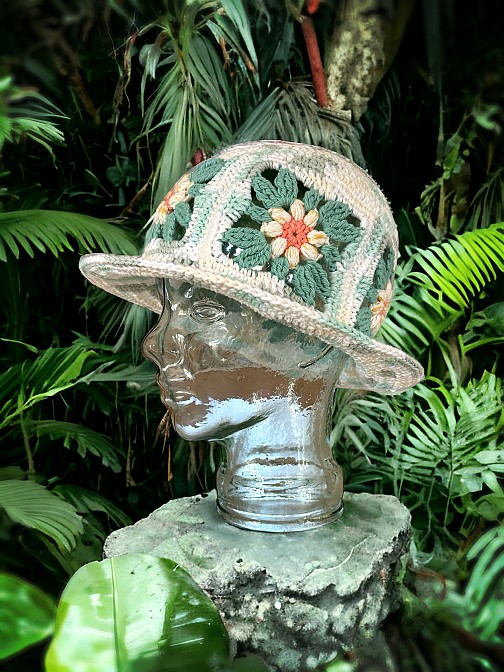
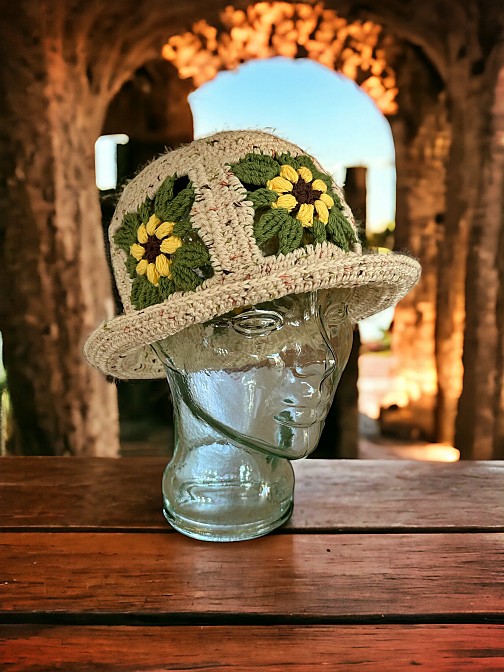
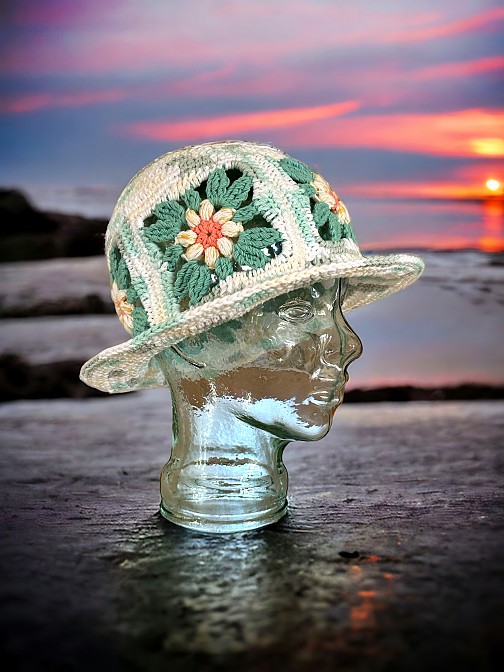
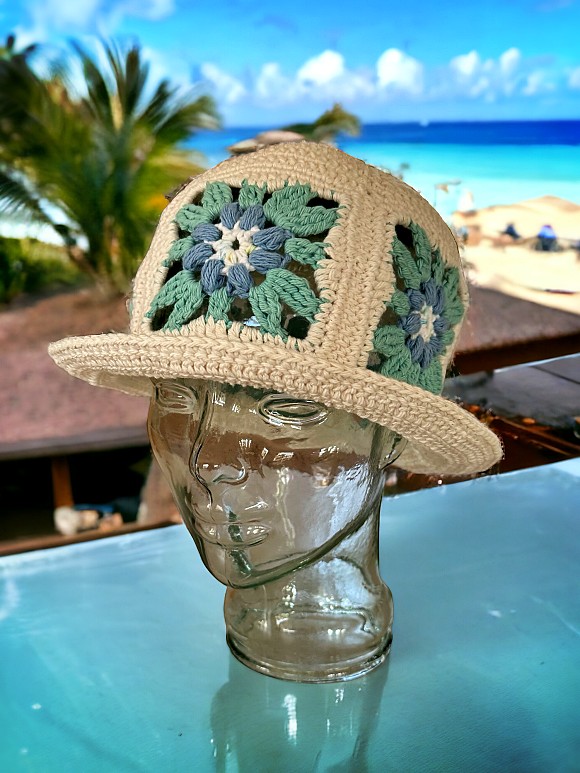
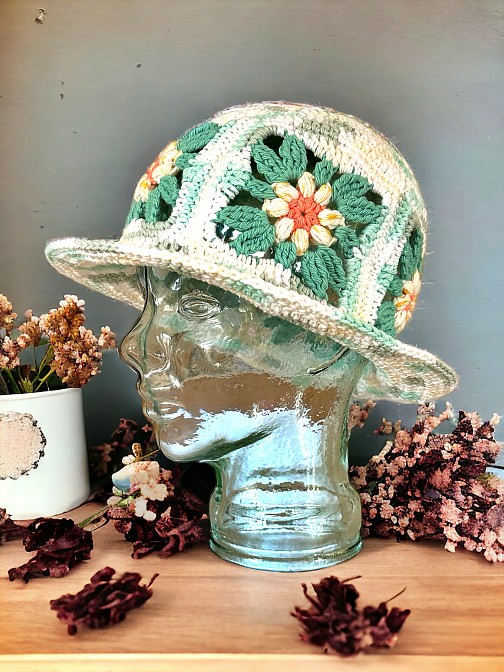
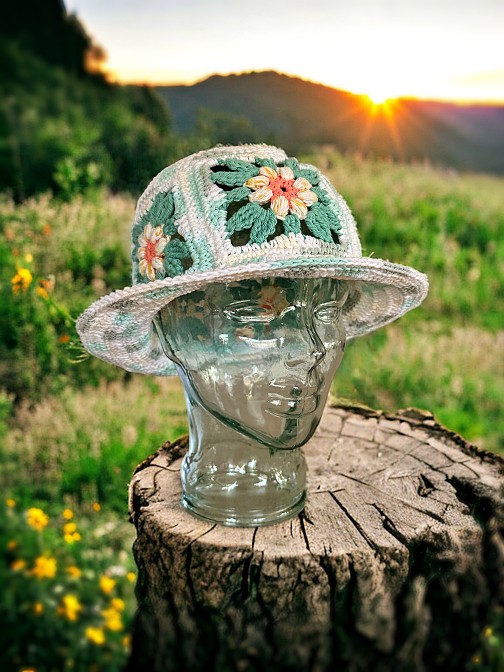
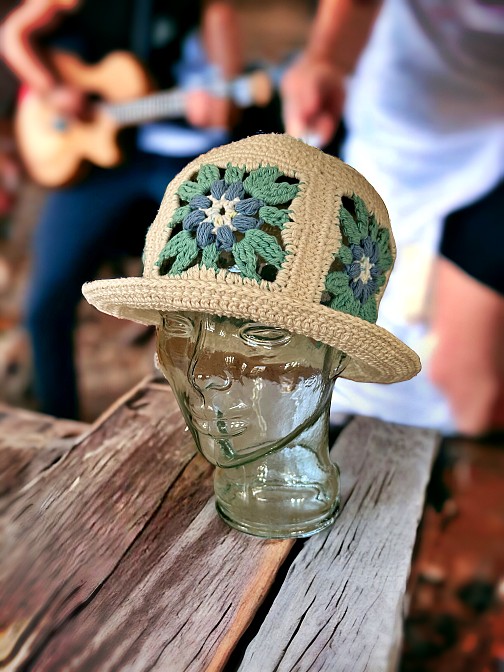
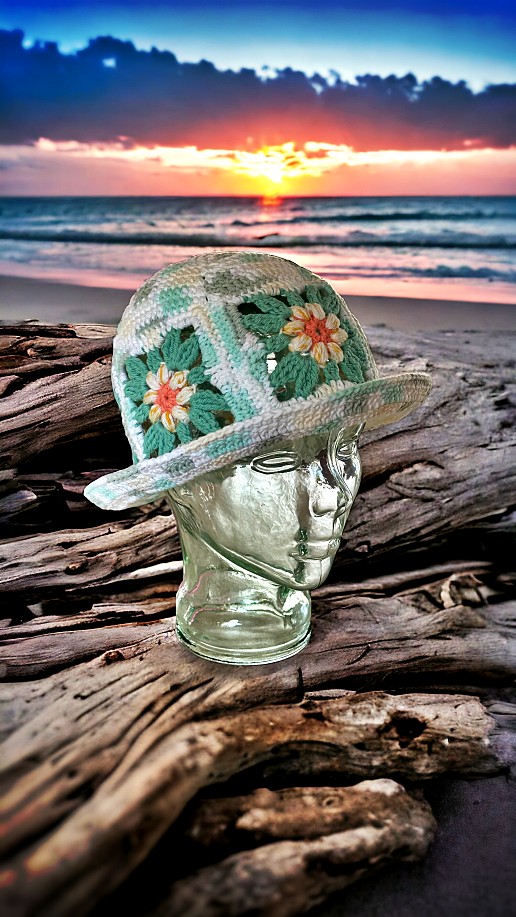
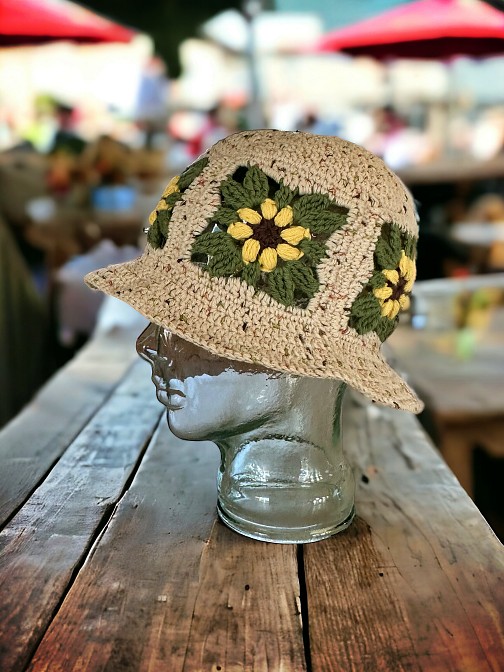
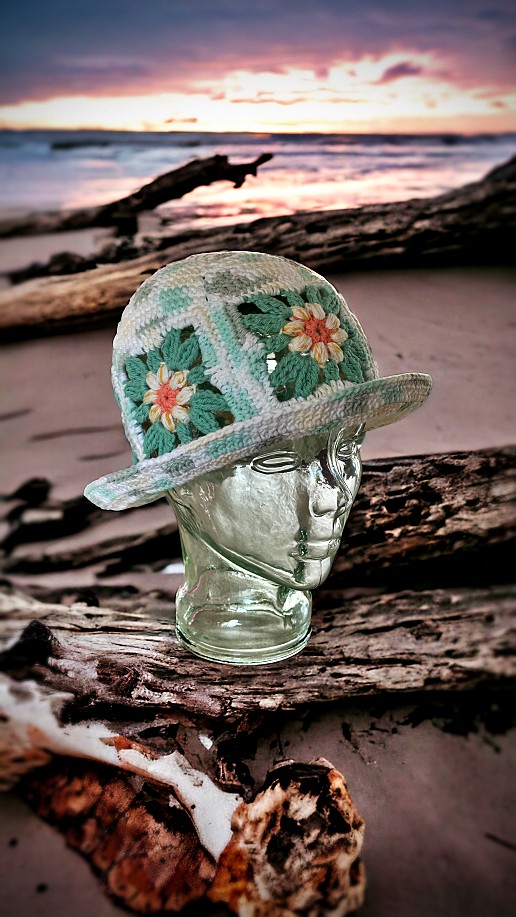
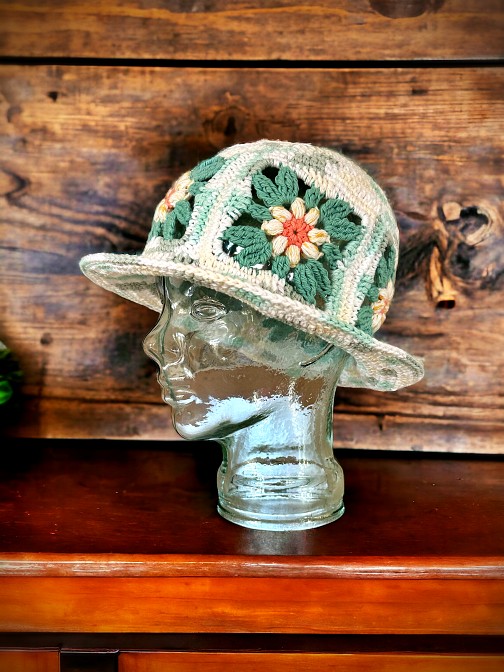
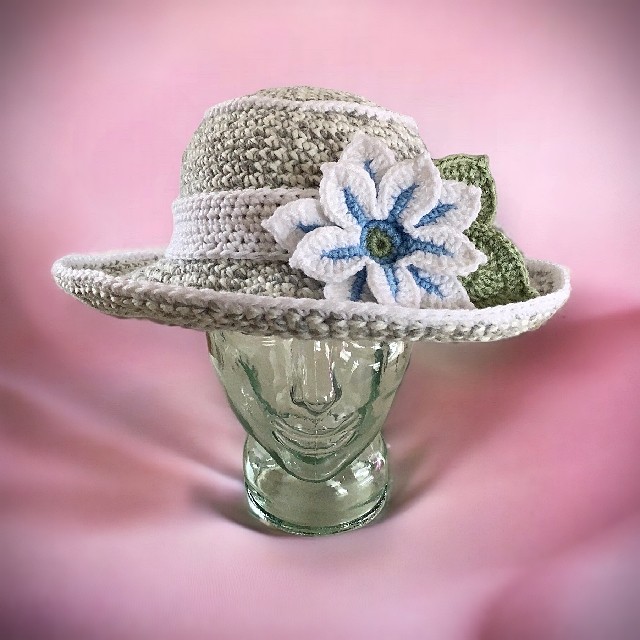
I decided to make a new style of bucket hat when I became enamoured with the many granny square hats I was seeing online. While I appreciate the basic granny square, I felt I needed to jazz up the square a bit. I found a very basic flat flower, which I liked, but I knew I could make it a bit nicer with a textured flower and more leaves.
While I wouldn’t say that this is a beginner pattern, I’ve supplied numerous photos to show you how to make all of the more complicated parts.
The hat itself is made to fit adults and is a one size fits most. It’s not too small to fit a larger head (that would be someone like me) but tight enough to be a roomy, easy fit for those with an average size head.out of 100% cotton yarn for comfort, but you can use whatever you prefer, or have on hand.
If you are looking for photos to help you along with the granny square, I made a separate post that will show you how with photos. I didn’t add them here because there are already so many photos, it would make for a behemoth of a post. It’s easier to just do 2. It makes it less of a burden on the server to separate them into different posts. To see the photos along with the written instructions, click this link – Flower and Leaves Granny Square – Easy Crochet Pattern
Use the Table of Contents tab on the left to easily navigate through the pattern and avoid photos if you don’t need them.
If you decide to purchase the downloadable PDF or the Kindle or paperback version on Amazon, the photos for everything ARE included in the single publication. If you want the printable copy you can buy it on this website here – Sunny Days Granny Square Bucket Hat, from my Etsy shop, Ravelry and the aforementioned, Amazon in both a Kindle and Paperback versions. If ordering the paperback, make sure you select the correct country. It’s set to USA by default.
Love the free patterns? You can say thanks in a couple of ways. You can read more about how you can Support My Work by clicking that link or make a small donation and Buy Me a Coffee. 👈🏼 That link is to a website where you can make a one time donation as a thanks. (FYI I have some great offers if you would like to buy me multiple coffees. You can see those by clicking on the Extras tab or you can click this link Janis Frank Extras).
Another way to support my work is by becoming a Member on this website. When you become a Website Supporter for $3/month, you’ll gain access to exclusive member only posts. These posts contain one click downloads of the patterns. Simply click the Download & Print button. The PDF will automatically download to your computer or smart device. You can then read it on your device or print it at your leisure. You can download as many patterns as you like for the same $3 each month. You can go to this page to learn more, become a member and support my work… Exclusive Member Area.
If you don’t want to or are unable to make a financial donation, sharing this pattern through social media is a great way to help out too! The links below are a super easy way for you to do so.
Things You Need
4 colours of worsted weight yarn (center, flower, leaves and hat body and brim). I used 100% cotton yarn for breathability in hot temperatures but you can use anything. You will need at least 2 of the smaller balls of cotton yarn for the main colour. I used the yarn that comes in the large balls of cotton yarn for my main colour.
3.5 mm (size E or 4) crochet hook
Stitch markers – spare pieces of yarn will work.
Tapestry needle to sew seams and work in ends
Gauge
In DC – double crochet
10 sts = 2 inches (5 cm)
5 rows = 2 inches (5 cm)
Each square measures approximately 12 cm (4.75 inches) wide.
The Granny Square (make 5)
With your choice of center colour,
Ch 2 making first chain large enough to fit the next 8 sts.
Round 1
8 HDC. Join with sl st at the top of the first ch. Break yarn.
In any HDC, join with sl st. Ch 1 and make it into a large loop. Pull up a large loop. YO. Pull up a loop. YO. Pull up a loop. YO draw through all the loops ion your hook. Ch 2. ♠ In the next HDC, *Pull up a loop. YO* Repeat from * to * 3 times more (total of 4 large loops). Draw through all loops on your hook. Ch 2 ♠ Repeat form ♠ to ♠ around for a total of 8 petals. Join with sl st to the first ch 1 of the first petal. Break yarn. Tie off.
Round 3
With your choice of leaf colour,
Join with sl st in any Ch 2 space. Ch 1 ♣ YO. Draw up a loop as if to make a DC. YO and draw through the first 2 loops on your hook. Leave the remaining loops on your hook unworked.♣ Repeat from ♣ to ♣ one more time. YO and draw through the all loops on your hook. (Small middle leaf complete). ▲ Ch 4.. In the next Ch 2 space, ♥ ◘ YO 3 times. Draw up a loop as before. YO and draw through the first 2 loops on your hook. YO. Draw through the next 2 loops on your hook. YO Draw through the next 2 loops on your hook. Leave the remaining loops on the hook unworked.◘Repeat from ◘ to ◘ 2 more times. YO and draw through all 4 loops on your hook. ♥ (1st corner leaf made). Ch 5. Repeat from ♥ to ♥ 1 time staying in the same Ch 5 space of the leaf just made. (2nd corner leaf made). Ch 4. In the next Ch 2 space, Repeat from ♣ to ♣ but repeat 3 times total. (Small middle leaf made).▲ Repeat from ▲ to ▲ ending with last 2 corner leaves. Ch 4. Join with sl st to the top of 1st small middle leaf. Break yarn. Tie off.
Round 4
With your choice of edging colour,
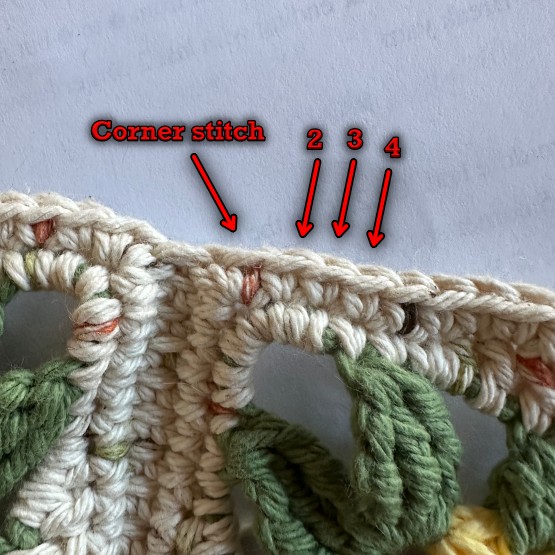
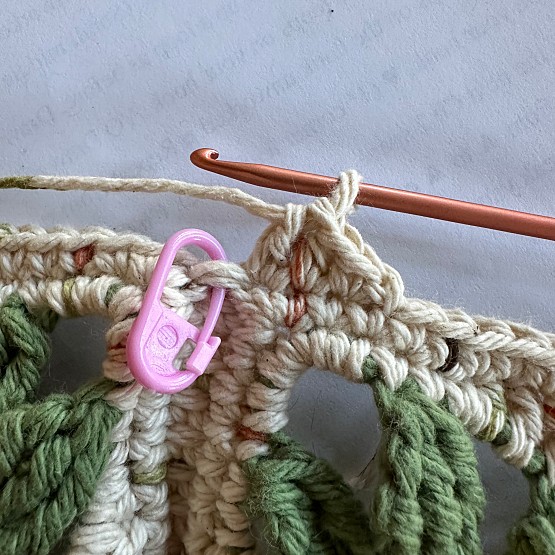
Join with sl st in the DC of any small middle leaf, Ch 2. ♫ In the next Ch 4 space, (DC, HDC, SC). SC in each of the next 2 sts. In the Ch 5 corner space, 5 SC, SC in each of the next 2 sts. In the Ch 4 space (SC, HDC, DC) DC in the next 2 sts. ♫ Repeat from ♫ to ♫ ending with 1 DC in the next st. Join with sl st in the top of the starting Ch 2.
Round 5
Working evenly over the sts unless otherwise stated, 6 SC, 3 SC in the corner st, ☼ 16 SC, 3 SC in the corner st. ☼ Repeat from ☼ to ☼ 2 more times. 8 SC. Join with sl st in starting SC. Break yarn. Tie off.
Make 4 more granny squares. Join squares together to make a circle. You can sew them together or use a sl st along the edges. Make the seam from middle corner SC to the middle corner SC.
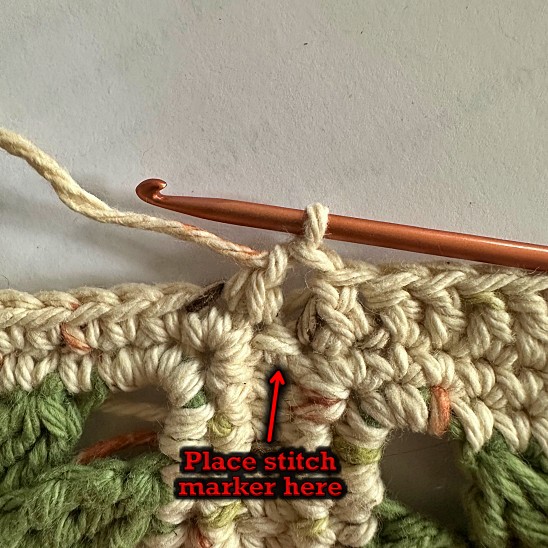
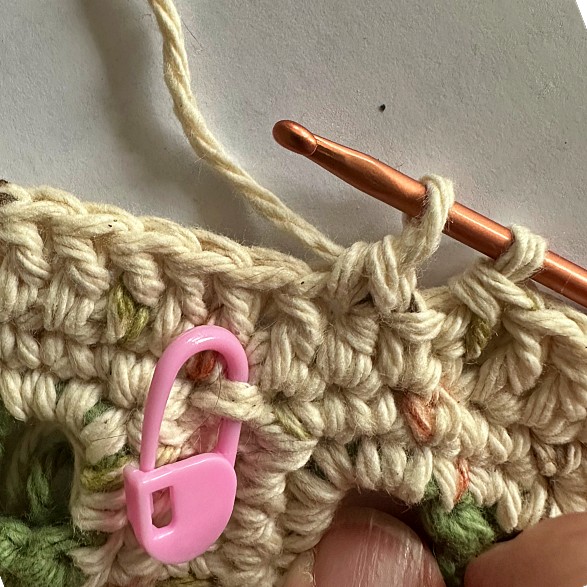
With the RIGHT side of the circle facing you, and on either edge, count back 4 sts from any joining seam. Join yarn with a sl st, SC, HDC, DC. Place a st marker at the seam. 18 DC *2DCtog twice. 16 DC. Place st marker on the seam* Repeat from * to * around to the 2 sts before the st marker. Do NOT join! You will now work continuously around the top of the hat.
Count back 4 sts
Join with Sl St, SC, HDC, DC. Place marker.
18 DC
2DCtog in these 2 stitches (decrease)
2DCtog made
2DCtog on other side of the seam
2DCtog at end of round.
Round 2 and beyond
☺ 2DCtog on each side of the st marker. DC to the 2 sts before the st marker. ☺. Repeat around from ☺ to ☺ until there are no sts between the 2DCtog. Make 2DCtog until there are 6 sts left. HDC over 2 sts. (Pull up loop in next 2 sts. YO and draw through all 3 loops on your hook). Join with a sl st in the next st. Break yarn. Tie off. Work in end.
Hat Brim
Round 1
With the RIGHT side of the hat facing you, count back 4 sts from any joining seam. SC, HDC, DC. Place a st marker at the seam. DC around to st marker. Do NOT join but work in continuous rounds.
Round 2
◊ 4 DC 2DC in next st. ◊ Repeat around from ◊ to ◊ to the st marker.
Round 3
8 DC, 2 DC in next st. ♪ 5 DC 2DC in next st. ♪ Repeat around from ♪ to ♪ to the st marker. 2 DC in last st. (don’t worry if your off by a few sts).
Round 4
DC around to the st marker. HDC, SC, sl st in the next st to join. Ch 1. Turn.
Round 5
With the WRONG side facing you, SC around to st marker. Join with sl st in Ch 1. Break yarn. Tie off. Work in ends.
Abbreviations
SC – single crochet
DC – double crochet
HDC – half double crochet
2DCtog – crochet 2 sts together. Do NOT YO. Pull up a loop in the next st as if to make a SC. Pull up a loop in the next st. YO. Draw through 2 loops on your hook. YO. Draw through the 2 loops on your hook. Decrease made. 2 stitches are now crocheted together.
YO – yarn over
sl st – slip stitch
st – stitch
sts – stitches
Hints and Tips
If counts are off for round 5, SC as many sts as you need to get to the middle st of the corner. Make sure the 3 sts in one st are always in the middle st.
There are a lot of ends when you make a multi-coloured granny square. Work the ends in as you crochet. Hold your yarn to the back of your work and catch the end over a few sts while you crochet. There are lots of great videos online that can show how.
If you would like a wider brim on your hat, DC with increases every other row around. End one row of DC without increases and a row of SC.
If the hat is too big or too small, you can always switch up the hook size. Use a smaller hook to make it smaller, and a larger hook for a bigger one. I wouldn’t add or take away a square as they are quite large and will make a big difference in the size. A larger size hook will also make the brim less stiff and more floppy. Please note I can’t help you with sizing if you’ve changed the hook size.
I decided to make a new style of bucket hat when I became enamoured with the many granny square hats I was seeing online. While I appreciate the basic granny square, I felt I needed to jazz up the square a bit. While this square is used in the hat, this particular pattern is for the square only.
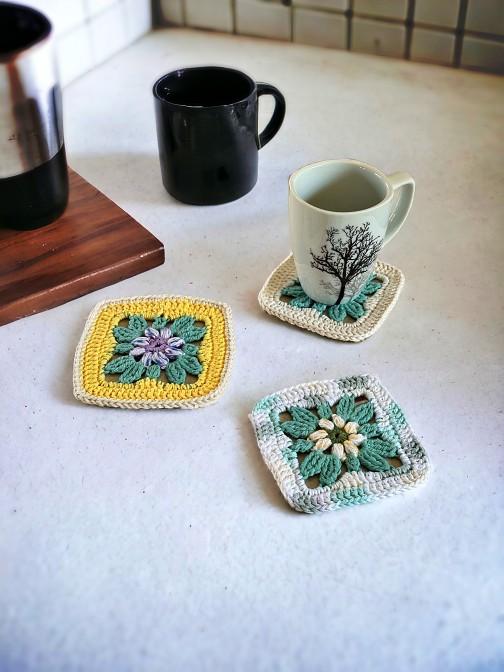
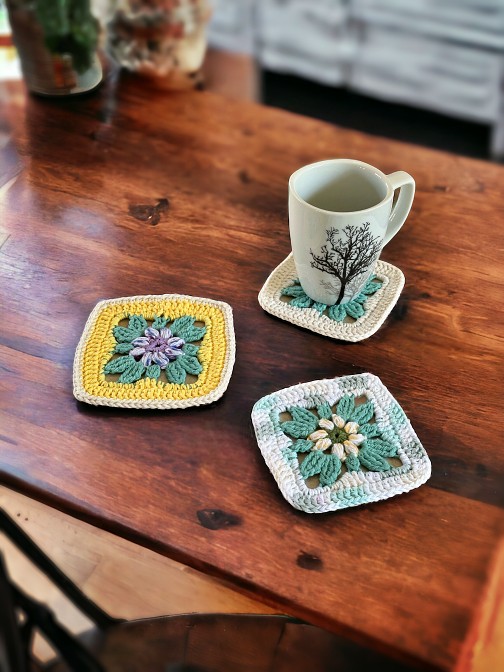
What can you do with a square? Pretty much anything. A square can be used as a square of course, like a coaster. It’s when you start adding those squares together that you really can do more. Attached them together to make a scarf, more squares to make a larger square for a pillow. Add a lot of squares and make an afghan. Put them together in creative ways to make the body and sleeves of a sweater, or diagonally and make a bag. Add extra stitches to make a hat, more stitches on one side to make a small purse. It really is only limited by imagination.
Use the Table of Contents tab on the left to go to the next round without scrolling past the photos.
Love the free patterns? You can say thanks in a couple of ways. You can read more about how you can Support My Work by clicking that link or make a small donation and Buy Me a Coffee. 👈🏼 That link is to a website where you can make a one time donation as a thanks. (FYI I have some great offers if you would like to buy me multiple coffees. You can see those by clicking on the Extras tab or you can click this link Janis Frank Extras).
Another way to support my work is by becoming a Member on this website. When you become a Website Supporter for $3/month, you’ll gain access to exclusive member only posts. These posts contain one click downloads of the patterns. Simply click the Download & Print button. The PDF will automatically download to your computer or smart device. You can then read it on your device or print it at your leisure. You can download as many patterns as you like for the same $3 each month. You can go to this page to learn more, become a member and support my work… Exclusive Member Area. This pattern is NOT in the member area.
If you don’t want to or are unable to make a financial donation, sharing this pattern through social media is a great way to help out too! The links below are a super easy way for you to do so.
Unlike most of my patterns, this one is NOT available as a printable version, yet. I’m planning on developing a collection of granny squares I’m going to make available. And I have a hat pattern I’m working on where this square will be added in full. But for now, you can scroll along and make the square as you go.
Things You Need
4 colours of worsted weight yarn (center, flower, leaves and border)
3.5 mm (size E or 4) crochet hook
Tapestry needle to sew seams and work in ends
Gauge
In DC – double crochet
10 sts = 2 inches (5 cm)
5 rows = 2 inches (5 cm)
Each square measures approximately 12 cm (4.75 inches) wide.
This is a fairly densely packed square with more sts per inch. It’s not very “floppy” and is more stiff. If you are wanting more flexibility in your final project, like a blanket, use a larger hook, like a 5 mm (Size H or 6) or so.
If you are making the hat pattern (coming soon!) you’ll need 5 squares.
The Pattern
With your choice of center colour,
Ch 2 making first chain large enough to fit the next 8 sts.
Round 1
8 HDC. Join with sl st at the top of the first ch. Break yarn.
Round 2
With your choice of flower petal colour,
In any HDC, join with sl st. Ch 1 and make it into a large loop. Pull up a large loop. YO. Pull up a loop. YO. Pull up a loop. YO draw through all the loops ion your hook. Ch 2. ♠ In the next HDC, *Pull up a loop. YO* Repeat from * to * 3 times more (total of 4 large loops). Draw through all loops on your hook. Ch 2 ♠ Repeat form ♠ to ♠ around for a total of 8 petals. Join with sl st to the first ch 1 of the first petal. Break yarn. Tie off.
Pattern continues after photos. Use the Table of Contents tab on the left to go to the next round without scrolling past the photos.
Pull up large loop
Pull up a large loop
YO and pull up a large loop
YO and pull up another loop
YO
Draw through all loops on hook. Ch 2
In next HDC, pull up a loop
YO and pull up loops like you did before
YO and draw through all loops. Ch 2
Round 3
With your choice of leaf colour,
Join with sl st in any Ch 2 space. Ch 1 ♣ YO. Draw up a loop as if to make a DC. YO and draw through the first 2 loops on your hook. Leave the remaining loops on your hook unworked.♣ Repeat from ♣ to ♣ one more time. YO and draw through the all loops on your hook. (Small middle leaf complete). ▲ Ch 4.. In the next Ch 2 space, ♥ ◘ YO 3 times. Draw up a loop as before. YO and draw through the first 2 loops on your hook. YO. Draw through the next 2 loops on your hook. YO Draw through the next 2 loops on your hook. Leave the remaining loops on the hook unworked.◘Repeat from ◘ to ◘ 2 more times. YO and draw through all 4 loops on your hook. ♥ (1st corner leaf made). Ch 5. Repeat from ♥ to ♥ 1 time staying in the same Ch 5 space of the leaf just made. (2nd corner leaf made). Ch 4. In the next Ch 2 space, Repeat from ♣ to ♣ but repeat 3 times total. (Small middle leaf made).▲ Repeat from ▲ to ▲ ending with last 2 corner leaves. Ch 4. Join with sl st to the top of 1st small middle leaf. Break yarn. Tie off.
YO and draw through first 2 loops as if you were going to make a DC. Leave the 2 loops unworked.
YO
Pull up a loop
YO and draw through the 2 loops. Leave remaining loops unworked
YO and draw through all loops on hook. Smaller middle leaf made. Ch 4
YO 3 times
In next ch 2 space, draw up a loop
YO and draw through 1st 2 loops
YO and draw through next 2 loops
YO and draw through next 2 loops. Leave the remaining loops unworked.
In same ch 2 space, YO 3 times to make next “arm” of leaf
YO and draw up a loop. Repeat the leaf “arm” same as last time.
Leave the remaining loops unworked.
Make the 3rd “arm”
YO and draw through the 4 loops on your hook. Ch 5 and make another leaf in this ch 2 space.
Ch 4. YO and draw up loop in next ch 2 space.
Draw up a loop
YO and draw through 2 loops. Leave remaining loops unworked
YO and draw up a loop in same ch 2 space
YO and draw through the 2 loops on hook. Leave remaining st unworked.
YO and draw through all loops on your hook. Ch 4
Round 4
With your choice of edging colour,
Join with sl st in the DC of any small middle leaf, Ch 2. ♫ In the next Ch 4 space, (DC, HDC, SC). SC in each of the next 2 sts. In the Ch 5 corner space, 5 SC, SC in each of the next 2 sts. In the Ch 4 space (SC, HDC, DC) DC in the next 2 sts. ♫ Repeat from ♫ to ♫ ending with 1 DC in the next st. Join with sl st in the top of the starting Ch 2.
Join in this st on ANY small middle leaf
DC, HDC, SC in ch 4 space
SC in next 2 sts
5 SC in ch 5 space between corner leaves
SC next 2 sts
SC, HDC, DC in ch 4 space
DC in next 2 sts of small middle leaf
Round 5
Working evenly over the sts unless otherwise stated Ch 3, 6 DC, 3 DC in the corner st, ☼ 16 DC, 3 DC in the corner st. ☼ Repeat from ☼ to ☼ 2 more times. 8 DC. Join with sl st in starting Ch 3. Break yarn. Tie off.
Please note:You can substitute SC for the DC in round 5. Photos of the granny square show the squares with DC edging. If using SC don’t Ch 3.
Abbreviations
SC – single crochet
DC – double crochet
HDC – half double crochet
YO – yarn over
sl st – slip stitch
st – stitch
sts – stitches
Hints and Tips
If counts are off for round 5, DC as many sts as you need to get to the middle st of the corner (I marked it in the photo). Make sure the 3 sts in one st are always in the middle st.
There are a lot of ends when you make a multi-coloured granny square. To help with things, hold your yarn to the back of your work and catch the end over a few sts while you crochet. There are lots of great videos online that can show how.
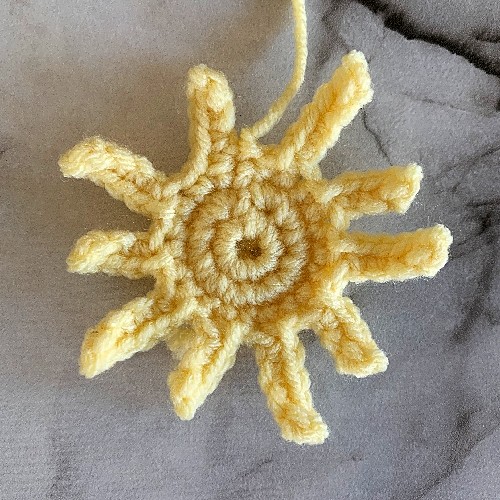
This crocheted leaf pattern was designed to go along with a flower made for my sun hat (Crochet sun hat pattern coming soon!). As I was getting the photos ready, I was thinking how these could also be used to highlight many things, especially a crocheted wreath for autumn. I like how the leaves look in the variety of fall colours.
The leaves by themselves aren’t really much to look at. I didn’t want them to be. I want them to be fill behind the flowers highlighting the flowers themselves.
I’m going to add buttons so you can easily go to the pages with the flower pattern and the hat (when it’s done).
This pattern isn’t available alone as a downloadable and printable PDF. It will be included with the sunhat/bucket hat/cowboy/cowgirl hat along with the flower. It was easier to divide the hat, flower and leaf into separate pages on the website.
If you know someone you think would like this post, by all means, share it! The more eyeballs on my work the better. If you are enjoying the free patterns, this is a great way to support my work. You can also Buy Me A Coffee or check out the other options when you check out the Help Support My Workpage. If you’re looking for something new to share with your friends on your website or on social media, these links will help you do it.
The hints and tips for how to finish and press the flowers is written below the pattern. You can also ask any questions in the comments section.
Abbreviations
ch – chain
sc – single crochet
hdc – half double crochet
dc – double crochet
trc – treble crochet
sl st – slip stitch
st – stitch
sts – stitches
Things You Need
Worsted weigh yarn (small quantities from your stash)
3.5 mm (US E or 4) crochet hook.
Stitch marker. (A piece of yarn or bobby pin will do).
The Pattern
Please note:
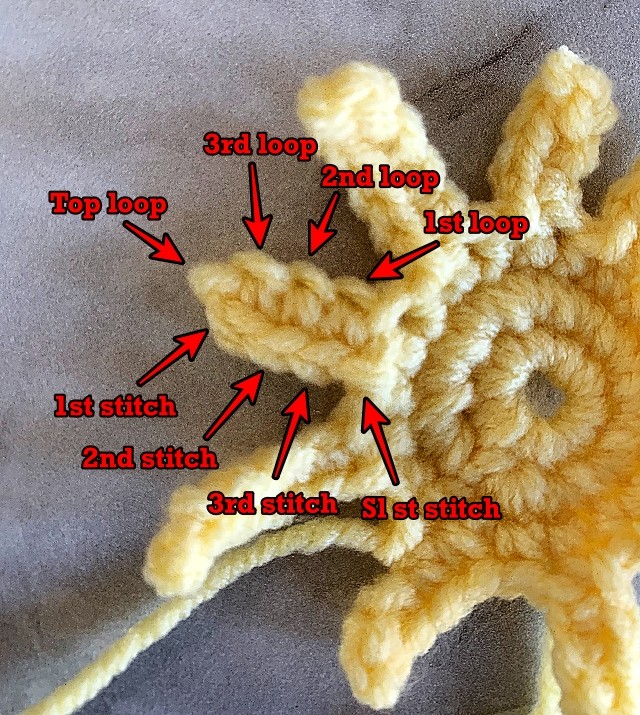
The rounds end in various places on the bottom of the leaf. Regardless, the stitch counts work. Round 4 evens out the stitches giving the leaf shape.
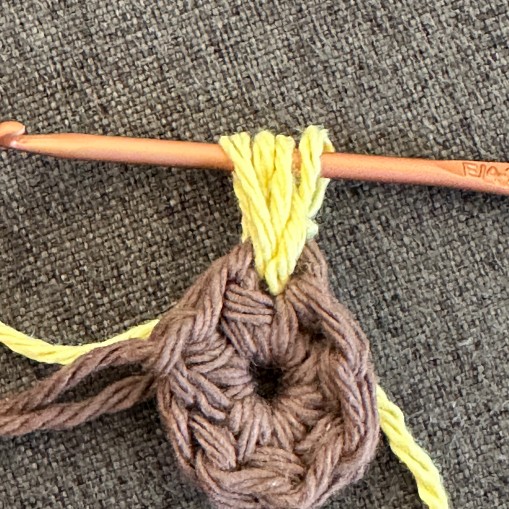
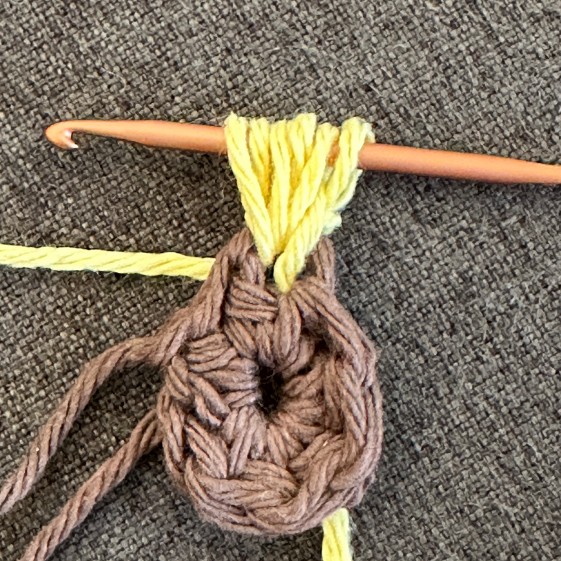
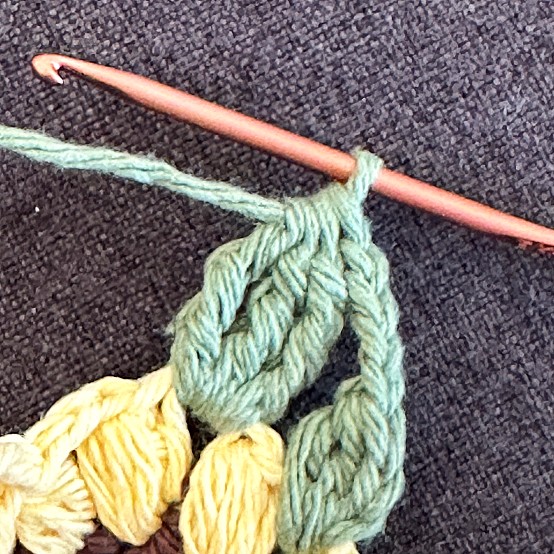
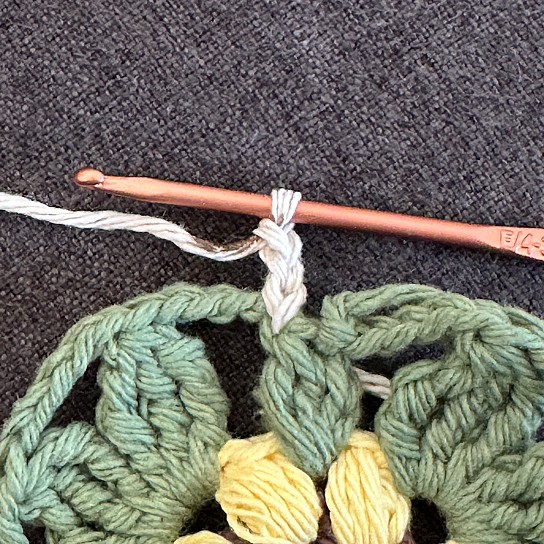
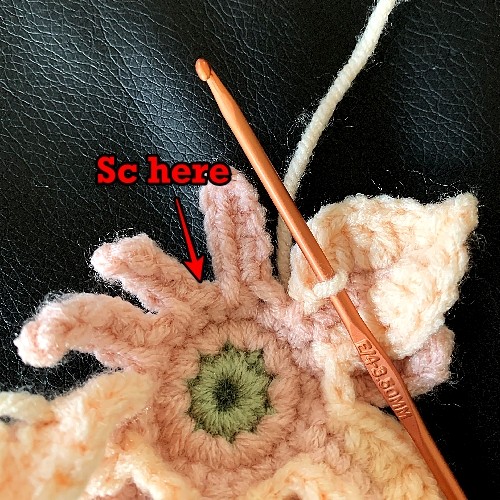
Ch 2 (make the first chain large enough to fit in all the stitches for Round 1)
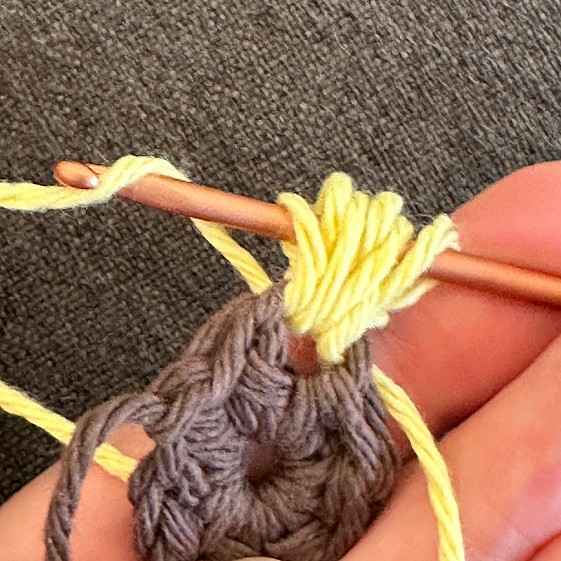
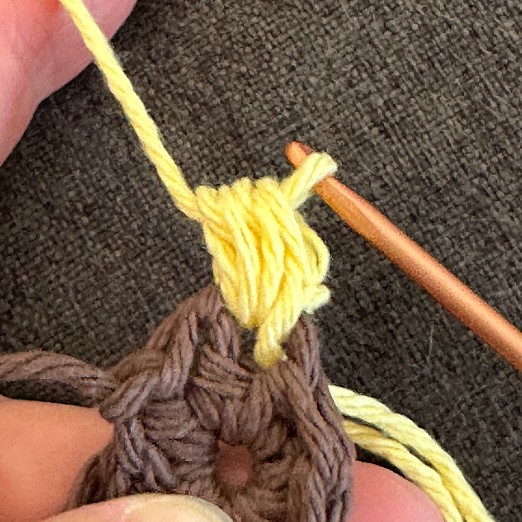
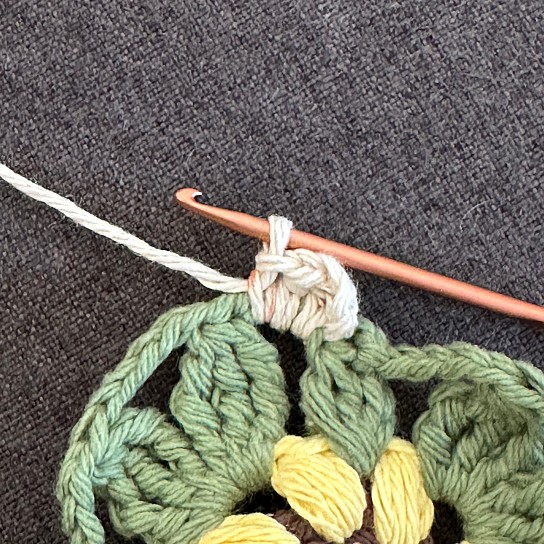
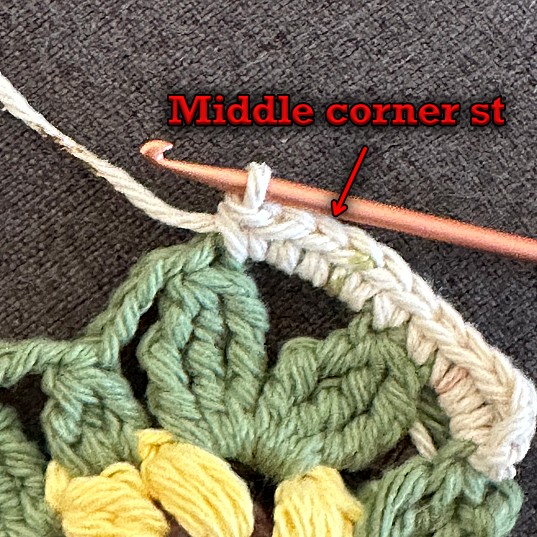
Round 1: 11sc in 2nd chain from hook. Do NOT join. Begin to work in the round.
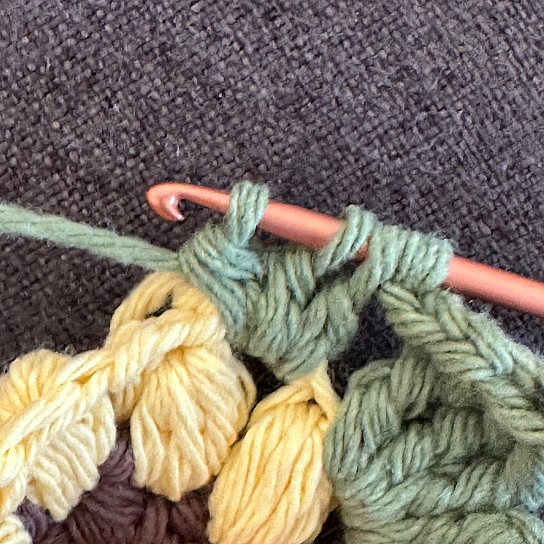
Round 2: In the 1st sc from the last round, sc. 2sc in the next st. In the next st, sc, hdc. In the next st, hdc, dc. 2dc in the next 2 sts. In the next st, dc, hdc. In the next st, hdc, sc. 2sc in the next st. Sc.
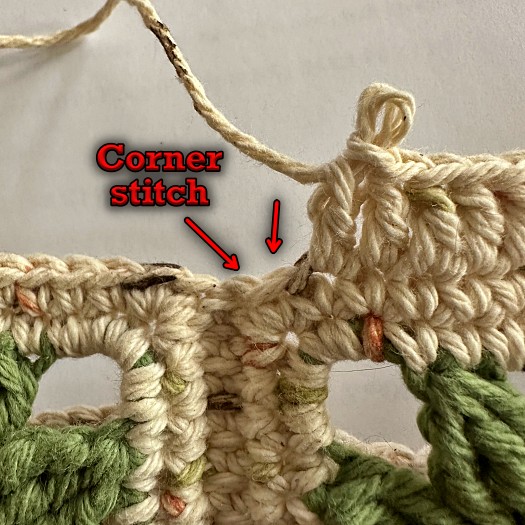
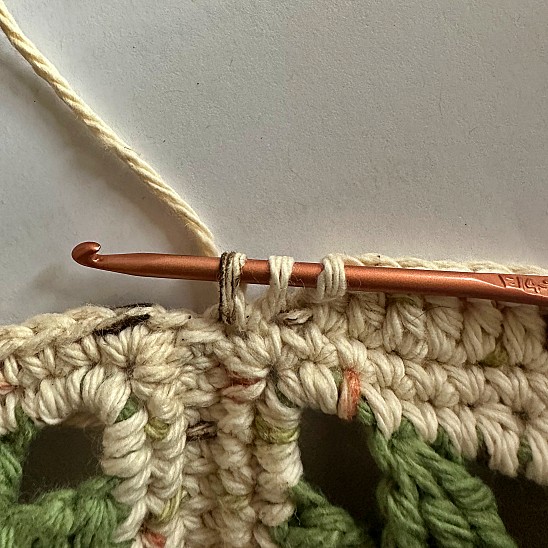
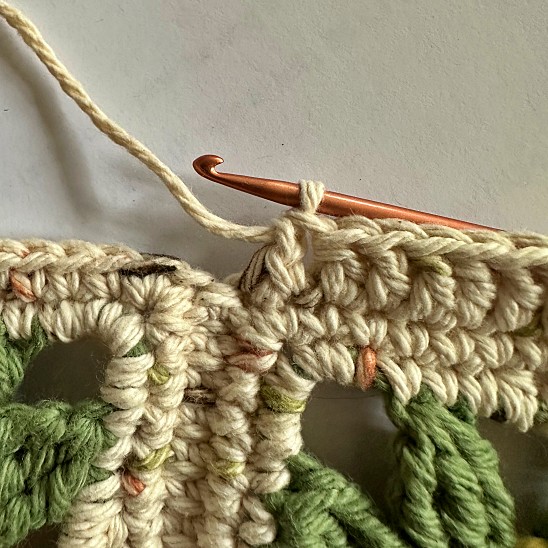
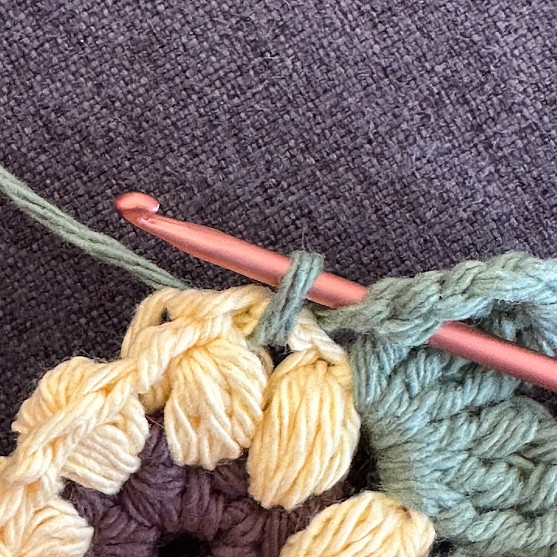
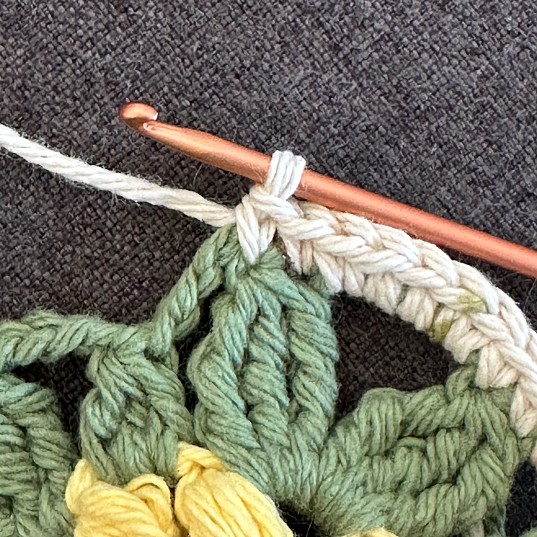
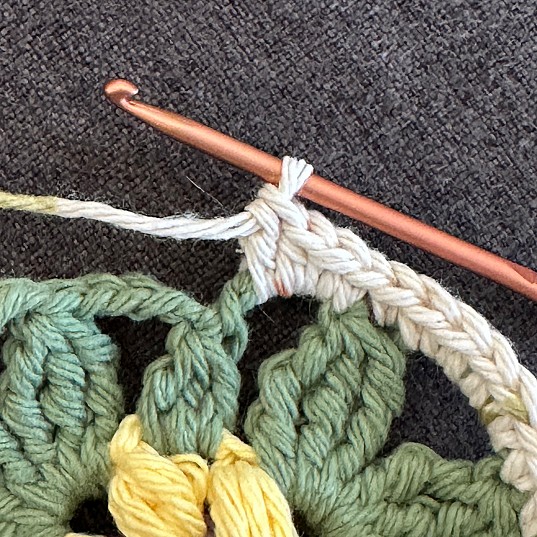
Round 3: *2sc in the next st, sc* Repeat from * to * 2 more times. In the next st, sc, hdc. (Mark the hdc with a stitch marker). In the next st, hdc, dc. 2dc in the next st. In the next st, dc, trc. In the next st, trc, dc. 2dc in the next st. In the next st, dc, hdc. In the next st, hdc, sc. *Sc, 2sc in the next st* Repeat from * to * 2 more times.
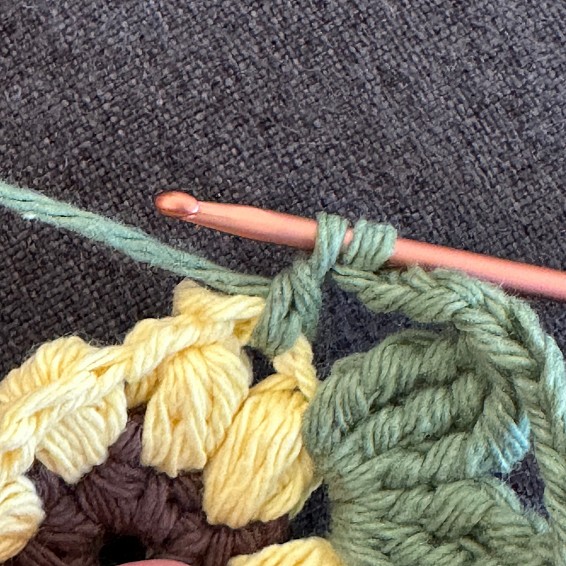
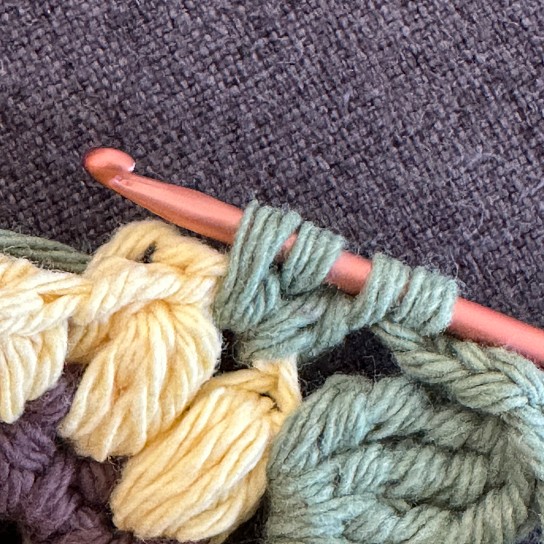
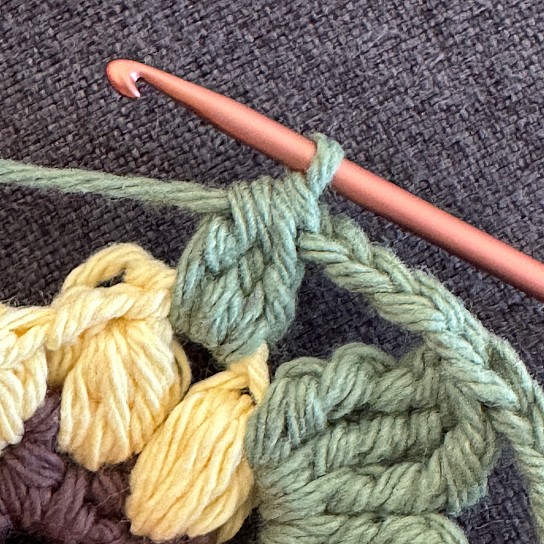
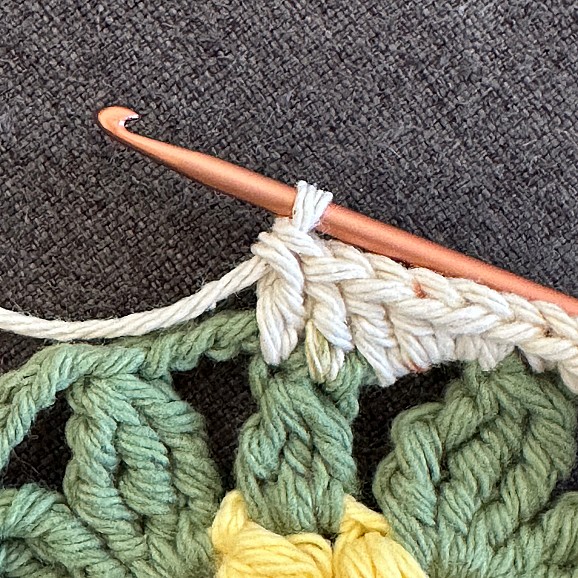
Round 4: *2sc, 2sc in the next st* Repeat from * to * 2 more times. (Or as many sc as you need to get to the stitch marker). Sc in the stitch marked with the marker. As you normally would, proceed as follows, hdc, 4dc. In the next st (the 1st trc from the previous round), dc, trc. Ch 2 sl st in the 2nd chain from hook. In the next st, trc, dc. As you normally would, proceed as follows, 4dc, hdc, sc. *2sc, 2sc in the next st* Repeat from * to * 4 more times. 2Sc. Sl st in the next st. Break yarn. Tie off.
Add extra embroidered details to the leaves as you see fit. Maybe some extra veining lines or stitches around the edge in a slightly darker shade? It really is up to you.
As much as I wanted to avoid pressing anything, the leaves also need to be pressed to have them lie flat. Be sure to do a test swatch BEFORE you press anything. Acrylic is notorious for melting and losing all constructive properties when pressed. It melts to give a flat, melted look. Press with your iron at the lowest setting possible. Press with a damp cloth between the iron and the leaf. Iron the leaves from the BACK only!
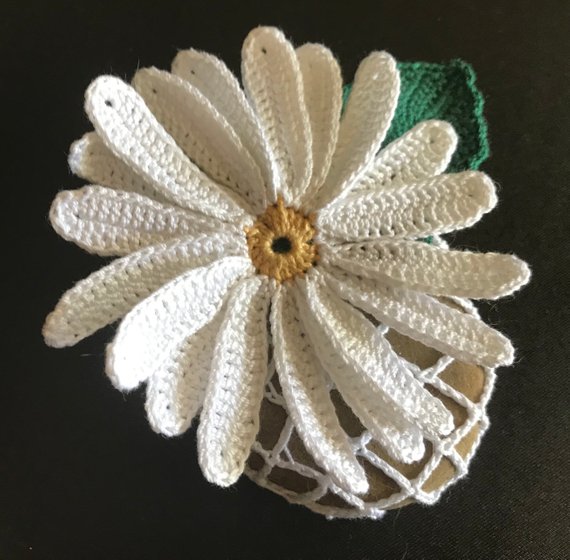
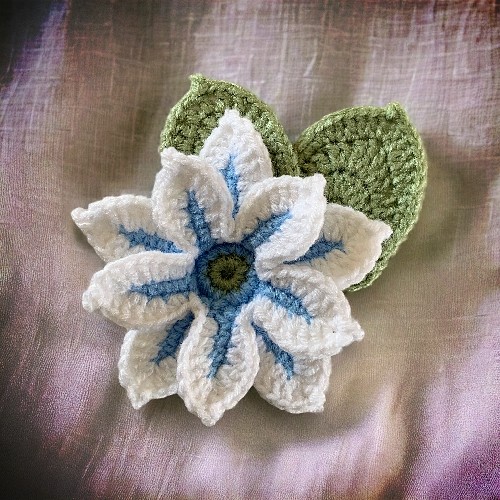
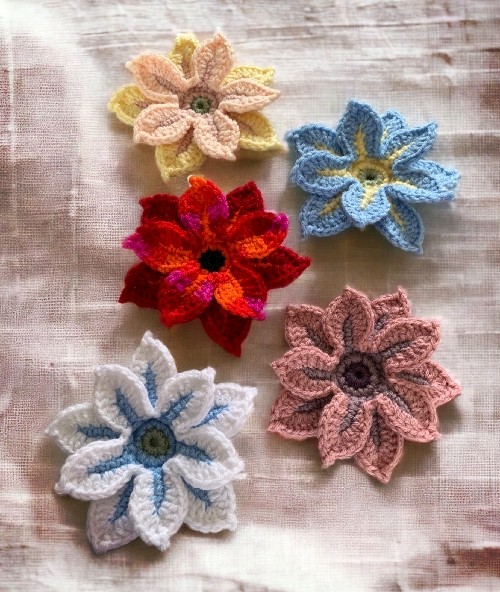
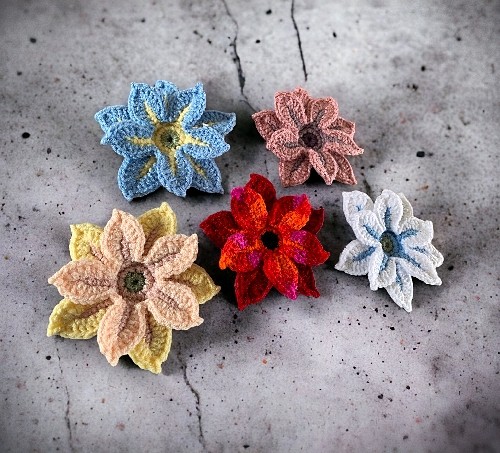
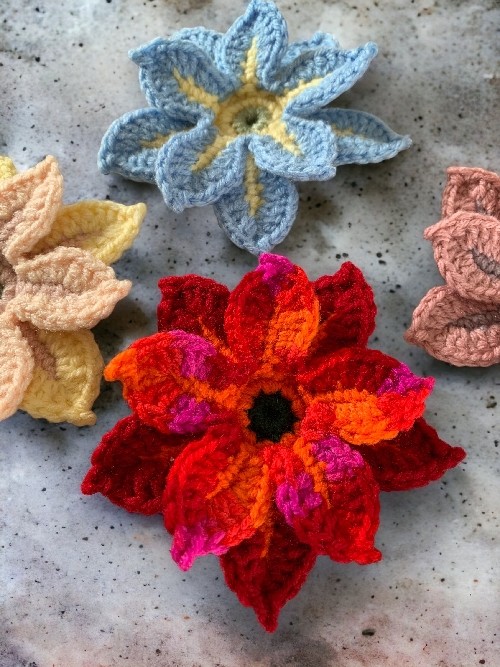
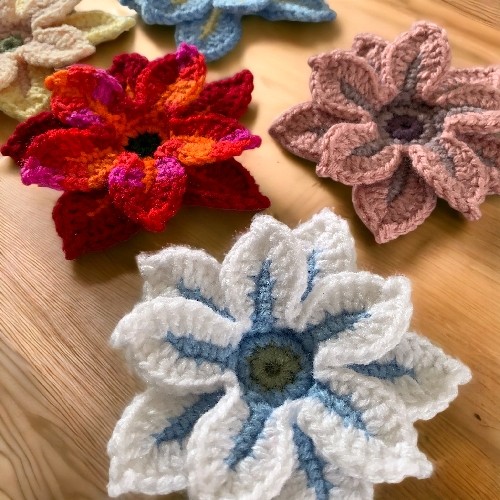
This flower is specifically designed to go with a crochet sun hat/bucket hat/cowboy/cowgirl hat that I’m making. The downloadable and printable version of this pattern is available in the pattern for the multi-hat. It was too much to add to the pattern for the hat on the website. It was easier to make its own page.
I have a number of tips and suggestions if you run into problems making the flower. Scroll down to the bottom of the page to read them or to leave a question in the comments.
Though the flower is made with yarn in this example, I originally designed it to be made with crochet cotton thread and a small crochet hook. You can add it to a band and make a bracelet with it. I have a number of bracelet designs that it will work with Waves Bracelet, Fans Bracelet Pattern, Quick Crochet Bracelet and my Friendship Flower Bracelet. The last one has a flower already made for it but you could easily switch that flower out for this one.
I’m not making any promises, but I do hope to post other flowers and leaves on my website. I have a number of different designs I’d like to get on there. At the moment I have two flowers (3 if you count the one included with my crocheted slippers) that you can take a look at. The flowers are done with crochet cotton thread and I’m not sure how large the final flower would be when made with yarn. I’ll leave that up to you. The one that would also work with the yarn is my Free Crochet Flower Pattern. It should be slightly smaller than the flower I designed to go with the hat.
If you know someone you think would like this post, by all means, share it! The more eyeballs on my work the better. If you are enjoying the free patterns, this is a great way to support my work. You can also Buy Me A Coffee or check out the other options when you check out the Help Support My Workpage. If you’re looking for something new to share with your friends on your website or on social media, these links will help you do it.
3 to 4 colours of worsted weigh yarn (all small amounts from your stash)
3 mm (US E or 4) crochet hook
Tapestry needle
The Pattern
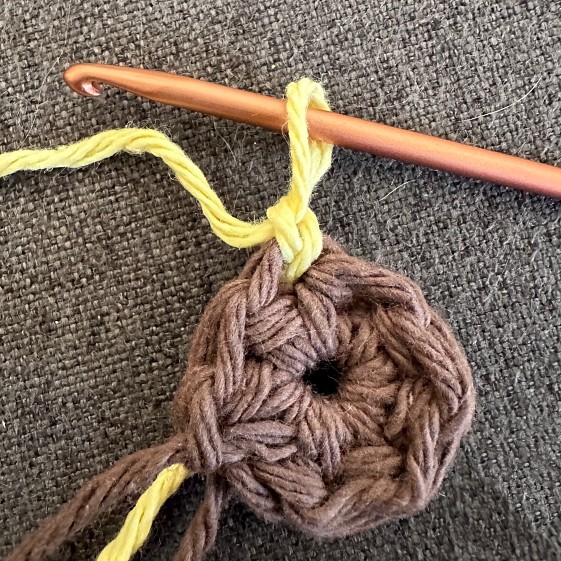
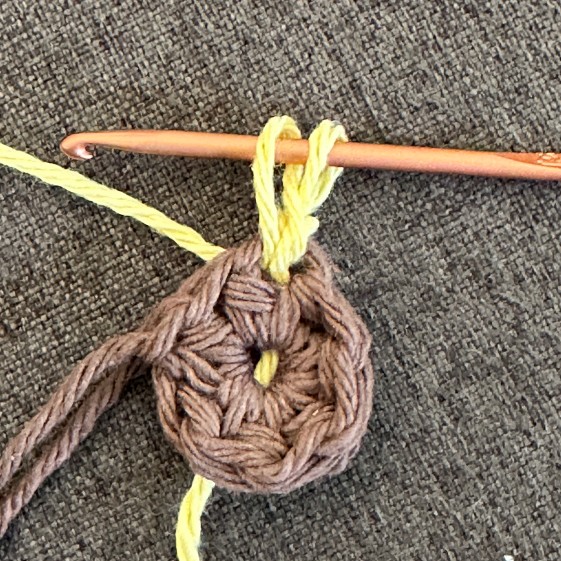
With the colour you want for your centre…
Ch 2 (make the first chain large enough to fit in all the stitches for Round 1)
Round 1: 10sc in 2nd chain from hook. Join with sl st in first sc. Break yarn. Tie off.
Round 2: With the 2nd colour of your choice, join in any sc. 2sc in same st as join, 2sc around. Join with sl st to 1st sc of the round.
Round 3: Ch 1. Sc in same st as join. *Ch 4. Starting in 2nd ch from hook, sc in each chain. (3sc total). Join with sl st in the starting sc of the Ch 4. Sc in the next 2 stitches. Ch 5. Starting in 2nd ch from hook, sc in each chain. (4sc total). Join with sl st in the starting sc of the Ch 5. Sc in the next 2 stitches.* Repeat from * to * around, ending with 1sc instead of the 2sc. Join with sl st to 1st sc of the round. Break yarn. Tie off.
Round 3 completed
Round 4: Working in the Ch 4 petals only! And with your third colour choice…
Join with sl st in 1st sc before Ch 4 petal. *In the bottom loops of the chain from the previous round, sc, hdc in 1st loop. Hdc, dc in the 2nd loop, 2dc in the 3rd loop. In the top loop, 2dc, ch 2 sl st in 2nd chain from hook, 2dc. Working on the other edge of the petal, 2dc in the 1st st, dc, hdc in the 2nd st, hdc, sc in the 3rd st. Sl st in the sl st of the previous round. Hold the next Ch 5 petal back, sc in the next 2nd sc between the Ch 5 and the next Ch 4 petal.* Repeat from * to * around. Join with sl st in the 1st sc of the round. Break yarn. Tie off.
Round 5: Working in the Ch 5 petals only! And with your third (or fourth) colour choice…
Join with a sl st to the 1st loop of the chain. *2sc in the same loop, 2hdc in the 2nd loop, 2dc in the 3rd and 4th loops. In the top loop, 2dc, ch 2 sl st in 2nd chain from hook, 2dc. Working on the other edge of the petal, 2dc in the 1st and 2ndsts, 2hdc in the 3rd st, 2sc in the 4th st. Ch1. Hold the ch 4 petal forward and working in the next ch 5 petal.* Repeat from * to * around. Join with a sl st to the 1st sc of the round. Break yarn. Tie off.
Work in all the ends. Attach to the hat. Link coming soon!
Hints and Tips
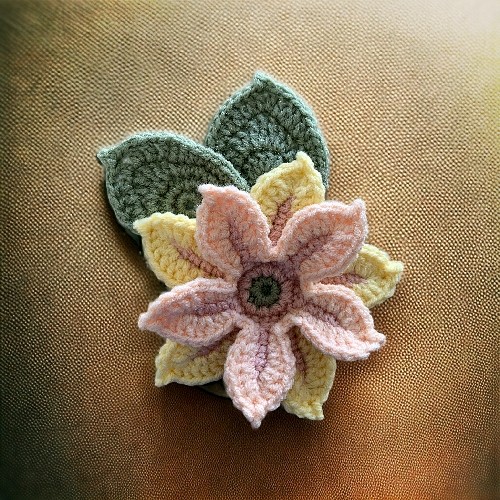
Add extra embroidered details to the flowers as you see fit. I made the white/blue flower with one solid colour with the middle and inside leaves to see what it would look like. I didn’t like it so did some quick stitches around to make it green.
Advice for working in the ends of the flowers. It’s easier to hold the yarn to the back of your work and catch the yarn for 4 or 5 sts as you are making the flower. It works the ends in automatically and involves less to fix at the end.
As much as I wanted to avoid pressing anything, the flowers need to be pressed to have the petals lie flat. Be sure to do a test swatch BEFORE you press your flower. Acrylic is notorious for melting and losing all constructive properties when pressed. It melts to give a flat, melted look. Press with your iron at the lowest setting possible. Press with a damp cloth between the iron and the flower petals. Iron the flower from the BACK.
It’s not overly important where you single crochet between the petals on Round 4. As long as it’s only 1sc and consistent.
I like to stagger where I join the next colour of yarn to make the flower. That way the joins and end points don’t all congest at one point.